Home2017May (Page 2)


People who are interested in preparedness routinely end up looking further into the future than an event and the aftermath, and eventually end up looking at sustainability and self-sufficiency. Whether we want to augment an affordable beans and rice diet or we want to never need a supermarket again, growing food rears its head. There are lots of factors that go into gardening and crop raising. It starts with the very seeds we plant, so I’d like to look at two of the seed sources we see in the preparedness fold, and how to test seeds to find out if stored seeds are still viable.

How to Procure seeds

Seed kits and especially the long-storage seed vaults can be had good and bad, like any other one-size-fits-all gear or a multi-tool. There are some charts available that tell you how long regular ol’ seeds last, in a fridge or at a constant temperature in a closet. Various vaults and long-storage kits will provide their own estimates.

I tend to think there are a lot of people making a lot of money off fear purchases. I dislike the claims of feeding a family for one year without specifying the calorie contents possible (veggies are diet food). I feel a little better about the “Plants an Acre!” claims, although method affects that, too. I think a lot of the packaging of those kits are window dressing with little effect – and it should be noted that with a lot of kits, their “use by” date is derived from the longest lasting seeds inside. They may boost storage time some, but it may not be enough of an expansion to warrant paying for a “vault” or Mylar instead of a Ziploc freezer bag.

Nobody agrees about seed shelf life across the board, but that’s pretty common in both life and gardening specifically, and there are always exceptions. Maybe freezer, fridge, 65-75-degree shelves make a difference to other people’s spinach, but mine and a lot of my brassicas tend to hit 50% germination at 3-5 years no matter what storage location I go with, fancy kit or saved seed in a junk-mail paper packet.

There’s also the factor of climate.

Very few seed kits or vaults are tailored to Arizona, Alabama, Alaska, or the Adirondacks (some have regional planning). There are some tried and true varieties that will thrive almost anywhere if you have good garden soil – if; not intended for tilling a clay or sand yard for the first time without serious amendments – and some that are a little more lenient toward poor soils. Few kits, however, account for both the short growing season of North Dakota and the sweltering heat and humidity of South Carolina. There’s likely to be something in there that anybody can plant, but you may not be able to use everything in the kit.

Crunch numbers to see what applies to your region, what you’re growing seasons allow for, and figure out how much of the cost is seeds you can’t or are unlikely to use.

Crunch the numbers on the types of seeds you’re getting, too, and be aware that most seed kits provide way more tomatoes than I could keep up with and very, very few calorie and protein crops, so you still need additional seed stocks (deer corn and pigeon peas not crazy talk). Something like a third or half of those “More than 20K seeds!!!” may be leafy greens of some kind – not only near-nils in calories, but also with seeding rates of 3-5 seeds at 2-3” and then thinning to 6+ inches. In other words, not a lot of food value for a lot of seeds, but they go far toward ballooning numbers for advertising purposes.

I’m sure there’s a ton of examples for when buying more expensive kits meant for long-storage would be worth it. I can actually think of a couple. I can also think of a couple of little kits or bucket kits that are just nice, handy, fairly economical ways to get a start. I just want people to be aware of the limitations so those can be considered as well. It may end up that you’re better off buying the seeds you specifically want instead of a kit or vault.

I’d also like people to consider whether they can survive to the next planting, growing and harvest seasons in their regions before they delve on a long-storage seed kit – and from that, decide if they’d be better off applying their budget elsewhere.

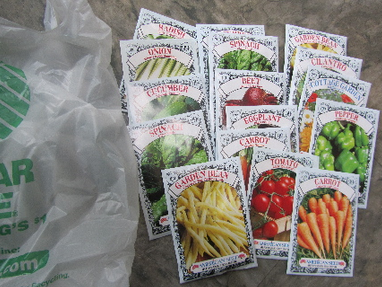
Sale seeds may or may not be a great alternative. Grandma and great grandpa didn’t need fancy packages to keep seeds for a couple of years, but they did typically keep them cool.

Early on in the season, seeds have come right from growers and packaging plants, where they were somewhat cared for. By the end of the season and the start of next spring, seeds have spent months or a year going from blazing hot to cold on a daily basis in a lot of storefronts, or at least hitting 30-40-degree swings, with exposure to high humidity in a lot of the garden centers. Like coffee that goes in and out of a freezer, this degrades the seeds. The more extreme the conditions and fluctuations, the more at-risk the germination rate is.

I do buy the 10/$1, 4/$1 and $1 seed packs at the beginning and end of seasons, but I limit myself to $5-10. I am more likely to take advantage of end-of-season seed sales from an internet provider (that I already trust) where there is some expectation that my seeds have been stored properly over the spring and summer than I am a brick-and-mortar shop, especially the ones with seed racks right by doors where they’re getting the greatest temperature fluctuations for 6-8 months. I do buy my field-plot seeds at the end of the seasons from bulk distributors, and so far they’ve been fine for next-year planting.

If it works for you, great. If you’re buying them without doing germination tests, maybe check that out before you go whole-hog with a garden or really depend on producing food.

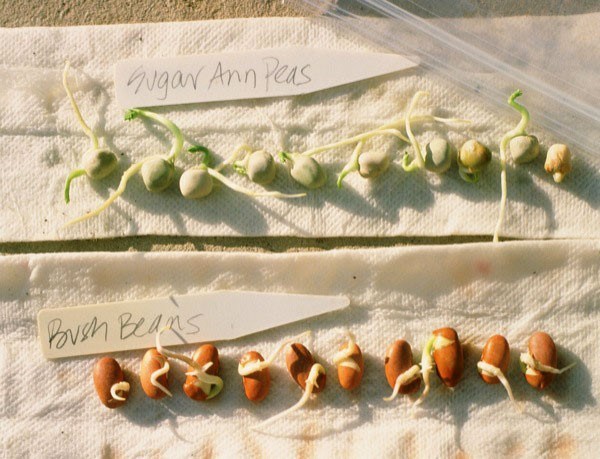
Use germination to test seeds

Germination testing isn’t difficult. It’s highly valuable in determining how viable your seeds are – and for how long. I will understand if somebody doesn’t want to pop a $200-$300 seed vault or set of #10 cans, but if it’s already several years old – and as good as some claim – go for it anyway. General commercial seed packets will be fine after opening as long as they stay dry. There’s no change in storage life opened or unopened for them.

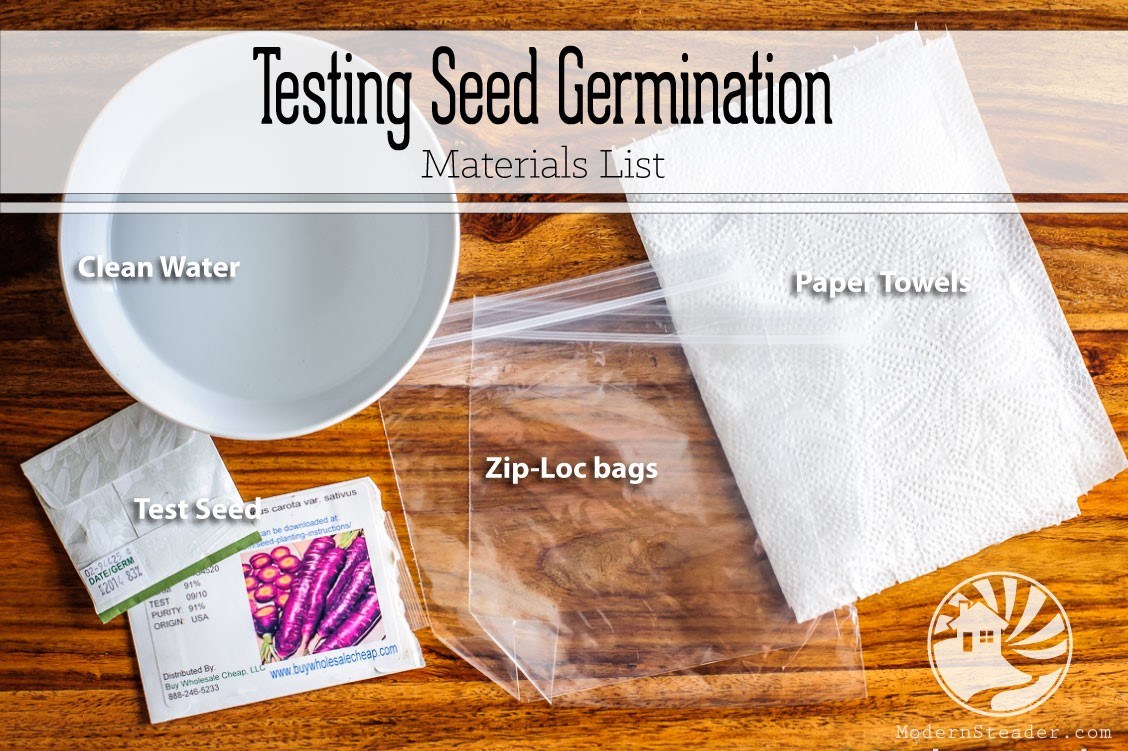
To do the test, snag some plastic storage bags or bowls, paper towels or smooth dish cloths/hankies or some fast food napkins, and a dry erase marker for “good” dishes, a Sharpie for disposables or Ziploc bags. If your seeds need scarification or stratification, do it. A lot of seeds benefit from a pre-soak for 4-24 hours, even if it’s not a requirement. For a germination test, I have no problem giving everything the best chance, even if I don’t plant them as soaked seeds in real life.

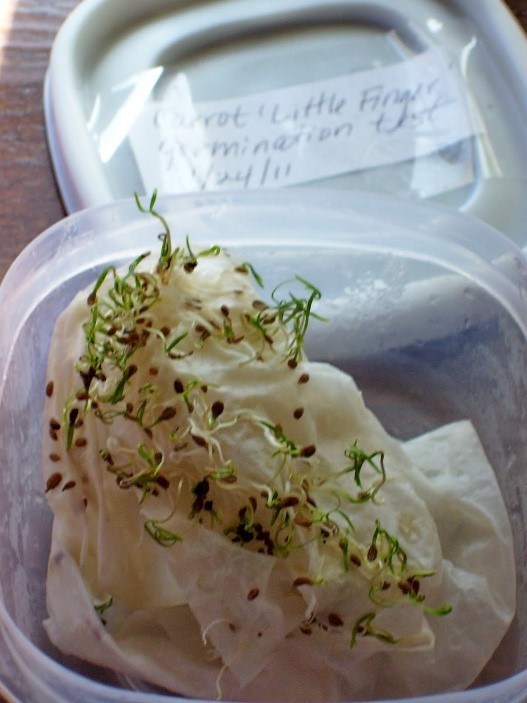
For a plastic bag, mark it so you know which variety and intended planting year it’s from (or the year you saved it) as well as the date you’re starting the test and the days it should take to germinate. Dampen your napkin or paper towel, toss in your seeds, stick them somewhere warm, and cover them in dark cloth (or stick a bunch of bags in a stock pot with a good lid).

For “good” bowls, use the dry erase marker on the container or snag a disposable plastic container like a milk jug or old blinds to cut up and mark with the same information. If you’re sure it’s not going to get rattled and your seeds will stay segregated, you can line a baking sheet with a smooth towel, put a drying rack on top of it, and cover that with an additional damp towel. For bowls, damp hanky- or bandana-like cloth or paper towels go in the bottom and you cover them with another damp towel. These dry out faster than Ziplocs, so they’ll need checked twice a day or more frequently.

Keep an eye on the seeds for mildew and so that you can update your notebook with how many have sprouted and the age of the seeds tested. Eventually, you’ll develop an average for seed shelf life in your storage conditions even within general classes and types like spinach, squash, buckwheat, crowder peas, and grass grains.

Running the numbers

Sets of ten are easiest to reach a rate for without doing any math at all – add a zero, that’s your percent (8 of 10 sprout – 80% germination). Multiples of ten give a better baseline, and it’s simple conversions for them. The “real” way to figure out the rate is to divide and then multiple by 100. Say 32 of 50 sprout, then…

32/50 = 0.64, then 0.64 x 100 = 64; a 64% germination rate.

If you’re good with eyeballing estimating and relationships, just go with that. 32 of 50 is 3 of 5, 6 of 10, so 60%. It’s close enough. This is to make your life easier, not harder.

Applying the results

There are some seeds that are just finicky and some that may germinate but the survival to transplant or harvest size is a little low. If you’re hitting a 50-75% germination rate routinely, get some help to make sure there are no test problems. Mold under 7-14 days means you need to find a slightly less-warm spot and possibly reduce some of the moisture.

If the test’s fine and those are your germination rates for a specific package, you need new seed for storage. Whether it’s age, manufacturer, or storage conditions, yours don’t have too much life left to give. In most cases, it’s going to be a combination of these factors that degrades seed shelf life.

When you plant and start seeds with those germination rates, you may want to double the seeding rate, because you know half aren’t going to even sprout.

Germination testing isn’t a one-off. Doing it once and never again doesn’t work. If these are your storage seeds, you need to be testing batches every 1-2 years, because viability drops off. That said, unless they’re saved seed (which I test at harvest time) you don’t really need to do a germination test on anything intended for planting this year or last year. Unless they got soaked or baked sometime or have had a really hard life, they should be fine.

Local help helps more – generally

Two of the greatest assets for growers is the nearest county, university, or state extension office, and the local Master Gardener’s association. They’re right there. A lot of our states have a whole handful of regional variables, but most have somebody who’s familiar with them – and might have somebody right there in your backyard.

Use them. The more local the advice, especially about pests and growing season and crop varieties that thrive, the better the advice is going to be.

Do, however, beware of five monkeys in a cage – the “we’ve always” syndrome; we no longer use leaches as healers or wipe only with our left hands, and those kinds of advances apply elsewhere as well. We now have all kinds of growing methods that do not involve tilling in lime, but that remains fallback advice north, south, east and west. (If any amendment is part of your gardening plan, you’re going to want to stock up on that, too.)

Advice should be taken with a grain of salt and additional information sources should be sought out, for anything, but if you’re strolling around or looking at pictures of a highly productive garden, and you’re growing using the same methods in the same place, these people might be worth listening to – from where they get their seeds and baby trees, to how they handle them.

Additional seed tips

There’s another round of seed tips coming up, specifically dealing with tracking seed varieties and their yields, and storing seeds for convenience, efficiency and contingencies. With any luck, some of the points raised in this one will help you decide for or against certain seed sources and you’ll be able to rest more comfortably knowing the results of germination tests, as well as be able to find somebody to help if you’re having garden problems.

  People who are interested in preparedness routinely end up looking further into the future than an event and the aftermath, and eventually end up looking at sustainability and self-sufficiency. Whether

Introduction

DISCLAIMER: This article in intended to provide basic information regarding defensive tactics to preppers who are new to the subject. Those with a military background or other advanced knowledge in tactical maneuvers are referred to more advanced treatments of the subject, such as the excellent book Contact! A Tactical Manual for Post Collapse by Max Velocity.

The tactics discussed here are purely from the perspective of group and community defense, and are limited to tactics that would apply to active-defense situations.

Tactics are defined as “the art of disposing armed forces in order of battle and of organizing operations, especially during contact with an enemy”. While authoring my preparedness book (“When There is No FEMA“) I covered the topic of using classic military tactics in post-SHTF situations. This was a natural extension of the treatment I had already given to guns and ammunition. (After all, what good is having a gun for defense if you don’t know how to apply it effectively?)

Recently, while viewing the excellent movie Lone Survivor, I came to realize exactly how important and pertinent the topic of defensive tactics is to the prepper/survivalist. As I watched the portrayal of those special forces soldiers being pursued by the Taliban across the rough, forested hills of Afghanistan I could not help but relate those scenes to the tactics I had covered in my book.

That realization of the importance of defensive tactics was further reinforced by recent social unrest in and around Ferguson, Missouri. From the news coverage of happenings there we have observed groups of loosely organized looters literally shooting their way into buildings. If and when a large-scale disaster strikes on a national level, and when pure hunger is the motivator, it is logical to infer that such violence will be acted out with much greater intensity, and almost certainly with less intervention by law enforcement.

SIDE NOTE: Many years ago I had a roommate who had dedicated his life to the pursuit of martial arts. One piece of advice he gave me that I have never forgotten was that one should always be imagining potential threats and vulnerabilities such that, when an attack materialized, one would be preconditioned to react instantly.   Needless to say, this bit of wisdom applies as much to group defensive tactics as it does to hand-to-hand combat.

The corollary to this advice is that a survival group should conduct regular drills and have regularly scheduled training sessions.

Terminology

Effective communications is essential to being able successfully carry out tactics, and communications benefits greatly from adopting a common vocabulary. The following are some common terms related defensive tactics:

  • Avenue of Approach – the path that an adversary is likely to take when approaching.
  • Field of View – a geographic zone that can be monitored through direct observation from a particular location.
  • Field of Fire – a geographic zone that can be protected by gunfire from a particular location.
  • Flank – a military formation’s undefended side.
  • Hard Cover – a location that provides both concealment and protection from weapons fire.
  • Soft Cover – a location that provides concealment only.
  • Suppressing Fire – weapons fire used to prevent the enemy from firing.
  • Kill Zone (“KZ”) – a geographic zone that has been selected to engage an approaching enemy for maximum effect.
  • Safe Zone – a location that has been specially hardened to withstand direct attack. Children and other non-combatants should generally retreat to a safe zone in the event of an attack.
  • Counter-Assault – an attack that is launched in response to an enemy attack.

Basic Tactics

Basic tactics tend to be quite simple and well known, and often involve defending from fixed locations.

They may also be combined and incorporated into more complex tactics. Basic tactics include:

  • Ambush – Concealing one’s forces and laying in wait along the anticipated avenue of approach to attack the enemy when they enter a predefined kill zone.
  • Crossfire – Firing on an enemy from two or more locations such that it is difficult or impossible for them to find cover (note that, as an example of combining tactics, an ambush may be designed to incorporate crossfire).
  • Charge – A frontal assault carried out with such speed that the adversary is (hopefully) overwhelmed before being able to mount an effective defense or counter-assault.
  • Flanking – Attacking an enemy on their undefended (or less well defended) side.
  • Hit and Run – Launching a surprise attack on a (possibly larger) opponent and quickly retreating before the advantage of surprise is lost.
  • Advance and Retreat

Knowledge of the defense-related terms defined above, as well as the basic tactics described here, should be covered by any survival group’s defensive training. By the time the group comes under any sort of attack these terms and concepts should be firmly fixed in everyone’s mind.

In addition to developing good knowledge of tactics, knowledge of the local terrain and the best possible level of physical fitness are critical. Physical strength will be necessary to carry out the tactics described here, and good tactics always required a knowledge of the local terrain (NOTE: If at all possible obtain and study topographical maps of any areas you may be defending).

Best Practices

Force Dispersal

In the case of two sides engaged in a gun battle, with each side finding hard cover in a single location, it’s easy to imagine that a dangerous stalemate condition might develop in which each side has the other pinned down and unable to move. However, if one side in that same conflict were to be able to fire from multiple locations – catching the enemy in a crossfire – then unless the enemy was in a position that provided complete protection from all angles the battle would soon be over.

The practice of ‘fanning out’ before engaging an enemy carries with it some significant defensive advantages as well. The loss of a single position (or the compromise of its cover) will not expose the entire group to direct fire. In fact, the availability of other team members to provide suppressing fire greatly increases the chances of survival for those team members who had been compromised.

The practice of trying to ‘fan out’ prior to engaging an enemy in a gun battle should be virtually built into the DNA of all defenders, and this practice should be reinforced continuously with drills and training before it is ever put to the test in the real world.

Topographic maps can be easily purchased for your entire city

.

Positioning Along a Diagonal Line

It has been common throughout history, and across all branches of service, to deploy equipment and troops along a line that is diagonal to the enemy’s line of attack. This orientation, known as the ‘echelon defense’, carries the advantage that it provides the defenders with a wider field of fire while also largely denying the enemy a flank to attack. When engaged in a firefight it is not always possible to select specific positions due to the constraints of terrain and the availability of cover, hence this deployment may not be possible. However in some cases this may be possible (e.g. when using trees in a densely wooded area for cover).

When defensive fortifications are being constructed around a fixed location it may be possible to anticipate an enemy’s avenue of approach and construct those defenses along a diagonal to that path.

Advanced Tactics and Defensive Principles

The Flying Wedge

The ‘Flying Wedge’ formation is a V-shaped formation that is basically two diagonal Echelon formations that converge. Like the Echelon, it does not present a readily accessible flank while at the same time providing the widest field of fire. This V-shape also provides a ‘spear head’ that can be used to punch through an enemy’s front line. The flying wedge would typically be employed in in a situation in which there is reason to believe the enemy forces could attack either flank.

Leapfrogging

‘Leapfrogging’ is a tactic that involves two or more defenders (or groups of defenders) alternatively advancing and retreating in steps while the other defenders provide suppressing fire. Military trainers often advise those advancing or retreating to say to themselves … “I’m up, he sees me, I’m down” … when in motion to help provide the assurance that they are not exposed long enough to come under fire. The risks associated with leapfrogging can be substantially reduced if one defensive position can serve as ‘overwatch’ and provide continuous suppressing fire.

The principle of leapfrogging applies to more than close quarters fighting. Two snipers, for example, could provide covering fire for one another over a larger geographic area.

Hills, the Defender’s Best Friend!

Use of terrain features has figured decisively into battles throughout history, and hills have proven to be particularly advantageous. In fact, the ‘reverse slope defense’ was employed quite effectively by the Duke of Wellington in 1815 during the Battle of Waterloo in his defeat of Napolean Bonaparte’s army. This simple-but-effective tactic involves the defender simply traversing a hill and then lying in wait on the opposite side for the pursuing enemy forces to crest the hill. The defenders will have taken cover or simply laid down on the ground to conserve energy, steady their aim, and present a more difficult target; while the enemy is more fatigued and silhouetted against the skyline.

This tactic is so well-proven that it merits additional discussion. An experienced adversary (particularly one with military experience) may recognize the potential danger involved in pursuing over a hill. If so then they will hesitate. If fighting in terrain that offers a succession of hills it may be wise to lay in wait behind a second hill, and observe the enemy’s behavior in traversing the first. This will provide some insight into the opponent’s own level of tactical sophistication.

When taking cover to lay in wait behind a hill, the defender’s forces should seek to fan out, as described previously, such that an approaching enemy will be caught in a crossfire.

SIDENOTE: It should be pointed out that the reverse slope defense becomes much less useful for those who are facing an enemy who has airpower.   Not only can aircraft launch attacks against the defender, but they can also communicate the defender’s position and defensive posture to any oncoming ground forces. Regardless of this, as was realistically portrayed in “Lone Survivor”, those aircraft are not always available, and they must eventually disengage to refuel. Also, if your opponent happens to be the stereotypical group of “mutant zombie bikers” they probably do not have airpower. Hence the tactic that worked so well against Napoleon may very well also be employed effectively on the modern post-SHTF battlefield.

AUTHOR’S NOTE: If I could recommend any one defensive tactic to be considered above all others it would be the reverse slope defense. Not only has it proven itself repeatedly in real battle situations, but it can also be quickly executed with minimal training.

Flanking

The ‘flanking maneuver’ is a battlefield maneuver that is as old as recorded history. It involves engaging an enemy directly while also attacking them (preferably by surprise) on one or both sides of their front line. This can be a highly effective technique because:

  • When firing at an attacker to the side the enemy puts their own personnel into the field of fire.
  • The attack from both the front and one or more sides essentially constitutes a large-scale crossfire.
  • Enemy soldiers that are constantly watching over their shoulders for threats coming from multiple directions become quickly demoralized.
  • A flanking maneuver from both sides becomes a partial encirclement.

Defensive Tactics mean the difference between life and death in battle.

Flanking maneuvers are often attempted by mechanized or mounted forces, as their increased mobility helps to assure success. Nevertheless, flanking remains a very legitimate tactic for those engaged in close-quarters fighting on foot.

The best way to flank an enemy is to anticipate their avenue of approach and to have the forces attacking the flank stay concealed until the time comes to attack. In this way the enemy does not have the opportunity to observe the troops positioning themselves.

Defenses against a flanking attack include controlled retreat, which can pull the flanking forces back towards the front line; starting a new line of defense that faces the attackers on the flank, or deploying in a circular formation so that there is no flank to attack.

Encirclement

Encirclement consists of completely surrounding an enemy force and attacking them from all directions simultaneously. This tactic is much like flanking, and offers similar advantages; however it also has a serious drawback. If an enemy is surrounded and has no line of retreat then that realization can galvanize them to fight with much greater ferocity.

SIDE NOTE: The ancient Chinese military strategist Sun Tzu, in his renowned book The Art of War, describes an encirclement scenario as being ”desperate ground”. Because those on desperate ground are presented with no option but to fight to the death, he recognized the danger of engaging such an enemy. Sun Tzu’s recommendation was to always leave an enemy with a path to retreat, and to attack them during the retreat.

Hammer & Anvil

The Hammer & Anvil tactic is much like the flanking maneuver, except that rather than having the secondary force attack the flank (the side), it attacks the enemy from the rear. The name of this tactic originates from the fact that enemy is caught between the hammer (the force attacking from the rear) and the anvil (the front line fighters). Like the flanking maneuver, the Hammer & Anvil maneuver benefits greatly from the secondary force being highly mobile.

A variation of the Hammer & Anvil consists of the rear forces executing a series of hit-and-run attacks rather than fully engaging in battle.

The Hedgehog Defense – Drawing Fire and Thinning Enemy Ranks

The hedgehog defense was originally conceived as a tactic for armored warfare; however the basic principle can be applied to small arms combat as well. This tactic involves placing a strongly fortified and well-supplied defensive location along an enemy’s avenue of approach such that the enemy may commit some of their forces to attacking that position while their main forces continue to advance. This has the effect of thinning the enemy’s ranks prior to a major engagement. Once the enemy’s main forces have been defeated the defender can return to the fortified location to attack the enemy forces remaining there (in this case the returning friendly forces would constitute a hammer and the fortified location would constitute an anvil).

Ideally the hedgehog defense would incorporate a number of fortified locations along the enemy’s avenue of approach in order to successively thin their ranks.

The hedgehog defense should only be considered if some aspect of the situation really lends itself to the tactic (for example, if a fortified position already exists along the avenue of approach). The weakness of this tactic is that the enemy may choose to simply ignore the fortified location and continue advancing in full force (which is exactly what happened when Hitler’s blitzkrieg attack bypassed France’s Maginot Line during World War II).

Conclusion

Having access to weapons and ammunition is simply not sufficient for the defense of any individual or group hoping to survive a major, long-term disaster. Good equipment is part of a solid foundation for defense, however dealing with adversaries having superior numbers, equipment or any sort of organization requires training and tactics. Paradoxically, the better prepared a group is to defend itself, the less likely it is that it will find itself in danger. However, when the need to act does become inevitable, a good command of defensive tactics will make all the difference.


Introduction DISCLAIMER: This article in intended to provide basic information regarding defensive tactics to preppers who are new to the subject. Those with a military background or other advanced knowledge in

In cases of emergency and situations, in which the only thing you can think of is survival, personal hygiene first aid is something you need to have previously prepared. To stay clean and keep your hygiene on the necessary level, here are some useful advices, you can apply to make your survival easier and less painful. The most important ingredient you need to have is water. How to be prepared to stay alive and have the necessary water for drinking, washing and cleaning is a problem, which isn’t easily resolved. If you have the necessary materials to keep your body clean, you can use water only for drinking and save it as much as possible for staying alive.

If you have some essential tools, packed with you, your survival in hurricanes, disasters and emergency situations won’t be that hard. Keeping a fire starting kit, some napkins, soap, wet wipes, towels and enough quantity of water for drinking, is very important. If you have access to some water resource, no matter if the water may be salty or inappropriate for drinking, with some matches and distillation (video below) you can boil it and make it usable for hygiene and drinking. Water from oceans and seas, which is salty and polluted can’t be only boiled, disinfected and used for drinking unless you remove the salt first by distillation.

You can store your water for drinking in plastic bottles, but each year they need to be refilled with fresh water. One gallon for each person a day is the necessary quantity for survival, according to some research. In this quantity is included the water you will use for drinking, cleaning, washing and etc. The sterilized water can also be used, as it has five years shelf live. You can also sterilize your water using some purification tablets and other sources for water disinfection.

Keeping a roll of gauze, wet wipes, clean cloths is also important. These items will help you keep your hygiene on a considerably good level. Keep with you a few packs of aspirin, pills used for painkillers and various purposes, antibiotics for emergency situations, toilet rolls, medical tape. All these pills and items are important for your survival and personal hygiene first aid. A sharp pocket knife or other cutting knife and scissors are also important tools, you will definitely need at some point of your survival.


Baking soda can be used for many purposes and is a useful product  you should keep. If you don’t have shampoos and soap, in emergencies, baking soda can be used as a substitute for disinfecting your scalp, some wounds and infections. If you keep enough rubbing alcohol you can use it for cleaning wounds, skin infections, irritations and different other purposes. It is also an essential part of your personal hygiene first aid.

If you don’t have enough water to take a shower and clean your body, you can search for some natural brooklet or any natural source of water, even the sea or ocean. The water needs to be boiled to kill all microbes and bacteria it has, if you want to use it for drinking. This can be done through the use of matches and some wood. If you don’t have enough water for washing and cleaning, you can use your wet wipes to disinfect your body. All infections and bites from insects and animals on your skin, can be stopped with a clean cloth dipped in rubbing alcohol. If you don’t have such clean the wounds with soap and water.

To survive in emergency situations like floods, earthquake, hurricane and others, you need to have a prepared first aid kit. Toilet paper, wet wipes, pills, soap and bottles with water are essential for survival. Keeping your personal hygiene on the necessary level, which includes washing your hands, taking a shower, dental hygiene and wound disinfection and care, is very important. Cleaning your hands before and after preparing of the food, before eating, after going to the toilet, after touching rubbish, before disinfecting wounds and in other such occasions is of utter importance. If you don’t take care of the your personal hygiene, you risk getting infected with some disease or illness and make your  survival tougher.

Bathing and cleaning  of your hands should be done only with clean water. If you don’t have purified water or access to some natural source of water, you may inflict more damage on yourself, washing and bathing with contaminated water. You can take care of wounds and infections, cleaning them with soap and water or rubbing alcohol if you have such. After irrigating the wound, it should be covered with a clean cloth to be kept protected from further contamination. Washing your hands with running water and soap is the best way to disinfect them and keep them protected from bacteria. If you don’t have soap and running water, wet wipes can be used instead. Washing your hands is very important, because all microbes and bacteria are spread with hands, especially when eating.

In cases of emergency and situations, in which the only thing you can think of is survival, personal hygiene first aid is something you need to have previously prepared. To

I saw dried tomatoes selling for $10/pound at a food coop and thought that price was outrageous. Now that I make and eat my own dried tomatoes, I think they’re priceless.

My husband and I can pretty much eat year-round from our small Ohio homestead. Preserving the summer harvest is an important part of doing this, but when I can find a new way of processing food that results in more variety for winter meals, I’m 
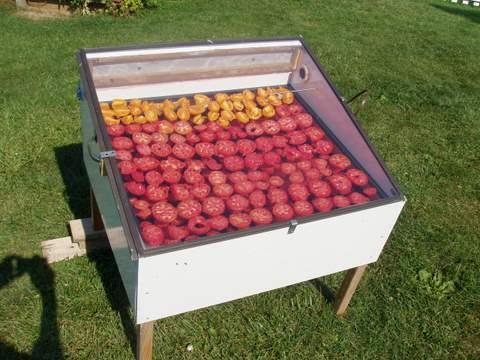
especially pleased. Drying apples and preserving tomatoes with a homemade solar food dryer condenses their flavor into incredible winter treats.

We learned to both make and use the food dryer by following directions in  The Solar Food Dryer book. The body is made from recycled cortec and the hardware bought locally. We ordered the polypropylene screen that the food sits on from the reference given in the book. We didn’t want to risk galvanized metal or aluminum screens interacting with the food.

One thinks of summertime as having long days and the sun high in the sky—perfect for a solar dryer. In reality, the days are getting shorter and the arc of the sun lower by August and September when most fruits ripen. Fortunately, the plans include a built-in light bulb that provides backup electric heat if the day becomes overcast or if the food needs drying into the evening.

The one design detail I would change for our latitude is to tilt the dryer a bit more to face the lower arc of the late summer sun. The original angle was calculated by taking our latitude and subtracting 15 degrees. So far, we’ve only used ours in late summer and have increased the angle by elevating the back legs on two-by-fours. We may soon commit to that angle by shortening the front legs.

A thermometer tells us the internal temperature of the dryer as we rotate it during the day to face the sun. Our goal is to keep the temperature in the 120 to 150-degree range. If it gets too warm, an additional screened vent can be opened as much as necessary.

I make it sound as if we’re standing by the dryer monitoring and adjusting its progress throughout the day. In reality, the homestead’s too busy for that, but the dryer does well with two or three adjustments during the day as we’re walking through the backyard doing other projects. It wouldn’t work, however, to put it out in the morning and leave for work until late in the day. It needs help in following the sun.

Preparation of the food for drying is pretty fast and easy. I prepare the tomatoes by giving them a minute or two in boiling water so they’ll peel easily, and then slicing them as uniformly as possible. I’ve even dried paste tomatoes by just halving them. It’s amazing how small and intensely flavored they become when most of their water is gone.

Preparing the apples for drying is easy and fun if you have a manual apple peeler-slicer-corer. This even gives you slices of equal thickness. The apple slices require no treatment to keep them from discoloring—the drying results in a slightly darker color anyway.

I judge when it’s time to take the food out of the dryer by making sure it’s beyond the sticky stage, still a bit leathery (a good excuse to taste-test!) but not brittle. Then I put it immediately in a container where it won’t rehydrate in the humid summer air. Glass jars with tight lids are a nice option, but need to be kept in a cool place. I sometimes freeze the fruit in 
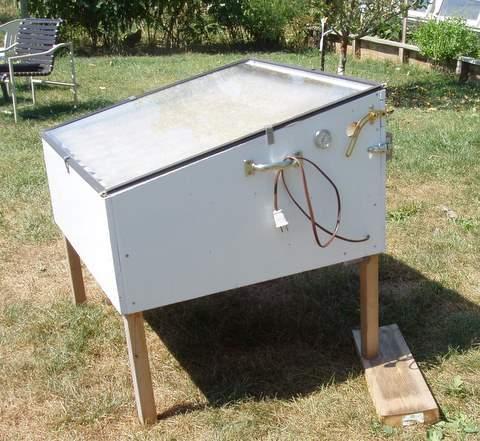
labeled plastic bags, though I’m trying to wean off plastics.

There are books that give recipes for making “fruit leathers” when drying, but I really dislike adding sugar to food that tastes so great with just its own fructose. I dry the apples and tomatoes plain, and I often savor them as “plain” winter treats. However, these dried tomatoes are great in pasta or soups, and the apples add incredible flavor to even vegetable dishes.

Anyone gifted by me with dried fruit must know that they are a very good friend indeed!

I saw dried tomatoes selling for $10/pound at a food coop and thought that price was outrageous. Now that I make and eat my own dried tomatoes, I think they’re

With a budget of almost 14 Billion dollars in 2013, you would expect that FEMA would have the resources at its disposal to really be able to assist the public prior to any disaster. If you haven’t already; I recommend going out to the FEMA website to see what their recommendations are for getting prepared. FEMA, through their Ready.gov website is the government’s office that addresses most of the specific topics of the prepper movement so I was surprised at the information I found on their site.

Regardless, I went out to see what I could learn from FEMA. I say that because I truly believe that our government should have the smartest people in our country in positions like this, right? I mean if you are an agency that deals with disaster you need to have the top disaster experts in the world giving out advice, right?

FEMA breaks the topics on their website down into a few categories to start with:

  • Be Informed – This is where FEMA says you can “Learn what protective measures to take before, during and after an emergency”.
  • Make a Plan – “Prepare Plan and stay Informed for Emergencies”
  • Build A Kit – “Build a kit for disasters to be prepared.”

So at first glance this seems like a good start. I went under “Be Informed” to learn what protective measures I could take and decided to start with pandemic. The first thing to notice is that they mention influenza pandemic and I didn’t see anything about Ebola, but let’s just assume that anything bad enough to spawn a Pandemic would be covered by FEMA. They mention having a two week supply of food and water, plenty of prescription drugs, copies of your health records and to talk with family members about how they should be cared for if they get sick. Lastly they ask you to volunteer and get involved.

During an actual Pandemic (this is the page that FEMA has for Pandemic information) they recommend avoiding close contact with people who are sick (Really??) staying home from work if possible and the usual suspects of covering your mouth when you cough or sneeze and washing your hands.

A pandemic by definition is when a disease is prevalent throughout an entire country, continent or the whole world. I am going to add my own addendum that there must be a relatively high loss of life. With that definition, the only other pandemic any living person has seen (I don’t count AIDs or SARS) was the Spanish Influenza pandemic of 1918-1920 that killed an estimated 30 to 50 million people in two years. In the United States alone over 675,000 people died in two years!! When FEMA is supposed to be informing you about what to do for a Pandemic that is the best they can do?!!!

Lists of phone numbers does not prepare you for a disaster

Maybe I am over reacting and this is sound advice? Perhaps, but look at Ebola where they say you are contagious for up to 21 days. If you are supposed to stay indoors for three weeks, you would be mighty hungry that last week if you only stored two weeks of food wouldn’t you? The World Health Organization states that people with Ebola can still transmit the disease though semen for up to 7 weeks after they have recovered. Is it possible that a two week plan might leave you seriously under prepared for the next pandemic?

Obviously I take issue with the plans FEMA seems to have for sheltering in place should that be necessary during a pandemic so I went over to their Make A Plan page and then down to the Plan to Protect yourself and your family link. The page seems worthless to me and the most prominent item on the page is a link to download their Family Communication Plan which is really just a sheet for you to write down phone numbers, a meeting place and medical insurance information. I don’t see how this is a realistic plan. Phone numbers are helpful I guess and having your dentist’s phone number would be a good thing if you are having a tooth emergency but I expected more again from FEMA.

A family survival plan is more than just simply writing down phone numbers and being truly prepared requires more than two weeks of food; especially during a pandemic. FEMA it seems has always recommended the most basic information and supplies that anyone probably already has on hand. Is this preparing or are they trying to cater to our lazy side? Is this the lazy person’s way to prepare? Just write down some phone numbers that won’t help you at all and keep the regular amount of food you probably already have on hand and no worries! But while you’re at it, FEMA does recommend some social messaging shout outs you can use.

FEMA doesn’t have a plan for you

You can go lots of places on FEMA’s website and there is some good advice, but on balance I get the sense that either FEMA is trying to lower everyone’s expectations for any real disaster to the point of leaving millions under prepared or they are simply out of touch with reality. I know people who have been without power for longer than two weeks in the winter and this wasn’t considered a disaster by any stretch. When we imagine disaster, it will probably take FEMA two weeks just to get out and do anything if you are foolish enough to believe that you only have to hold out until they get there. Once FEMA does arrive, they are no magic savior. Remember Hurricane Sandy when the FEMA office closed? They actually had the mental sharpness to hang up signs informing the public, who presumably was going to the offices for assistance, that they were closed “due to the weather”. You can’t rely on anyone else in a disaster so it’s important that you take the responsibility for your life and the lives of those you care about into your own hands.

FEMA doesn’t want to get out in the storm to help you.

So what are my solutions since I seem to know everything? First thing is that will admit that I don’t know everything but I don’t believe there are any one size fits all plans for preppers. You can’t just say store 2 weeks of food and think that will do for just about any disaster. Everyone has to have their own plan that has been carefully structured based upon the needs, resources and skills of your family/group with a strategic consideration of the potential threats you face. Here’s my take on FEMA’s 3 points.

  • Be Informed – Make sure you know what is going on in your home, city, region, state and country. Staying informed doesn’t have anything to do with sports scores, reality TV or what the latest star is doing that has gotten her in trouble. Being informed is knowing what is going on around you (situational awareness) and what is going on that could affect you. Learn as much as you can right now about different ideas and perspectives. I like to think we cover a lot of bases on Final Prepper, but there are dozens of other sites out there that offer a ton of great information too.
  • Make a Plan – Once you have considered who you are prepping for, it then makes sense to ask what are you prepping for. Once you have the answers to those two questions you can start working on a plan that will work for you personally, that addresses the needs of your family with regard to the threats you have identified. Your plan won’t look like mine, but there might be similarities. What works for you might not work for a single mother in the city.
  • Build A Kit – I don’t think the normal supplies I would consider for someone to be adequately prepared would fit into anything I would call a “kit”. A kit sounds like a box that sits in the closet. If you want to be prepared you will need to begin stocking up on supplies and that means different things to different people. There are lots of bases to cover but the most important begin with food, water, shelter and security.

Food

Water

Shelter

Security

Make your plan to fit your family, to take into consideration where you live and what you are dealing with. You will make better choices than any bureaucracy and your family will be better off with you than at any FEMA shelter regardless of the disaster. FEMA doesn’t have a plan for you. They have a plan to maintain order for the masses and hopefully prevent chaos. You are the only one that is going to keep your family’s needs in the front of your focus. Take steps now to ensure you aren’t living with FEMA’s idea of what is important.

What’s your plan?

With a budget of almost 14 Billion dollars in 2013, you would expect that FEMA would have the resources at its disposal to really be able to assist the public

A violent mob a tad over 1,000 strong is blocking all outbound traffic on a major freeway leading out of downtown, your car is stuck in the snarled traffic and night is approaching. What are you going to do?

You were just about to pull into work on a Monday morning when an electro-magnetic pulse (EMP) leaves your car sitting in the middle of the street on a downtown city block. How are you going to move?

Record breaking 100-year flooding is quickly rushing towards your neighborhood, and you have heard the bridge to safety is already under 3 feet of water. Where are you going to go?

Civil unrest, the breakdown of society, perhaps Martial Law, or the absence of the Rule of Law, are all possible consequences of any number of doomsday scenarios, or even breaking points themselves. Solar flares or tactically deployed strategic nuclear weapons can emit an EMP capable of destroying on-board computers and sensitive electronics in vehicles manufactured after 1980, while damaging the power grid and basically returning modern technology to the peak era of horse and buggies, the butter churn, and the quill pen. Major natural disasters such as flooding, earthquakes, and wildfires can be severe, quick, and unannounced, potentially forcing you into an immediate need to evacuate, sometimes without the luxury of vehicles, boats, or other modern modes of transportation.

What is your current level of prepper conditioning?

Being in the wrong place, at the wrong time, swarmed by an angry mob can reduce a city to foot traffic, and potentially put you in direct physical danger. Think about Ferguson, Baltimore, Dallas, Milwaukee, or Reginald Denny, the truck driver during the 1992 L.A. Riots, whose beating was caught by a news helicopter:


Fight-or-Flight instincts right? We are all familiar with that clever little quip. Are you capable of fighting back? Against multiple aggressors? For a sustained period of time? If not, are you capable of the flight option? Can you escape those aggressors? Could you outrun them in a sprint, through an urban environment, and continue to lose them over a sustained longer distance? What if you do initially outrun the aggressors, but are eventually caught and then forced to defend yourself? Fighting fresh sucks enough, try fighting when you are already fatigued. It is important to consider your level of prepper conditioning before you are facing a disaster.

Many of us have our everyday carry (EDC) gear, whether on our person or in a small easily accessible bag of some sorts, at all times. Others have a get home bag (GHB) or bug out bag (BOB) loaded with tools, gear, emergency food supplies, and even defensive items, either in our vehicle, at work, or otherwise ready to grab and go at a moment’s notice. Have you ever shouldered that pack and walked any distance? Even if you know a route to get home without consulting your Google maps or in-dash navigation, have you ever actually walked it? How far is it? What type of footwear do you have on? Dress shoes, high heels, flats, sandals, all not good choices for long walks. Have you done so in inclement weather? What if your planned route is impassable (consider the angry mob presence, or flooded roads/trails)? How heavy is that pack again?

Paratus 3 Day Operator’s Pack Military Style MOLLE Compatible Tactical Backpack Bug Out Bag

Sheriffs offices, fire departments, and other emergency management professionals do their best to warn residents of impending danger from natural disasters, and will assist in pre-planned evacuations often designed to allow ample time for you and your family to be removed from your residence safely. However the timing of natural disasters is not always so convenient and officials may not be available to help you, individually. You may have to load up your valuables and find a road out, but without the knowledge to move forward, a safe route may not be possible in your family car. Can you hike out of your neighborhood on foot? Are you a strong enough swimmer to tread water for extended periods of time, or even swim across a pond or lake to escape the danger? If you have small children with you, are you capable of carrying them to safety as well? Can you push a heavy object out of your way, lift an item off yourself or a loved one, pull yourself over an obstacle, or negotiate a series of uneven, loose, or otherwise treacherous terrain to find safety on solid ground?

What do all of these have in common?

How long do you expect to survive a SHTF event?

All of these scenarios are examples of easy ways your ability to survival the initial blow of shit hitting that proverbial fan will depend upon your physical ability and conditioning. If you have ever been in a fight, even in training, sparring, bag drills, or other controlled environments, you know how quickly you can fatigue. If you have not, just find a large pillow or something else soft to punch, and hit it as furiously as possible – as if your life depended on beating that pillow – for about 30 seconds, then assess your heart rate, breathing, and perspiration. They are probably all up quite a bit. Rest for 10 seconds then do it again for a minute. Then sprint out your door to the end of the block, and do it again for another 45 seconds. Rest for 5 seconds and go ALL OUT for a final 10 second surge. Then run a lap around your neighborhood and reassess yourself when you get back home. Go inside for a glass of water, you earned it – then defend yourself against that last attacking pillow for another 30 seconds. Get the point?

Fatigue from fighting is very real, and very quick. If you are not big on hand-to-hand combat, but have read a couple of books, or seen a movie or two, or practiced kata or other sequenced movements such as are commonly trained in karate and taekwondo, then you may not know how your body will actually stand up to the massive expenditure of energy required in a fight. Need somewhere to start? Look for a local gym and sign up for a free test class in Krav Maga. Condition yourself.

If you have ever been in a fight, even in training, sparring, bag drills, or other controlled environments, you know how quickly you can fatigue.

If your prepping relies heavily on the use of EDC, GHB, or BOB gear, you should not only be intimately familiar with every piece of gear you carry or plan on carrying, but you should be even more familiar with what it feels like to actually carry that gear. As the crow flies, I work 10 miles from home. My regular commute covers 15 miles. Pending any alterations in safe passage following an incident, I expect my trip home could range upwards of 20-30 miles. At 6’4” and about 225 lbs with a GHB weighing in around 24 lbs dry, I have a little room for 3 liters of water while keeping my ruck right around 30 lbs. With a little intimate road time, proper footwear, a series of blister/heal cycles and rubbing my shoulders raw from straps, I know what pace I can move at and how long I can move like that. Toss in variables of being loaded with an unplanned item, or extra gear I happen upon, and I also know that I can double upon that coupon and keep going. How do I know that? Walking around the neighborhood, simple day hikes on the weekend, or a good backpacking trip are all good places to start. Or jump straight up for a good sense of what added stresses could feel like on your psyche and your body, and look at completing a GoRuck event (Google it, it is worth every dime). Condition yourself.

Not sure what will be required of you before, during, after a natural disaster? Ask anyone who has lived through an earthquake, wildfire, tornado, or flooding. Look at the Cajun Navy in Baton Rouge, LA. Think they have it easy in their boats? I guarantee they end their day plum tired from the physicality required to help their neighbors. Strangers even. If you cannot push yourself off the floor, could you push a standard home office bookshelf off yourself? If you cannot perform a single pullup, could you pull yourself up and over a large item like a refrigerator blocking the doorway out to safety? Say your kid, spouse, or loved one is unconscious or otherwise unable to walk to safety themselves, can you carry them – even if for just a short distance to get out of the house? Could you drag them even? Can you hike out from danger, run away from danger, swim to safety, or simply walk down the road, for miles, until you find refuge? No, you do not need to go to the gym, eat protein bars and post-workout shakes. Try some simple body-weight exercises. Pushups, pullups, squats, planks. YouTube any one of those, find progression exercises for them if you cannot do them strictly now, and work your way towards them.

Take care of your conditioning now before life takes care of it for you

Get up and move, if even a little. Go for a walk, swim at the rec center, ride a bike, anything. You have a busy schedule. Work. Family. Life. A daily set of push ups, pull-ups, squats, and planks can be done in as little as 5 minutes. You have spent far more time than that just reading this little 1600 word article. You probably spent more time than that navigating the internet to find this article. You may even spend ten times that amount scrolling through Facebook feeds, or news articles, or simply sitting on the couch watching glimpses of your favorite programming between chunks of commercials and advertising. That’s fine. Just slip off the couch and do 10 push ups during a commercial break. Even once a day. How long does it take to walk around the block? Twenty minutes? Take the dog. Can you run a couple of miles? That doesn’t really take too long either? Be like Nike…Just Do It. Swim at the pool? It takes longer to drive there, rinse off afterwards, and drive home than it does to actually swim even just 500 meters. Condition yourself.

No, you do not need to go to the gym, eat protein bars and post-workout shakes. Try some simple body-weight exercises. Pushups, pull-ups, squats, planks.

Surviving is just the first step to survival. If you struggle with the basic physical abilities to easily get through some of the things I have discussed above, what good will the 2 years of food, hundreds of gallons of water, or thousands of rounds of ammunition do for you when the shit hits the fan? That stockpile will just be a jackpot for someone more conditioned for a survival situation than you. Someone like me who comes along later to find the money you spent, thinking you were prepared, when a few simple daily efforts could have made a far bigger difference in your life.

Are you free of addictive substances, habits, or vices? Quitting smoking is hard enough today, without other stresses, and with the assistance of any gum, patches, or other tricks to take the edge off. I know. I have done it. I cannot even imagine how weak-minded I would be a few weeks after SHTF to come across someone trading a pack of cigarettes…I probably would have sold the farm for it if I hadn’t already quit. Many prepper philosophies out there advocate for even non-users to stock up on alcohol, tobacco, and coffee to be used as trade items later on. The thought being that these little trinkets will have substantial value in bartering systems when regular supplies have long disappeared or been consumed by former smokers, drinkers, and coffee addicts. If you make it that far after the SHTF but cannot turn down a smoke, a drink, or a cup of Joe, you are just begging to be taken advantage of.

Is your body accustomed to the diet you plan on sustaining yourself with post-SHTF? Yeah, bust out the beef stew or chicken with salsa MRE, throw it in the nifty heater and lean it against a rock or something, and you’ll be a member of the “these are actually pretty good” crowd. Now eat them every day for two weeks. How has your stomach felt? How are your bowel movements? Are you paying attention to calorie intake versus expenditure? During the crucible for the Marine Corps, you are given just 2 MREs over a 54 hour period when you cover 48 miles with 45 lbs of gear, navigate 36 “warrior stations” and 29 “team building exercises” all on 6 hours of sleep. I had food left over afterwards and don’t remember going number two at all, but made it just fine. If you eat three MREs per day, breakfast, lunch, and dinner, you’ll “survive” alright, but your guts will hate you.

Can you perform the daily physical duties and manual labor required in your long-term survival plan? If you currently work on a farm or ranch, in most construction trades, oil field operations, logging, or other physically intense professions, you probably do not need much of this information at all. If you do not work in one of the above, or a closely related field, go spend a day with a family member, friend, or neighbor who does work in one of those fields and tell me how you feel the next morning. Manual labor is real. If you think the post-apocalyptic world is ripe with clerical positions, business analytics, or private consulting firms, think again. Your air-conditioned office, break rooms, water coolers, hour-long lunches, and paid vacation and sick leave are all gone. If you want to get by now, it will all be on your shoulders. Day in and day out. If you cannot weed a garden all day, you will starve. If you cannot walk the countryside gathering wild edibles all day, you will starve. If you cannot climb to the top of a ridge, check a trap line, or take down some big game and carry it home, you will starve. If you cannot gather firewood, build or reinforce a shelter, haul water, move gear – over and over – or potentially even engage in defensive postures, struggles, or all out battles, where does that land you in your new world?

Condition yourself early and often. Move. Eat right. Live right. Easiest, cheapest, most sustainable preps out there. I appreciate any and all feedback and dialogue! Know a little about anything in any of these areas, share it, talk about it, and get the thought trains rolling. Disagree with me, let me know why. Look for more to come on my conditioned prepping, from SHTFit. I am totally open to your ideas, I may even flat-out admit it and incorporate your thoughts into my own conditioning approaches. In the end, we should all make sure we are Fit for when the Shit Hits.

A violent mob a tad over 1,000 strong is blocking all outbound traffic on a major freeway leading out of downtown, your car is stuck in the snarled traffic and