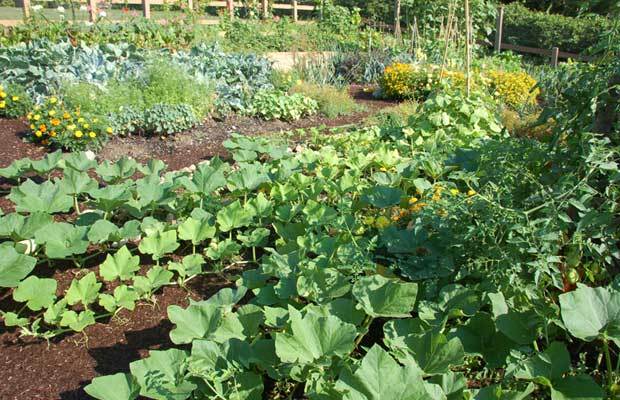
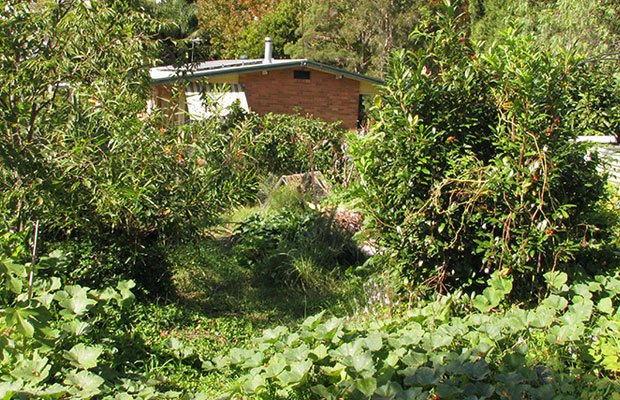
Home2017June (Page 3)

Don’t kill, spray, tear up, or destroy the weeds in your garden, yard, and fence rows. Many of them are actually highly-regarded, widely-used, and extremely-valuable medicinal herbs! What could be easier than growing an herbal medicine garden with no effort? Of course, you’ll have to harvest your edible weeds, but you would do that anyhow: it’s called weeding.

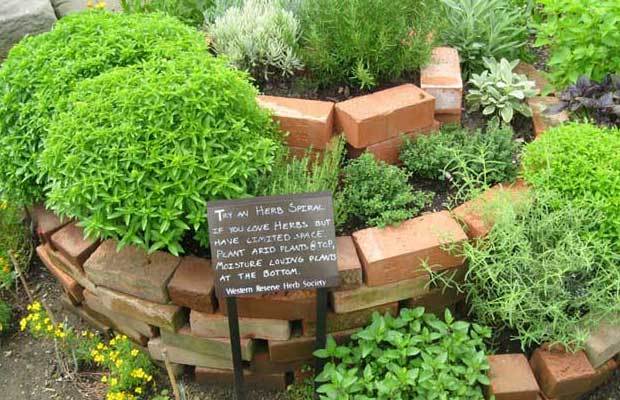
Spring is an especially fertile time for harvesting your edible weeds – roots and all – and turning them into medicines. Here then are some tips on how to find, harvest, prepare, and use a baker’s dozen (13) of common edible weeds that probably already grow around you.

To make your medicines you’ll need glass jars of various sizes with tight-fitting lids. And at least a pint each of apple cider vinegar (pasteurized), vodka (100 proof is best, but 80 proof will do), and pure olive oil (not extra virgin) or good quality animal fat such as lanolin, lard, or belly fat from a lamb or kid. You will also want a knife, a cutting board, and some rags to mop up spills.

In general, you will fill a jar (of any size) with coarsely-chopped fresh, but dry, plant material. (Do not wash any part of the plant except roots, if you are using them, and be sure to dry those well with a towel before putting them in your jar.) Then you will fill the jar with your menstruum, that is, the vinegar, the oil, or the alcohol. Label well and allow to stand at room temperature, out of the sunlight for at least six weeks before decanting and using. (See Healing Wise for info on making preparations.)

A field guide is helpful for positively identifying your weeds. The one I like best is: A Guide to the Identification of New Zealand Common Weeds in Colour, complied by E. A. Upritchard. This book even shows you how the edible weeds look when they are emerging.

Ready? OK! Let’s go outside and see what we can find.
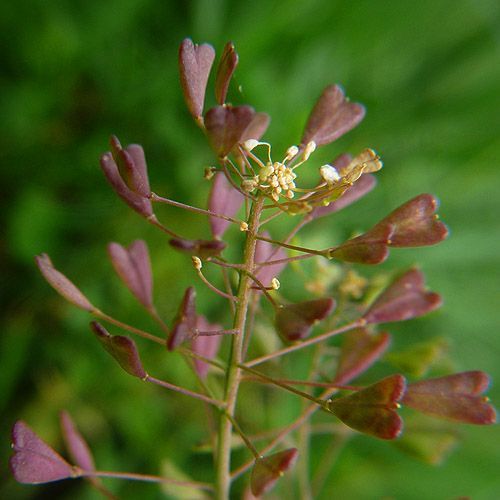
Shepards Purse

Shepherds’s purse (Capsella bursa pastoris) is an annual in the mustard family. Cut the top half of the plant when it has formed its little heart-shaped “purses” (seed pods) and make a tincture (with alcohol), which you can use to stop bleeding. Midwives and women who bleed heavily during their period praise its prompt effectiveness. Gypsies claim it works on the stomach and lungs as well. A dose is 1 dropperful (1ml); which may be repeated up to four times a day.

Gallium Aparine

Cleavers (Gallium aparine) is a persistent, sticky plant which grows profusely in abandoned lots and the edges of cultivated land. The entire plant is used to strengthen lymphatic activity. I cut the top two-thirds of each plant while it is in flower (or setting seeds) and use alcohol to make a tincture which relieves tender, swollen breasts, PMS symptoms, and allergic reactions. A dose is 15-25 drops (.5 – 1 ml); repeated as needed.
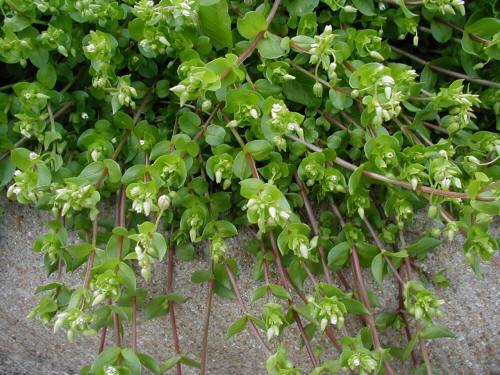
Chickweed

Chickweed (Stellaria media) this edible weed has many uses, including delicious salad greens. I cut the entire top of the plant and eat it or use alcohol to make a tincture, which dissolves cysts, tonifies the thyroid, and aids in weight loss. A dose is a dropperful (1 ml), up to three times a day.
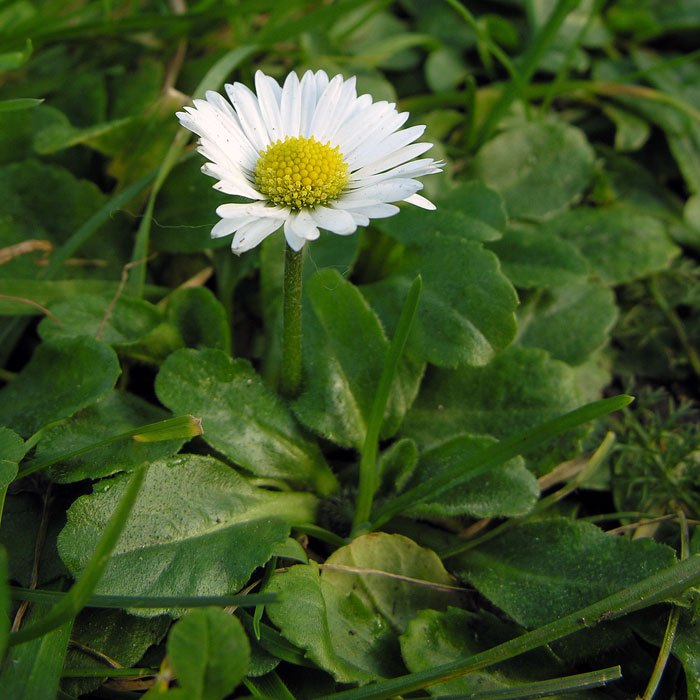
Daisy

Daisy (Bellis perennis) is a common perennial edible weed of lawns and open areas. Quite different from the native daisy (Lagenifera petiolata), the little English daisy is related to feverfew and has similar abilities. I use the leaves and flowers to make a tincture (with alcohol) or a medicinal vinegar which relieves headaches, muscle pain, and allergy symptoms. A dose is a dropperful of the tincture (1 ml), up to twice a day; or a tablespoon of the vinegar in the morning.
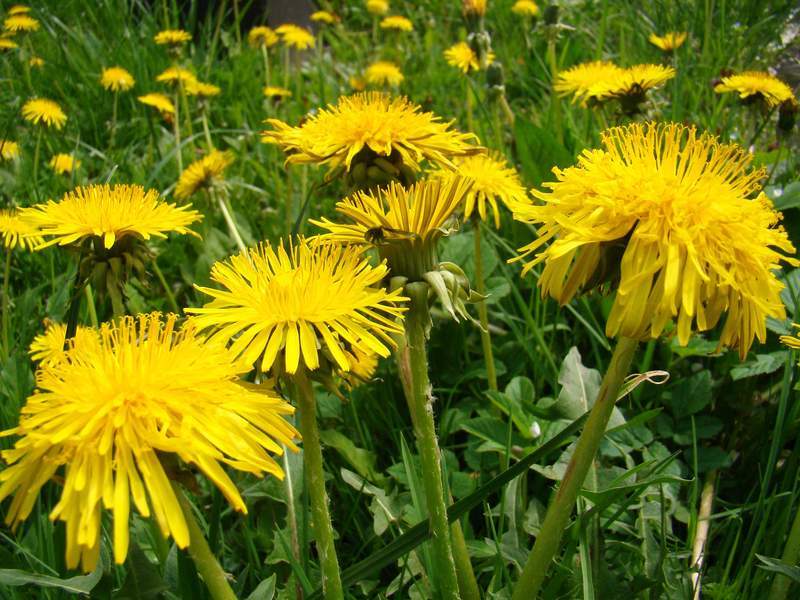
Dandelion

Dandelion (Taraxacum officinalis) is a persistent perennial of lawns and gardens and one of the best known medicinal herbs and edible weeds in the world. (The native dandelion of New Zealand – Taraxacum magellanicum – is medicinal too.) Those who love a pure green lawn curse the sunny yellow flowers of common dandelion. But those who are willing to see beauty anywhere (such as children and herbalists) treasure this edible weed. You can use any part of the dandelion – the root, the leaves, the flowers, even the flower stalk – to make a tincture or medicinal vinegar which strengthens the liver. A dose of 10-20 drops of the tincture (.5-1 ml) relieves gas, heartburn, and indigestion, as well as promoting healthy bowel movements. A tablespoon of the vinegar works well, too. More importantly, taken before meals, dandelion increases the production of hydrochloric acid in the stomach, thus increasing bio-availability of many nutrients, especially calcium. The fresh or cooked green leaves are loaded with carotenes, those anti-cancer, anti-heart disease helpers. And the oil of the flowers is an important massage balm for maintaining healthy breasts. (There’s lots more information on dandelions in Healing Wise.)

Dock

Dock, also called yellow dock, curly dock, and broad dock is a perennial plant, which my Native American grandmothers use for “all women’s problems.” The Maori call it paewhenua or runa. It is another plant that disagrees with sheep, especially when the land is overgrazed. I dig the yellow roots of Rumex crispus or R. obtusifolius and tincture them in alcohol to use as an ally when the immune system or the liver needs help. A dose is 15-25 drops (.5-1 ml). I also harvest the leaves and/or seeds throughout the growing season and make a medicinal vinegar, taken a tablespoon at a time, which is used to increase blood-levels of iron, reduce menstrual flooding and cramping, and balance hormone levels. If the chopped roots are soaked in oil for six weeks, the resulting ointment is beneficial for keeping the breasts healthy.
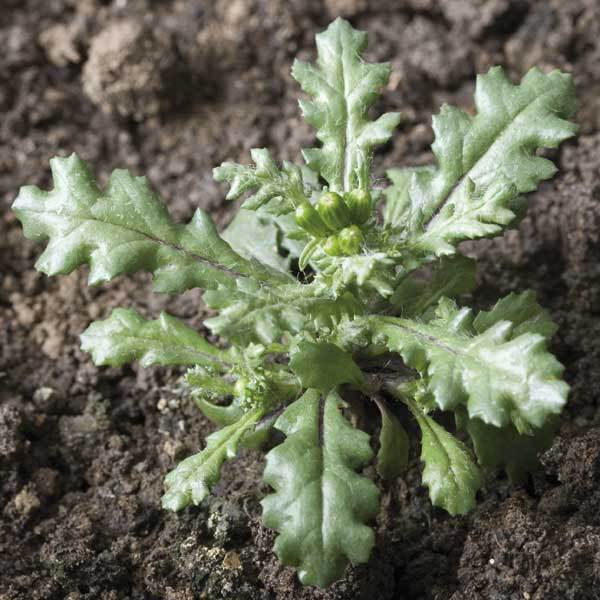
Groundsel

Groundsel (Senecio vulgaris) and Ragwort (Senecio jacobea) are hardy perennials that have a reputation for poisoning livestock, like their cousin tansy. Although not good for sheep, these two Senecios are some of the world’s most ancient healing plants, having been found in a grave 60,000 years old. You can use the flowering tops and leaves with your alcohol to make a tincture which acts slowly to tonify the reproductive organs, ease PMS, and stop severe menstrual pain. A dose is 5-10 drops (.2-.5 ml) per day, used only once a day, but for at least 3 months. (A larger dose is used to speed up labor.)
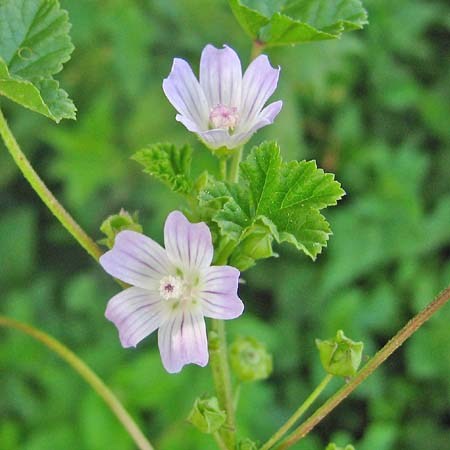
Mallows

Mallows (Malva neglecta, M. parviflora, M. sylvestres) grow well in neglected gardens and are surprisingly deep-rooted. The flowers, leaves, stalks, seeds, and roots are rich in sticky mucilage which is best extracted by soaking the fresh plant in cold water overnight or longer or by making a medicinal vinegar. The starch is extraordinarily soothing internally (easing sore throats, upset tummies, heart burn, irritable bowel, colic, constipation, and food poisoning) and externally (relieving bug bites, burns, sprains, and sore eyes). The leaves, flowers, and bark (especially) of the native Hohere (Hoheria populnea) are used in exactly the same way by Maori herbalists.
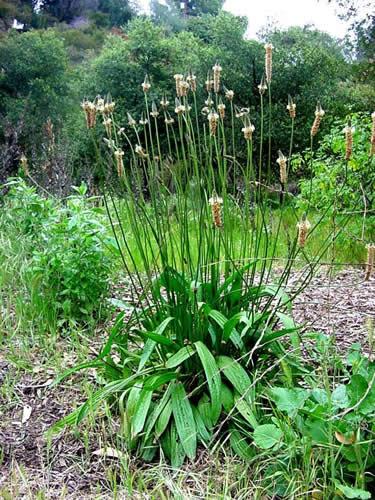
Plantain

Plantain, also called ribwort, pig’s ear, or bandaid plant – and kopakopa or parerarera by the Maori – is a common edible weed of lawns, driveways, parks, and playgrounds. Identify it by the five parallel veins running the length of each leaf. You may find broad leaf plantain (Plantago major) with wide leaves, or narrow leaf plantain (Plantago lanceolata) with lance-thin leaves. Either can be used to make a healing poultice or a soothing oil widely regarded as one of the best wound healers around. Not only does plantain increase the speed of healing, it also relieves pain, stops bleeding, draws out foreign matter, stops itching, prevents and stops allergic reactions from bee stings, kills bacteria, and reduces swelling.

Try a poultice or a generous application of plantain oil or ointment (made by thickening the oil with beeswax) on sprains, cuts, insect bites, rashes, chafed skin, boils, bruises, chapped and cracked lips, rough or sore hands, baby’s diaper area, and burns.

To make a fresh plantain poultice: Pick a leaf, chew it well and put it on the boo-boo. “Like magic” the pain, itching, and swelling disappear, fast! (Yes, you can dry plantain leaves and carry them in your first aid kit. Chew like you would fresh leaves.)

To make plantain ointment: Pick large fresh plantain leaves. Chop coarsely. Fill a clean, dry, glass jar with the chopped leaves. Pour pure olive oil into the leaves, poking about with a chopstick until the jar is completely full of oil and all air bubbles are released. Cap well. Place jar in a small bowl to collect any overflow. Wait six weeks. Then strain oil out of the plant material, squeezing well. Measure the oil. Heat it gently, adding one tablespoon of grated beeswax for every liquid ounce of oil. Pour into jars and allow to cool.
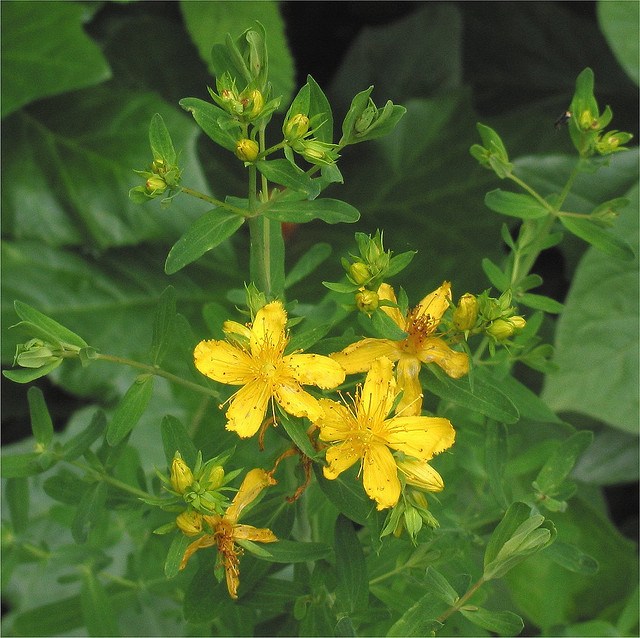
St. Johns Wort

St. Joan’s/John’s wort (Hypericum perforatum) This beautiful perennial wildflower may be hated by sheep farmers but herbalists adore it. The flowering tops are harvested after they begin to bloom (traditionally on Solstice, June 21) and prepared with alcohol, and with oil, to make two of the most useful remedies in my first aid kit. Tincture of St. Joan’s wort not only lends one a sunny disposition, it reliably relieves muscle aches, is a powerful anti-viral, and is my first-choice treatment for those with shingles, sciatica, backpain, neuralgia, and headaches including migraines. The usual dose is 1 dropperful (1 ml) as frequently as needed. In extreme pain from a muscle spasm in my thigh, I used a dropperful every twenty minutes for two hours, or until the pain totally subsided. St. Joan’s wort oil stops cold sores in their tracks and can even relieve genital herpes symptoms. I use it as a sunscreen. Contrary to popular belief, St. Joan’s wort does not cause sun sensitivity, it prevents it. It even prevents burn from radiation therapy. Eases sore muscles, too.
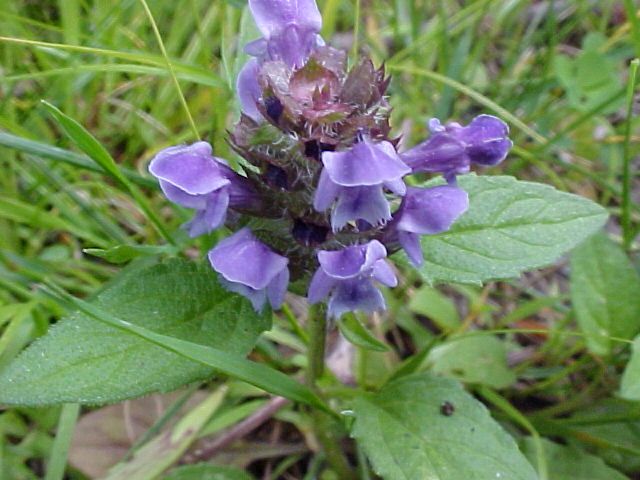
Self heal

Self Heal (Prunella vulgaris) This scentless perennial mint is one of the great unsung healers of the world. The leaves and flowers contain more antioxidants – which prevent cancer and heart disease, among other healthy traits – than any other plant tested. And as part of the mint family, self heal is imbued with lots of minerals, especially calcium, making it an especially important ally for pregnant, nursing, menopausal, and post-menopausal women. I put self heal leaves in salads in the spring and fall, make a medicinal vinegar with the flowers during the summer, and cook the flowering tops (fresh or dried) in winter soups.
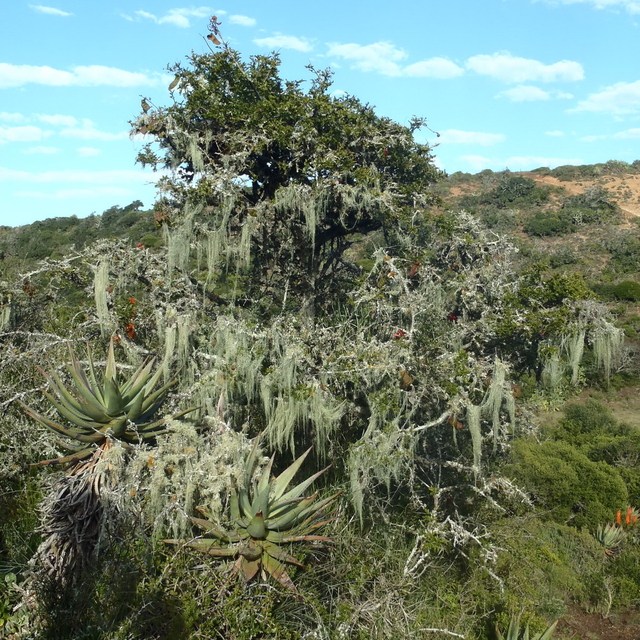
Old Man’s Beard

Usnea (Usnea barbata) is that many-stranded grey lichen hanging out of the branches of your apple trees or the Monterey pines planted in the plantation over there or in almost any native tree in areas of the South Island Alps, where it is known as angiangi to the Maori. If in doubt of your identification: Pull a strand gently apart with your hands, looking for a white fiber inside the fuzzy grey-green outer coat. To prepare usnea, harvest at any time of the year, being careful not to take too much. Usnea grows slowly. Put your harvest in a cooking pan and just cover it with cold water. Boil for about 15-25 minutes, or until the water is orange and reduced by at least half. Pour usnea and water into a jar, filling it to the top with plant material. (Water should be no more than half of the jar.) Add the highest proof alcohol you can buy. After 6 weeks this tincture is ready to work for you as a superb antibacterial, countering infection anywhere in the body. A dose is a dropperful (1 ml) as frequently as every two hours in acute situations
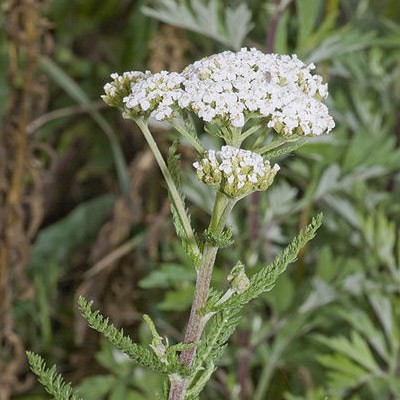
Yarrow

Yarrow (Achellia millefolium) This lovely perennial weed is grown in many herb gardens for it has a multitude of uses. Cut the flowering tops (use only white-flowering yarrow) and use your alcohol to make a strongly-scented tincture that you can take internally to prevent colds and the flu. (A dose is 10-20 drops, or up to 1 ml). I carry a little spray bottle of yarrow tincture with me when I’m outside and wet my skin every hour or so. A United States Army study showed yarrow tincture to be more effective than DEET at repelling ticks, mosquitoes, and sand flies. You can also make a healing ointment with yarrow flower tops and your oil or fat. Yarrow oil is antibacterial, pain-relieving, and incredibly helpful in healing all types of wounds.


Don’t kill, spray, tear up, or destroy the weeds in your garden, yard, and fence rows. Many of them are actually highly-regarded, widely-used, and extremely-valuable medicinal herbs! What could be


Whether you’re interested in home protection or looking to stay safe while hunting, you’re going to want the best accessories for your gun to defend yourself. There is no time to waste when you only have a few seconds to take action. Fumbling with your gun can be the difference between life and death. Not having confidence in your aim or your mechanics can also spell doom. And, if you’re not accurate, your technique won’t matter anyways — no matter how sure you are in it.

Competence in one of those traits without proficiency in the others typically ends in a disaster. You need to be confident, steady, and accurate when facing a threat, because you can bet that your rival will also be in survival mode. Luckily, there are various tools and fittings to help you in tight spots. There is no more comforting feeling than having the upper hand when faced with a bad situation. By simply adding some upgrades to your firearms, you can rest assured that you and your family will be protected in any circumstance.

While guns are great fun when shooting safely at the range, they can also act as a valuable and useful tool in the right setting. But, with all the gadgets and frills available now, which ones do you really need? Certainly you won’t require most of the contraptions out there, but there are a few that will come in handy when in a pinch. Good thing we have a starter list for you right here.

Some of the best accessories for your guns

Gun scopes

Bushnell AR Optics Drop Zone-223 Reticle Riflescope with Target Turrets, 1-4x 24mm

When facing a wild beast, you’re never assured of safety. While most who choose to hunt big game know how to take the proper precautions, having the right equipment certainly doesn’t hurt. Whether your rifle is built to take down a moose,  or a deer, having the correct gun scope will increase your accuracy and take-down ability. Trust in your gear may be the difference between coming back to camp with a trophy kill and not coming back at all.

Laser Sight

Vokul Shockproof 532nm Tactical Green Dot Laser Sight

Utilized more for home defense, a laser light is best for precision. Should you find yourself in a compromising situation while at home, this nifty piece of equipment will make sure you’re armed to handle yourself. Great for low light and target identification, laser lights are a near necessity for keeping your loved ones secure.

Gun Grips

Maybe you found a gun you like, but there is something that’s a bit off. A new gun grip could solve the problem. Find the perfect mold for your hand by attaching the accessory to the butt of your pistol. A little practice at the range may be necessary to find peak comfort level.

Holster

Glock 19/23/32 Holster – Tulster Profile Holster IWB

There’s no point in carrying a firearm if you can’t conceal it. From shoulder holsters to ankle holsters to hip holsters, having your gun easily accessible is a must. Finding the easiest spot on your person to carry should be a top priority for every gun owner.

Flashlight

Aimkon HiLight P10S 400 Lumen Pistol LED Strobe Flashlight with Weaver Quick Release

Sometimes all you need is a little light. Most flashlights easily attach to the front of your weapon and provide enough illumination to help you out in poorly lit areas. Find an LED or an infrared device for optimal usage.

Extended Magazine

Perhaps your six-shot clip isn’t enough to serve your primary carry weapon. An extended magazine may be just what you’re looking for. Using one will affect your grip on the gun, but the extra bullets could be helpful if caught in a hairy situation.

Gun Sling

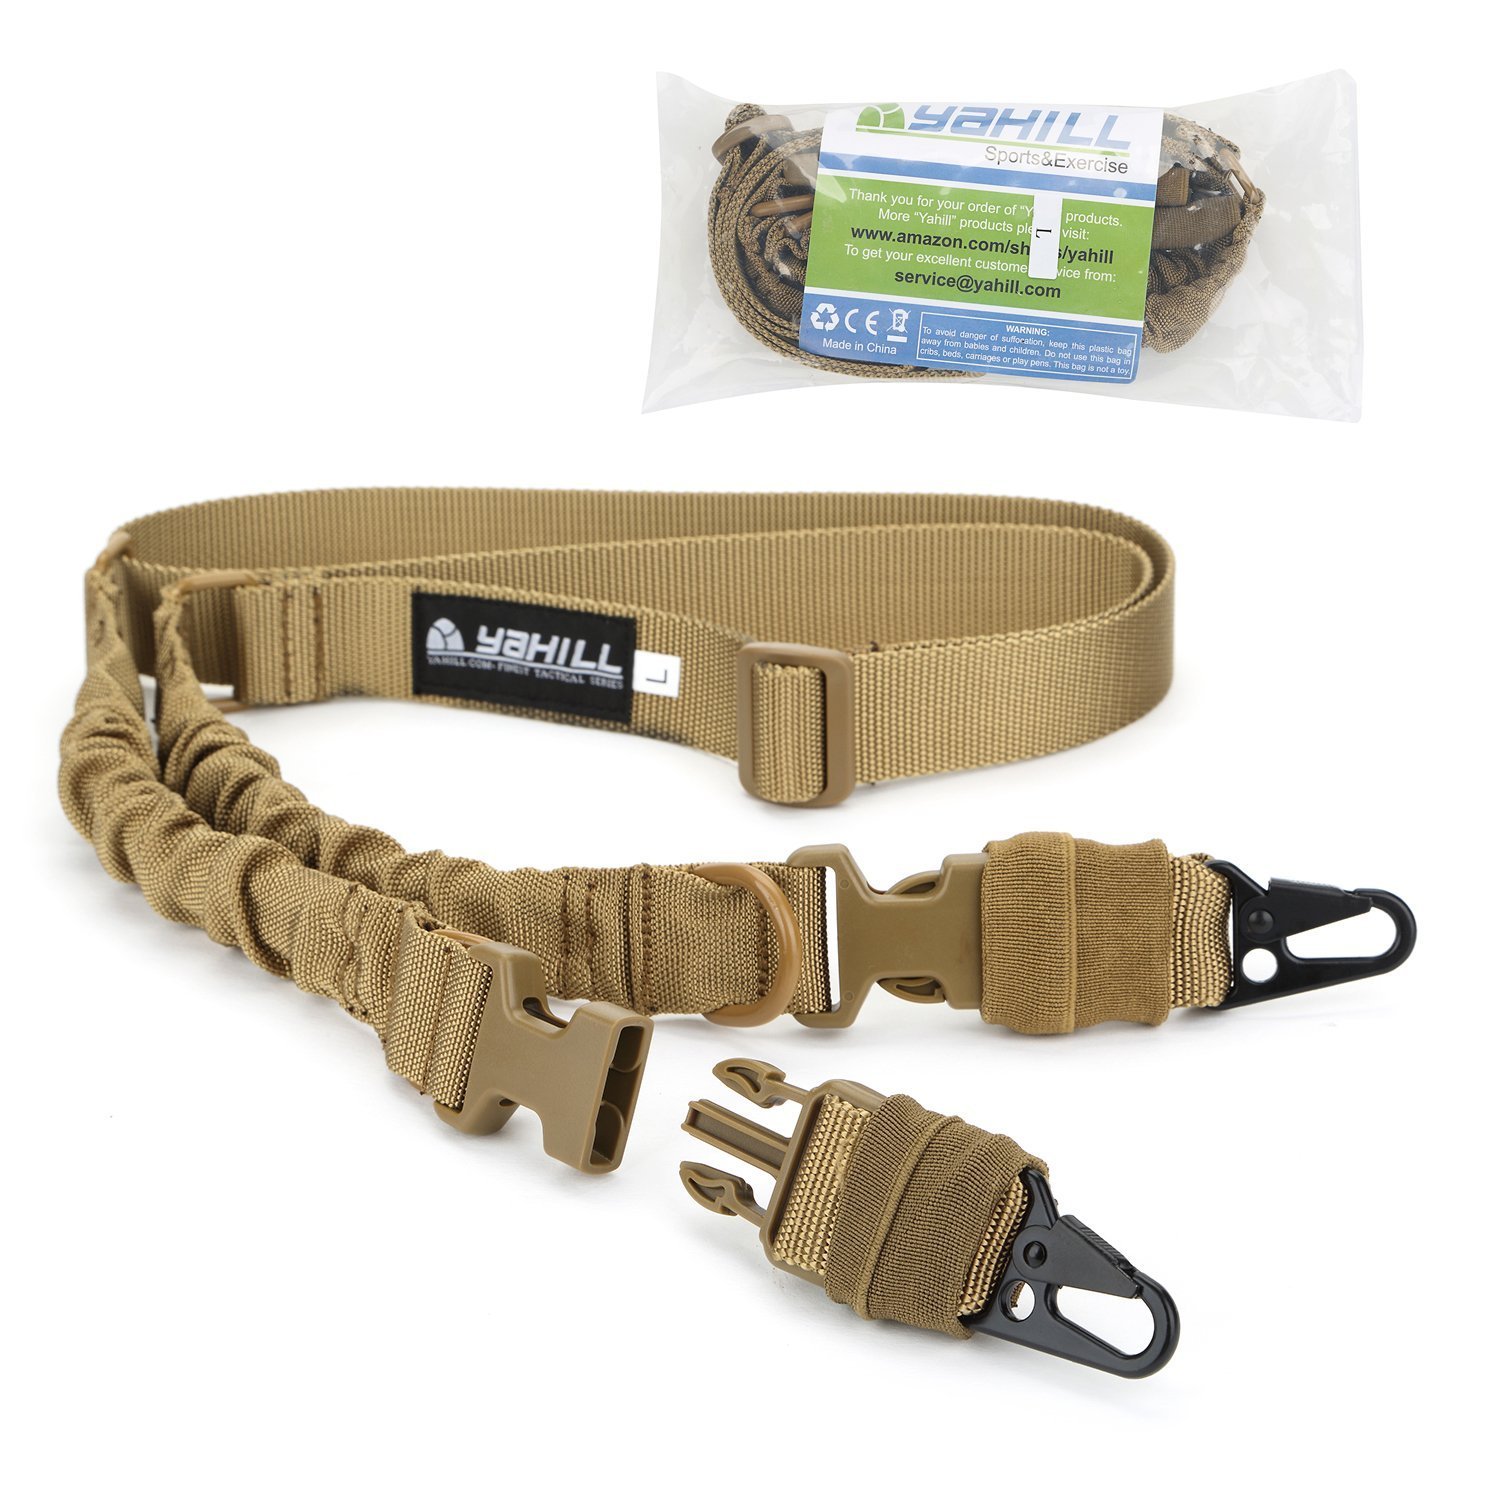
Yahill(TM) Multi-Use 2 Point 2-IN-1 Rifle Gun Sling Adjustable Strap Cord

Attaching a sling to your rifle will improve flexibility. The add-on will also help you carry the firearm through thick brush and heavily wooded areas. Useful and practical, a sling provides relief during your hike so you can save your energy for when it’s needed most.

Weapon Cleaning Kit

Otis Modern Sporting Rifle and AR Cleaning System

If you have a gun, you need to keep it clean. Bullet fragments, material, and powder will influence your accuracy if not flushed out after each use.

Vertical Grip

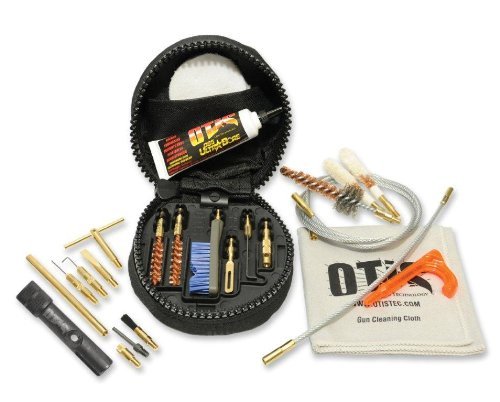
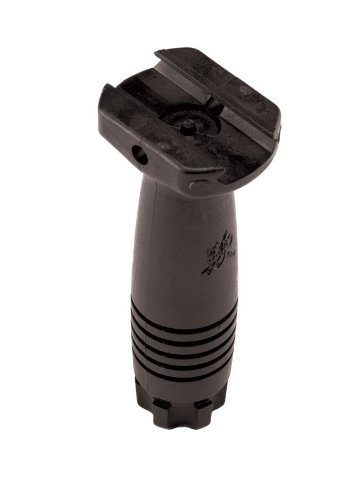
KNIGHTS ARMAMENT VERTICAL Rifle GRIP KAC

Similar to a pistol grip, a vertical grip provides a better placement for your hand when managing a rifle.

Folding Stock Adapter

Law Tactical Gen-3M Side Folding Adapter Tool Genuine 5.56/223/308 –

Fold up your rifle into an easily portable piece of machinery by folding it in half with this adapter. No matter what type of firearm you have, there is always a way to upgrade it for safety and suitability.

  Whether you’re interested in home protection or looking to stay safe while hunting, you’re going to want the best accessories for your gun to defend yourself. There is no time


Gathering tinder is for when you are out in the bush right?

True, locating and identifying good sources of tinder and fire craft is more commonly related to bush survival. However, in a SHTF situation knowing where the available sources of tinder and fuel are and how to use them could save your life. In the usual urban environment shelter is readily available. This leads us to the next second priority – fire.

Making fire when the gas and power is out, even for a short time, can be a real challenge unless you are willing to think outside the box and use everything around you. This, in itself, is the essence of prepping.

First things first – Getting heat

You can put all methods of fire craft into practical use in the urban environment if you can get hold of the raw materials, from the fire plough with a couple of chair legs to a bow drill with a shoelace and coat hanger. However, with modern living comes modern solutions to starting a fire. Commonplace household products, materials and cleaning chemicals can be used to create fire.

Below is a list of ways of making sparks / a flame with simple household items.

1 – A lighter – Even with no fuel the spark given off from the lighter is enough to ignite good dry tinder such as toilet paper. This is better known as a prison match. This spark can also be used to ignite flammable fluids or gunpowder.

2 – Reflective surfaces – The benefit of living out of nature is the amount of reflective, shiny things. CDs, crockery, aluminum foil, cans, bottles or machine parts can be bent and used to focus sunlight to the point of ignition. You can polish some of these surfaces with household cleaners or chocolate. (see below)

3 – Children’s toys – While it is less common nowadays, some toys do still use a wheel and flint to light up toy parts. Crack into the casing and you have yourself a flint and striker. Again in modern children’s toys this is less common due to the fire risk. That said, electronic children’s toys on the whole could well provide a solution or materials for making fire.

4 – Batteries – Batteries when connected with aluminum foil or steel wool will heat to the point of ignition. However, remember that the initial charge held by the battery must still be good. Also, make sure the foil is thinnest in the center of the strip you use to speed the process. Similar to a light bulb filament. (see below)

5 – Break fluid and chlorine – Household chlorine for the pool and standard break fluid will make a big exothermic reaction. Pound the chlorine into a fine powder, make a decent size pile, add the fluid and stand way back. Keep in mind that these materials should be handled with care and used in a well-ventilated area. (see below)

6 – Any battery-powered electrical items when the main power wires are found can be used to make a spark. Wear gloves when doing so. A good example of such are battery-operated flashlights, hand-held games, radios and digital clocks.

7 – Car Batteries – A car battery and jumper cables will make a strong spark. However, take great care when attempting it. Be sure to thoroughly inspect the cables and battery before use and wear gloves.

8 – A working flashlight – By carefully breaking the bulb and leaving the filament exposed it will heat and ignite dry tinder. This can leave you without a working light and only work once. Keep this in mind and only use it as a last resort.

Tinder and Fuel – Think outside the box.

We all know about the usual sources of tinder around the home, dryer lint, newspaper, toilet paper, gasoline, but have you explored every option? It is highly probable that in every room of your home there is something that you can use to create a spark or flame.

Below is a list of items that people may overlook.

  1. Hairspray (spray onto toilet paper or cotton for a better and longer burn before ignition)
  2. Deodorant / Aftershave (spray onto toilet paper or cotton for a better and longer burn before ignition)
  3. Oil – Cooking oil burns well depending on the type. Also, the oil from inside cans of food such as tuna. You can make a very effective oil lamp using said cans.
  4. Crayons – As we know crayons will burn like a candle. However, be sure to keep the area well ventilated. The fumes can be dangerous.
  5. Cleaning products (Different products regardless of their use have different contents. When burning these products, always do it in a ventilated area and only to get the fire going.)
  6. Potato Chips (foods with high corn and oil contents burn well, Doritos for example)
  7. Dry pasta – Spaghetti for example when lit will burn like a match. By keeping the piece unbroken at full length you can potentially light a few dozen candles to place around your home in a black out. This will save you time and conserve the other fuels and sources of fire that you have.
  8. Labels from food and household items. Most people will over look this and see the can as being metal, not remembering that it is wrapped in perfectly flammable tinder / kindling.
  9. Hair (works as tinder but has an extremely bad odor when burnt)
  10. Dryer lint from inside the machine (Even if the trap is empty, lint builds up inside the machine itself. Open up the casing at the back or bottom to check.)
  11. Oranges / Butter –  (these videos explain the process well)
  12. Bicycle inner tube or car tire (will burn for a long time, but has poisonous fumes)

All of these ideas and methods came from either my own experience or the hard work and research of other dedicated preppers. This is not a comprehensive list of all possible ways to make fire, just a few ways that might inspire a few more.

Keep prepping and keep safe.

  Gathering tinder is for when you are out in the bush right? True, locating and identifying good sources of tinder and fire craft is more commonly related to bush survival. However,

During the difficult days of World War II, victory gardens became popular symbols of frugal living and self-reliance. As the nation’s resources became focused on the war effort, families did their part to economize by growing their own vegetables, herbs, and fruit. The victory garden has enjoyed a new lease on life in our own day. In tough economic times, it is more appealing than ever to grow your own food. It can also be an important part of a modern healthy lifestyle. Even if you’re on a tight budget, these seven tips can help you get started with a successful victory garden. You’ll be on your way to delicious home-grown food before you know it!

1. Start Small

There are many helpful and inspiring books about growing your own vegetables. The Internet is also full of useful information on gardening. It’s easy to get too enthusiastic and take on a huge garden project in your very first year. Remember to start small! You can always expand your garden gradually as you become more familiar with the details of growing your own food. Even if you only produce a few rows of potatoes or a handful of tomato plants in the first growing season, you’ll have the satisfaction of knowing you’re a real gardener. You’ll also be saving money and enjoying better nutritional value every time you eat your own home-grown produce.

2. Make the Most of the Available Space

Are you an apartment dweller? Do you live in a condominium or a small townhouse in the city? You might not have a huge backyard to devote to your victory garden. There’s no need to worry. A victory garden can be grown in a very small space. Consider getting a small plot in a shared community garden or finding a rooftop garden you can participate in. If you’re in a tiny apartment, you can still grow edibles in window boxes or similar containers. Even if you only have a small strip of outside space, you can put food plants in among the existing trees and bushes. You can go online for inspiration in designing your small urban garden.

3. Think About What You Love to Eat

A victory garden may look beautiful and be a fulfilling hobby, but the main point of these gardens is food production! When you plan your garden, think about what sort of foods you like to cook and eat. Once you’ve started growing them, they will take center stage in your kitchen during the appropriate season each year. If you don’t enjoy eating squash, then think twice about planting a whole row of it. The same goes for zucchini, which is notoriously productive in late summer. If you do a lot of creative cooking, think about adding herbs and aromatics to your victory garden to spice up your recipes. The possibilities are almost endless. Take some time to review your favorite recipes and think about what foods you’d most like to grow.

4. Work With the Weather

When you grow local food, you need to pay attention to the local climate. Try looking up your town’s USDA hardiness zone and finding out which plants are likely to thrive in your victory garden. As a gardener, you’ll be working closely with the different seasons of the year and becoming more sensitive to small changes in weather. If you live in a colder climate, you might want to boost the growing season by starting plants indoors. With the proper lights and warming areas, you can create an early spring inside your own house or shed. By the time spring has sprung outside, you’ll have healthy young plants ready to take root in the ground, providing you and your family with delicious food.

5. Take Care of the Soil

If you just dig up a patch of soil in your backyard and put in a handful of seedlings, you may end up with some vegetables in a few months, but you’re not going to get the great results you want. Every bit of time and money you invest in preparing the soil will pay back many times during the harvest season. Visit your local garden store for a full selection of compost, mulch, and organic fertilizers. Make sure the ground is thoroughly tilled and aerated. If you’re short on time or muscle power, you can rent a mechanical tiller for a weekend and get your victory garden in great shape. Be sure to pay attention to weeds and remove them promptly from your vegetable beds. When the soil is in good condition, your fruits, vegetables, and herbs will be happier and more productive.

6. Think About the Long Run

Gardening can be an exercise in patience. In our modern age, when we’re accustomed to getting instant gratification with the click of a mouse or a few words on the phone, it can be hard to wait for months to see the results of our victory garden experiments. Sometimes there are difficulties with pests, sunlight, irrigation, or other variables of outdoor life. Yields can be disappointingly tiny or overwhelmingly large. (Have you ever tried to can a hundred pounds of tomatoes in a small kitchen on a sweltering summer afternoon? At moments like those, a garden that yields just a few puny tomatoes may seem appealing!) Don’t get discouraged, and remember that gardening success happens in the long run. Your first year as a victory gardener is just the prelude to a long and happy career of growing your own food.


7. Enjoy the Benefits

There are many benefits of growing your own vegetables at home. You’ll start to enjoy some of them almost immediately: plenty of fresh air and exercise, an increased sensitivity to the changing seasons, and the chance to think about where your food really comes from. As soon as the crops start coming in, you’ll save money on your grocery bills each week. The best reward of all — as experienced gardeners know — is the unforgettable taste of home-grown vegetables. Once you’ve tasted a tomato picked fresh off the vine, you’ll never want to go back to grocery store tomatoes. Start a victory garden this year and enjoy the delights of the freshest food you can get!


During the difficult days of World War II, victory gardens became popular symbols of frugal living and self-reliance. As the nation’s resources became focused on the war effort, families did

As recently as 100 years ago, the most important site consideration for homesteaders and villages was whether plenty of good water was within easy reach. When electric power lines and drilled water wells reached rural areas, however, close proximity to clean water became immaterial – or so we assumed.

Our nonchalant attitude regarding water is rapidly changing, according to well pump installers I spoke with recently. Many are seeing an upsurge in interest by homeowners wanting to learn about and fit hand pumps to their water wells. There are now numerous manually-operated water pumps to choose from, depending on factors such as static (resting) water level and output needed.

Emergency Backup, General Use and New High-Volume Hand Pumps  

An increase in powerful storms with longer power outages is one factor inciting people to think about manual pumps, says Albert Brandt, general manager of Radiant Water Company in Tulsa, Okla. A 2007 ice storm that disrupted electric service for 14 days prompted many to contemplate their water-preparedness, he said.

“A lot of our customers remember using a hand pump on Grandma’s farm, and now want one as a backup,” Brandt told me when I called to ask about hand pump popularity. Radiant Water Company installs Bison, Hitzer and Baker-Monitor hand pumps.

Brandt, who took over Radiant Water in 1998, remembers a swell in hand pump sales as Y2K neared. Now, after a decade-long calm, people are again preparing for potentially troubling times by making sure their families will have fresh, clean drinking water, even if the grid goes down. Recent advances in hand pump design have made them even easier to use and less expensive, he said.

Richard Stothoff, president of Samuel Stothoff Company of Flemington, N.J., said manufacturers, such as Bison Pump Company of Maine, used modern technology to adapt their pumps to function with existing electric submersible pumps.


Stothoff, whose great-grandfather founded the company in 1885, said the company used to install many hand pumps in the then-rural area. Some households still use hand pumps exclusively for water, he said, although such use is rare. Stothoff said he has seen a slight increase in hand pump interest this year, mostly among the self-reliant.

Weather disasters, such as Hurricane Sandy that darkened much of the East Coast for extended periods, spurred more sales for fuel-powered electric generators than for hand pumps, Stothoff said.

“We’re too advanced,” Stothoff said. “We’ve got electricity.”

In neighboring New Hampshire, however, a representative of Northeast Water Wells said hand pump interest over the past five years has steadily climbed as more people build off-grid or geothermal homes. Northeast Water installs Simple Pump brand pumps.

Many types of human-powered pumps have been introduced through the years to accommodate the variety of situations and applications encountered when bringing water to the surface. Until now, however, the discharge capacity has been too low for large communities.

In January 2013, Mother Earth News blogger Ed Essex introduced a homemade hand pump machine, now the WaterBuck Pump, to readers. Since then, the pump has been greatly improved, presently exceeding the peak capacity of a 12-foot diameter windmill by 25 percent, making it ideal for remote communities that need more water from deeper water tables or need an irrigation pump with shallow wells.

In a recent WaterBuck Pump test, a 50-something man of average fitness pumped 17.5 gallons in 1 minute from a static level of 80 feet. These results are minimal compared to what can be done with this machine with one or two stronger men or two to four operators and twin cylinders for irrigation, according to the inventor, Darren Holliday. Now because of the design of this high-volume pump, large communities, small farms and developing countries can have the water they need, he said.

Kresten Jensen, III, general manager of Cook Pump Company, who calculated the WaterBuck’s performance recently, said, “Considering how important the commodity produced by the WaterBuck Pump is to sustaining life on this planet, you have created a very powerful piece of equipment.”

Why Hand Pumps Went to Scrapyards

Because most Americans abandoned hand water pumps more than a generation ago, few today understand how they work or what their limitations are. The pump principle has changed little since its inception, whether for the piston pump invented in 275 BC by Ctesibius, or the rope pump invented in China during the 1st century BC.

Hand pumps were still commonly used in the countryside of the United States and Europe in the 19th century. One pump was usually sufficient to supply water for a family and its livestock. Communities generally took shape around a central well. The people of tiny La Russell, Mo., were so reluctant to give up their community hand pump when progress arrived that they had the new highway paved around it. Residents continue to adorn the old pump with seasonal decorations.

Although hand pumps were scrapped when mechanization and electrification reached rural America, they are still broadly used in Third World countries. Especially where economic resources and fuel sources are sparse, human-powered pumps can significantly improve a water supply system and, consequently, a community’s livelihood.

Hand pump use in the United States is largely for emergency backup, intentionally going off-grid, or even novelty and nostalgia. Meanwhile, in developing nations, human-or animal-powered pumps are vital to survival. Having a manual pump, for instance, significantly increases agricultural yields, provides fast access to drinking water, improves sanitation and empowers women, children and small farmers.

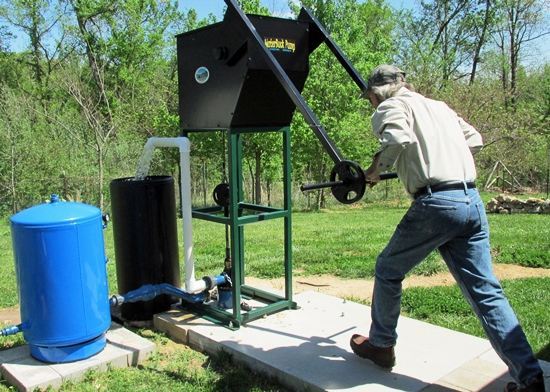
Types of Pumps and Hand Pump Operation

The majority of hand pumps fall into one of two categories: suction pumps (having a cylinder above ground) and lift pumps (having a cylinder below ground).

A suction pump, or pitcher pump, is the type we envision on an old homestead. Repeated strokes of the pump handle gradually “suck” water up the riser main and into the cylinder and out the spout. A suction pump’s operational depth is limited to about 26 feet, according to “Water Lifting Devices” by the United Nations Food and Agriculture Organization.

Piston pumps have their pump cylinder below ground and the water table. Instead of sucking well water out, they lift a column of water upward through the riser main. Each consecutive stroke of the pump handle causes the piston to displace more water up the riser until it flows out the spout.

Theoretically, the depth from which a piston pump can remove water is unlimited. In practice, however, the limit is determined by the power a human can exert on the pump handle and the fabrication and materials of the pump cylinder and rod and piston valves and seals.

There is a hand pump for nearly every need. When selecting a hand pump for your home, consider your average daily household use, static (resting) water level, size of well casing (and liner) and whether the pump will be used only in emergencies or every day.

As recently as 100 years ago, the most important site consideration for homesteaders and villages was whether plenty of good water was within easy reach. When electric power lines and


Some 10 years back, I left the city and set out to build a cabin in the Alaskan wilderness. It was late September before I could actually begin construction of the dwelling, and the rivers were already freezing, so I had to work hard and quick!

Yet — despite the rigorous physical labor — I’d go for days without a bath. At the time I told myself I couldn’t wash because of the cold weather and primitive camp conditions, but now I know that I simply hadn’t yet adjusted to “new” means of keeping clean.

Since then, I’ve spent as much as 26 months at a stretch without even seeing running water, and I’ve very rarely missed my daily bath. I’d like to pass on what I’ve learned about taking a sponge bath to any of you who may be about to quit the city and its conveniences, whether on a permanent or a temporary basis.

Clean With Seven Cups

For those of us who like soap, it makes sense to have the know-how and materials if you need to do this yourself.

I once doubted the word of a friend who told me that he’d been taught to take a complete bath with an army helmet full of water. Now I know he was telling the truth, because I’ve done it myself using a hard hat while fighting forest fires. The fact is, it’s possible to clean every part of your body but your hair — using an ordinary metal wash basin — with only seven cups of water … which is just under half a gallon!

A complete bush-country bathing outfit should include a 15-inch metal basin, washcloth, towel, soap, baking soda, and fingernail brush. It’s best to stay away from enamel basins (they’ll eventually crack, and you’ll ram an enamel chip under your fingernail sooner or later), and steel tubs will rust … in spite of their shiny appearance when new. Aluminum basins, on the other hand, have never failed me. Whatever type of basin you use, however, keep a fingernail brush handy for scrubbing out the dirt film after you bathe.

The real secret of this water-conserving wash method is the elimination of soap from most of the bath. If you really lather up, you face the problem of getting rid of the suds, and — when you’re washing from a small tub — this can be such a chore that you may start to skip baths altogether.

You’ll be better off if you take a bath — without soap — every single day. Simply rub down well with a hot, wet washrag, rinsing the cloth frequently. (You may want to use soap on the hairy parts of the body, but this small amount of suds can usually be rinsed off with a damp rag.)

A Soap-less Shampoo

Hair washing presents a special problem, again because it’s very difficult to rinse off the suds. Leftover soap or shampoo is bound to make your scalp itch, but you can get your “crowning glory” clean — and avoid the “itches” — by using baking soda!

You see, all soaps are made by combining a fat and an alkali (usually lye). Baking soda — itself a mild alkali — seems to react with hair oils to produce its own natural, mild washing product. Under the proper conditions, soda will even create a copious lather.

To wash your hair, put two or three cups of soft water into the basin … (make sure the liquid is as hot as your scalp can stand!). Add two or three tablespoons of baking soda (NOT baking powder), then bend over the basin and soak your scalp. Comb the soda solution through your hair … backward, forward, and sideways. Any dirt will immediately begin to wash out, and — in a short time — will neutralize most of the soda. So after you’ve combed the solution through your hair several times, throw out the first batch of “soda water” and prepare another. Repeat the combing process, then pile your wet hair on top of your head to let the “bicarb shampoo” work while you take your bath, and brush your teeth.

When you “draw” your bath water, add a heaping teaspoon of soda to that liquid, too. Baking soda is a good cleaning and deodorizing agent, and I believe it has a beneficial effect on any kind of skin. (Pregnant women sometimes use it to relieve the itching sensation caused by their bellies’ stretching.) My guess is that the mild alkali combines with skin oil — just as it does with hair oils — to form a natural soap. One thing’s for sure: a soda wash leaves you feeling clean and refreshed.

After your bath, put a new supply of warm water in the basin, dunk your head again, massage your scalp with your finger tips, then comb out the soda water along with the remaining dirt. You’ll have a sweet-smelling, clean head of hair, and there’ll be no leftover soap to make your scalp itch.

The key to a successful baking soda shampoo is soft water, and I’ve found that I get the best results with melted snow. (Rainwater ought to be equally soft, but I think it may be affected by the containers — galvanized metal, especially — that you catch it in.) However, if you want to break away from soaps and shampoos, just try mixing up a baking soda solution using the softest water you’re able to obtain. I can practically guarantee that you’ll be pleased with the results!

Nice, but Unnecessary

There was a time when I felt that a “sponge bath” was something you got in the hospital when you were too sick to make it to the shower. Now that I’ve bathed out of a basin for 10 years, I realize that showers and bathtubs are nothing more than very nice — but also very unnecessary — luxuries.

EDITOR’S NOTE: Whenever you use a new substance on your skin or scalp, make a small patch test to check for any possible allergic reactions.

  Some 10 years back, I left the city and set out to build a cabin in the Alaskan wilderness. It was late September before I could actually begin construction of

Body armor can protect you against a multitude of threats preppers will face, and is well-known for its versatility. Vests are increasingly accessible, and their size and weight are being reduced all the time. This means that protection can be worn comfortably in a variety of situations for extended periods. However, it can be difficult to know exactly how a vest can help you. It is all very well to explain the different levels of protection and the sizes of bullets, but what does this all actually mean? What exactly can a bullet proof vest protect you against?

Guns

The first and most obvious threat a bullet proof vest can protect you against. Of course, bullets come in a variety of shapes and sizes, and vests are available at different levels to correspond to this. This is something that all Preppers need to consider, as firearms are so easily accessible and so deadly. However, after civilization has broken down, firearms will become less and less of a threat as ammunition gets scarcer and the parts begin to deteriorate. While it is important for the short-term to be protected against guns, there are other weapons that you should consider for the long-term.

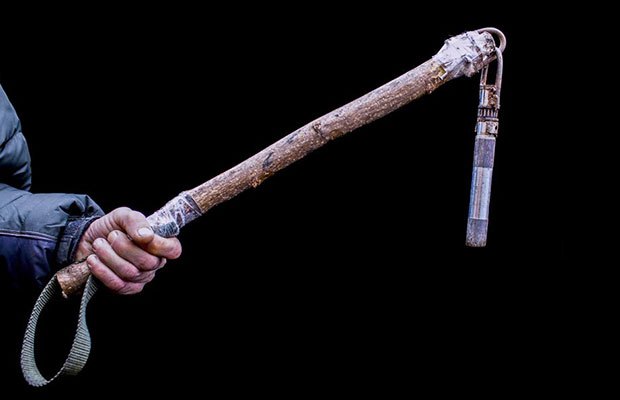
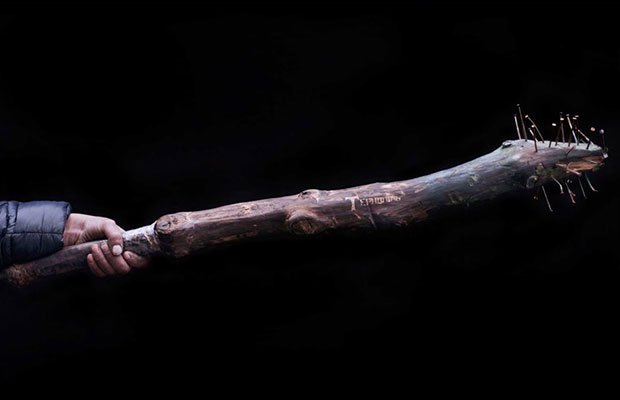
Makeshift weapons like this were created in the violent protests in Ukraine recently.
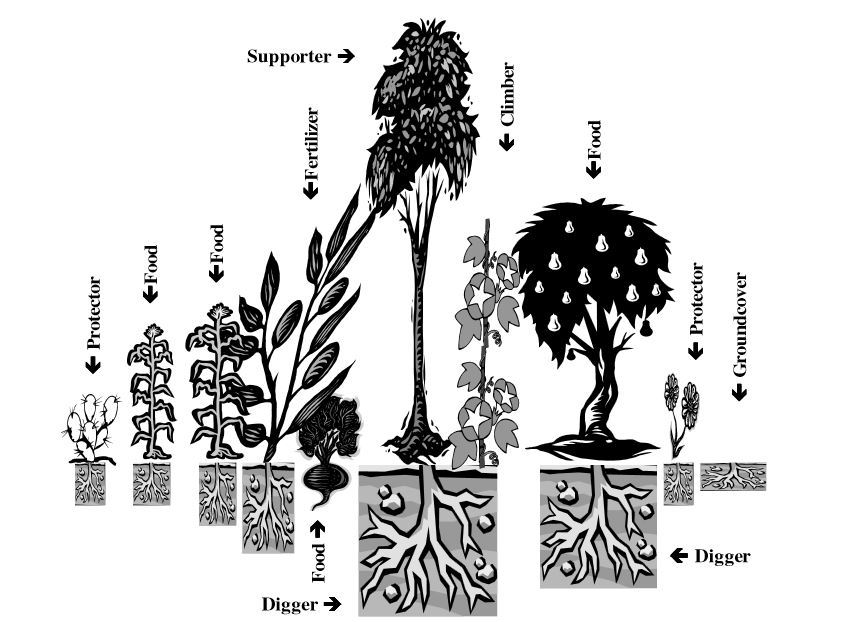
Sharp Objects

Anything with a sharp or spiked edge is potentially deadly, but specific weapons like knives and needles are important to consider. These weapons are already very easy to access, and in an environment where a weapon is needed and guns are no longer a viable option, edged blades will become more and more popular. Bullet proof vests cannot protect you against these weapons; while the materials used are very strong, they will be cut by an edged blade, potentially injuring you. Similarly, spiked weapons can pass through the minute gaps between the fibers. Therefore, it is worth considering a stab and/or spike proof vest, which often comes with ballistic protection as standard.

Crossbows and Bows & Arrows

As an extension of spiked weapons, crossbows and bows & arrows are an exciting weapon that many may try to get their hands on. These have been made more popular thanks to post-apocalyptic media, but are far harder to use than many realize. Nevertheless, it is important to consider a spike proof vest if only for these weapons, which can otherwise cause a great deal of damage.

Rocks

It may sound ridiculous, but these can certainly be used to great effect; consider David and Goliath! In all seriousness however, any projectiles can cause damage, and in a post-societal landscape any injury could prove to be a deadly one, even if it only slows you down and makes you less effective at defending yourself. Fortunately, a bullet proof vest is capable of stopping large amounts of blunt force, keeping you safe against the vast majority of impacts. This means that whether you’re hit by a rock or a car, a bullet proof vest can save your life.

Other People

The most dangerous threat of all, as anyone will tell you. Attacks from people, even without weapons, can cause you great injury and even death. As resources and weapons dwindle, attacks may not decrease, and desperate survivors may attack you with the only thing they have left- their bare hands. Traditional body armor would not serve you well in this situation, as its bulk and weight would make you slow and vulnerable. However, modern bullet proof vests can absorb the energy from impacts, and are light, thin, and flexible enough to keep you on your feet and fighting back.

It is hard to know exactly what threats you will be facing, and therefore what you need your body armor to protect you against. Some of the above examples may seem ridiculous or far-fetched, but explaining them serves two purposes; firstly, it shows the versatility of body armor and just how useful it is to a Prepper. Secondly, it outlines just how many dangers there are out there, even before you factor in the end of the world. Being prepared against a wide range of threats is a little easier with body armor, and is something all Preppers should consider.

Body armor can protect you against a multitude of threats preppers will face, and is well-known for its versatility. Vests are increasingly accessible, and their size and weight are being

If you watch Doomsday Preppers like me you probably saw this episode that showcased two Preppers. The difference for me it was that I have actually heard of two of the preppers on the show. Rick Austin is the author of the Secret Garden of Survival: How to Grow a Camouflaged Food Forest which is an excellent introduction and thought starter on the concepts of Permaculture guilds and how they can be incorporated into the Prepper garden plan. He frequently speaks at conferences and self-reliance expos. Along with Rick was his wife (and this was news to me) Survivor Jane who has her own survival blog, started the #preppertalk hashtag on Twitter and speaks at Prepper Conferences also.

The show spent the first part of their episode focused on Rick’s camouflaged food forest that he has grown on his secluded property in the Appalachian mountains. I was already familiar with the concepts but seeing his home and surrounding lush permaculture garden was interesting and got me thinking about this subject all over again.

The brilliant aspect of this from the standpoint of preppers is that unlike a garden, the camouflaged food forest requires less maintenance, less water, no chemicals and best of all, doesn’t look like a garden. This could be especially helpful if we have some EMP event like Rick and Jane were prepping for. One fear of a massive EMP strike is that there is no longer any power for long periods of time. With this is the potential for vehicles to no longer work, gas pumps and pretty much any other electronic devices unless they are heavily shielded. If this happens, trucks won’t be rolling to deliver food.  Food shortages lead to food riots which lead to people scouring yards looking for food. Gardens will make an easy target in the right season. If your main food source is hidden in what looks like an overgrown patch of plants, you will be more likely to have your secret garden overlooked.

What are Permaculture Guilds?

I found this great article below on the Never Ending Food website that describes the process and concepts nicely. I also recommend getting Rick’s book the Secret Garden of Survival for some great photographs and practical application advice. It is much cheaper on Kindle now. You can also visit Rick’s site and read the first chapter online for free.

Diagram of a permaculture guild.

Permaculture is based on natural systems like those that we see in forests.  In a forest system, there are multiple layers of vegetation growing together in a very diverse setting.  We see many types of trees, shrubs, plants, insects, animals, and various other things all living together in a system that continually strengthens itself.  All of these components of a natural ecosystem serve a function (or several functions) that support each other like the strands of a web.  One strand on its own may be weak, but the combination of all the strands together add to the overall strength and usefulness of the web.In order to mimic these natural systems and to provide for human needs (i.e. food, building supplies, fuel, fibers, etc.) we must learn to identify and work with the various functions of our natural resources.  This is where the concept of the “Permaculture Guild” comes from.  A guild is usually defined as an association of people working toward a common goal.  In Permaculture, a guild is a grouping a plants, animals, insects, and other natural components that also work together to help ensure their survival.  Instead of planting gardens, Permaculture teaches us how to “build guilds”.  Instead of teaching about specific plants, we teach about the plant’s functions.  This is why Permaculture can work throughout the whole world.  It is a guide for design rather than a “how-to” type of agriculture.  (For more information on Permaculture Design, click here.)A good Permaculture guild generally has seven components:

Food for us

When building a guild we need to think about maximizing the health and nutritional benefits that we will be getting from our systems.  In order to eat a diversity of foods we need to plant a diversity of foods.  In Malawi this should be based on our 6 food groups. This means including fruits, vegetables, staples, legumes & nuts, fats, and even animals.  With good planning, we should be able to receive foods from all of the 6 food groups throughout the entire year.

Food for the soil

All plants need nutrients to grow, just like we do.  One of the main nutrients that plants use for growth is call nitrogen.  An easy way to get nitrogen into the soil is by planting legumes (i.e. beans, peas, groundnuts, leguminous trees, etc).  All legumes are considered “nitrogen-fixers” and are able to take nitrogen from the air and convert it to a usable form in the soil.  Using legumes actually helps to ”feed” the plants that they are growing near.  The leaves and other organic matter from legumes may also be added to compost to increase the nitrogen content.   Any organic matter that is added back to the soil will eventually help to act as food for the soil  This includes: leaves, kitchen scraps, market resources, decaying matter, compost, compost tea, mulch, manure, etc.

Diggers/Miners

Deep rooted plants, such as trees, will reach deep into the earth’s soil (like a miner) and bring minerals up to the surface.  These deep rooted plants also act as diggers to break open the soil, make it soft, and allow for air & water to be easily absorbed.  Some diggers also take the form of root crops that can be used as staple foods. Examples of diggers include: cassava, sweet potatoes, yams, Irish potatoes, trees and other deep rooted plants, etc.  Diggers can even be insects and animals that burrow through the soil such as: ants, termites, worms, beetles, mice, etc.

Groundcover

These protect the soil from the sun, help to hold moisture, and help to keep “weeds” (good plants in the wrong place) down. There are many types of groundcovers available in Malawi.  These include: sweet potato vines, pumpkin, cucumbers (minkaka, zinkhananga, fwifwi, etc), and anything else that will vine or spread across the soil.  Mulch is also a form of groundcover.

Climbers

Climbers help to maximize food production, especially in areas where land resources may be scarce or limited.  In most forest sytems you will generally see examples of climbers, because nature uses all of its layers to their fullest potential.  Examples of climbers that you can use in Malawi include: beans, passion fruit (magalagadeya), loofa (chinkupule), air potatoes, cucumbers (zipwete, minkhaka), etc.

Supporters

These are stronger items that support the climbers and make the most of our space.  Supporters can be living things like trees, bushes, stalks such as a maize or sunflower, or they can be non-living things like houses, bathing areas, outdoor toilets,  walls, fences, etc.  The main thing to be careful of is choosing the right supporter for the right climber.  Some climbers are very aggressive and can bring down a fence, or take over a tree.  If you put a passion fruit vine into a mango tree, you may not end up with any mangoes.  This is where thinking ahead and planning become very important.

Protectors

Any thing that helps to protect your guild is a protector.  In terms of protecting your guild from damaging insects, strong smelling plants can be very useful.  Things like onions, chives, spices, lemon grass, and pungent flowers can help to repel insects and even confuse them making it difficult for them to find their food.  Natural predators can also be very helpful in controling the insect problems in a guild.  Beneficial animals and insects such as frogs, birds, lizards, praying mantis, ladybugs, etc should be attracted to the garden with various types of habitat and plants that they prefer.  You can even protect from larger animals like goats and people by using things with thorns or sharp ends.  Some living fences that we have seen are even more effective than the razor wire that many people put along their fences.

If you watch Doomsday Preppers like me you probably saw this episode that showcased two Preppers. The difference for me it was that I have actually heard of two of the


One of the most important aspects of preparedness is the process of establishing a group of people who you can count on when the chips are down.  But what does that mean when the situation comes down to really basic survival, when there will be no power, accessible fuel, food or medicines for the foreseeable future?  What if every stranger you encounter represents a potential or real threat to the safety of your family and/or to your community, whether large or small? What if the tasks of achieving and sustaining security become the collective responsibility of individuals rather than local government?  If that happens, who can you trust?

I have not chosen the word “trust” lightly.  Trust is performance based.  For the most part, it is objective and, therefore, measurable.  Even where it may become subjective in nature (such as an assessment of someone’s character), it will be based upon standards that you have developed over a lifetime.  I may have faith in an individual, but even that term owes its existence to a steady build-up of confidence, like building blocks, which ideally leads to rock-solid trust.  Is such a thing possible?  I think it is, but it requires you to assess individuals in a way that you may have never thought about – at least in the context of survival.  Importantly, it is a process that must begin long before you are confronted with a life threatening crisis.

If you’ve raised any children you already know that every degree of trust that you give to them is based upon the demonstration of prior, as well as continuing, progress in every aspect of their growth, training and development, character and conduct.  So it is with individuals that you choose to stake your survival on.  Stated differently, if desperate circumstances forced you to throw in with a group that you had no prior knowledge of, you would be casting your fate to a far lower standard called “hope;” which can alternately be defined as desperation.

I want to emphasize that effective assessment of survival group participants is really a long-term process.  You have the benefit of knowing your immediate and extended family over a relatively long period, and it affords many opportunities to observe.  In urban settings, neighbors may come and go.  Some may not be very sociable, or you may only get opportunities to learn more about them at infrequent intervals.  That can make it difficult to assess their strengths and weaknesses as potential survival partners.  Don’t rush the process, but don’t neglect the need and value of building a survival support network, either.  The larger your support group is, the better off it will be for you and them.  It should go without saying that you can quietly assess people without disclosing your prepper orientation and objectives.  Final Prepper and its contributing writers have touched on this issue numerous times over the past few years.

If desperate circumstances forced you to throw in with a group that you had no prior knowledge of, you would be casting your fate to a far lower standard called “hope;” which can alternately be defined as desperation.

If you are married, your spouse must take an active role in helping select individuals or other families that will become part of your survival group.    Trust your instincts.  If, after assessing their prospects, either of you has a gut feeling that says “no” it’s best to pass on that individual, even if they demonstrate some aspects of prepping skill.  Your reasoning for accepting someone into your group has to be as rigorous as your rationale for declining someone.

Sources of Support

There are four sources of mutual support that you can potentially draw upon during a temporary or sustained crisis:

  1. Family (nuclear and extended)
  2. Neighbors
  3. Friends
  4. Your local community

You may think that your family members, by virtue of a blood relationship, automatically fit into the “trusted” category for survival purposes.  That could be a fatal assumption (more on that, later).  In similar fashion, just because you enjoy the company of a neighbor for his or her friendliness at a Friday night poker game does not mean that they possess the qualities needed to enhance your survival prospects, or even their own family.

The context that I use for friends is confined to individuals that share long-term common interests and skills as they pertain to survival.  For example, a hunting, fishing or backpacking partner.  In my experience these tend to be deep relationships that stretch over many years.  You may have known that person since childhood or developed a deep friendship and common interests with someone at work.

The concept of “community” might be a bit vague, depending on whether you live in densely populated urban areas or less populated rural settings.  That distinction is important however, and your prospects for developing a successful support system may diverge in very dramatic ways between those two settings.

I’ll come back to these mutual support sources later, but first, let’s examine what I believe are the essential building blocks of trust.  Your list might be longer or shorter, but here are my top five “starter” categories that should get you thinking.

You may think that your family members, by virtue of a blood relationship, automatically fit into the “trusted” category for survival purposes. That could be a fatal assumption.

The Foundations of Trust

  1. Character: The moral and ethical nature of an individual or group. I’m not trying to be moralistic with this category – your principal objective should be centered around avoiding individuals with a demonstrated history of behavior that could endanger your survival.  For example, you might know a neighbor that borrows but never returns, someone with an addiction or other serious behavioral issue. If so, you may justifiably view them as persons who might steal your food, other essential survival supplies, or place you in direct physical danger.  Once you are cooped up with a predator, it’s too late to hear your wife or daughter say that she doesn’t feel safe around him or her.
  1. Conduct: The manner in which a person carries out their activities, assignments, duties or obligations.  Whether at work, in your neighborhood or at family gatherings, you undoubtedly come to know people who are industrious and passionate about their chosen role in life.  It may be a neighboring family that enthusiastically invests countless hours in gardening, an associate that is always trying to find a better way to perform a task, or a relative who overcomes difficulties with dignity and poise.  In contrast, you probably also know people who make a career out of taking shortcuts, exhibit unsafe practices, take unnecessary risks, or never quit seem to complete a task without intervention.  The question is, do you want to surround yourself with achievers, slackers or reckless people when you are in a survival situation?
  1. Judgment: The ability to accurately assess risks, needs and courses of action.  That is, people who demonstrate good analytical skills and sound judgment in the course of their work, a specialized activity or daily living.  In a protracted survival situation, you will be confronted with innumerable challenges, many of which you will have never encountered before.  You will need people around you that are able to think well, both inside and outside of the box and provide good counsel, rather than people who simply react to fear.  Remember this:  Real survival situations mean that your margin for error is far smaller than in ordinary, day-to-day living.  You don’t get to take a Mulligan if your risk analysis is faulty.
  1. Knowledge and Experience: The knowledge and skills that provide someone with the ability to effectively and consistently perform a task. This is an issue of training, experience and, to a degree, physical capability.  It requires that you objectively determine what types of expertise a person possesses.  There is a huge difference between “exposure” and experience.  Assigning the wrong tasks to an individual may bring harm to them or to the entire group.  Since we are talking about trust in the context of survival, this necessarily means that several members of your group should have demonstrable skills in field craft and the effective use of firearms.  Failure to select individuals with vital survival skills will put your group at risk in the long run.  By contrast, selecting only individuals that are skilled in the use of firearms – and nothing else – means that your group is only fit to be a raiding party.  Give me an accountant that was a combat medic and I’ll be happy.  Give me an accountant and a combat medic who each possess additional survival skills, and I’ll be four times as happy.
  1. Capacity: This includes physical ability, stamina, age and health as it pertains to certain tasks. For example, you may have a high trust level in someone’s ability (young or old) to stand watch, even though they are not physically able to dig a well.  He or she may be able to patrol a one-mile security perimeter, but not have the stamina to perform a 20 mile foraging hike in rough terrain.  In other words, someone may have perfectly adequate capacity for certain tasks, while being limited in other areas of need.  A person’s physical limitations should not be an automatic disqualifier, particularly if they can contribute in other important ways to group survival as described in the preceding categories.  In essence, “capacity” is a function of matching knowledge and experience with physical durability under specific circumstances.

These five criteria, and others that you may wish to add, provide the basis for establishing a level of trust about individuals that you may wish to include in your survival group; whether they be family, friends, neighbors or the community at large.  My list comprises more than these five, and includes a shared religious faith in God.  Your list may include other diverse requirements that are perfectly valid for the circumstances that you envision.

I think it is important to say that trust is something that you confer to an individual, rather than to a group.  In other words, the trust that you develop with one person should not automatically extend to his or her associates, particularly if you don’t know them.  Simply stated, you are ultimately responsible for assessing the trustworthiness of every member of a group that you may choose to form an alliance with.

  One of the most important aspects of preparedness is the process of establishing a group of people who you can count on when the chips are down.  But what does


I live in Chicago, the most dangerous city in America.

Not only is it the most dangerous city in America, but it is obnoxiously difficult to get out of even in the best of times. Geographically, it is three-sided (lake Michigan prevents egress to the east) and the only high-speed avenues of approach run North/South. Dismounted movement in any direction is not a viable option, as you would most likely become prey even in a situation where society has not collapsed. Most of the antagonists (see: gang members) in the city are already well armed, and if not well-trained they are nonetheless combat-hardened and more than audacious enough to be a serious threat. To make matters more complicated, I have two children under the age of 7.

I know… why on earth would any preparedness-minded individual choose to live in such an indefensible position? There are many reasons why a family might find themselves in such a survival nightmare, ours is very simple and, unfortunately, equally inexorable: I am in the United States Military and I am stationed here. I won’t go in to what I do here other than it is very routine and far from glamorous, and I am here for a three-year tour.

So hopefully that should put to rest all of the obvious questions. Suffice to say I now understand that there are reasons why NOT living in the city isn’t necessarily a viable option, at least not in the short-term. Not everyone can just uproot to the rural redoubt property, plant some corn and put up a solar array.

I have several combat tours as an Infantryman in the middle east. Through these experiences and the balance of my 20 some odd years in the military, I can easily make the mental leap between what a metropolis like Chicago is today and what it could be after a societal collapse, in fact I have experienced it firsthand in Baghdad circa 2005 or so. In central Iraq, we were not the primary danger to the average Iraqi citizen. Most dangerous to them were the rape gangs, terrorist cells that used murder and extortion to raise funds to fight coalition forces, and regular members of the criminal element present in every place in the world. AQI (Al-Qaeda in Iraq) was the dominant terrorist network that rose out of the ashes of Baghdad in the years following the invasion. They were notorious for their strong-arm tactics to wring funds out of the indigenous population. They kidnapped young girls from families with means to pay ransoms. These girls were subjected to the most unspeakable captivity, raped many times a day, and had little chance of being returned to their families alive, no matter how much those families paid. Citizens were tortured and maimed in order to instill in them enough fear that the terrorists would reliably be provided materiel support and the victims would be far too afraid to speak to us or tell us who they were. Our patrols lasted 12 hours…. The terrorists lived among them and controlled them through fear and intimidation.

I don’t think most preppers realize how hellish the collapse of our society would be. I don’t think most reasonable people can imagine the magnitude of violence that people will readily visit on their neighbor when propelled by ideology, hunger, or sometimes simple profit. Can you imagine living in a place where your wife and your daughters were commodities? Where your sons are either killed or kidnapped or forced to fight for and perform suicidal tasks for evil men? Preppers talk about bugging out, and getting their families to safety… but I’m not sure most realize that the concept of safety is an illusion if you are alone. Much like the United States, Iraq is a large country, and most people lived in cities, but rural areas of Iraq were terrorized just as much as the urban areas. In many places it was more so due to proximity to resources and opportunities for the terrorist networks to conceal their own activities.

A family alone was prey. Nothing more.

I would like to dispel some myths about the way preppers in America think about how we will survive the coming collapse. Here are my top three:

1. I will bug out with my family to our cabin in the woods and we will grow a garden, raise chickens, and wait out the worst effects of the collapse.

Maybe, if you’re lucky…. but if you are alone in the woods you will most likely be found and be raped, killed, and looted. We know that the 240,000,000 plus people who live in our American cities will run out of resources and begin the process of starvation after about 72 hours or so. They are going to go somewhere. The strongest will have already preyed on the weak, sick, and stupid. The ones who find you will be strong, they will be motivated, and they will be ruthless. If they weren’t they would never have survived the urban exodus. They aren’t going to knock on your cabin door in broad daylight. Your chances as a family alone are very low.

Contact! A Tactical Manual for Post Collapse Survival

2. I am safe because I have the 5 best SHTF guns that I saw in a cool online survivalist forum and a zillion rounds.

Congratulations. If you have no or very little training, you’ll be lucky to make it to your first magazine change. Smart bad guys will back off after you shoot at them and simply wait for the opportunity to kill you and take your awesome weapons and free fodder. And they will be smart… or they would be one of the dead dumb ones who didn’t make it out of the city

3. I have enough food and resources to survive indefinitely, and I have a foolproof plan of egress and evasion, and I have thought through all the variables.

I hope you do. Have you done several complete rehearsals of every aspect of your plan? A wise old NCO once told me “don’t expect what you don’t inspect”. You don’t know what you don’t know unless you have run through the plan on the ground to shake out the bugs. It is very likely that there are fatal flaws that could be easily corrected given an honest rehearsal. This rehearsal must include your entire family or group, it must include all the physical movement and labor that the real thing would include. You must use the gear and resources that you would be using were the worst to occur. If you do not regularly train on your plan, then what you have is not a plan… it’s called a theory.

Pulling yourself and your family through is far more about physical conditioning and mental toughness, confidence in your training and in your plan, and good old-fashioned luck. I survived over 500 combat patrols with a single weapon, my issued M4 with a good weapon light, and the seven loaded steel magazines I kept with me on my body armor. I didn’t carry huge knives or tomahawks or pounds and pounds of the newest and coolest “tacticool” useless crap… just a multitool and an expandable baton. Sometimes we were out for 12 hours, sometimes up to 36 hours. The point is that it’s way more about the gear between your ears than the gear hanging off of every molle loop or picatinny rail.

Along with my training and a solid plan, I had my brothers on my left and right. They were my survival community. The truth of the matter is that in order to survive a collapse, we must build communities. In a community we have sentinels on guard 24 hours a day. We have a person on duty monitoring communications equipment to stay in contact with neighboring communities 24 hours a day. Our community has guards that patrol for resources and interdict incursions. In a community there is a division of labor where we can teach our children, grow our food, mend our shoes, and stand watch over our fences simultaneously. In a community we are strong enough to live in peace. Whether that community is our extended family, or a network of like-minded citizens who prepare and TRAIN together, it is precisely hanging together that will keep us from hanging separately.

That’s how the people survived after we destroyed Iraq. They relied on the members of their communities and their tribe, and they rebuilt. If the worst happens, we can learn much from them.

  I live in Chicago, the most dangerous city in America. Not only is it the most dangerous city in America, but it is obnoxiously difficult to get out of even in

Why do you need protection?

If you’re going to prepare for the worst case scenario, a bullet proof vest needs to be part of your plan. When SHTF, personal protection is really your number one priority– even food and water can wait if you’re not safe from the danger of other people.

Aside from getting a weapon to defend yourself, you’ll need something to defend yourself from other weapons. Since smart shooters will be aiming for your torso above all else, this is the first area you want to protect, and the best way to do so is with a body proof vest.

Of course no vest will protect against absolutely every weapon, so you will have some decisions to make. There are tradeoffs between level of ballistic protection and comfort/conceal-ability that need to be considered when choosing a bullet resistant vest. Generally, vests that protect from high caliber rounds are bulky, cumbersome and their presence is obvious. Covert bullet proof vests are far more concealable and comfortable to wear, but don’t provide optimal protection.

What’s the best choice?

So what’s best for a survivalist? In almost all cases, you will want to procure covert, wearable body armor. Wearability and concealability are supremely important. You have no idea how long you’ll need to wear it, so preparing for long periods of time is wisest– there’s no telling when you’ll be safe enough to take it off.

Covert bullet proof vests are worn under clothing and have comfortable linings. Many are made with CoolMAX lining, which is designed to regulate your core temperature by letting excess heat out of the vest. For those who are irritated by synthetic fiber, cotton-based alternatives are also available.

Soft body armor won’t stop rifle rounds but could be useful in many other scenarios.

Concealability is equally important. OPSEC for preppers is a must-know, and avoiding “indicators” — things that signal to people that you’re well prepared — is very important. If people know how well prepared you are, this makes you a clear target. If you’re seen parading around in an overt body proof vest, people will know that you have your act together, and likely have some other useful stuff to take.

For this reason, it’s recommended that you don’t get anything higher than level IIIa– upwards of that level, you’re getting into ceramic plates which can’t be concealed. One thing to consider is that the lower the level, the easier it is to conceal. Level IIIa soft armor may still “print”, or show its outline underneath clothing.

Of course sacrificing bulk also sacrifices protection. Level IIIa will protect against most common weapons and also minimize blunt force trauma, an often overlooked benefit. If you go lower than that, you’ll have some vulnerabilities, but on the other hand you’ll be more stealthy.

Heavy Weapons and Blades

The only other thing to consider is the possibility of heavy weaponry. As you may already know, getting to know your neighborhood is a very important factor in planning. If it looks like you might actually be threatened by heavy weapons, get some small arms protective insert (SAPI) plates and store them in a safe place. Only put them on when you need them– no need to go traipsing around with an extra 15 pounds of weight for no reason.

Also consider getting vests rated for stab and spike protection. Blades and points are different than bullets, and bullet proof only vests will not protect against them. Overall, it’s key to know that no body armor will protect against everything. The best defense is preparation and staying calm in the face of danger. Even then, having the right bullet proof vest may save your life.

Why do you need protection? If you’re going to prepare for the worst case scenario, a bullet proof vest needs to be part of your plan. When SHTF, personal protection is

If you are reading this article, I would imagine that you have never eaten an MRE before. Why do I say that? Well, for anyone who has eaten MREs you probably already have a strong opinion about them or at the very least, your experience might be based upon military service years ago. I had eaten more than my fair share of MREs when I was in the Army, but things have changed as you would expect with the passage of more years than I want to think about so I decided to take them up on the offer and while I was at it, share my opinion on what if any place MREs have in the food storage plan for preppers.

My military experience was let’s just say in the last century and MREs have gone through some pretty decent changes and updates since the time I was chowing down. For those who don’t know what an MRE is, the Acronym stands for Meal Ready to Eat and this is what is given to our soldiers when they aren’t near a mess hall. When I was in the field we would usually get an MRE for lunch. Breakfast and dinners would be a hot meal, or it started out as hot when we crowded around the mess tent or the insulated containers they drove out to us on the back of a jeep. By the time you got somewhere to eat your meal it was usually cold. We would only go to the field in the winter time naturally.

MREs at the time were pretty much like they are now, but the menus have improved and some minor details have made this meal in a bag much more palatable if you can believe that. I served before they had things like M&M’s or skittles for dessert and hot sauce to flavor your food. We also didn’t have a built-in heater like they do now. If you wanted your MRE warm you were limited only by your creativity. MRE food packets are foil so they are both waterproof and allow you to heat them on almost anything. We would use the heater vents in our trucks, lay them on our stoves in the tent or on the block of our engines.

MREs come in boxes of 12 and each MRE is a different meal. You quickly learn which meals you like and which ones you don’t. If you were unfortunate enough to be the last one to the box you got what everyone else passed over. When I was in the service I think the worst meal was the beef patty. There are some similarities between the meals. They all come with an entrée, some side and a dessert. You get crackers and peanut butter or cheese, a condiment packet and usually a drink mix. We would even come up with our own names for meals that displayed our disdain for the contents. One meal, Meatballs with barbecue sauce was affectionately called ‘Meat nuts with Barf A Shoe’ sauce by myself and the guys in my unit. I am sure there are millions of other creative renames. I actually liked that MRE and I think it was pretty much my go-to meal as long as I could beat everyone to the box.

I opened up a box looking for some differences in the contents on the bag and searching for my old favorites because I was definitely getting the best MRE and I wouldn’t be stuck with the Beef patty. I was surprised at the options. For starters we didn’t have anything vegetarian when I was in the service, but this box had Vegetarian Ratatouille, Vegetarian Lasagna and Apple Maple Rolled Oats. Breakfast?? They also had the old standbys of Pork Sausage Patty and it looked like my Meatballs with Barbecue sauce was changed to Meatballs in Marinara sauce. That is what I decided to taste first.

What do MREs taste like?

Before I get into what the MREs from Meal Kit Supply tasted like, I wanted to set expectations here. When you tear open a bag like this, you aren’t getting fresh ingredients from the garden prepared by a classically trained French chef. You are getting food that was designed for the military to pack enough calories in there to keep them alive, be waterproof, tolerate being mistreated and last for 5 years sitting in a warehouse most likely. If you are expecting Ruth’s Chris here or maybe even Golden Corral, you might be in for a surprise.

Everything in the bag.

I opened my MRE and noticed that everything was still pretty much the same. You have food in foil packets although my packets weren’t in separate boxes. They did include the nutritional insert though and I never understood why they had the extra boxes anyway. Another thing we didn’t have when I was in was the handy ration heater. The ration heater is activated by placing a little water in a bag. The water mixes with an element and causes a chemical reaction that generates heat. You wrap your entrée in the bag,  and in 10 minutes you are supposed to have a hot meal. It didn’t work that way for me.

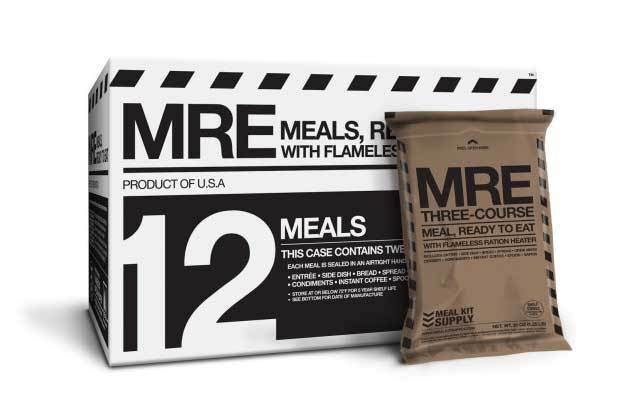
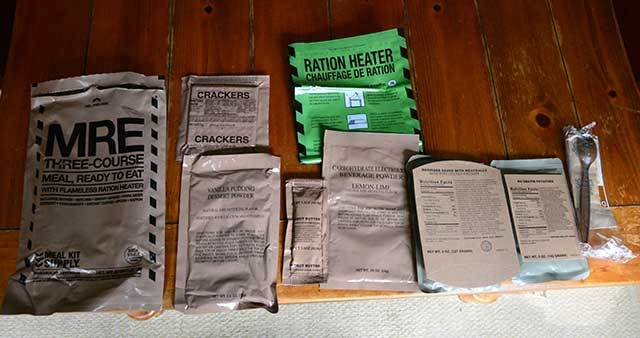
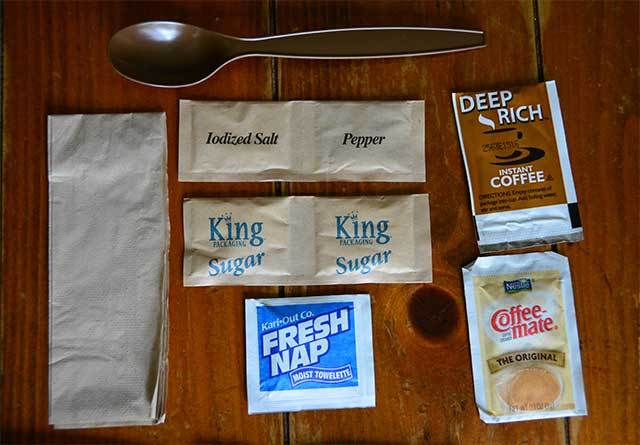
Everything you need plus a big long spoon to reach the bottom of the bag.

I followed the instructions or so I thought but my heater didn’t warm up. I waited the 10 minutes but finally decided to eat my meatballs cold. They weren’t bad at all, but I know they would have been so much better warm. My survival dog certainly loved the taste too when I gave her one of the small meatballs to taste. When I finished eating, I noticed that the warmer was finally getting warm so I placed my Au gratin potatoes in there. Yes, they had Au gratin potatoes and although they didn’t have the slightly burnt edges from being in the oven but they were cheesy and filling. They only needed a little salt and pepper to doctor them up. The heater worked just fine after-all.

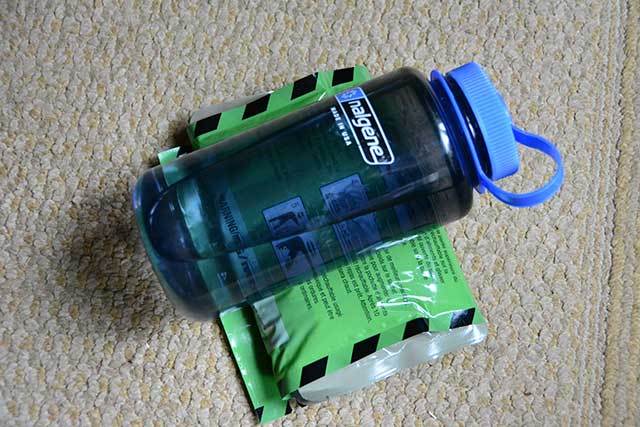
The Ration Heater instructions say that it works best if you place a heavy object on the packet.

So far so good. I broke out the crackers; literally because they came apart in my hands. This wasn’t the fault of the manufacturer I don’t think. I was just clumsy. Regardless, once I had my peanut butter on them they were great. I finished up with the dessert, Vanilla pudding which to prepare you needed to mix a little water in the bag and shake the bag for 60 seconds before it was ready. This was definitely good!

How do MRE’s fit into a Prepper Plan?

Any prepper plan has to take into consideration what food options will be best in various situations. Usually we recommend different types of food for different scenarios. If the power goes out you look for food that doesn’t need to be cooked. Canned tuna, MRE’s and snack bars fall into this category of course so do a lot of other foods. You want to store foods that your family will eat but there is also a need to have long-term storable food that you can take with you in a bug out bag. Frequently I will recommend freeze-dried foods for bug out bags, but those do require some preparation. For starters they need hot water or else you are eating rocks. MREs do not need water (except the pudding) and you don’t even need to heat them up.

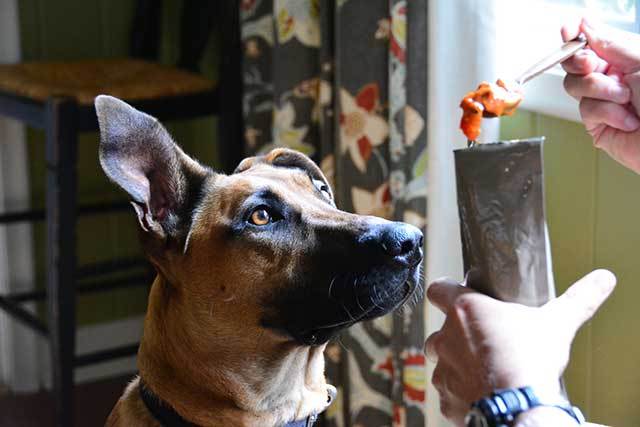
My dog was a big fan of the Meatballs.
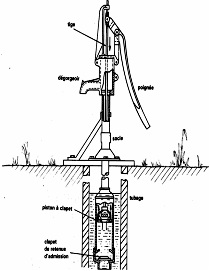
There are some weight considerations in that MREs weigh more than freeze dried food but they do have their advantages. I have a few boxes stored as part of my food storage plan because they are an easy way to get the calories you need for survival. I also have food stored in buckets, canned food and freeze-dried food. I am an equal opportunity food storage person and there is something to be said for having variety. Are MREs the the best prepper food? I don’t think there is ever a single best food for all prepper situations, but MREs are proven reliable. If our military uses them you can bet that you could find reasons to use them too. They are more expensive than other options but you don’t have to prepare anything, they even throw in the salt, pepper and a little moist towelette to wipe your face and hands when you are done. They used to come with toilet paper and chewing gum but apparently that is not part of these MREs.

You can get a box of 12 MRE’s yourself and try them out or just place them aside for an emergency. MRE’s are another good food option that will store for a long time and could save your life.

If you are reading this article, I would imagine that you have never eaten an MRE before. Why do I say that? Well, for anyone who has eaten MREs you