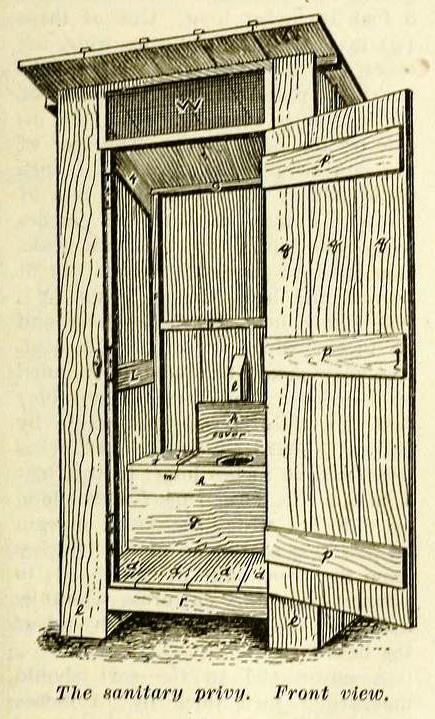
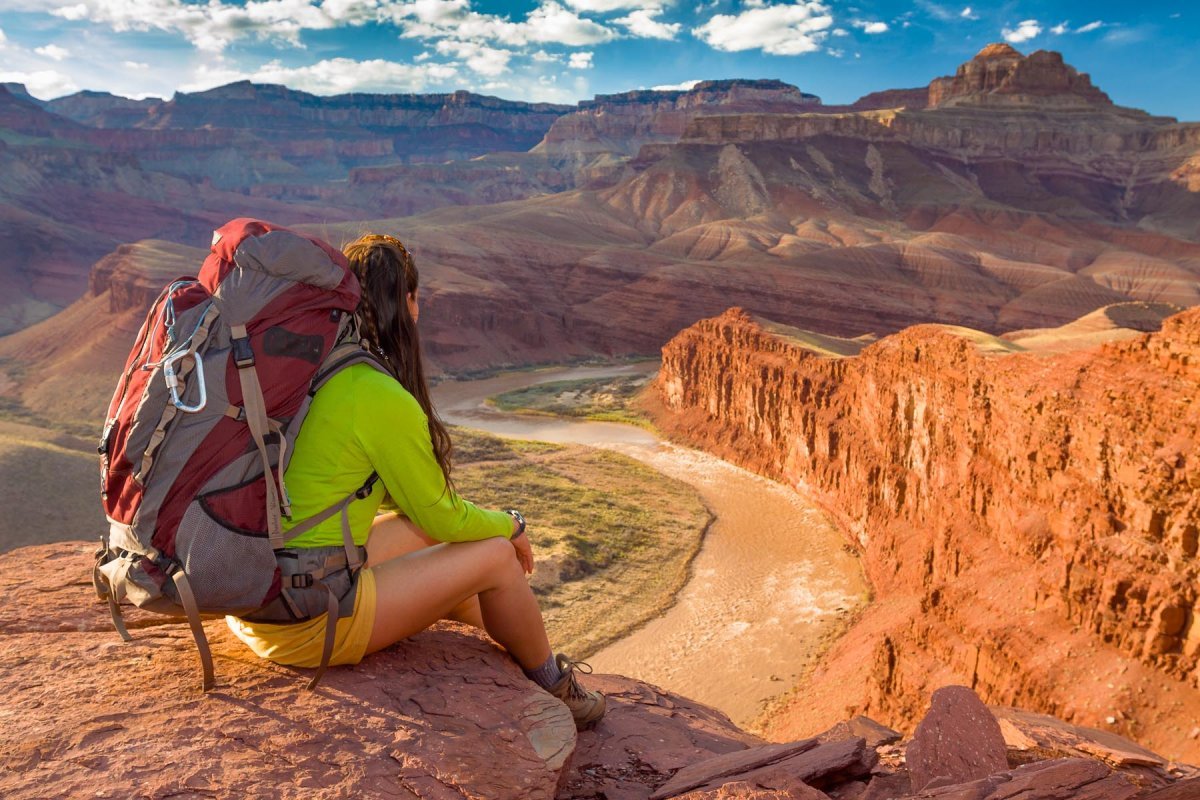
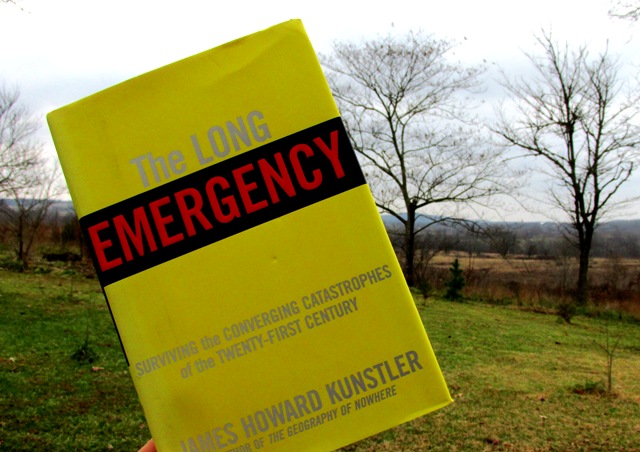
Home2018 (Page 5)

The world of Survival and Prepping Bloggers is pretty diverse. There are those who will say that they are only talking intelligently about preparing without any of the fear as if fear somehow makes prepping less relevant.

There are those who are on the opposite of the spectrum and almost daily warn of impending doom around every corner. In our broad sphere of influence you have Preppers, Survivalists, Homesteaders, Back to the Land types, current and ex-military, Off-Grid, Anti-government, Sustainable living, farmers, militia and all other points in between.

The largest majority in my experience are just regular folks who don’t want to be caught off guard if some emergency happens. Like the Prepper versus Survivalist argument, there are a lot of sides to any one topic.

With each of those sides come opinions and you know what they say about opinions.


When it comes to opinions I have more than my fair share and right or wrong they are what guide me on just about every decision.

My opinion from time to time has gotten me in trouble with some who read this blog and as long as the conversation stays civil, which I think it always has, that is perfectly fine to me. Now, I would like to think I am wise enough to realize when my opinion is wrong and be mature enough to change my mind. This to me makes perfect sense. If you learn something that wasn’t known to you before that completely alters your understanding and yet you refuse to change your beliefs out of stubborn pride then you deserve whatever you get.

Opinions in my opinion aren’t hard and fast rules. Opinions can change over time.

Speaking of opinions, there are some people in the Prepper community that absolutely abhor guns. They may each have their reasons, but usually they are convinced that a gun is not necessary for protection or survival. I had a reader send me in this question:

Does it even make sense to Prep extensively with intentions of NOT including firearm(s)? Why would someone Prep just to have it all taken away by somebody with nothing but a gun? I thought this might enlighten some of those who Prep but are dead set against owning a weapon of any kind.

I think this is a great question and there are really only two main opinions when it comes to guns. You either like them or you don’t. Maybe like isn’t the right word. You either appreciate what they are useful at doing or you don’t.


Digging Deeper

I wanted to try and come up with all the reasons I could think of for why anyone would not want to have guns in a survival situation. I came up with a few reasons, but maybe you have more I didn’t think of.

  • Their Religion forbids owning guns
  • History of bad experiences
  • Philosophically opposed to killing even to protect life
  • Scared of guns
  • Believe guns are better in the hands of police/military

I am sure there are a myriad of other reasons, but for this article I’ll start with these. For the sake of argument, I will even say that all of these are valid reasons for not wanting to purchase a weapon for defense.

Getting back to the question; does it make sense to prepare if you aren’t checking the box on the firearm box? I think this depends greatly on a lot of factors.

What are you Prepping for?

Prepping is not something you can ever accomplish. To me, Prepping is a way of living in a way that will keep you as safe and self-sufficient as possible no matter what emergency or crisis comes your way. You could also say that Prepping is about becoming self sufficient in a way. You could be prepping for an earthquake or a Tornado, a Hurricane or even a broken down vehicle. Each of these normal events has a relatively short time period, but the devastation from some of these natural phenomenon can last years. If you lose your home to a hurricane you might literally not have a home to call your own for over a year.

For these events, safety from others is not normally your focus in the short term, but I can point to virtually any natural disaster and show examples of looting and robbery. Eventually safety does become an issue whenever there is a crisis even if it was caused by Mother Nature.

Others are prepping for man-made events like war, home invasions, economic collapse or riots where the rule of law is out the window. In an event like this it’s every man/woman for themselves. In this type of event safety is no less an issue, but what makes this worse is that you don’t have relief workers spending their summer vacations passing out water. You don’t have power company trucks from other states rolling in. You could very well be alone with no one but your family and neighbors for safety.

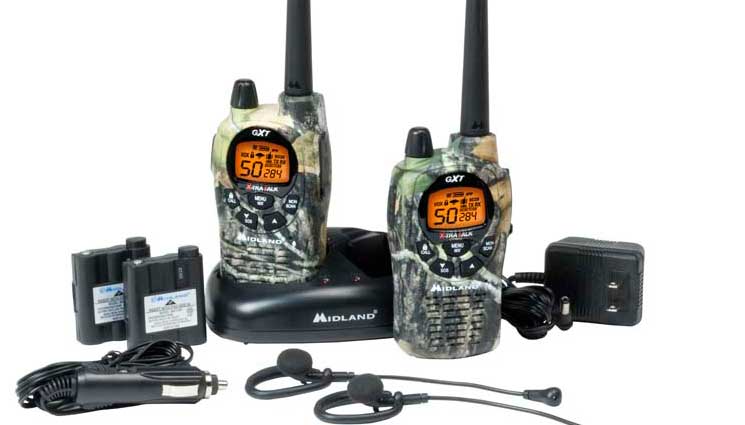
What do you want to have by your side in the middle of the night?

Where do you live?

Now even if we do have the worst case scenario, global catastrophe, or plague known to man there will be people who aren’t as affected as others. If you are living in downtown New York, regardless of the issue you will have a lot of other people to contend with. If you live out in the plains of eastern Kansas, I imagine there will be a lot fewer people to deal with and worry about. Does that mean you have nothing to worry about though?

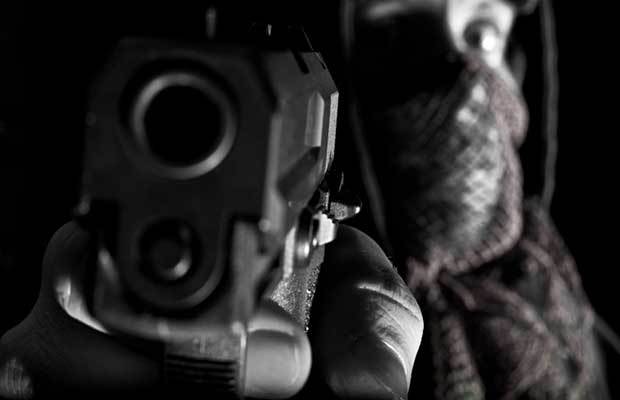
To anyone who has read this blog for any length of time, it is probably painfully clear that I have and advocate the responsible use of firearms by legal adults. Firearms serve a purpose for me and that is almost singularly around protection of my family. I have weapons that are solely for hunting but in a pinch they can be used for defense too. I live in what I would call a small town. Not one stop light small, but small enough I think. We do not have the same problems as those in New York, but we certainly don’t have the breathing room that they do in Kansas either.


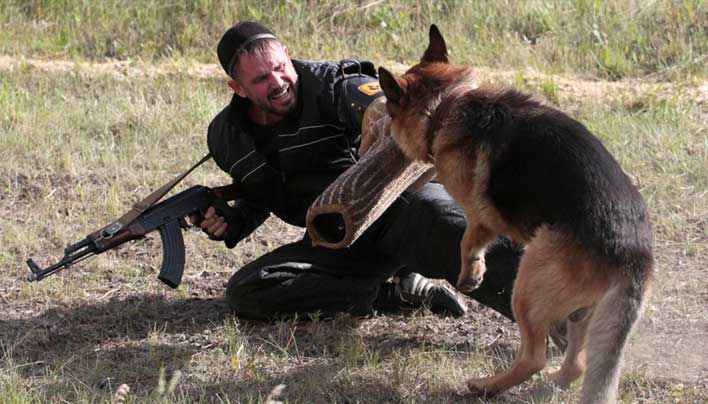
As I have said on multiple occasions, I believe that a means of defending yourself is one of the key items you need to account for if you are prepping for almost anything. Your very life could depend on the choices you make or the situations you find yourself in and in my opinion, planning to survive without considering the dark side of humanity is a failure to plan for one of the most likely scenarios.

Is purchasing a gun your only option? No, I guess you could have a baseball bat, or a cross-bow or a hockey stick.
You have to ask yourself, how well protected will you feel with your choice? I don’t want to look into the eyes of someone intent on killing me as I grip a golf club.
I want to have the most effective means I can purchase for defending my family and our home. I have settled on firearms because to me that makes the most sense.


If you are planning to survive catastrophe, but don’t expect the darker side of humanity to ever be a threat to you or your family I would urge you to reconsider.
For me having a gun and never needing to use it would be far superior to not having a gun and losing my family to someone who did.
Does simply having a gun guarantee the bad guys won’t come knocking?

Hardly.


Does me having a rifle mean I will be able to defend my home against any and all threats? No, but it does give me a fighting chance at surviving and protecting my family. Isn’t that what you are prepping for after all?


The world of Survival and Prepping Bloggers is pretty diverse. There are those who will say that they are only talking intelligently about preparing without any of the fear as

If your community gets hit by a disaster, like a hurricane, flood, radiological release, or even an earthquake, how would you and your family fare? Would you join the masses who are left unprepared for such an eventuality? Or, do you have the supplies and knowledge that would allow for you to survive? Has your pantry been carefully stocked? Do you have a plan for retrieving and purifying water? Do you have an energy source? In other words, are you prepared? Let’s take a quick peek at some of the things that you can do to ensure that when something happens, you will be ready for it.

Getting Power

Yes, you can have a generator for an energy supply, but how long will that last and how much gas will you need? What if the power will be out for an extended period of time?

Solar Panel Starter Kit 400W

Another option, and one that is much lower maintenance, is to get one of the home solar kits that are available. These kits have everything that you will need to turn your solar dreams into an actuality. You can even use these to power your home when there isn’t a disaster. What a great way to reduce your carbon footprint and save money on your energy bills! When the power goes out for everyone else, your lights won’t even flicker.

Location Matters

If you are a prepper, you will know that where your home is located is of utmost importance. You might want one that is off the grid and will be away from the chaos should there ever be a disaster. So, what should you consider when you are looking for the best prepper property? One thing to consider is access. You will want to find property that is remote, yet can still be accessed with relative ease. You will also need to have access to a water supply that is sustainable and one that has enough storage space for all of your supplies. Security is also a concern. If you are the all-out sort of prepper, you will also want to make sure that the soil will be good for planting crops. Find a place with all of these things and you will have found the ultimate prepper hideaway.

Emergency Kits

Small First Aid Kit 100 Piece: Car, Home, Survival

Another great prepper tip is that even if you have the ideal prepper property, you will want to make sure that you have a 72-hour emergency kit. This is also sometimes called a ‘bug out bag’. It can be critical to your survival. These short-term kits will make sure that you are able to be self – sufficient for as much as three days. You might build this kit yourself or buy one that has already been made. Some of the things that should be in it include, but are not limited to:

Have a Plan

You might have all of the gear in place. You might have all of the food and medical supplies in place. You might have everything ready in the event of a disaster. What is the plan, though? Having a plan will help you to do a couple of things. The first thing that it will do is make you consider the current state you are in and what your responsibilities are. The second thing that having a plan will do for you is that it will give you a checklist that can be used to purchase the necessary supplies or to plan on the amounts of things that you will need to have on hand and how many people you are preparing for. All of this is what you will need to know if you truly want to be ready to take on whatever the world can throw at you.

You will also need to have a way to communicate with the world. This might be a two-way or short wave radio or cell phones.

Also, when it comes to plans, make sure that everyone in your family knows the plan and that you have drills to ensure that everyone knows their part in the plan. This will ensure that if there is a disaster, your plan will go off without a hitch.

If your community gets hit by a disaster, like a hurricane, flood, radiological release, or even an earthquake, how would you and your family fare? Would you join the masses

We all know about the dangerous side effects of over-the-counter and prescription painkillers. But when your head is pounding, it’s hard not to reach for the bottle of pills in your cabinet. We all experience pain every once in a while, whether it’s from a migraine, sore muscles or swollen joints. But instead of stocking up on painkillers, you might be able to find a natural painkiller in your own backyard!

Wild lettuce (Lactuca virosa) has been used for centuries as a natural painkiller and sedative. It looks similar to a cross between a dandelion and a thistle. Back in the day, many referred to it as the “poor man’s opium.” It contains a resinous milky sap which releases a small amount of pain-relieving opiates. When this substance is collected and dried, it’s known as lactucarium.

The main active compounds in lactucarium are lactucopicrin, lactucin and lactucopicrin. These compounds have been found to possess analgesic activity, along with sedative activity. Researchers have found that this “opium lettuce” was a well-known painkiller even before the Victorian Period. If you want a natural way to help reduce pain, wild lettuce might be able to help.

Here’s what you can use it for:

1. Insomnia

Thanks to its powerful sedative effects, wild lettuce can be used to treat insomnia and other sleep problems. It has a mild sedative effect on the body which works to calm anxiety and promote sleep. Wild lettuce calms and relaxes the body.

2. Anxiety

Wild lettuce is believed to slightly inhibit the function of the nervous system. This makes it a natural remedy for stress and anxiety. It provides a calming effect on the body and mind.


3. Pain

Wild lettuce can be used as a natural pain remedy for sore muscles and joints. It’s calming, relaxing and pain relieving effects match those of over-the-counter painkillers, without the dangerous side effects.

4. Asthma And Coughs

Wild lettuce can be used as a natural treatment for asthma and coughs. The powerful herb helps reduce irritation of the bronchial tubes and lugs. It’s also able to loosen mucus and difficulty breathing associated with asthma.

5. Migraines

Migraines can be extremely debilitating. Sometimes medication can’t even help relieve the pain. Wild lettuce can be used as a natural remedy for headaches and migraines. It relieves pain while calming the nervous system to reduce the anxiety associated with migraines.

How To Use Wild Lettuce

Wild lettuce has a naturally bitter taste. But if you make it into a tea and mix in a little honey, you can enjoy its many health benefits. You can look for it in your own backyard or in health food stores. To make wild lettuce tea, pour a cup of boiling water onto 1-2 teaspoons of wild lettuce. Let it steep for 10-15 minutes then drink! Add some honey for a sweeter taste.

Watch the video below for more information about wild lettuce extract:

We all know about the dangerous side effects of over-the-counter and prescription painkillers. But when your head is pounding, it’s hard not to reach for the bottle of pills in

Outhouse from the rear

Besides taking for granted how simply water normally arrives into our homes, sometimes we also fail to consider how easily we can discharge waste-water.  Looking through one of my favorite old books the other night, I was reminded of how easy most of us have it today.

The 1909 book, “Household Discoveries and Mrs. Curtis’s Cook Book,” includes detailed plans for building a privy, which is quite useful ― right down to the size of boards and hardware required.

“It is believed that any 14-year-old schoolboy of average intelligence and mechanical ingenuity can, by following these plans, build a sanitary privy for his home” at an expense of $5 to $10 per receptacle, according to locality, the book states.

The plans could be adjusted so that instead of one seat, it may have two, three, four or five seats, etc., according to necessity. A pretty lattice covered with flowers or vines will add to the privacy of the privy ― at least outside it may be private. Also, for those with more “elegant taste,” an elaborate, and more expensive, structure can be built with a peaked roof instead of the standard single slant.

What really caught my attention, though, was the additional information about cleaning the privy and ensuring a clean water supply for the home and gardens. Unlike the open-pit outhouses I remember as a child, these plans call for a bucket under each seat, which should be deep enough so the user is not splashed. It also must fit snugly to keep out vermin and insects.

But here is where the fun comes in: “The frequency of cleaning the receptacle depends upon (a) the size of the tub; (b) the number of persons using the privy; and (c) the weather. In general, it is best to clean it about once a week in winter and twice a week in summer.


Privy Bucket Rotation

Outhouse from the front

“An excellent plan is to have a double set of pails or tubs for each privy. Suppose the outhouse is to be cleaned every Saturday: Then pail No. 1 is taken out (say January 1), covered and set aside until the following Saturday; pail No. 2 is placed in the box for use; on January 8 pail No. 1 is emptied and put back in the box for use while pail No. 2 is taken out, covered, and set aside for a week (namely, January 15); and so on throughout the year.

“The object of this plan is to give an extra-long time for the germs to be killed by fermentation or by the action of the disinfectant before the pail is emptied. Each time the receptacle is emptied, it is best to sprinkle into it a layer of top soil about 1/4 to 1/2 inch deep before putting it back.

How to build an outhouse in the South

Waste Disposal

“For the present, until certain very thorough investigations are made in regard to the length of time that the eggs of parasites and the spores of certain other germs may live, it is undoubtedly best to burn or boil all excreta; where this is not feasible, it is best to bury all human discharges at least 300 feet away and downhill from any water supply (as the well, spring, etc.).

“Many farmers insist upon using the fresh night soil (the bucket contents) as a fertilizer. In warm climates, this is attended with considerable danger, and if it is so utilized, it should never be used upon any field upon which vegetables are grown which are eaten uncooked; further, it should be promptly plowed under.

“In our present lack of knowledge as to the length of time that various germs may live, the use of fresh, un-boiled night soil as a fertilizer is false economy which may result in the loss of human life.”

Flies carry disease

The book further advises that a box of topsoil or lime can be left in the outhouse to sprinkle on top of the excreta to control flies. However, as a rule, people are almost always messy and fail to cover the excreta completely. “The lime is not used with sufficient frequency or liberally to keep insects away, as is shown by the fact that flies carry the lime to the house and deposit it on the food.”

With that said, I promise to never gripe again about cleaning the bathroom.

This book is available for free online at Open Library.org.  The section with privy plans begins on page 122, including drawings, measurements and parts lists.  We can’t promise the privy can be built for $5 or $10 though!

Outhouse from the rear Besides taking for granted how simply water normally arrives into our homes, sometimes we also fail to consider how easily we can discharge waste-water.  Looking through one

There are two recurring themes we have in prepping and survival blogs around preparing for disasters of any type. The first is the need to practice any plans you have well before the actual need should arise. This is similar to practicing a fire drill with your children so they will have experience going through the motions and the event will hopefully be more successfully executed because of this training should a real fire break out in your home. Practicing anything you are planning to do when under stress is going to make you better at that task when you are faced with a real scenario. Examples for prepping are to turn off the power for a weekend and live like the grid has gone down. Another theme we discuss regularly is the process and plans for Bugging Out.

Bugging Out simply means leaving the area you are in to move to an area that is safer. It could be safer from a chemical spill, impending flood waters or violence caused by looting. There are as many reasons why you could conceivably want to or have to leave your home as there are for staying. Bugging Out isn’t limited to your home either because you could be anywhere when a disaster strikes and still need to move quickly to a safer location.

Bug Out bags are designed for us to be able to quickly grab enough supplies for each person in your group to live for a minimum of 72 hours at least according to FEMA and although we would like to think we could drive our survival vehicle out of the ruins and wreckage, staying just a car length ahead of the big cloud of disaster rolling swiftly behind us (cue the summer disaster movie music) reality tells us that in times of major crisis, roads quickly become overwhelmed and traffic makes getting out by car at a certain point impossible. Bugging Out on foot is a better plan that will cover the contingencies if travel by vehicle is out of the question.

So, how can you practice bugging out with all of the gear you would actually need to survive for 72 hours or more with only what you can carry and not look like a weirdo? Backpacking into the woods is the best way I can think of to practice bugging out and I have composed a list of 10 ways your first backpacking trip will better prepare you for bugging out below. By practicing an actual bug out for three days in the wilderness you will learn so much that will better prepare you if you really ever have to Bug Out.

A lot of people plan to simply walk into the woods if the grid goes down. I won’t debate the merits of that approach in this article, but I have written on the subject before. All that is fine and well, but you may actually have to leave your home with a pack. If that is your plan, here is your chance to take what you have assembled and do just that. I can almost guarantee that you will learn lessons if you do that now that will change how you really bug out in a potential disaster. I took my family into the woods a few years ago and we have since been back a few times. Here are some of the things I learned from that experience.

1. – Find out what works and what doesn’t. – This is one of the big advantages in my opinion of practicing your bug out plans in this way. When I started building my bug out bag, I had a big list of items I needed and once I had them all, they were crammed into my military surplus bag. After walking around for a while with about 70 pounds of gear I quickly decided that I needed to drop a lot of weight from my bug out bag and that while the military surplus Alice pack was nice, it wasn’t the most comfortable thing in the world. Also, carrying that bag might make me a target a little more than someone who was just hiking with a regular bag in that someone might think I had a lot of supplies in there (prepper) instead of just some sweaty socks and camping gear. I also learned that in general I just had too much stuff. We packed too much food, that was too heavy and our clothing options were more than we needed. Lastly, I found a lighter water filter and all those things combined shaved a lot of weight off my pack and my shoulders.

2. – Live Simply – Piggybacking on the item above, backpacking should give you a great excuse to live simply and to ignore all the extra clutter in our lives. What do I mean by clutter? I have seen a lot of bug out checklists that have so many extra things included that are ridiculous. Kindles or e-readers, coffee presses and a lot of unnecessary creature comforts. In this exercise, bugging out will be to save your life and your bug out bag should be packed with items that will help you live. It should not be packed with small inflatable boats unless your plan is to escape by water, camp chairs and portable fans. Keeping your bag to the essentials will make carrying it much easier. You will also find that you don’t need or even much use some of the extra stuff you brought. Instead of bringing a whole set of cookware and utensils, a simple pot and spoon might be all you really need.

3. – Learn how to use the bathroom outdoors – This might sound silly, but unless you have gone number 2 in the woods then this is something fun to learn. How hard can it be you ask? It’s just squatting, right? Well, maybe it is, but it wasn’t as simple as sitting on the throne for me. I got it done of course, but in the beginning it was awkward and took a little finagling to get right. Just like anything else, practice makes perfect.

4. -Discover wild water – Probably the single heaviest item you can have in your bug out bag is water and we should all know that we need at least a liter per day for optimum health, more if you are in hot climates or exerting yourself and even more for regular hygiene. Carrying a bag on your bag through the woods will exert you but in order to meet the requirements of 72 hours, you do not want to carry three giant bottles of water with you. Learning how to filter your water and of course finding sources of water is going to be the best long term strategy for bugging out. My kids were amazed when I broke out the water filter and in no time had all of our Nalgene bottles filled with clean fresh water out of the river. I swear it tasted better than anything in a plastic bottle from the store or our tap and they all know how to filter their own water now if they need to.

5. – Discover how everyone in your group reacts – One of my initial concerns with my family was how they would react to the wilderness and carrying their bags for three days so I tried to pay special attention to the weight they had and how they were faring on our hikes to new campsites. To my surprise, they all did amazingly well but that might not be the case with your family. By finding out who hates this whole exercise right now, you could save yourself some headache later when just going back to the car isn’t an option.

6. – Find friends with common interests – Once you start backpacking you will invariably meet friends who are also into this hobby. They may share common ideas about being prepared or at the least common interests and skills that might be helpful to your group should we all need to walk into the woods. If nothing else, you may have another source for gear advice should you need it and experienced friends who also like to backpack can share their observations and lessons learned with you on various locations, routes and strategies that could improve your bug out plans. Even if you meet people along the journey, you can learn from them. We only ran into 2 other people the entire weekend we were out, but they all had hammocks instead of tents and sleeping bags so that was something I started investigating.

Learn what to carry and how to cook outdoors.

7. – Increase your options – Simply being able to live for three days in the woods or a field or anywhere outside of a house or hotel is going to give you options if you are forced to leave your home. The more you experience living outside and traveling over distances with your house on your back, the more you will see options where before there was only dread. Leaving home with a pack won’t be as daunting once you have done it a few times for fun regardless of the scenario. The scenario might be bad, but the thought of sleeping in the woods won’t.

8. – Adapt and reuse – One of the best ways to simplify your backpack or bug out bag and to reduce weight is to use items for more than one purpose or to reuse items for something different. One simple example is to have the water filter so you can refill water along your route or at your site as opposed to hiking it in. Clothing is another area that can be viewed in this way. On our trips, I would have one set of pants, not three but these are convertible so I can make them shorts if needed. One fleece, a hat, gloves spare underwear and thermals. The clothing lists changes with the seasons. You don’t need a change of clothes for every day. If the weather or your climate is relatively warm, a tarp will double as a shelter and weighs a lot less than a tent. It takes up much less room too. Paracord can be used as well as duct tape for a million uses.

9. – Set new goals – After our experience in the woods, I wanted to go on longer hikes to have a greater challenge of both navigating terrain and planning a longer stay in the woods. Successes make you strive for new goals, but even setbacks should give you something to strive for. If you have a miserable time in the woods, analyze what the problems were. If it was your gear, this can motivate you to think more clearly about what you have and how to use it for your next trip.

10. – Build your confidence – Lastly and I think the most important lesson you should take from backpacking is the confidence you will have to live in the woods for a while. This was most noticeable in my wife and kids. I was already fine with camping, but for my family this was all new and before we went, there were lots of questions and doubt. After our three days my family was not only happy with the experience, but were really impressed with how “not horrible” our time was. They had plenty to eat even though we had no kitchen table to sit around. They slept well even though their beds were on the ground and we all had a great time even when there was no traditional entertainment to be found. After our first trip my family was ready to bug out and even if that never happened, we had a great new activity to do for fun. Win Win.

There are two recurring themes we have in prepping and survival blogs around preparing for disasters of any type. The first is the need to practice any plans you have

Portable Swamp Cooler

How to build a low-cost 12 volt evaporative cooler.  My husband and I built two swamp coolers that we use to air condition our tent when we camp in hot, dry weather at Burning Man.  These compact units blow cool air like an air conditioner, but they use just water for evaporation instead of using a compressor or toxic Freon. There are two great designs on the internet for making evaporative coolers for camping.  This blog post enhances one of those designs by providing lots of detail on sourcing parts, comparing options for parts, and a variety of power options.  We built ours for under $40 each and they worked great for cooling a tent and letting us nap in the Nevada desert.

We used the following materials:

  • 5 gallon bucket from the local hardware store or recycled, $0 – $2.30
  • 12v water pump from Amazon.com, $14.50 + shipping = $17
  • Swamp cooler pad 33.5″ x 24″, $2 – $7
  • Drip irrigation tube 48″ long, Tee connector, diameter should fit your water pump, $5 – $10
  • Recycled PC fan, 12VDC and around 1 to 2 Amps, $0.50 – $4
  • Elbow duct 4″ diameter, $3
  • 12 volt battery, $10 – $20
  • Screws, 4 Short sheet metal screws, $0.50 – $1
  • Quick connect female crimp connectors, sized for your battery
  • Four to eight feet of small gauge wire (20 – 26 gauge)
  • Butt splice connectors, to connect the wires butt to butt, in the gauge of your wire
  • Optional: window screen 33.5″ x 13″, $0 – $6
  • Total:  $40 to $73

Tools that you will need to buy or borrow:

  • Drill
  • Hole saw drill bit, 2″ to 3″ , $13
  • Wire cutters and very small gauge wire strippers, 20 – 26 gage
  • Tin snips for cutting your elbow duct
  • Optional: silicone caulk

How do I choose a good recycled PC fan?

Recycled PC fan screwed to lid of bucket. Note the edges of the elbow duct

You can get a great deal if your town has a store where you can get recycled computer parts, or perhaps your local Goodwill has electronic stuff.  We got a bunch of fans for 50 cents each at PC Recycle in Seattle.  Or for a bit more money you can buy recycled PC fans off the internet.  Or you could pay the full price for a new fan from your local computer store.

You want to read all those letters and numbers and find “12 VDC” which means 12 volts of direct current.  Direct current is what you get from a battery or solar panel.  Next you want to find a fan that will move a lot of air by drawing a lot of current, so you look at the number preceding the “A” for amps.  For example, “0.11A” or “0.20 Amps” are pathetically weak, and a “1.2A” or “1.6A” fan will blow a lot of air!    The bigger the number, the cooler you will be, and the faster it will drain your battery.  My fan was 1.6A and our little $10 battery ran the fan and pump for 5 hours before we noticed the battery getting low.

Online the listings will also describe the dimensions of the fan, such as 80mm or 120mm.  The size doesn’t really matter as long as it is in the ballpark of about 80 – 120 millimeters. You’re going to drill your own mounting holes in the lid of your bucket so the exact size doesn’t matter.  Bring the fan with you to the store when you buy your elbow duct.  Your elbow duct diameter must be smaller than the distance between the corners of the fan’s mounting holes.

The number of wires coming out of the fan also don’t matter for this application.  You will only use power and ground, typically red and black.  The other wires control the speed of the fan if it were connected to a computer, but we don’t care.

Which Swamp Cooler Pad to Buy?  Synthetic or Organic?

You can buy swamp cooler pad that is made of organic or synthetic fibers.  You can read the marketing stuff about which one is better, but here’s my experience from hosting a workshop where a bunch of people built 5 swamp coolers in my yard and some of them used organic and others used synthetic pad.  When you cut the pad, little bits will get everywhere.  The organic pad that got all over our garage and yard was quickly used by birds and squirrels to make energy-efficient nests in the trees.  The synthetic blue bits seemed to get ground into the floor and dirt by our feet.  The synthetic bits were difficult to remove with a shop vac or broom, perhaps because they had some static charge making them cling?  The organic fibers smell like wood chips or hay, and the synthetic pad has a slightly plastic smell.  Neither smell was offensive to me, but some folks didn’t like the  smell of hay when the swamp cooler was operating.

I recommend purchasing a roll of the organic Aspen Cooler Pad, and cut rectangles to share it with friends and neighbors. We cut one piece of pad into a  33.5″ x 24″ rectangle and then folded it in half, and rolled it into a cylinder that fit inside our bucket.

Battery Options and Solar Energy

For maximum portability, we used a 12 volt sealed lead acid battery for about ten to twenty dollars.  This type of battery is often used to run a computer backup uninterruptible power supply, or UPS.  You will want a battery which can give enough current to both the fan and the water pump, so 1.2 AH rating on the battery is quite sufficient.  AH stands for Amp Hours.  We ran our swamp cooler with the big 1.60 Amp fan for 6 hours and it ran down our battery enough that it wasn’t blowing very hard anymore.

If you’re traveling with a car or boat, then you can run your swamp cooler on your 12V vehicle battery.  When we go to Burning Man, we take a deep cycle marine battery that weighs about fifty pounds.  That huge battery runs our lights, a stereo, and our swamp coolers for 9 days.  The marine battery is easily recharged with a small (12″ x 4″) solar panel and a charge controller.

Steps to build your Evaporative Cooler

Step 1 Drill Holes in your 5 gallon bucket

We drilled two rows of 2″ holes because that’s the size of hole saw that we already owned.  This step is messy and fun.  Use a shop vac to cleanup the mess.  The goal is to maximize air flow through the damp pad, and leave enough water in the bottom of the bucket to cover your water pump for the entire duration of the runtime (e.g. six hours of sleep).

Key considerations on where to drill the holes:

  • Your water pump must be completely submerged or it will run dry and break.  Mark your water line that gives you at least 2 inches of water above your pump intake.  Cut your ventilation holes above that water line.
  • The holes should be at least 4 or 5 inches from the lid of the bucket.  You want the air to come in through the holes, pass through the damp pad, then come out through the fan at the top.   If the air passes through more damp pad, then that’s great!

Step 2 Cut your Screen and Cooler Pad

Two rows of 2″ holes above the water line

The optional window screen helps to keep the cooler pad and the drippy water inside of your bucket.  I tried gluing the screen to the inside of my bucket, but that didn’t work well, so don’t bother.  The screen and cooler pad should cover all of your ventilation holes.  Measure from the inside bottom of your bucket to at least 3 inches above your ventilation holes.  Leave an inch or two at the top section of the bucket for your PC fan and wires.

You want to force ALL the air through the damp pad.  If air can sneak in the air holes and out through the fan without going through the damp pad, then it won’t be cool!

Option A exact dimensions:  Measure and cut your screen in a trapezoid shape because the bottom circumference of your bucket is closer to 32″ and the top diameter of the bucket is about 33.5″ if you are using the same bucket that I did. Measure the diameters of the inside of your bucket near the lid and near the bottom, and then do some math (diameter * 3.14 = circumference).  Now measure and cut your window screen and test the fit before measuring and cutting your cooler pad.  For the cooler pad, cut your trapezoid slightly smaller to allow for the thickness of the pad.

Option B Close Enough Engineering:  Cut your screen to a rectangle about 34″ x 13″ and it will overlap some when you stick it in your bucket.  Cut your swamp cooler pad about 33″ by 24″, fold it in half and shove it in your bucket.  Trim it if you have to.

Step 3 Drip Irrigation

We used black drip irrigation tube and a little bit of clear poly tube. Measure the dimension of your water pump output spout and purchase the appropriate size hose.  Take your pump with you to the store.  Buy whatever is cheap and available by the foot from your local store.  Buy the appropriate size Tee connector for your hose and any connector that you might need to connect the hose to your water pump.

Swamp cooler pad with drip irrigation tube

You’re going to make a halo shape with the irrigation tube. The diameter of your drip tube halo should be about one inch smaller than the dimension of your bucket, so that your tube rests in the middle of your swamp pad ring.  If your halo is too close to the edge of the bucket, then the water will drip out of your ventilation holes.  Again, circumference = diameter * 3.14.  Adjust your circumference result to include the amount of the Tee connector that will complete the halo.  Now cut the irrigation tube.  Use the Tee to make the circle first, and then attach a piece of irrigation tube that will go down the middle of your bucket to the pump on the bottom.   Place your halo inside of your bucket with the cooler pad and make any adjustments to the size and shape of your irrigation tube halo.

Next you poke holes in the halo to let the water rain down on the cooler pad.  Carefully place your halo on a flat surface to make the holes on the bottom of the halo so it rains down on the cooler pad, and not up on your fan!  Space the holes equal distant from the next hole, about the same size.  We tried three methods of poking holes in the irrigation tube.  You can use a drill with a very small bit, and be gentle to not drill all the way through the tube!  For more control, you could use a small nail and manually poke the tube, or use a gentle tap from a hammer to poke the hole.  My preference was to use a light weight hammer and two gentle taps for each hole.  A fourth option that we did not try was heating a piece of wire and melting holes into the irrigation tube.

After you poke holes, test your irrigation system.  Put your cooler pad in the bucket.  Pour water in the bucket.  Attach your water pump to the irrigation tube halo and connect the battery.  How much water is coming out?  Enough?  Is the water coming out of all the holes, or just the holes nearest to the Tee connector?  Decide if you want to make your holes larger or make more holes, or scrap your halo and start over with new tube.

Step 4: Install duct on and fan on the Lid

Fan and duct screwed to the bucket lid

Wear gloves so you don’t cut your hand on the sharp metal.  Cut a hole in the lid so the duct just fits through snugly.  Mark a 1 inch line on one end of the duct.   Use the tin snips to cut narrow triangle-shaped notches out of the elbow duct, to form little flaps.   Stick the duct through the lid and bend the flaps you just made.  The flaps should be on the inside (bottom) of the lid, and the elbow duct should be on the outside (top) of the bucket’s lid.

Hold your fan against the bottom of the lid so that at least 3 of the four mounting holes on the fan will go through metal flaps and lid.  You want your four screws to securely sandwich the metal flaps between the plastic lid and the fan.

You want to buy sheet metal screws.  They have very coarse thread, which means fewer turns per inch.  You also want them to be fairly short screws, shorter than an inch.

First use a drill to make a tiny hole in the bucket lid.  Then just use a manual screwdriver to push the sheet metal screw from the top of the bucket lid, through the bucket, the metal flap and the fan.  alternatively, you could use a nut and a bolt, but if you try this option then you must use a lock washer to prevent the nut from shaking lose.

Step 5: Wire everything together

Connect all the wires.  First strip the wires to expose a good 1/3″ (1 cm) of copper core of the wires.  We used butt splice connectors.  Decide how long a wire you want from your swamp cooler to your battery.  The wires from the PC fan will likely be really short, so use the butt splice connectors to make them much longer.  Use Red wire for the positive wires, or use black wire and mark it with a flag of red tape.  You’re going to make a Y shape when you connect the positive wire from the fan and the positive wire from the pump to a single wire using the butt connector.  The singe wire will then connect to your battery.  This is called wiring in parallel.  Do the same thing for the ground wires.

Our battery used Quick connect female crimp connectors.  Your battery may use a different shape of connector.

You’re done!  Test it a few times before you make any significant modifications.  Optionally, seal the gaps around the elbow duct with caulk.

Troubleshooting:

If water gets outside your bucket and onto the floor: Perhaps you need more swamp cooler pad to absorb the water, or perhaps your pump is squirting too hard in a direction that aims the stream directly at the ventilation holes.

Air doesn’t feel very cool: touch your swamp cooler pad and check for uniform wetness.  Verify that the pump is working  and the water is dripping uniformly around the halo.

FAQ:

How much water does it use?  Answer:  I add about a gallon of cold water that we drain from our drink cooler to the bottom.  Then each day we top it off with another pint or quart, depending on how much we run the cooler during the morning sleep or afternoon nap.

How long do the batteries last?  Answer: the batteries really depend on a lot of factors, such as wattage of your fan & pump, age of your battery, and temperature of the battery.  We topped ours off with a tiny solar panel (the size of an ipad).  If you plan to go completely nocturnal at Burning Man, then you will want a small, deep cycle marine battery to run your coolers for 6 – 8 hours every day while you sleep.  Keep the battery in the shade and off the ground with two wood blocks or a milk crate to allow air circulation.

[caption id="attachment_8666" align="alignright" width="263"] Portable Swamp Cooler[/caption] How to build a low-cost 12 volt evaporative cooler.  My husband and I built two swamp coolers that we use to air condition our

There are millions of people out there who would never leave their dogs behind in any emergency situation if they can help it. That is wonderful and that sort of love and loyalty is to be commended. So I ask, why not take it one step further and train your dog to benefit you in a survival situation?

Dogs have natural survival instincts already in them so there are some things you do not have to worry about. It has been my experience that the majority of dogs can assess a dangerous situation and let the owners know by barking at the threat. Teaching your dog to speak, or to be quiet, is not as hard as you think and can mean the difference between life and death in a survival situation. If you do not want someone to know your location then being able to keep your dog quiet on command is of the utmost importance. If you are in a situation where you need to be found then having a dog that can alert others on command is very important.

No matter what you are training your animal to do you must always remain patient when training. Dogs can sense aggravation and may become scared or timid. This is not what you want. You want training time to be fun. Most dogs live to make their owners happy and are more responsive and willing to do what is asked with positive reinforcement training.

In order to teach your dog to be quiet, you must also teach your dog to speak. The two commands go hand in hand. For this reason we begin by teaching the dog to speak. Practice these steps 1-2 times a day for about 5-10 minutes. Anything longer than that usually results in boredom and then is no longer fun for your dog.

Speak Command:

  • Invoke a situation that will get your dog to bark, such as knocking on the door. When someone knocks and the dog barks say in a firm commanding voice, “Speak,” and when he/she barks immediately give him/her onetreat and lots of praise such as, “Good girl” in an excited voice.
  • Repeat this process until you can gradually stop using the door knocking to get your dog to bark. Once the dog has mastered the speak command then he/she is ready to learn the “Quiet” command.


Quiet Command:

  • Place your dog on a leash and give him/her the command to bark. When he/she does, then give the dog one treat.
  • Do this several times in a row.
  • After 4-5 times of barking, quickly tug on the leash and give the command “Quiet” or “Hush.” When the dog stops barking quickly give him/her three treats in a row. By giving the dog three treats the dog learns that being “quiet” has a higher treat value than bark does.
  • Repeat these steps 4-5 times in a row and then take a break making sure to praise and reward the dog for good behavior. Toss around a ball or his/her favorite toy.
  • Do this until the dog no longer needs the leash corrections to follow the Quiet command.
  • As the dog progresses, stop giving treats for the speak command and give one treat for the quiet command.

OBEDIENCE REVIEW

Whenever possible, your dog will try to get away with as much as possible. If you start to slack off with obedience practice, your dog will soon forget all the commands you’ve taught him. It is better to practice five minutes a day than to randomly do it every few weeks. When your dog behaves perfectly on a consistent basis, then you can start to get a little lazy. But if you notice a bit of attitude or stubbornness, get right back into a routine of practicing obedience before things go too far and are harder to fix later. Here are a few tips on how to practice obedience with your dog.

  • Don’t repeat commands more than twice.
  • Use his name first, then the command.
  • Take your time. Most dogs, especially young ones, are already in an excited state. Teach them to relax and slow down.
  • Do obedience with the dog on your left side, not in front or behind you. By having him in a consistent position, you can be more aware if he’s creeping ahead or lagging behind. It’s also easier to correct a dog that is at your side, rather than being slightly ahead or behind you.
  • Praise your dog when he is in the correct position, even if you had to physically help him into the position.
  • Use a low, firm tone of voice.
  • Pick a release command, such as “Okay!” to let him know when he is done with a command.

There should be a clear separation between giving a command and giving a correction. Give the command. Wait three seconds. Then correct him, if necessary. If your dog waits until you start to give a correction before doing the command, follow through with the correction anyway. Otherwise you will continually have to start to correct before the dog performs the command, rather than the dog automatically performing the behavior when he hears the command.

These commands were learned through Animal Communications Institute.There are training tools you can use to help you in your journey to having a well trained dog. I have listed some examples below.

  1. Prong collar: This collar looks mean but I assure you it is safe and will not hurt the dog. It is designed to simulate how a mother dog would correct her pup if she didn’t want the dog doing something by grabbing the fur around the neck and pulling back by the loose skin. A safe and effective alternative to choker collars, it puts even pressure around the neck, about every half inch, pinching the skin in a band. This collar does not apply direct pressure to the trachea so you can train your dog with little or no tugging, jerking, or pulling. (Note: We have and train pit bulls to the best of our ability and this collar has been very effective in teaching them how to not pull us when on the lead and due to their massive size, it is needed.)
  2. Vibration collars: These collars give momentary burst of pre-measured stimulation to get your dogs attention if he is distracted; it gives electrical stimulation for as long as you hold the button down, up to eight seconds; and page causes the collar to vibrate for non-electrical stimulation. There is often a shock feature on these types of collars as well.
  3. No- Pull Dog Harness: Self explanatory.
  4. Basket Style Muzzle: There are some dogs out there that can be unpredictable around strange people so for their safety and your dog’s safety you may consider owning one of these. This high ventilation quality muzzle can be very useful in many situations and everyday use – visits to a vet, traveling, off-leash walks, preventing eating off the ground, yet allow for panting and drinking, providing the ultimate in comfort and safety for both the dog and owner or trainer. Well-fitting, light weight, soft and comfortable yet strong and durable. Safe and non-toxic. The straps are adjustable and won’t stretch. Please measure snout circumference and length for fit.

When there is a natural disaster hitting such as a tornado or hurricane the last thing you want to be doing is calling/searching for your dog. Obedience training can eliminate this so that your dog stays with you unless told otherwise. I encourage all pet owners to think about what all your dog is capable of learning that can benefit your safety and theirs.

Note: Here is an amazingly affordable dog back pack that will help lighten your load by allowing them to carry their one dog supplies.

There are millions of people out there who would never leave their dogs behind in any emergency situation if they can help it. That is wonderful and that sort of

I was approached via email back in June of this year by a reporter in New York State who was covering a local story about a man who had been killed in a gun accident. Apparently, the man was cleaning a shotgun and it was loaded. The shotgun went off and he died from a wound to the chest. What does that have to do with me you ask? The reporter said that this man along with many other things was a Prepper and he wanted to get some background about the Prepping Movement to accompany the other article about the accidental death of this man.

I was a little skeptical at first because I wasn’t seeing a clear correlation between the death and prepping from what he was telling me, so I asked for some additional information. I wanted to make sure that preppers weren’t negatively associated with this accident and I certainly didn’t want to enable any misrepresentation on my part. The reporter asked me three questions and I responded to him. I didn’t expect most of what I wrote to make it into the actual article; it never works that way but I did want to include them here on my site for our readers. I think there was one sentence from my response and another from a different article I wrote. The rest of the article was full of a lot of generalization and it doesn’t appear that this reporter interviewed anyone else. Actually, the article doesn’t even seem complete to me, but that is his job I guess, not mine.

One good thing about having a blog is that you get to write as much as you want so in this article I will include my responses in their entirety. This is my perspective on the questions I was asked about the Prepper Movement, why it is growing and how I would answer people who think the movement is fringe. This is how I responded to his three questions but I don’t mean to come off as being petty that he didn’t use more of my text. On the contrary, I just want to make my point a little clearer than you can with such a dynamic subject when you are limited to one sentence. So, here goes.

Why is being prepared a growing movement?

To understand why the Prepper movement is growing I should first describe what I think the movement is. Prepping just means taking steps to be better prepared for any unforeseen or unplanned events that can threaten the health, safety or well-being of yourself or those around you. What are people preparing for? The list can be pretty long and varies by person, region and situation, but at its heart; the movement is about empowering yourself. Being prepared to take care of your family or yourself when an emergency or disaster strikes, reduces the sense of helplessness so many people feel after a crisis. The helpless feeling usually comes from being unprepared for a particular situation and this is often for completely preventable reasons. Instead of depending on government agencies or the police or national guard to rescue you, you take that responsibility on yourself to a larger degree than most people choose to. Simply starting with the basics of food, water and personal security can mean the difference between life and death.

Why is prepping becoming so mainstream?

I think the desire to be more self-sufficient in an crisis or emergency is becoming more mainstream because we have so many examples where the people we are told to depend on have not been able to take care of themselves much less anyone else in a disaster. You only have to look at events like Hurricane Katrina or Hurricane Sandy to see examples of perfectly natural events destroying lives and leaving people without homes, power, food or gas for weeks and months. When banks close their doors for weeks in Cyprus and then the people are left with no options, it causes some to consider what they would do in a similar situation. People even 50 years ago were so much more self-sufficient than we as a society are now and I think there is a growing awareness that complete and total dependence on systems and processes that are fragile isn’t wise. I think it’s simply becoming harder to argue with the logic of having some level of preparedness.

What would I say to people who think it is a fringe movement?

There is nothing fringe about wanting to make sure your family has food when the grocery store shelves are empty or that you have money if the banks lock their doors. There isn’t anything fringe about a father wanting to protect his children if bad men come to bust down the door. If these people can explain how planning to take care of yourself if the power goes out, the gas stations are rationing gas and looters are breaking into houses next door due to a relatively minor storm,  is somehow insane, I am all ears. Until someone can give me a rational reason why they believe that it is much wiser to do nothing and expect FEMA to show up, I don’t want to stop planning for alternatives. Until they can guarantee that the National Guard can fix everything in 24 hours or that despite repeated warnings from the police, that they should not be counted on in an emergency to protect you, I would rather do what I can to prepare myself and my family. Even the federal (via ready.gov) government says you should have a plan so really who is fringe?

Those were my responses, what would you say to a reporter?

I was approached via email back in June of this year by a reporter in New York State who was covering a local story about a man who had been

When I was 4 or 5 years old my dad gave me a plastic bow and arrow set. It was one of those cheap, $5 toy bows with the plastic arrows and suction cup tips. From the moment I let one of those toy arrows fly I was hooked. From then on archery was a permanent part of my life. Today we’re going to tackle some of the commonly held misconceptions about archery and its use in disaster scenarios and several of the debates going around in the preparedness community about archery and its effectiveness as a disaster skill.

Recurve vs. Compound

One of the most debated subjects about archery (as it pertains to prepping) is between compound bows and recurve or traditional bows. For those unaware of what these terms mean, check out this article from Wikipedia. The main debate here is that many people believe that a compound bow doesn’t have a place in a disaster scenario because it has a lot of complex moving parts and requires routine maintenance, which may not be available after disaster strikes. On the other side of the debate, many preppers feel that a recurve bow simply doesn’t have the power to be used in a defensive situation, doesn’t have the range of a compound bow, and takes significantly more practice to become accurate.

Concerns about compound bows

Compound bows do require significantly more maintenance than a recurve will. The pulley system of a compound bow is a fine tuned machine that withstands constant pressure and force due to the high draw weight of most compound bows. That being said, we are preppers. Our goals are to remove ourselves from systems of support. If you’re relying on an archery technician to maintain your bow, then you’re relying on yet another system of support. This is fine when you’re not dealing with a disaster scenario, but there may come a day when you can’t go down to the local archery shop and have your bow tuned up or restrung. There’s no reason why we can’t learn how to perform these maintenance tasks ourselves and stockpile all the tools and materials we need to keep our bows running perfectly for years.


Concerns about recurve bows

Recurve bows do take significantly longer to learn to be accurate. There’s no sighting system like on a compound, and the shooter has to rely more on instinctual shooting and a lot of habitual practice to really become proficient with them. However, these bows are less inexpensive to shoot, maintain and with a few tools and the right wood you can even make a great recurve bow yourself. Yes, recurve bows do have a lighter draw weight than most compound bows and are a little more of a hassle when hunting from a tree stand, but they are still more than capable of taking down large game animals and hunting with a recurve is a great way to learn game stalking skills and hunting from ground level.

In the end, I personally feel this debate is a moot point. I mean think of it this way, is there ONE firearm that will perform ALL the functions that firearms are supposed to perform? No. There are rifles, handguns, shotguns, carbines… it’s simply picking the right tool for the job. Bows are the same way. If I’m doing small game hunting on foot then I’m going to want a recurve bow that I can shoot instinctively and quickly. If I’m looking to get up in a tree stand and put some meat in the freezer, I’m going to want my compound.


Can bows be used as defensive tools?

One of the more lively debates that I’ve seen recently is that archery isn’t a viable skill to learn because they are ineffective defensive tools. This is ridiculous. Yes, firearms have taken the place of the bow and arrow in modern defensive tools because they are much more efficient.  However, apparently some people forget that the bow and arrow was THE ranged weapon of choice for thousands of years. It does a pretty good job of putting holes in things, just a like a firearm does. Firearms run on ammunition that is finite, have more movable parts than bows do and can easily jam. Don’t get me wrong, I love my guns, but if I’m trying to conserve ammunition, or even worse, I’ve ran out of ammunition; a bow is the next best thing. There are also several places all around the world where you simply can’t have a firearm. If I were in an area like this, a bow would be my ranged weapon of choice.

Bows are better than guns because you can make a bow, a string and arrows

This one gets thrown around a lot in these debates. I’ve even seen many a Walking Dead fans claiming that a crossbow is actually the best weapon because “It’s just like a gun and you can make your own arrows really easy.” OK, let’s try to put this in perspective. Yes, you absolutely can make your own arrows for a bow and even a crossbow if you have the right materials and tools to do so. However, throwing some feathers on a stick and calling it an arrow isn’t going to cut it. Arrows are just as precise as bullets. They both require specific measurements, and have to be made a certain way in order to be used safely. Hundreds of years ago, apprentices would train for years before they could make arrows that were judged worthy enough to fire. Before buying that takedown bow and assuming you’ll be able to fashion arrows for it when the time comes, you may want to do a little research first because it’s not nearly as easy as you might think.

Bows are better than guns / guns are better than bows

Most debates about archery vs. firearms really just boil down to people believing that one is better than the other. The truth is that a gun can do things a bow cant and a bow can do things a gun cant. I mean, is a hammer better than a screwdriver? Is a mouse better than a keyboard? My suggestion would be to not limit yourself to a bow (whether it’s a recurve or a compound) or a gun, get the best of both worlds, so that you’ll have the right tool for the job when you need it the most.

When I was 4 or 5 years old my dad gave me a plastic bow and arrow set. It was one of those cheap, $5 toy bows with the plastic

In late 2009 my boss plunked a book with a hazard-yellow cover on my desk and said, “This might interest you.”

I didn’t know it then, but reading “The Long Emergency by James Howard Kunstler would be the final push that changed the course of our lives. My husband, Darren, and I were already on the road to self-sufficiency but now felt utter urgency. Within a year, I quit my job. We sold all of our trinkets and trappings on eBay and bought a rustic homestead far from the city.

Written in 2005, the book details the numerous potential catastrophes facing humanity as we scrape the bottom of the oil barrel. None of them are pretty. Kunstler warns that humans are “sleepwalking into the future,” completely unaware we could be staring at our very demise while still buying electronic toys and microwavable lasagna.

Americans are a nation of overfed clowns, Kunstler said, who complacently tool around in SUVs, build unsustainable suburban McMansions and freak out if the power goes out for an hour. Many fail to fathom our fossil-fuel-driven industrialized lifestyle is merely temporary, just a blip in time.

Since Darren and I have practically all we need here, including an awesome deep-well hand pump for water, we seldom leave the county. Perhaps once a year, though, and since I still can, I’ll hop a Greyhound north to visit family. Last month as I wandered about in St. Paul, Minnesota, I was astonished by what Darren calls the “illusion of abundance.”

Every grocery store shelf was overflowing. I counted 12 different kinds of ketchup and massively long, wide rows of nothing but snacks. The mall was even more enlightening, as I haven’t been in one of those places for several years. I poked around in a dozen stores and never saw a thing I needed, or that anyone really needed. Mostly, the wares were just plain cute – knickknacks and paddy whacks.

At first glance, it all seems so plentiful. There is more than enough of everything to go around. But, do the math. How long would it take a half-million St. Paul inhabitants to consume every last morsel if no more groceries were to arrive magically by truck? As Kunstler points out, even farmers buy their food in supermarkets today.

The Long Emergency

We are in for a rough ride through uncharted territory.

Kunstler says it has been very hard for Americans — lost in dark raptures of nonstop infotainment, recreational shopping, and compulsive motoring — to make sense of the gathering forces that will fundamentally alter the terms of everyday life in our technological society.

“Most immediately we face the end of the cheap-fossil-fuel era,” Kunstler writes. “It is no exaggeration to state that reliable supplies of cheap oil and natural gas underlie everything we identify as the necessities of modern life — not to mention all of its comforts and luxuries: central heating, air conditioning, cars, airplanes, electric lights, inexpensive clothing, recorded music, movies, hip-replacement surgery, national defense — you name it.”

The few Americans who are even aware that there is a gathering global-energy predicament usually misunderstand that we don’t have to run out of oil to start having severe problems. We only have to slip over the all-time production peak and begin a slide down the arc of steady depletion.

Once the world’s leading oil producer, the United States passed its peak in 1970. Egypt’s oil production has been declining since 1986. A peak, of course, can only be discerned after it has passed. To intensify the issue, we must also realize that we have already extracted all the easy-to-get oil. What remains will inevitably cost more and be of poorer quality.

Because we have built our lives around nonrenewable cheap fossil fuels, giving it all up will not be easy for first- or third-world nations. Kunstler predicts economic, political and social changes on an epochal scale, and not terribly far into the future. Exactly when the chaos will erupt is hard to pin down, he says, because oil companies and nations haven’t exactly been upfront about oil reserves. That would be bad for business.

But, as Kunstler explains, as frightening as it is, we don’t have to do nothing. We must learn to trade locally again, feed ourselves and downscale everything from farming to schooling. It’s already happening small-scale around the country. Even in our little corner of Missouri, a group of food producers has formed a cooperative to sell their homegrown meat, eggs, milk, and garden produce.


A “simpler time” may be in our future whether we want it or not.
Not so long ago, since my grandparents were born, local was the lifestyle here in the Ozarks. A quick tour of the county back roads reveals numerous old country stores and schools now boarded up or converted to hay barns. Cars and store franchises killed those early settlements.

“We can be confident that the current set of arrangements will not endure,” Kunstler writes of our motor vehicle dependence. “Everyday life deeper in the twenty-first century will be as starkly different to people living today as the America of 1955 was different for someone who was a child before World War I. The automobile age as we have known it will be over.”

Kunstler says that if there is any positive side to the stark changes coming our way, it may be in the benefits of close communal relations, of having to really work intimately (and physically) with our neighbors, to be part of an enterprise that really matters.”

In late 2009 my boss plunked a book with a hazard-yellow cover on my desk and said, “This might interest you.” I didn’t know it then, but reading “The Long Emergency”

In the 1960s, my father spit out the word “plastic” as if it were poison. To him, anything made of a substance other than real wood, metal or glass was junk. Now, I understand.

Our first greenhouse was entirely plastic, a snazzy do-it-yourself kit Darren ordered online for about $1,600. He eagerly awaited the day the UPS truck showed up with the soon-to-be mega-veggie-growing house. Like a kid at Christmas, Darren ran out to help the delivery man with the boxes, thinking they’d weigh a ton. His expectations were high.

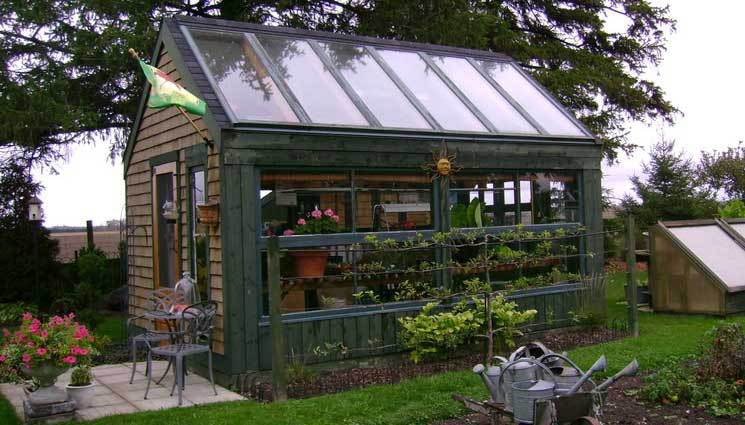
Although he later called it a “toy”, Darren built a foundation for the 8’ by 12’ greenhouse and filled the north wall with black 55-gallon barrels to retain heat. The plastic shivered in the wind. Within two seasons, the windows were cloudy.

We’ve learned a thing or three since then.

Rather than building a stand-alone greenhouse of plastic, you can have a sturdier, less-expensive and warmer greenhouse of real wood, metal and glass by attaching it to a south-facing wall of your home or other building.

Using some scrap material, old sliding glass doors and windows, and as few purchased supplies as possible (cinder blocks, wire cloth, 2x4s and roof tin), we built such a greenhouse last fall for about $400. All winter long, it provided more than enough greens for our heaping, twice-daily salads, and cost a fraction of that plastic model.

The finished greenhouse measures 15-1/2 by 5-1/2 feet along the south side of our unheated porch. Attaching it to the house, we used less materials and the greenhouse needs no artificial heat. The temperature in our part of the Missouri Ozarks rarely gets below 0, but, on really cold nights, we set the pail of woodstove ashes in the greenhouse for extra warmth. A few 1-gallon jugs placed on the stepping stones absorb heat during the day. But, that’s it – no electric or propane heat required.

So far, these no-cost methods have kept the greenhouse at a perfect temperature for spinach, lettuce, kale, mustard greens, 
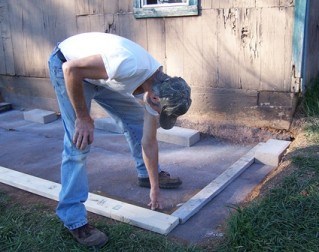
radishes and bok choy. The plants generate enough oxygen to compensate for that consumed by the glowing embers. I’ve heard, too, that a few candles will produce enough heat to keep the tender plants from freezing, although we haven’t needed to try that trick.

From the Ground Up

Our project began with a sketch, followed by marking the site and digging a level base. Shoveling by hand took almost two days. I thought we’d keep the excavated dirt for greenhouse soil, but it was mainly clay and rock, so was used elsewhere.

Once the ground was smooth and level, we built a foundation of cinder blocks topped with 5-inch x 5-inch beams. We banked the blocks on both sides with some of the excavated clay to keep them in place during construction.

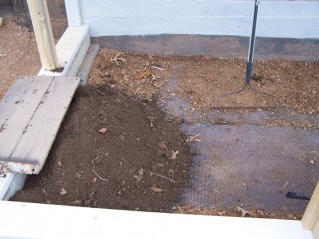
To keep out moles and other dirt-digging rodents, Darren “sewed” together two pieces of quarter-inch hardware cloth by weaving a wire along the edges of two pieces. The wire-cloth base may not be necessary in all parts of the world, but, here it is absolutely the difference between us crunching on spinach or crying over our empty salad bowls. The wire covers the entire floor and extends about 8 inches up the walls. We know it works, as mole tunnels girdle the greenhouse, yet no varmints get inside.

We added plastic (oops, there’s that word again) landscape edging along the inside of the foundation at soil level, but only because the edging was given to us and will help keep wet soil away from the lumber. It is certainly not mandatory, though.

From Doors to Windows

Next, the 2×4 studs went up, followed by rafters. Darren put on the tin roof while I painted the interior walls glacier white, snow-blinding bright. With a roof overhead, we headed to the woods with a wheelbarrow for topsoil, which we mixed with some of last year’s compost. We shoveled it in about 8” deep, adding flat rocks from the yard for stepping stones. Then came the sparkling clean glass. Dad would be proud.

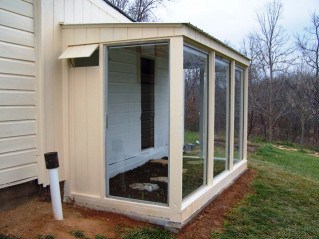
We carted home our used sliding glass patio doors from a junk shop for $10 each and $5 for a window, although I have heard of people just giving them away. Check with glass shops, contractors or online (freecycle.net or freecycle.org) for used doors. Also, non-frosted shower doors make great entry doors.

Our used patio doors are about 4 feet wide and 6 feet tall, the perfect size for three along the south face and one on the west. The east side has a homemade wooden door and another used window, about 3-feet wide and 6-feet tall. The old porch window opening is now a very handy, narrow doorway leading from the porch into the greenhouse with only a scruffy wool blanket as a door.

Recently, we added a shelf, the wire kind used in closets, to hold trays of seedlings. It’s up high enough to not shadow the plants below. We also lined the wall behind the shelf with aluminum foil to reflect even more light onto the seedlings.

An old 70-gallon stock tank we found for $20 in the local thrift store sits under a downspout where, in winter, it stays full of nutritious rainwater. All I have to do is dip in my watering can. I let the water warm up to the greenhouse’s ambient temperature before watering so the plants aren’t shocked by ice water.

Year-Round Usefulness

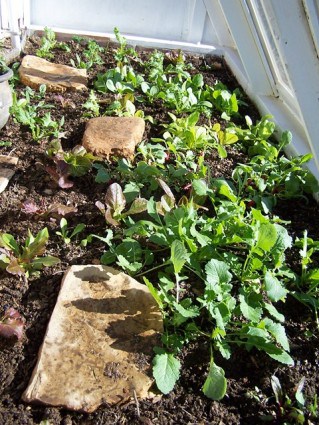
Our first glass greenhouse here, a lean-to Darren built along his shop in late 2011, supplied us with delicious, organic greens from mid-December until May. By the time it got too hot in the greenhouse to grow food, our raised beds outside started producing.  So, the greenhouse became a large and super-efficient compost bin. We kept it damp with rainwater, and in just 2-3 weeks our peelings and whatnot became compost – many weeks ahead of the outdoor compost pile, and without rodents.

Our new greenhouse has been staying cool enough, I think, for tomatoes.  Well, I’m giving it a try anyway.  I had enough leftover seedlings, so I planted five in the greenhouse this morning.  I’ll post an update this summer about that experiment.  If it works, we’ll have fresh tomatoes all winter.  I understand tomato plants will keep on growing until they freeze.  We’ll see.

Even if you hire someone for the actual construction project, round up some used windows or doors for a real greenhouse. They are inexpensive (sometimes even free) and surprisingly available. Our challenge was joining a square and level greenhouse onto a very un-square and out-of-level old porch. Perhaps you will have a less tetragonal starting point.

The best part of projects like this for us is being able to do all if it ourselves, keep recycled building materials out of landfills and put ourselves another leap toward self-reliance.

In the 1960s, my father spit out the word “plastic” as if it were poison. To him, anything made of a substance other than real wood, metal or glass was

If you collect any random group of radio owners together and ask them what they would most like to improve on their radios, the chances are most of them would emphatically say ‘more range’.

Now, when we talk about greater range, it is important to realize there are two parts to a radio’s range.  The first part is how far away its transmission can be heard, the second part is from how far away it can receive transmissions from other radios.

There is usually little point in improving one part of a radio transceiver’s range without improving the other part as well.  What is the point of being able to transmit further than you can receive (or vice versa)?  The whole idea of a two-way radio transceiver is that you can communicate bi-directionally, both to and from some other person.

On the other hand, if you made some tweak to your receiving circuit so you could now hear stations twice as far away, and if they were to do the same thing to their receiving circuits too, then that would balance out and you’d both be able to send and receive to each other again.

So if you are seeking to optimize conditions among your own group’s radios, making an ‘unbalanced’ improvement to your radios is okay if you make the change to all the radios.  And of course, always, any better performing feature is to be preferred to an under-performing feature.

Number 1 Priority :  Antenna

The most important thing you can do to improve your radio’s range – both for transmitting and receiving – is to improve its antenna.  For some strange reason (mainly cost, secondarily size) the standard default antenna that most radios come with is very disappointing and does not perform as well as an antenna is theoretically capable of doing.

A ‘good’ antenna may be a bit larger than the standard default the radio comes with (the ideal length for an ‘on radio’ FRS/GMRS antenna is about six inches) but that’s not a huge increase in size so is almost an essential ‘must do’ upgrade.

A poster on a Yahoo group about the Baofeng UV-5R transceivers gave a great example of the impact the antenna can have on the radio.  He measured the strength of transmitted signal from a UV-5R with its standard antenna, and with two different after-market antennas instead.

The standard antenna gave a signal strength of -19 dBm.  The first of the two after market antennas gave a strength of -12 dBm and the second one came in at -10 dBm (lower numbers are better).

Now for the amazing thing.  These are logarithmic measurements, so a 9dBm change is about the same as an 8.5-fold increase in transmitting power AND receiver sensitivity.  Oh – the cost of this amazing antenna that converted the radio from an average performer to a super-performer (the Nagoya NA-701)?  Less than $10 on Amazon!

Now if you have a FRS radio, you probably can’t replace the factory antenna, because it almost certainly comes with a fixed ‘hard wired’ antenna.  The same is true of most but not all GMRS radios (especially the low-priced ‘blister pack’ consumer units).  The importance of a good antenna can not be overstated, and so you should make this a part of your buying evaluation of radios – do they have removable antennas or not.

A good antenna is by far the best thing you can do to improve your radio’s performance.  It will give you a balanced improvement in both transmitting and receiving capabilities, and will give you the equivalent of a hugely overpowered transmitter, without breaking the law/restrictions on transmitter power, and without using up your batteries more quickly (which would happen if the transmitter was consuming power at a much greater rate).

If you have a radio to be used in your car or at your home/retreat/wherever, you have more options for antennas without needing to be quite so concerned about antenna size/weight/portability.  In particular, there’s another amazing transformation you can do for a fixed ‘base’ station, and that is to mount your antenna outside the building, and as high up as possible.

Getting your antenna up higher not only gives a clearer line of sight to nearby radios, but also extends the line of sight distance for further away ones.  At typical heights when your radio is being held to your head, the horizon is only 3 miles away (and if the other radio you are communicating with is also, say, 5.5 ft above ground level, then the total distance between you should be under 6 miles for line of sight conditions).  But if your antenna is 20 ft up, you’ve almost doubled the distance to the horizon, and you could now be almost 9 miles away from the tower antenna.

If your communications will always be in one general direction, you can also consider choosing a directional antenna to focus your transmitting power (and your receiving sensitivity too of course) in only one part of the hemisphere that otherwise radiates out from your antenna.  Even if that is not the case, there can be advantages to having both a general antenna and also a very directionally focused one, and if you need to, switch from the general to the directional antenna and point it where the other radio you want to communicate with is, and that will surely give you another doubling or quadrupling of equivalent transmitter power and receiver sensitivity.

Number 2 Priority :  Power and Voltage

If you have a portable unit, maybe it is designed to operate with a rechargeable battery pack that it is provided with.  If so, well and good.  But maybe it is designed to work with standard AA or AAA type batteries, or perhaps even a 9V battery.

If that is the case, there is a temptation to replace the standard single-use batteries with rechargeable Ni-MH batteries.  Normally, this is a great thing to do, but rechargeable batteries (both Ni-Cd and Ni-MH) are 1.2V per battery, whereas standard single-use batteries are 1.5V.  Rechargeable batteries have 20% less voltage.

How important is this?

Your radio’s receiver will work pretty much the same with either voltage.  But your radio’s transmitting power is probably proportional to the square of the battery voltage.  In theory this is true, but maybe the radio has a voltage limiting circuit inside it and cuts down the voltage from the standard batteries and runs at full power with rechargeables.

Assuming no voltage limiting circuitry, then with the rechargeable batteries, your radio might be only developing 64% of the power it would with the standard batteries.  That’s an appreciable power reduction – not as significant as with an antenna change, for sure, but still an appreciable one, and if you’re in an area of marginal coverage, it might make all the difference between getting a signal out or not.

What to do in such cases?  Either use single-use batteries, or have an external power pack with sufficient rechargeable batteries to equate to or slightly exceed the standard battery voltage and a wire running in to the radio from the external power pack.

Oh – in addition, if you’re in a marginal coverage area, make sure your batteries are reasonably fully charged.  That could help, too.

Number 3 Priority :  Hold Your Radio High, Don’t Shield It

We suggest you get an external microphone/speaker or earpiece/microphone for your radio, so that when you are transmitting, or struggling to receive a weak signal, you can hold your radio not at your mouth but high above your head.

Not only does this give your signal a bit more clearance, but it prevents your body from soaking up some/much of the signal.

If this is not practical, at the very least, and as best you know where the other people you wish to talk with are, don’t put your body between the radio and the direction you want to transmit/receive.  That can sometimes make a small bit of difference too.

Number 4 Priority :  Move Your Position

If there’s a big barn immediately next to you and blocking your line of sight to the other radio you are trying to communicate with, then (if the signal is poor) move so that the barn is no longer blocking you.

If you’re in a small dip in the land, climb out of it and onto the highest ground you can find.

While radio waves will go through objects to some extent, as a general rule of thumb, the more clearly you can see the other person you want to communicate with, the more clearly your radio signal will reach him, and the more obstructions between you, the lower the signal quality will be.

Other Comments

The preceding items are about all you can do once you’ve bought your radio(s).

In general, we suggest the most important part of your radio to optimize is its receiving ability.  Think in real life – which super-power would you prefer :  Super-hearing or a super-loud voice?  Most people would choose super-hearing, and you should too.

Your objective is not to be heard by everyone, everywhere, within an extraordinary radius of your radio.  Rather, you want to be able to hear everyone – friend, foe, and neutral stranger – and communicate primarily with those you need to communicate with and ideally without being overheard by any more people than you absolutely can’t avoid.

The less transmitting power you need and use, the better.  That keeps your transmissions closer to ‘below the radar’ of other people who might be out there, and saves the batteries in your radio.

If you collect any random group of radio owners together and ask them what they would most like to improve on their radios, the chances are most of them would