Home2019May (Page 3)

I would lie if I said that I don’t envy all those wonderful homesteaders who managed to put a couple of bucks outside for the root cellar. Yeah, those things are really great (if you have them, of course) and not to mention very useful during any kind of shit hits the fan situation – a hole in the ground, some stones, a couple of shelves, and you’ve got yourself a gigantic fridge capable of storing veggies, legumes, pickles, and whatnots.

Ingenious, that’s what it is! However, if your home doesn’t come with a root cellar, building one from scratch takes a lot of time, energy, and, yes, a shit-load of money.

Fortunately, there is a way to tap into Mom Nature’s icy powers without the need to fork over too much cash. Being a very determined guy, I have searched high and low for ways to recreate a root cellar without actually having to build one. Sounds crazy, right? Not in the least, as you’re about to see.

The idea to write this short and sweet piece came to me after watching a documentary on National Geographic about ancient food storage methods. Can’t remember the name of the show, but there were these two guys traveling around the world and interviewing homesteaders about how they make food last longer.

In the last part of the show, there was this man from China who was quite a bit of a local celebrity, thanks to his top-notch Kimchi. For those of you who don’t know, Kimchi is Asia’s version of pickled cabbage. However, instead of using canning jars, homesteaders would place the thinly-sliced cabbage inside a ceramic jar, which would later seal with wax before burying it in the Earth.

So, with this in mind, I snooped around the Internet and found a simple and cheap way of making a mini version of the root cellar using only an old metal barrel. Here’s how to whip up a backyard cellar in order to store your veggies.

Gathering the necessary materials

For this project, you’ll need the following:

  • A shovel.
  • A barrel (I would go with a galvanized metal barrel because they’re easier to clean and fare much better underground compared to the plastic ones).
  • Rocks (shape and size don’t matter).
  • Straw.
  • Several pieces of plywood to cover the lid.

Ready with the gear? Neat! Let’s get to work, then.

How to build a mini root cellar in the backyard

Step 1. Find a suitable place to dig a hole. I would advise you to place your barrel\future root cellar in a sunny spot. You should also make sure that there are no water pipes or electrical lines running nearby.

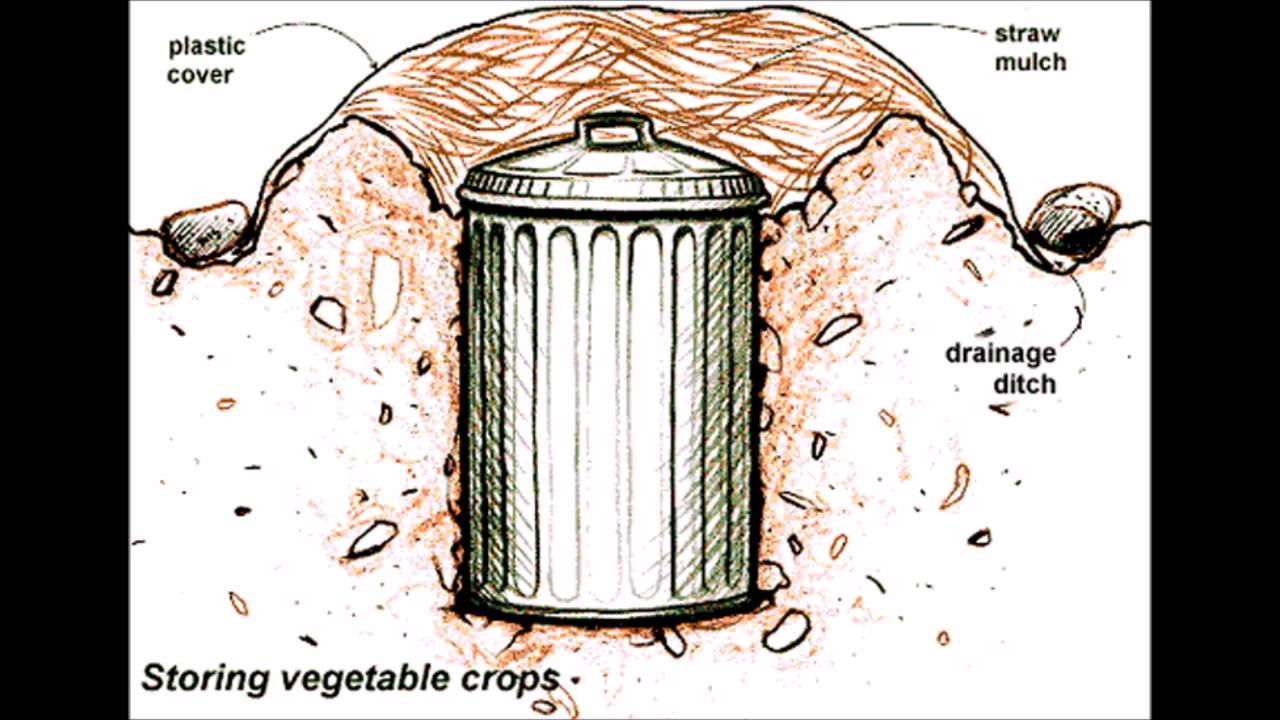
Step 2. Once you found a suitable location, grab your shovel and start digging. The hole will need to take the shape of the barrel. As for depth, it all depends on the size of the barrel. Just be sure that the rim stays on top, with the remaining underground.

Step 3. After you’ve finished digging the hole, remove any deep roots or pebbles from the bottom. Moreover, ensure that the end of your pit is dry.

Test the ground – if it feels moist to the touch, it means that there’s water underneath which is a big no-no. I know it’s annoying, but if this happens, you will need to find another location for your root cellar. Mark the spot in case you’re thinking about adding a well to your property.

Step 4. Fill the bottom with the rocks you’ve brought.

Step 5. Place the barrel on top of the rocks. Ensure that the body of your barrel remains below the freezing line while keeping the rim up top.

Step 6. Place some earth around the barrel to seal it in. Don’t put on the lid yet.

Step 7. Prepare the veggies or fruits for storage. If you’re not sure about the thingamajig’s cooling action, you can try it out on a couple of potatoes.

Step 8. Place a handful of straw on the bottom of the barrel.

Step 9. Place your veggies on the straw. You can add more vegetables if you like. Just remember to put some straw between your veggie layers.

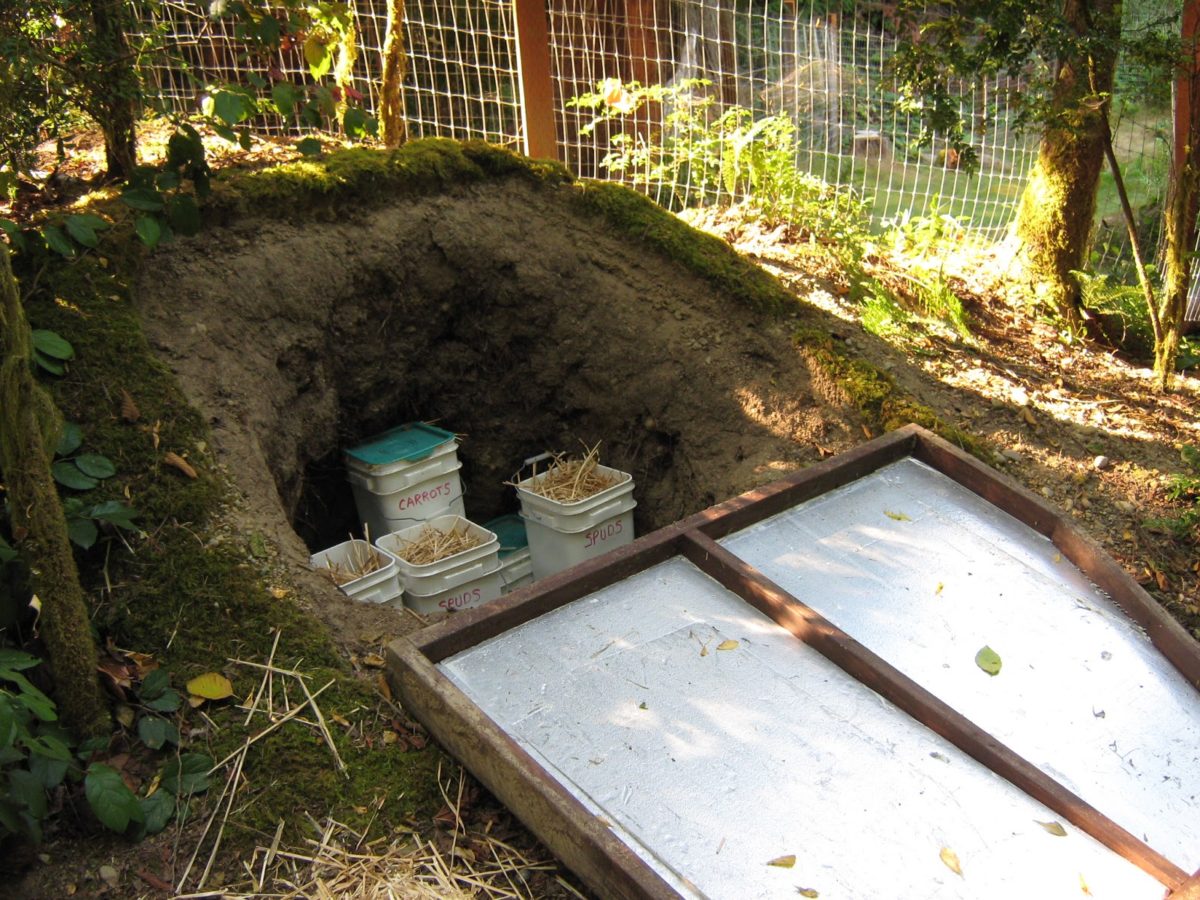
Step 10. Put the lid on the barrel, put the plywood boards on top, and cover with dirt. Congrats! You’ve just made your first backyard root cellar.

Additional Consideration on Mini Root Cellars

Building’s the easy part, but knowing what and how to store – that’s a bit challenging. The first rule of the game is never to mix your veggies with fruits. If you plan on storing fruits, you should consider placing a second root cellar.

The reason why fruits and veggies should never be placed in the same barrel is because of ethylene, a plant hormone which induces ripening in fruits. The same substance that makes fruits yummy-yum-yum will cause your veggies to ripen and rot a lot faster.

A root cellar built in this fashion will allow you to store food at a decent temp (somewhere between 32- and 40-degrees Fahrenheit), with humidity at around 95 percent.

For this reason, you’ll be able to store even short-lived veggies such as cauliflower, brussels sprouts, celery, kale, endive or leaks. If the seal holds, you can look forward to a scrumptious carrot-based dish even after six months. As far as fruits are concerned, you should ensure that your root cellar has a bit of moister compared to the one used to store veggies.

After consuming every veggie or fruit from the barrel, I would recommend giving it a good wash with the power hose and use plenty of detergent. I can’s put my finger on it, but I believe that this kind of contraption can also be used the summer to keep your fruits and veggies cool.

In most cases, the mini root cellar can extend the shelf life of fruits and veggies by at least a couple of months, with one exception – kale. If you’re planning on storing some kale, keep in mind that you can’t keep it in for more than two weeks.

Think I’ve missed something? Have another way of building a root cellar in your backyard? Hit the comments section and let me know.

If you didn’t start digging, you may also want to check out this offer coming from our partners at Easy Cellar. As well as the many benefits of having one in your backyard.

A hole in the ground, some stones, a couple of shelves, and you’ve got yourself a gigantic fridge capable of storing veggies, legumes, pickles, and whatnots.

Surviving winter used to be a much more literal scenario. It was only a couple hundred years ago that winter meant death for many. The cold would take them or starvation. Illness was another big killer during the winter months.

Much of this was attributed to malnutrition.

A lot has changed since then, but winter is still a tough season to deal with. It only takes a small emergency for you to be reminded of the power and effect of cold weather. Here are some of the biggest concerns for the modern day winter survivor.

  • Power Outage
  • Automobile Breakdown
  • Blizzard

There are several ways that you can prepare for these instances, but you must put some work in ahead of time. Let’s look at a number of things that you a do to prepare for next winter, starting today!

Your Car Kit

To deal with the automobile breakdown or flat tire in winter you need to have a winterized car kit. This kit can stay in your trunk during the winter season, but it will make all the difference when you need it.

What kind of items should you include in your car kit?

  • A NICE BLANKET TO KEEP WARM
  • EXTRA GLOVES, HATS, BOOTS
  • CANDLE AND LIGHTER
  • ALTERNATE COMMUNICATION METHOD
  • FLARES
  • READY TO EAT FOODS
  • LIST OF EMERGENCY NUMBERS

Heat is Paramount

How do you heat your home? Is it time to consider using alternate methods of heating your home? When the power goes out and your heater stops running you realize just how vulnerable you are to the cold.

As the night moves in it gets even colder and the warming power of the sun disappears on the horizon.

In those cold moments you start wondering about things like a wood stove. A wood stove offers you several benefits. The right model will warm you and it will give you a means of cooking food. These are powerful heating elements that give you another option when it comes to keeping warm in the winter.

A smaller model can be had for around $300 and will easily keep your family warm in the winter, when all else fails.

This spring you should get some quotes an consider adding a wood stove to your winter arsenal.

Preparing for Winter Weather

Outside of clothing and heating systems you are also going to want to consider the hardware of winter. What do I mean by hardware?

  • Shovels
  • Salt
  • Ice Scrapers
  • Snow Blowers

These are very simple items to have on hand, but most people must rush out and buy them when they are needed.

Rather than wait for the winter storm to go to the hardware store, you should create a winter stockpile of salt, shovels and ice scrapers that you always have on hand. That will put you in a place where you can have success and do not need to rush out into the panicking masses.

Cold Benefits

Its not all bad. If you have a warm home and have prepared for winter, there is real beauty in the season. Many people are taking intentional plunges in cold water or cold showers in the morning to increase vitality.

There are several benefits in this. One of the most important is the boost in immunity.

It’s much easier in the winter and you can find yourself outside early in the morning taking advantage of that terrible cold.

A great way to start your day is to head out side in your skivvies before the sun comes out. Spend 5-10 minutes out there and focus on taking deep consistent breaths. This is a great way to wake up, get your cold benefits and start your day.

Boosting immunity is important in the winter because of flu season. This can help but so can a number of other things. Ralph La Guardia penned an incredible book on immunity, health and treating injury and illness.


It’s called The Doomsday Book of Medicine and is everything you need in a home medical resource. Follow this link and learn how to put together your own medicine chest. 


Canning and Preservation

Our ancestors would have depended heavily on what they could can and preserve for winter. This canning would take place in the spring and summer but would be called upon when fresh foods were all gone.

While you have the ability to run to the market and pickup up those disgusting hot house tomatoes, you might use Spring and Summer to focus on canning and preserving your own home grown tomatoes. These are very important aspects of self-reliance.

As your harvest comes into season you can eat a percentage and can a percentage. We all reach a point where

If we are looking to maximize nutrition, canning our own vegetables will assure we are getting the best possible produce in the winter. No, it will not be fresh, but it will be high quality.

Get your hand a good canning book or preserving in general. Salted meats are another great way treat in the cold winter months.


Conclusion

Its not that we must prepare for the next winter as though modern society will fail, however, you will find much deeper satisfaction in being prepared. The truth is, we never know when the next big storm or power outage is coming and if we depend solely on modern amenities it can be to our detriment.

Winter can be a monster but if you use it as motivation it can take you a long way.

This push towards self-reliance and independence is real. Its hardly a fad. We spent the last 50 years on an increasing wave of convenience, and we are now living with the consequences of that. We can see the affect on the planet and on our mental and physical health.

Owning your existence is an important part of our future and future generations. We were never meant to depend on others for things like personal preparedness. There is fulfilment in being ready for all seasons and all situations.


Surviving winter used to be a much more literal scenario. It was only a couple hundred years ago that winter meant death for many. The cold would take them or

The pen may be mightier than the sword, but nothing beats the common pencil when it comes to shit hits the fan situations. Have you ever stopped to think for a second what would life be without that curious thing? Yes, I know that most of you have little need for pencils since there are computers and laptops and printers.

But what happens if there are no more PCs around? Do we stop writing? Nope. Anyway, I’m not here to wax philosophy. Today, I want to talk about some clever, dare I say witty ways to use pencils in a survival-type ballgame. So, without further ado, here’s what that the common pencil can do for you when your ass is on the line. Enjoy!

Fire-starter

This one’s a doozy – since pencils are made out of wood or, at least stuff that has the same properties as wood, it’s obvious that they can be used to start a fire in case of an emergency. I would advise salvaging the lead and use the pencil’s body. You can use that stuff to create a portable water filtration system. You can also add a couple of pencil splints to your tinder box – mine contains a piece of char cloth, a wad of steel wool, pencil splints, and a dash of sawdust.

Reveal hidden messages

Can’t really make out the writing on a surface? Use a pencil. Put a piece of paper on top and use the flat edge of your pencil to make a rubbing. FYI, that’s how I figured out that my son was doodling in school instead of taking actual notes.

Make those cloth moths skedaddle

Finding too many moths in your wardrobe? No problem. There’s a quick and cheap way to get rid of them. Use a pencil sharpener on at least three pencils. Grab a small satchel and place the shavings inside. Since most of them are made out of cedar wood, moths will not even dare to get close.

Getting a zipper unstuck

If you have zipper issues, use the gum on the other end of the pencil to get it, well unstuck. Just rub a bit of that stuff over the zipper’s teeth and give it a few tries. Works like a charm every time.

Magically open any lock or padlock

In a survival-type situation, there’s not much time for playing nice with a key that simply refuses to go inside the lock. You have two options: either use your 6-in-1 survival tool to break that lock or use a pencil. Here’s what you will need to do. Using your survival knife, shave a tiny amount of graphite over the keyhole. Now get that key inside and give it a twist.

Plugging holes

There’s nothing worse than spending minutes at an end trying to get a screw to fit inside a hole that’s just too big. A quick workaround would be to plug it using graphite shavings. You can also rip out a small piece of the gum and use in on the hole.

Replace cutlery

If you forgot to pack a fork, you could always replace it with two pencils. Yup, it’s just like eating Chinese food with chopsticks.

First-aid

If you need to improvise a small splint for a toe or a finger, use a small pencil or cut one to shape. I’ve heard that there’s a guy up in Nebraska that uses graphite on minor wounds. Don’t know if pencil leads have this kind of properties, but you’re welcome to try if you’ve got nothing else on hand.

Water filtration

Since I’ve already said something about using pencil lead to create a rudimentary water-filtration system, it’s only fair that I show you how to do it. Grab a plastic water bottle, sand, pebbles, two pieces of cloth, and as many pencils as you can find. Using your survival knife, get the graphite out of each pencil and ground it into a fine powder.

Now, cut the bottom part of the plastic bottle and add a thin layer of pebbles. Next, add some sand, followed by the graphite shaving, and a piece of cloth. To finish off your water filtration system, add one more layer of pebbles, sand, graphite shavings, a piece of cloth, and some pebbles. Make a small hole in the cap and hang the bottle from a branch. Get a canteen underneath and pour the dirty water in the upper part. That’s it!

Extend the life of rechargeable batteries

After a quick trip to the hardware store, I found it useful to add another gadget to my bug out bag: a portable battery charging station and a couple of rechargeable batteries. They’re very useful, especially if you have gadgets that eat through batteries like there’s no tomorrow. Anyway, if you want to extend the life of your rechargeable cells, rub the terminals with some pencil gum.

Get a pair of muddy boots squeaky clean

It doesn’t matter how thing shitty gets – clean clothes and boots are one of those small things that keep us going. If you’ve been traipsing through the mud, you can easily remove the dried-out mud from your boots using the tip of a pencil.

Keeping your fishing supplies and sewing kit organized

If you find it hard to keep your fishing hooks, safety pins, and needles organized, try using a pencil’s gum. You literally have to stick them in the gum, and that’s the end of the story. If you have a paracord grenade or other mini version of the B.O.B, you can use pencils to keep your cordage neat and organized.

Tweak your landline

In 9 out of 10 cases, the reception’s bad because there’s too much gunk on the phone cradle. To clean those metallic bits and improve reception, use the pencil’s gum. Are all done with the cleaning? Call someone to see if there’s any improvement.

That’s about it on creative ways to use a pencil in SHTF. Anything missing from the list? Let me know in the comments section.

The pen may be mightier than the sword, but nothing beats the common pencil when it comes to shit hits the fan situations.

As much as I hate doing this, I have to agree with the docs on smoking. I don’t really need to remind you just how unhealthy tobacco is – social media’s a pretty good job informing people on the dangers of chain-smoking, nicotine addiction, and all that crap. I find myself in an unusual position – although I have been smoking since 19 and yes, I’m one of those people who really enjoys having a cigarette after a good meal, I still remind others about how bad smoking is.

Anyway, maybe I’m a bit of hypocrite when it comes to smokes, but let’s leave it at that. In today’s article, I’m going to show you 8 unusual ways of using tobacco and cigarettes in a shit hits the fan situation. Should you smoke? That’s a big nope. Should you stock up on cigs? Most definitely! So, without further ado, here’s how to use those coffin nails in the field.

Trading

Remember those movies about gold-diggers using cigs and jeans for bartering? Well, in some parts of the world, and not to mention places like prisons or whatever, cigs are still being used for trading. Doesn’t matter if you smoke or not.

If someone has something you want and that person enjoys a good cig, then you’ve got yourself the best bargaining chip. Just be sure to stock up on the good stuff, not that cheap contraband crap. It would also be a good idea to stockpile some rolling tobacco as well.

Starting a fire

Well, if a cigarette’s destiny was to end up in flames then, by all means, let’s oblige. If run out of tinder, char cloth or steel wool, you can always use a cigarette tube to start the fire. Don’t throw away that tobacco. You may need it later.

Wound management

To increase clotting rate, light up a cigarette, and sprinkle some fresh ash over the wound. Yes, I know that it sounds like an open invitation to infection, but it actually allows the wound to close faster. Of course, you can always use a lit cig to cauterize the wound in case you don’t have any other means of stopping the bleeding. Just be sure you clean the spot and flush with a saline solution afterward.

Now, in case you have to deal with a more severe wound, let’s say gunshot or stabbing wound to the lung, you may be able to stop the bleeding by using the packet’s plastic wrap. Tape that thing over the wound and roll over. That makeshift wound plugger will stop the bleeding and, at the same time, will prevent blood from filling up your lungs.

Get rid of a tooth pain

I don’t think there’s anything worse than tooth pain. Throughout my life, I had to deal with broken bones, scrapes, bruises, nicks, and everything in between. But nothing compares to that pulsating pain you feel when you have a tooth infection.

If you’re in the field with no pain meds, break open a cigarette, take a little bit of tobacco and rub it against the hurting tooth. The pain will go away in a couple of minutes since tobacco has minor anesthetic properties. It can also be used as an antiseptic.

Get rid of intestinal parasites

In a previous article, I’ve shown you a couple of ways to get rid of intestinal parasites such as giardia, hookworms, and roundworm. You may want to add another anti-parasitic med to that list of yours: tobacco.

You know the saying: what doesn’t kill you, makes you stronger and also kills tummy worms. So, if you’re experiencing intestinal parasites symptom, here’s what you will need to do. Get the tobacco out of two cigarettes and eat it. Just like that! Drink plenty of water as the tobacco is sure to leave a nasty aftertaste. To ensure that the stuff killed all those disgusting worms wriggling in your tummy, repeat the procedure after 48 hours.

Removing nasty stuff from your water

In a survival-type situation, water is vital. However, that doesn’t mean you can drink water from any muddy puddles and springs you come across. If you run out of water purification tablets, you can use cigarette filters in order to make water safer for drinking. Here’s what you will need to do. Search your bug out bag for straw or any tube-like implement.

Remove two cigarette filters and shove them in the tube. Place your water filtration implement above a clean canteen and start pouring water. The water will slowly trickle into that container of yours. This system works more or less the same as the charcoal & pebble filtration system. That’s because most manufacturers place trace amounts of charcoal inside the filter tips.

Keeping the insects at bay

Camping would indeed be charming if not for mosquitos and other creepy things that sting at night. If you’re all of the insect repellent, you can make your own by using a pack of cigarettes. To do that, get all the tobacco out of pack and place in a pot.

Add some water and bring the whole thing to a boil. While it’s still hot, pour it in a bucket, and place it outside your sleeping area. I should warn that the smell makes your stomach churn. However, it will keep mosquitos and other crawling things away from your bedroll.

Relieves a stuffy nose

Spring’s is finally here! However, at least for me, it’s not a joyous time on account of my allergies and those damned colds. Well, if you feel like someone has shoved lint up your nose, try this old Native American remedy. Take a handful of rolling tobacco and put it in a pan. Add water and bring the mixture to a boil.

Grab a large bowl from the kitchen and a towel. Remove the pan from the fire and empty its contents in the bowl. Now, get your head over the bowl and cover your head with the towel. The smell may not be nice, but at least those tobacco vapors will relieve your nasal passages.

That’s it for my article on ways to use tobacco and cigarettes in a shit hits the fan situation. What’s your take on this? Hit the comments section and let me know.

As much as I hate doing this, I have to agree with the docs on smoking. I don’t really need to remind you just how unhealthy tobacco is.