How To Clean Your Clothes When The Grid Goes Down
Just like responsibilities, laundry goes unattended to until absolutely necessary. Doing laundry comes from way back. We are not doing it just because the clothes are dirty and look bad, but also because we want to prevent infections from spreading around or other diseases.
In the 3rd world countries, because of the poor conditions of having proper hygiene, the people deal with ebola, cholera or some other viruses. Washing clothes is a sign of civilization.
There are many ways people can do laundry some of them are just below:
Powered Options
There are a number of options that use power, but use a little less or have a lower draw that most generators can provide (to include fuel-burning and mechanical like wind or hydro, or solar backup banks). There are also the small-space and high-capacity machines that have a pretty big draw, but they’ll use it efficiently. Those let us still do whole loads in 15-20 minutes or so, and walk away from loads that are washing ou clothes so we can go do something else.
Some of those options include:
- Maytag Wringer Washers – (the Amish favorite) and similar rebuilt antiques
- Small RV, camper and tiny-living washers
- Wonderwash – Non-electric Portable Compact Mini Washing Machine
- Mini Mr. Heater RV-camper washer
Some of the electric options do require water hookups, or for you to be there to drain and refill when they’re ready. It’s something to be aware of while gathering information. Also, be aware of the power draw. As mentioned, some of the mini’s are only more efficient or smaller than standard washers and can have high power draws.
Some of the RV and camper or dormitory mini’s are all-in-one units that either convert to a dryer or have two chambers. You can also get separate low-power, highly efficient, or space-saving dryers like the EasyGo Wardrobe Dryer that works like an oversized dehydrator but for clothes (without the shrinkage) or dedicated spin dryers like the XtremepowerUS Stainless Steel Tumble Dryer.
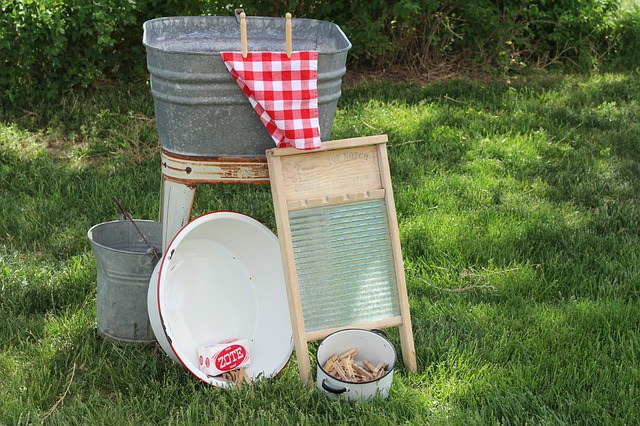
Lehman’s Own hand-washing and crank wringer laundry system
Commercial, non-powered laundry cleaning options
There are options for just picking up a hand-crank or foot-pedal washer as well, for those who aren’t DIYers. Most are going to be in the general build of a lettuce spinner or a tumbling “egg” washer. Some require hoses (or hassle) to drain, too. Some are a little easier on that aspect, but they all have to be rinsed somehow. Sometimes the little guys will wash the clothes, but then it’s up to us to better rinse the soap out and wring them dry.
Some of the commercially available hand-crank or manual-pump washers are:
- Easy-Go Washing Machine (and similar like the Eco-egg and many others)
- Drumi – The Foot Powered Washing Machine
- Scrubba laundry bag
- Old-school, historic crank washers like those at Lehman’s and similar retailers
*Most of these are going to be pretty small and only do 1-2 pairs of jeans or a few shirts at a time.
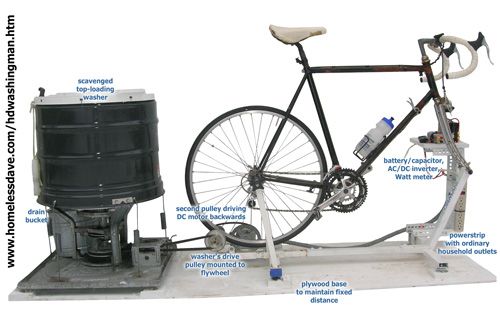
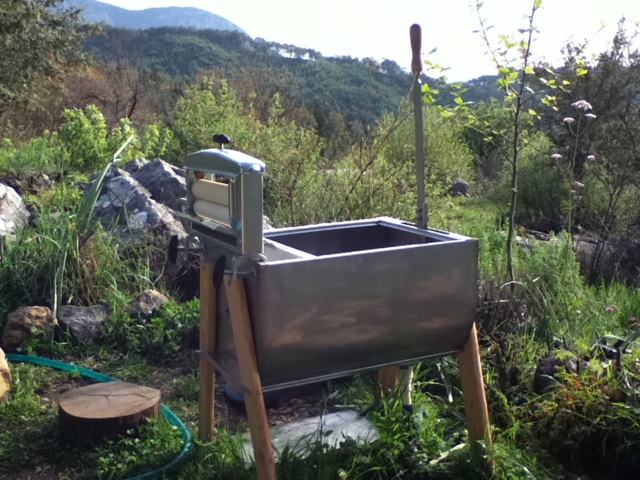
DIY project to power a spinning-basket drum washer using a bike
Manual Clothes Washers
There are truly lots of options to go DIY or old-old school. You can buy some of the options for manual washing, but there are really easy DIYs for some of them that can save move or just keep you from spending it because by the time you need them, the power’s off and you can just salvage them.
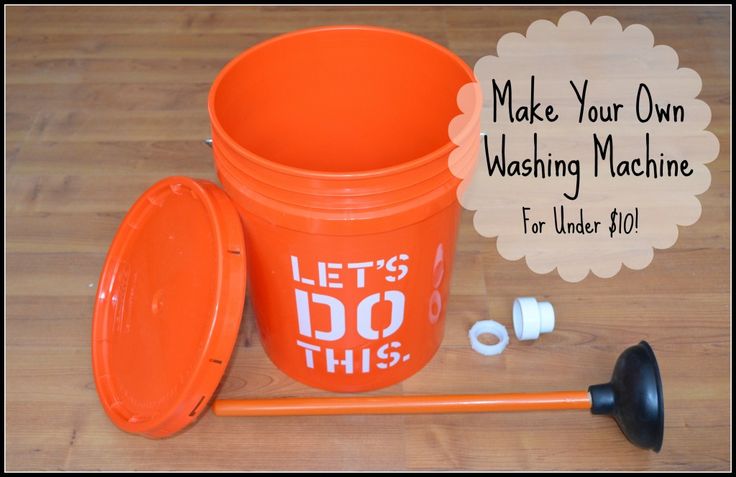
Plunger + bucket = DIY Clothes Washer for your Laundry
Instead of buying the large head, consider just drilling some holes in a clean plunger so that it doesn’t stick to anything. You can use a 3-5 bucket system or a bathtub, storage tote, trough or small stock tank. No reason not to use an aquarium or planter or filing cabinet drawer if they’re available (for this one or any other).
Related – The vital self-sufficiency lessons our great grand-fathers left us
I like buckets and storage totes with lids I can drill a hole for the handle for because it’s less messy. Five or six waiting buckets makes the process fast for me. It only takes a couple of minutes per load. They go in the first with a few drops of dish detergent or a penny-sized pool of pine cleaner, get pumped 8-20 times, then they go in the first clean water bucket. It usually takes 3-4 buckets for me to be confident they’re well rinsed. Unless stuff is just black, I can use the soapy bucket 2-3 times without adding detergent. By then, the first rinse bucket or two is getting pretty soapy, I add a little more, and somebody takes the dirty wash bucket to dump. That bucket gets refilled and goes to the end of the line.
You can go even more advanced with it like these guys:
Simple DIY Washer
Mechanized bucket washer
*If you use Dawn or an eco-friendly detergent, that bucket can get dumped for well-established trees and shrubs, or into less-sensitive annuals beds. Dawn is still not great for compost, and it’ll shut down the microbe processing for red wiggler bins.
Washboards
You can spend money on a washboard. Or you can just plan to take the large A/C or heater intake vent cover off the wall and use that alone or along with the current bathtub brush(es). I don’t find any real difference in clothes results, but I’m not doing lacy finery or sweaters on them. You do need to pad the bottom edge with a dowel, bamboo, or section of hose before you stick it in your bathtub, though.
The nice thing about a board and a brush is that you can really work specific spot stains, and you can use bar soap and laundry powder as well as dish soap and liquid detergents like pine cleaner, which can be had in super condensed forms really inexpensively. I also don’t worry about soaps degrading my buckets or toilet plunger (or the $20 blue thing I bought before I knew better) or my potato/bathroom brush and grate. Some people are a little crazy sensitive about the types of soaps they’ll use on their “real” washboards.
Related – 4 Important Forgotten Skills used by our Ancestors that can help you in any crisis
The downside is that you’re going to be doing one piece of laundry at a time, two tops, and it takes me a lot longer than dunking a pair of jeans in the buckets and plunging, even if they’re oily and it takes me 2-3 sessions of 15 plunges to get them clean. It takes me way longer to do the weekly hand towels and wash cloths with a washboard.
Boiling your laundry
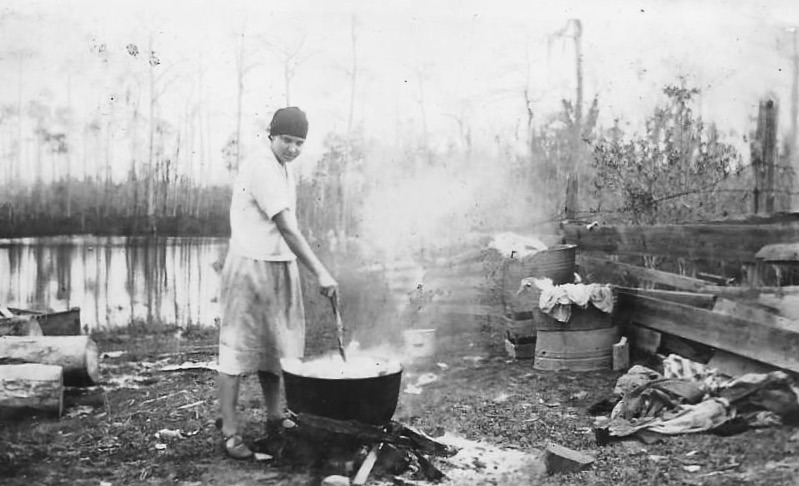
Finnish Immigrant Boiling Clothes for Wash, Near Bayou Cumbest, Mississippi. Around 1900
This method will lift some things, but anybody with two Xs and a learning curve for adulthood or wine on a shirt can attest that cold water is our friend when it comes to stains and appearance. Boiling clothing is really more about just killing germs. You can do as many clothes as you have a container to fit with room to stir them a bit – stock pot, maple syrup boiling cauldrons, big Dutch ovens. You want to boil in excess of 30 minutes and you want a hard, rolling boil. This is a good method if you’ve already got a fire going for something else and appearance doesn’t matter, but be aware that boiling alone will not kill all germs. Many bacteria will form resistant spores that “hatch” again as conditions return to tolerable. The addition of a soak in cool water and bleach for whites or pine cleaner for colors can help with both stains and germ reduction.
The nice thing about just boiling is that once it’s cool, the water can be dumped into any garden plot, creek, or pond without anything that wasn’t already in the dirt touching it.
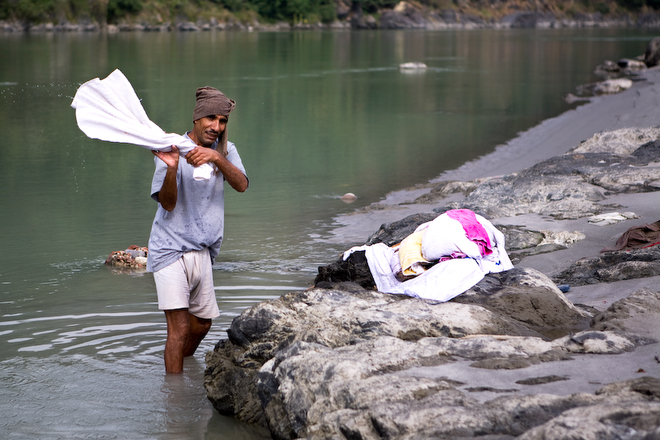
Stones, brushes and boards at creeks
*Please use Dawn detergent or a no-kill camping soap or detergent so we limit our impact on the microbes that are the base of the food systems in creeks and ponds.
This isn’t that different from a brush and washboard. It’s how I did a lot of laundry in my time as a through-packer and kayaker. You apply some sort of soap (or just water if you pre-boil clothes to kill germs) and then scrub with whatever’s handy – even if that’s just the friction of clothes against each other.
Mop wringers and presses
There are mechanical clothes wringers that can be purchased. Or you can pick up a mop wringer or press for a whole lot less most of the time. There’s also a crazy-expensive 5-gallon salad spinner on the market for restaurants that can replicate the washer’s spin cycle.
Quickfire considerations

Consider the expandable or rotary racks for indoor drying as well as lines inside and outside
- Laundry matters for hygiene reasons, not just appearance.
- Many of us are already going to be working pretty hard, so investing in a fast or low-labor option may appeal.
- Small battery-powered fans and generator-run box fans can help drying immensely in campers, tents, and humidity or cold-rainy houses with limited airflow and high moisture (when dehydrating food, too).
- Bleach is only a sanitizer in cool water. Boiling and hot-hot water break down that aspect and it becomes only a whitener.
- With most hand-washing systems, bleach is going to be best used out on a tarp in the yard or in a bathroom (and in grubby clothes or birthday suits).
- Laundry is a high-water-use process a lot of the times, so a good catchment system or backup system is important. They sell some powders and gels for water-free shampoos, body wash, laundry, and pet shampoos, but they tend to be pricey.
- Consider the expandable or rotary racks for indoor drying as well as lines inside and outside. Getting clothes dried especially on cool, damp days can be a trial and there’s only so much space near a stove.
- Nobody ever said a now-defunct extension cord, cargo straps, or dog tie-out line can’t be used as a clothesline or that you can’t string your line between your shed and a vehicle. Don’t spend money you don’t have to until you’re totally set to take care of yourself for at least 6 or 12 months.
- We can take cues from our ancestors (and parents) who had/have “school” clothes and “play” clothes and through-packers who change undies and base layers, let those air dry, and re-wear outerwear. Work clothes get re-worn multiple times. (Ask service members how often they washed BDUs/ACUs/Cammies/Diggies).
- Wearing farm boots or gaiters can protect clothing from picking up debris and muck.
- Use two sets of sheets and pillowcases on beds and inside bags. Sheets function as the base layers for packers. They’re thinner to wash and faster to dry than blankets and quilts.
- If pets get on furniture or beds, consider throwing another set of sheets over the comforter or quilt so that can get washed instead of the thicker covers.
- The more hankies, towels, and sheets we have available, the longer we can go without needing to wash them, which can become an issue if the whole household gets a stomach flu or head colds when it’s cool and wet outside. We’re not overly inclined to be doing laundry even now, and without the ability to just press buttons, it’s going to be even harder to keep up with sickness, wet animals, and poorly trained humans. A pass-through pine sol or bleach can absolve Salvation Army rejects of all previous germs, and freebie rejects can be a great way to increase our storage of those items without paying a dime.
Laundry
Laundry sometimes doesn’t get its due, even from people who’ve had the joy of showering in their clothes first or going weeks with just a couple of pairs of base layers and a set of outerwear. We can pre-plan a lot of ways to reduce the amount of laundry we have to do and take advantage of a number of DIY projects and household items to create low-cost alternatives to our stand washers. Super-condensed, powerful cleaners like commercial Pine Sol concentrate and liquid dish soap can be used just a few drops at a time and stored for upwards of 10 years without loss of potency, or we can research lye and germ-killing plant teas for our laundry purposes. For those who already have power systems in place, there are some low-power-draw options that can maintain some ease with the process.
For most of us, water is going to be a consideration – and it will be a consideration even before we run out of clothes in a lot of cases, unfortunately. Some methods are more and less water-friendly, and some of them allow more reuse of laundry water than others. That might influence us one way or another as we cruise through our options.
Here’s some other self-sufficiency and preparedness solutions recommended for you:
The Lost Ways (The vital self-sufficiency lessons our great grand-fathers left us)
Survival MD (Knowledge to survive any medical crisis situation)
Backyard Liberty (Liberal’s hidden agenda: more than just your guns…)
Alive After the Fall (Build yourself the only unlimited water source you’ll ever need)
The Lost ways II (4 Important Forgotten Skills used by our Ancestors that can help you in any crisis)
The Patriot Privacy Kit (Secure your privacy in just 10 simple steps)
Some methods are more and less water friendly, and some of them allow more reuse of laundry water than others.