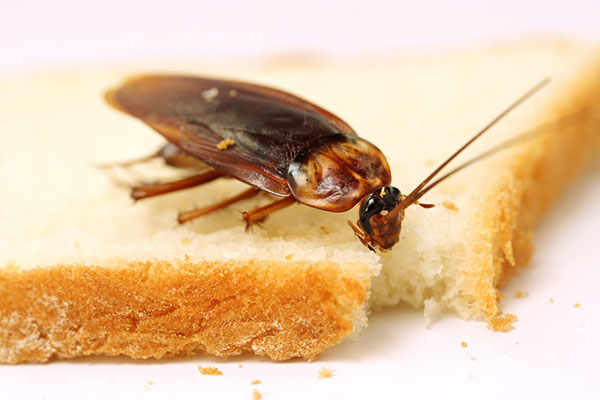
When it comes down to it, the reason that science fiction endures is that it is, at its core, an optimistic genre. What it says at the end of the day is that there is a tomorrow, we do go on, we don’t extinguish ourselves and leave the planet to the cockroaches.

But for some of us, living in the present, it really looks like the roaches took over. 

When you see roaches in your house, your first thought might be to grab a bottle of insecticide or to call an exterminator. But not only would you be exposing your family to toxic chemicals, they might not do much good.

A study by published in the journal Scientific Reports finds that German cockroaches — the most common roach species found around the world — are becoming harder to eliminate. These disease-carrying insects are developing resistance to many different insecticides, making them nearly impossible to kill with chemicals alone.

Because cockroaches are becoming so close to invincibility, researchers suggest combining chemical treatments with other methods — like traps and better sanitation — when fighting a roach problem. Or you can forego chemicals and try just natural methods.

Getting rid of roaches naturally can be a slow process. But getting rid of them naturally can also prevent the problem from reoccurring. So how do you do it? Take a shot at these ways to rid your home of roaches without using harsh chemicals!

Ways to Rid Your Home of Roaches the Safe Way

How to Get Rid of Roaches Without an Exterminator

Applying these natural ways to get rid of cockroaches is a longer process than when using hazardous pesticides. But for the sake and safety of your family and pets, taking it one step at a time is all worth it.

Besides, a roach exterminator cost will take a huge dent on your budget. In this article, we will share with you the natural ways to rid your home of roaches slowly but safely, and without a costly exterminator.

1. Boric Acid

Savefrom home-pest-control.us1Pest control ideasInsect exterminator

Boric acid is basically safe for use around the household and in fact used as an insecticidal substance. But take caution though, because it can be irritating to the skin so make sure to keep it away from children.

To make an effective boric acid cockroach killer, mix a part of powdered sugar to three parts of boric acid. The sugar will lure the roaches to the mixture and will terminate the cockroaches.

Sprinkle or spread the mixture in areas frequented by roaches.

What Is Boric Acid? It is a chemical substance which appears as colorless crystals or white powder which dissolves in water. It has many uses including insecticidal.

2. Wet Coffee Grounds (Water Tar Trap)

After brewing, if your grounds look wet & soggy, try this! Make the grounds coarser & increase the quantity of coffee.

What you’ll need:

  • 2-3 large glass jars
  • Wet coffee grounds
  • Water
  • 2-3 small cups

Instructions:

  • Fill the large glass jars about halfway with water.
  • Place the coffee grounds in the small cups.
  • Place one small cup inside one large glass jar. Make 2-3 similar setups with a small cup inside every glass jar.
  • Place these jars where you see roaches the most.
  • Roaches will be attracted by the aroma of the coffee and try to enter into the jar.
  • Once the roaches fall into the water jar, it is nearly impossible for them to escape.
  • Check the jars daily and discard any dead roaches.
  • Make new traps daily.
  • Repeat this process until you discover no sign of roaches within the traps for a couple of days.

3. Liquid Fabric Softener

Roaches breathe through their lower body. When you spray fabric softener on roaches, it will produce difficulty in their breathing and roaches will die due to suffocation.

What you’ll need:

  • Spray bottle
  • Water
  • Fabric softener

Instructions:

  • Make a spray by mixing 3 parts of liquid fabric softener with 2 parts water.
  • Fill a spray bottle with this mixture.
  • Spray this solution on the roaches; making sure the solution hits the lower mid-region and head of the roach.
  • In addition, spray this mixture wherever you see evidence of roaches.

4. Ammonia-Water Solution

What you’ll need:

  • 2 cups of ammonia
  • 1 bucket of water

Instructions:

  • Add 2 cups of ammonia to the bucket of water.
  • Wash the hard surfaces of your kitchen and bathroom daily with this solution.

Ammonia works effectively as a repellent for roaches due to its sharp smell. Roaches will leave your home in no time using this method.

5. Catnip

While cats love the smell of catnip and it’s non-toxic to humans and animal, the same cannot be said for roaches. It will send the cockroaches flying to wherever they came from.

While the effect is not permanent, you can always reinforce it with any of the roach killers here. You can make a catnip tea where you can spray in areas where cockroaches might be hiding.

Note: This natural repellent should only be used in homes without cats!

6. Listerine Spray

Does Listerine kill roaches? The essential oils present in the mouthwash is what actually kills the roaches, so any brand of mouthwash with essential oils will do.

What you’ll need:

  • Water
  • Listerine
  • Dishwashing liquid
  • Spray bottle

Instructions:

  • Mix equal parts of water and Listerine to make a solution and add two drops of dishwashing fluid to it.
  • Add this mixture to a spray bottle and spray areas where you have seen evidence of roaches; also can be sprayed directly on the roaches.

7. Soapy Water – To Kill Roaches on Contact

As I mentioned before, roaches breathe through their body and spraying them with soapy water will suffocate them.

What you’ll need:

  • 3 Tbsp of dishwashing liquid (preferably regular blue Dawn dishwashing liquid)
  • Water
  • Spray bottle

Instructions: Add 3 Tbsp of Dawn dishwashing liquid to 4-6 oz of water. Using a spray bottle, spray this mixture directly on roaches to kill them on contact.

8. Essential Oils – Citronella, Peppermint, or Lemongrass

It’s amazing how the scent we love, cockroaches hate. You will love this essential oil trick which will make your home smelling heavenly and cockroach-free.

Soak some cotton balls in the essential oil of your choice. From lemongrass, citronella, cypress, tea tree oil, and peppermint, they can all be effective.

Place the essential oil-soaked balls in areas around the home where the cockroaches are hiding. Or, you can also make this essential oil spray cockroach repellent.

  • Make a spray solution by putting half a cup of water in a spray bottle.
  • Add 10 drops of peppermint essential oil.
  • Add 5 drops of cypress essential oil.
  • Mix and spray in areas desired frequented by cockroaches.

9. Bay Leaves

Unlike us, who sniffs at bay leaves before throwing them to a dish cooking, cockroaches hate the scent of bay leaves. For this, bay leaves are a fantastic way to get rid of cockroaches naturally.

You simply need to crush a handful of bay leaves, then spread them in areas where cockroaches may be hiding.

10. Edible Baking Soda

The amazing baking soda simply has no bounds to the wonderful things it can do for our home. With the many benefits of baking soda around the home, it’s incredible they are effective roach killers, too.

Apparently, when baking soda comes to contact with water, it just expands.

To make a simple and safe cockroach repellent, mix edible baking soda and sugar in equal parts and sprinkle them in crevices and areas they frequent. The cockroaches will consume them and you know what will happen next.

11. Cedar

SaveFirst Editions Plants1Patricia PinskyJapanese Maples

Cedar also ranks one of the plants which a few insects find disgusting, and it includes cockroaches. Thujone–an essential oil present in cedar is the culprit.

While we find the aroma pleasant, insects are averse to it. Leave pieces of cedar in the kitchen areas where they could be frequenting to stop these intruders in their tracks.

Learn how to get rid of cockroaches in 4 easy steps in this video from Solutions Pest & Lawn:

We may never know how to get rid of cockroaches forever since they’ve been here before us. But we do know we can get rid of these critters in our territory.

With these natural ways to rid your home of roaches, you have several options to choose from. Apply all these natural ways to rid your home of roaches and we’ll be seeing none of these critters for good!

Which of these natural ways to rid your home of roaches have you tried or wish to try? Tell us about your thoughts in the comments section below!


We thank our guest contributor Stacy Bravo for this article. 


Other Self-sufficiency and Preparedness solutions recommended for you:

The Lost Ways (The vital self-sufficiency lessons our great grand-fathers left us)
Survival MD (Knowledge to survive any medical crisis situation)
Backyard Liberty (Liberal’s hidden agenda: more than just your guns…)
Alive After the Fall (Build yourself the only unlimited water source you’ll ever need)
The Lost ways II (4 Important Forgotten Skills used by our Ancestors that can help you in any crisis)
The Patriot Privacy Kit (Secure your privacy in just 10 simple steps)

Getting rid of roaches naturally can be a slow process. But getting rid of them naturally can also prevent the problem from reoccurring.

Growing your own food and medicine will vastly improve your chances of surviving a long-term disaster. Cultivating fruit trees is just one small way to enhance the food sources at your prepper retreat or bug in location.

There are a multitude of trees that are chock full of nutrients like Vitamin C and ingredients for natural remedies that can treat illnesses and major wounds. First, we’ll look at the top 20 edible and medicinal trees every prepper should be familiar with, then we’ll talk about how to make poultices, salves, and mixtures.

1. Alder

The bark and leaves from this tree are used to create a wound wash and can be consumed as a tea to treat fever, hemorrhoids, and tonsillitis.

2. Apple

Sure, you can eat the tasty apples, but this classic American fruit tree has a lot more to offer than pie-making ingredients. The bark from apple trees can be consumed to treat diarrhea and fever.

Stewed apples can be used as a laxative to treat constipation. The produce from the tree can be used to make apple cider vinegar, which has a plethora of natural remedy and cleaning uses. Baked apples can be used to make a warm poultice that when placed upon the throat or head can help reduce a sore throat or headache pain.

3. Ash

The leaves and tips of twigs from this tree can be consumed to help treat gout, rheumatism, and jaundice.

4. Beech

A tea created from the bark of this tree has long been used to treat tuberculosis and may also serve as a successful blood cleanser. Poultices made from the leaves of the birch tree may be used to soothe minor to moderate burns and to treat frostbite. Neither type of tea is recommended for consumption by pregnant women.

The tree produces small yet edible nuts. They are not very tasty, but they are safe to eat and contain nutrients the body needs to remain healthy. The spring leaves from the beech tree can be eaten raw or cooked. The interior bark can be consumed after drying and finely chopping the material so it can be used as a flour.

5. Birch

A birch tree can be tapped for syrup. It does not produce as much syrup as a maple tree, but the fluid has a delicious butterscotch taste. The leaves of the tree are rich in Vitamin C and can be consumed after being picked or used in natural medicine recipes.

The leaves from birch trees have often been a singular or primary component in natural medicines created to treat urethra, bladder, and kidney infections and can also be used as a diuretic. The interior bark of the birch tree is edible after being dried and ground so it can be used as a flour. The bark may also be cut into fine strips after being dried and added to stew or soup to act like noodles.

6. Cedar

A tea brewed from the bark of this tree can help alleviate the symptoms of the common cold, fever, the flu, and rheumatism.

7. Elder

The tea created from the bark of the elder tree may help treat congestion, break a fever by increasing perspiration, and soothe headache pain.

8. Elm

Both salve and poultices created from elm bark can be used to treat childbirth pain and gunshot wounds. If a poultice is placed on the victim’s abdomen, it may draw out their fever. The bark boasts a high calcium content and may facilitate bone healing, decrease diarrhea, and treat both bowel and urinary problems.

9. Hawthorn

A tea commonly referred to as a “cardiac tonic” is brewed from Hawthorn tree leaves. It is believed to provoke a decrease in blood pressure and therefore helps promote good cardiac health. It is not recommended to consume bark tea for more than two weeks before skipping a week and then resuming the treatment again if necessary.

10. Hazel

Nuts from this tree can be consumed and may aid in the treatment of kidney problems. Interior bark is used to make poultices to treat stomach ulcers. When mixed with animal grease, hazelnuts can be used as an insect repellent.

11. Linden

This tree, which is also commonly referred to as a basswood, has edible leaves and flowers. The spring leaves can be eaten raw or cooked. Flower blossoms from the tree can be brewed into a rather delicious tea that can be consumed either hot or cold.

12. Maple

A leaf wound wash or poultice is used to relieve sore eyes and soreness of the breasts for nursing mothers and pregnant women. Bark tea is used to treat kidney infections, the common cold, and bronchitis. Maple seeds can be boiled or cooked and consumed. Smaller seeds are sweet but larger seeds often boast a bitter flavor.Remove the outer skin of the seed and then boil until they become soft, approximately 15 minutes. Add spices to taste, preferably salt and butter, and then bake at around 350 degrees for about 10 minutes.

13. Mountain Holly

Spring buds and twigs from the mountain holly tree were once used by Native Americans to treat fever, diarrhea, stomach ulcers, and jaundice. Leaves can be brewed into a tea to treat cold and flu symptoms.

14. Mulberry

The spring twigs from this tree are fairly sweet and may be eaten either raw or boiled.

15.Oak

Acorns from the oak tree can be ground into a fine mash to be used in place of flour or cornmeal.

16. Pine

The interior bark of pine trees and the sap contain high percentages of both vitamins A and C. The sap and inner bark can be eaten either raw or cooked and may help thwart the onset of scurvy. As with other types of bark, you can cut the interior bark into thin strips and use them like noodles.

It can also be dried and ground into a flour. Pine needles can be chewed on for several minutes to ingest the juice before being discarded and not swallowed. The needles can be steeped in boiling water during the winter months after they have aged and used to make a nutrient-rich tea.

17. Poplar

The interior bark can be eaten either raw or cooked and has a sweet yet starch-like taste. The interior bark can be ground up as a carbohydrate-rich flour or cut into strips and eaten. The catkins from the poplar tree are also edible.

18. Sassafras

The young roots can be brewed into a delicious tea. The spring twigs can be chewed on to clean teeth and promote gum health. Leaves and buds in the early spring are also quite tasty and make great salad and soup ingredients.

19. Slippery Elm

The interior bark from the slippery elm tree is sticky yet boasts a pleasant taste. The inner bark can be eaten either boiled or raw. When the sticky bark is mixed with a fairly equal amount of water it forms a thin paste that soothes wounds and rashes and was even once used by soldiers as a battlefield treatment for gunshot wounds to help stem bleeding and ease the pain.

It has also been consumed to soothe sore throats, urinary tract infections, and as an anti-inflammatory agent. Powdered bark mixed with water can be used as an SHTF baby formula and also be consumed by folks who have difficulty drinking or consuming food made with cow’s milk.

20. Willow

The interior bark can be cut into strips and used like pasta once cooked or eaten raw. The leaves of the willow tree are really bitter, but they may be safely eaten in an emergency situation.

Making Natural Remedies From Medicinal Trees

Bark

  • Bark can be dried and powdered after being harvested and preserved for future use.
  • Dry the bark in a shaded area to avoid over-drying which can harm the cambium layer and reduce its nutrient content.
  • To make a bark tea, simmer approximately 3 teaspoons of the ground or chopped bark in a pot (preferably cast iron) with 1 cup of water for 15 to 20 minutes.
  • One-quarter of a cup of bark tea is typically considered a single dose of medicine in most natural home remedy regimens.
  • Most bark teas are safe for adults weighing around 150 pounds to drink up to three or four times per day. Cut the dosage in half for smaller adults and children age 12 and up. For younger children, decrease the dosage by half again. It is generally a good idea to not drink bark tea on an empty stomach.
  • Once made, bark tea can typically be stored in a jar with a tight-fitting lid for about seven days.
  • Adding a little bit of honey to a bark tea not only enhances the taste but increases its healing power.

Poultices and Wound Washes

  • Wash the leaves if possible or at least remove as much debris as possible if water is not available.
  • Chop or tear the leaves into fine pieces and mix with enough water to cover them so they can be either steeped or simmered to make a mash.
  • The mixture should resemble pancake mix to a thin dough after being simmered if making a poultice.
  • Spread the simmered leaf mixture onto bandage wrap or a clean piece of natural fabric and apply it to the injured area. Remove the poultice at least once a day and replace it with a fresh poultice if additional treatment is necessary.

Salves

To make a salve, put finely-chopped bark or leaves into a non-metallic pot and cover it with a carrier oil – olive and coconut oil both work well. Simmer the mixture for about 20 minutes and then melt beeswax into the mixture and simmer again for another 20 minutes. Use about 3 tablespoons of beeswax for every single cup of carrier oil used. Pour the mixture into a container with a firm-fitting lid and store until ready to use.

Tinctures

Tinctures are typically made out of spring buds, roots, or barks. The foraged material must be chopped finely and then covered with alcohol that is 80 proof or higher – vodka works best. Cover the mixture with a firm-fitting lid, preferably a glass container.

The mixture should be allowed to settle for about 10 days and must be shaken at least once daily. At the end of the 10 days, pour in 1 cup of water and a teaspoon of vegetable glycerin. Strain the mixture to remove the foraged material and store in a cool, dry, and dark place until ready to use.

If making a tincture using leaves, permit the mixture to settle until the foraged material shows signs of wilting. This will likely take longer than 10 days. Follow the same tincture steps notes above but shake the natural medicine up to three times per day.

Growing your own food and medicine will vastly improve your chances of surviving a long-term disaster. Cultivating fruit trees is just one small way to enhance the food sources at

Is there any one of us who doesn’t drool a little whenever you see an exotic sports car tooling down the road? I don’t mean a Mustang GT either; I am talking about Ferrari, Lamborghini, McLauren – something in that range. I love these cars and if someone gave me one I would gladly take it. Of course, after I took it out for a good spin I would sell it as quickly as I could. Why? Because I can think of so many other things I need to spend money on besides the most expensive sports car I can find.

One problem I have with a lot of the Best bug out vehicle lists is that they are full of really exotic (expensive) vehicles that the average prepper simply couldn’t afford. If we could, then I guess we would all have that Knight XV Fully Armored SUV that goes for around $800,000 if my source is right. I started thinking about this subject a little more as I was shopping for my own personal Bug Out Vehicle. After much saving, searching and research I finally found what I think is a great option for me, but I wanted to talk about bug out vehicles and create a different kind of list. This list will be the best bug out vehicles you can actually afford. So if you are in the market for a vehicle that may help you get out of or survive the next disaster, zombie apocalypse or the common summer or winter storm, read on.

What is a Bug Out Vehicle?

A bug out vehicle by definition is what you would hop in if you needed to get out of dodge. If you were going to pack your family and all your survival supplies in a vehicle and race out-of-town to avoid danger that was coming for you, the bug out vehicle would be the best option for you do accomplish this task. All bug out scenarios aren’t created equally though and each person has their own needs and preferences. Fortunately for us, there are almost as many bug out vehicle options as there are situations. The list below should account for most of what I can foresee the average person needing in a vehicle.

What should the bug out vehicle allow you to do?

Could you bug out in that 2 seat sports car? Absolutely. You someone bug out on a survival bicycle? Of course and before it’s all over that might be what you are forced to finally resort to, but in my mind a bug out vehicle has to be able to accomplish a few tasks to even make the running. Ideally we have a vehicle that you can use daily that can also hold its own if forced to be put into action to get you out of a hairy situation.


It must hold 4 people – But I am a single girl you say, why would I need something to hold 4 people? I believe it is short-sighted to plan on a bug out vehicle that only carries one or two people. That might be what you are forced to live with if something happened right now, but it shouldn’t be the goal. If this is a real bug out scenario you want to be with some friends or family because there is strength and support in numbers. The best bug out vehicles won’t leave the possibility of taking a few more people with you out of the equation.

It must be able to carry your supplies – Back to the 2 seat vehicle and even a lot of mid-sized cars these days. Most have so little cargo room that you would be lucky to get your bug out bag and a pillow in the trunk but you could forget about all of your prepping supplies, ammo and food and water you have stored. I am not saying that your bug out vehicle should be able to carry everything in your house or else it is worthless, but you do want the ability to pack a good portion of your supplies or gear.

It must be able to navigate rough terrain/rough weather – The first thing that comes to mind when I am considering a vehicle that I could actually use to bug out is 4 wheel drive. I have read other forums where some will complain about the fuel you would need and how a larger vehicle could actually be worse. Some have even recommended a hybrid as a better solution to save gas and I simply disagree. In almost every horrible scenario I can imagine, even something as mundane as a hurricane evacuation, the ability to go off-road is an important advantage. Try taking that Prius across the median of a clogged highway that is soaked with rain. Can you imagine that Chevy Volt in a snow storm with downed trees? Motorcycles don’t pass the test for me on this point although if outfitted correctly, they can go through a lot of rugged terrain. The downside is cargo capacity and exposure to the elements.

It must be fairly nimble and able to negotiate obstacles quickly – Back to motorcycles again. They are perhaps the most nimble but they have their drawbacks. Also, a trailer on the back of your vehicle would give you the ability to carry a lot of gear but seriously reduce your mobility. Try backing up a trailer and turning around to avoid an ambush quickly. Most people have problems backing up a trailer when they aren’t panicked, getting shot at or worse. You could wait for Ford’s Pro Trailer Backup Assist coming in their 2016 line, but is it worth it?

What are the best bug out vehicles?

So taking all of those criteria into consideration and this assumes the market is the US, what are the best bug out vehicles that meet that criteria and won’t break the bank? Most all of these are vehicles that unlike the Knight XV are driven by millions every day and can get you to safety, all things being equal. You can also buy late-model versions of each of these for less than $20,000. Not free obviously, but not $800,000 either.

Jeep – There are several models of Jeep that boast both 4 wheel drive and have a decent amount of cargo capacity to get you where you need to go. For serious off-road enthusiasts there is a huge market of parts and accessories to make this vehicle highly customizable.

JeepBugOut

Jeep’s are tried and tested off road vehicles that could make excellent bug out vehicles.

Humvee – The average prepper knows all about these vehicles and new ones are out of the realm of possibility, but you can get surplus military Humvee right now for less than $10,000 on the GOV Planet website. If you have always dreamed of outfitting your own mini-fiefdom after the world ends, now is your chance. Of course if you just want a great vehicle that can get you and your family to your secluded retreat, this makes a compelling option at this price.

HummerBugOut

A surplus Hummer could be an incredible savings and give you a battle tested winner.

4 Wheel drive Truck with crew cab – There are too many four-wheel drive trucks to list here, but a crew cab make this a natural fit for a Bug out vehicle. You can improve the suspension, add a cargo top and have a great vehicle that you can drive every day or when the grid goes down.

BugOutFord

Trucks are one of the most common bug out vehicles for their capacity and off-road ability.

4 Wheel or all wheel drive SUV – Just like with trucks, SUV’s are everywhere but they aren’t all created equally. Some have 4 wheel drive, but all 4 wheel capability isn’t created equally. For SUV’s I would stick with Toyota 4Runner, Nissan or the Jeeps mentioned above. Obviously, the old Ford Expeditions and Chevy Tahoe can work in this capacity too and there will always be easy access to parts for each.

SUVBugOut

The family SUV can also get you out of a jam with the right upgrades.

Best Bug out vehicle upgrades

These vehicles listed above will make great, affordable bug out vehicle options for most people but if you want to extend their capabilities, you can add some fairly simple aftermarket additions to make them even better.

  • Roof top cargo racks – This will extend the amount of gear you can carry by a considerable bit. Two well-known manufacturers are Gobi and Baha.
  • Improved front and rear bumpers – This is not an upgrade for everyone because they aren’t cheap but if you want some more protection (a lot more) for your bug out vehicle, there are several manufacturers. ARB, Shrockworks and CBI make insanely tough bumpers that you can add to your own vehicle.
  • Winch kits – Sometimes you get stuck and if the end of the world as we know it happens and you are riding into the wilderness in your bug out vehicle, you won’t be able to call AAA. Having a sturdy winch could pull you out of a jam.
  • Enhanced lighting – Regular headlights are only meant to show the road immediately ahead of you at a normal distance that won’t blind traffic coming towards you. If you are out in the wilderness or a power outage or storm has rendered your world as black as night, additional lights can help you see or be seen. The current LED technology has really increased the amount of available light you can have for your BOV. Some of these lights are capable of putting out over 24,000 lumens! For comparison, your regular Cree mini flashlight has about 200 lumens. Rigid Industries is probably the best known (and most expensive) but there are cheaper options out there if you look around. For instance, Amazon has a 24 inch LED light bar for under $60. That will save you about $800.
  • Communication optionsCB Radio and Ham Radio make excellent upgrades to your bug out vehicle. Either will allow you to communicate with the rest of your group or rescue sources nearby.
  • Additional fuel storage tanks – Increase the range of your bug out vehicle by adding a larger or secondary fuel tank. Of course, there are cheaper options where you can just purchase additional fuel cans and mount them on your roof rack or bumper.

Hopefully, this gives you some ideas if you are looking for a bug out vehicle that you can afford. What are you driving?

A bug out vehicle by definition is what you would hop in if you needed to get out of dodge. If you were going to pack your family and all

Squirrels may ravage my garden, but I do appreciate their ability to store for winter. My ancestors did too–storing their harvest in self-dug root cellars. Here in Massachusetts, our winters are too chilly to keep crops in the soil, covered with straw, as they did in England. So the American colonists watched the squirrels put their acorns in holes and promptly did the same.

Root cellars make use of the consistent temperature and humidity present just a few feet beneath the soil.  Most cold-weather vegetables thrive in these conditions, thus allowing them not only to be stored throughout the winter but remain alive, with all of their nutrients intact.  Why buy plastic-tasting vegetables that have been shipped thousands of miles when you can have your own fresh, living ones just a few feet from your front door?

Root cellaring is essential for eating seasonally.  It is one of the cheapest methods of food storage and is arguably even more effective than a refrigerator.  Root cellars are also adaptable to any terrain or budget.  They can be as large as an underground room, complete with ventilation shafts and shelving, or they can be as simple as a hole dug into the ground with a bin put inside.  The latter is the route that I took for my own project.

Materials

  • Large Bin or Barrel
  • Rocks (preferably flat)
  • Hay or Pine Needles
  • An Old Door
  • Something to Store (like potatoes)

Tools

  • Tape Measure
  • Shovel
  • Pick
  • Wheelbarrow

Method
First, choose a location that won’t flood and that you won’t mind trudging to in the middle of the winter. I chose a clearing in the woods just fifty feet from my front door. Remember, if your root cellar isn’t convenient, you’ll never use it.

Next, start digging.  The size of your hole will depend upon the size of the box or barrel you plan on burying.  Dig a hole larger than the box on all sides, and make the depth at least five or six feet from the surface.  You’ll go through a few different layers of soil, but hopefully, you won’t hit any heavy ledge.

Don’t dig too deep or you’ll find yourself with a well rather than a root cellar. And take care not to leave your hole unoccupied or uncovered.  You don’t want anyone getting hurt.

2

After your hole is clean and square, fill the bottom of it up with about six inches of large rocks or crushed stone.  This will give excess water somewhere to go so that you do not make vegetable soup prematurely.  The stones will also draw cool air up from the soil and further insulate your crop.

3

At this point, you need to begin preparing the vegetables you intend on storing.  Since your root cellar can be accessed at any time, you can always add to it.  However, some vegetables must be stored differently than others, so this must be a consideration when you are planning what to put in your bin.  Information on how certain vegetables should be stored can be found in many different books.

In my own cellar, I stored my potato crop. Unless you’re storing massive quantities of potatoes, you can keep them in bins without any special treatment. After digging, allow them a day or so of curing outside.  Use up any potatoes that you accidentally nicked or bruised rather than storing them because they’ll rot.  Beware squirrels, along with excess sunlight, which can turn them green and poisonous.  Once the skin of your potatoes has thickened up, you can carefully add them to the bin.

4 5

When you’re confident with your hole and veggies, gently place your bin or barrel onto the rocks.  It’s not a bad idea to fill in around the barrel with more crushed stone, but since I didn’t have much on hand, I decided to forgo it.

6

Now cover your bin with straw or hay. Since I had neither of the two, I used pine boughs, which worked the same and were actually easier to remove when I needed to get in the bin.

7

Finally, you will need to cover the hole with something solid.  I happened to have an old barn door lying around, but you can use anything from an old car door to a big sheet of plywood.  Just make sure that it covers the hole completely to prevent water seepage and critters from venturing down there.  If you’re really crafty, you could even put a whole door with the frame on top so that you can just open it rather than having to flip the door over. Either way works.

Also, you may want to leave a tiny crack for air flow, but cover this loosely with some pine boughs or hay.  And when the cold weather really rolls in, throw a couple of hay bales on top of the door to fully insulate the cellar.  Remember, we are trying to preserve that steady cool that exists naturally beneath the earth.  Any hot or frigid air from above might disrupt the environment, spoiling or freezing your veggies.

8

Check on your root cellar every once and a while, and remove any spoiled produce.  One bad apple truly does ruin the lot.


Other self-sufficiency and preparedness solutions recommended for you:

The vital self-sufficiency lessons our great grand-fathers left us

Knowledge to survive any medical crisis situation

Liberal’s hidden agenda: more than just your guns

Build yourself the only unlimited water source you’ll ever need

4 Important Forgotten Skills used by our Ancestors that can help you in any crisis

Secure your privacy in just 10 simple steps

Root cellars make use of the consistent temperature and humidity present just a few feet beneath the soil.  Most cold-weather vegetables thrive in these conditions, thus allowing them not only

Homesteading’s the fine art of getting your land legs while learning how to do most of the stuff on your own. It’s great to have your own slice of heaven by the sea or in the middle of a dark and twisted forest – I for one can vouch that, most of the time, it’s rather amusing to figure out how our ancestors did things like tending to the garden, raising farm animals, settling in for the winter, picking up fresh herbs from the garden or building simple stuff out back.

Still, as pleasure-laden, as homesteading may be or become, it’s rather a turnoff when you need to do all of the things or more when you’re sick. Even a simple cold or the flu can turn a grown man into a noodle, but imagine what happens when you become bound to your sickbed with no one around to take care of you and your house.

Yes, that may strike as being a little depressive, but, unfortunately, it can happen even to the best of us. I being struck down a couple of months ago by the stomach flu somehow wound up all alone at my hunting cabin. Wife couldn’t come up on account of the kids being sick too and no driver’s license, so I was kind of force to get ingenious about my homesteading.

Anyway, after careful considerations and some chicken soup, I came with this wonderful piece which details my journey from sickly couch-potato to a regular Paul Bunyan wannabee. Without further ado, here’s are my golden rules to successful homesteading while you’re sick.

  1. Stay in bed

Of course, my first golden rule had to be a no-brainer because of reasons. Just kidding – most people tend to underestimate the severity of their medical condition and decide to just brush it off. Don’t do that. If you’re feeling that your legs are turning into the noodle, get to bed, medicate, and sleep on it. Remember that you’re all alone out there, and if you happen to collapse while working the field or chopping wood, there’s no one around to pick you up or drive you to the hospital.

  1. Get in touch with emergency services

No matter if you’re a big city dweller or the king of your own hill or mountain, you’ve still got to figure out how to get in touch with the emergency services in case shit hits the fan. A while after I bought my hunting cabin, figuring out that I kind of get down with the flu when spring comes, I went to my local drug store and bought me a one-push emergency bracelet.

Surprisingly, the device has great coverage, even in places where there’s no phone signal. Don’t kid around with your health, especially if you decide to drop off the grid. If you can’t find an emergency bracelet, use an emergency service smartphone application like Emergency+ if you have adequate coverage. A portable distress beacon is always a great alternative, but it will need some tinkering before you can use it to alert the local emergency services.

  1. Keep an ample supply of chopped wood or fire-starting material

Golden rule number three – when you’re game, chop as much wood as you can because you won’t be able to do so when you’re sick. It would also be a good idea to keep a small wood stack as close to the home as possible to minimize exposure to the elements.

Yes, I know that’s a big no-no in the big book of prepping, but some rules are meant to be bent if in doing so increases your survival likelihood. If your stove is running on another kind of fuel, be sure to keeps some close by, but not too close to the heating device.

  1. Soup broth all around!

I know it’s kind of a cliché but hot chicken soup really help you’re sick or feeling down. Making some in your home is no big deal. Still, I would skip the cooking part and go buy some canned soup. Sure, nothing beats a home-cooked meal, but do keep in mind that you can’t prepare the broth that much in advance.  So, make sure you have enough in your pantry for whatever the case may be.

  1. No one should be without a checklist

Checklists are a marvelous way of keeping everything nice and tidy, especially if you’re the kind of person that has no love for neatness. If you find yourself alone and sick on your property, get yourself together and try to jot down a small to-do list for the next couple of days. That way, you will have ensured that you haven’t missed anything.

  1. Let someone know you’re there

You may be king of the mountain, but every king sometimes requires the aid of a royal advisor. In this case, you should let someone know where you are and, most importantly, how long you’re planning on staying. If you plan on moving there, get to know your neighbors and, if possible, ask someone to check up on you every couple of days to make sure that you’re safe and sound.

  1. Keeping your meds close

You don’t need to be sick in order to figure out that it’s really important for the meds to be within reach. I personally emptied an old wooden wardrobe and sort of turned it into a big med cabinet. Of course, you can do as you like when it comes to med storage. Don’t forget about the golden rule of med hoarding: painkillers first, anti-histamines second, and vitamin supplements last.

These are my golden rules of homesteading while I’m sick. As I’ve mentioned, all of this stuff are the results of my me-time at the hunting cabin. Sure, it may be possible that some steps might be a bit off, but, as I’ve said, this was a personal experience. Think something’s missing from the list? Then go ahead and hit the comments section and let me know what you think.

Homesteading’s the fine art of getting your land legs while learning how to do most of the stuff on your own. It’s great to have your own slice of heaven

Did you know that before the Winchester repeating rifle was invented, Walter Hunt patented the “combined piston breech and firing cock repeating gun”?

Not only that, according to the Smithsonian, he also invented the fountain pen, the sewing machine, and that little thing most of us call the safety pin. While they certainly don’t pack the power of a repeating gun, there are a number of survival uses for safety pins if you include them in your EDC kit.

When it comes to survival , the ideal thing is to have a good EDC kit and some first aid supplies or a bug out bag. But what happens if you get caught out away from home without your bug out bag and first aid kit?

We’ve listed suggested uses for keeping safety pins in your EDC kit below. Please keep in mind using safety pins for some of these things are recommended as a last resort, meaning when you have no other option.  We are NOT recommending that you rely primarily on safety pins for tasks critical to survival.

Also keep in mind this article is NOT medical advice, and anything you do is at your own risk, and neither the author nor www.SurvivalSullivan.comcan shall be held liable for any injuries or negative effects as a result of putting the advice of this article into practice.

#1. Remove Foreign Objects Under the Skin

Just about everyone has probably experienced getting a splinter or some other small sharp object stuck under their skin. Use an open safety pin similar to tweezers to remove splinters, thorns, insect stingers, ticks or even the dreaded botfly. With insects, make doubly sure you know what the risks are and seek medical advice first if available.

#2. Flush Out a Wound

Once you’ve removed a splinter or other foreign object, it’s probably a good idea to flush out the wound to ensure it’s as clean as possible. You can use a safety pin to poke a hole in a water bottle or plastic bag filled with water so that you can have a precise stream and conserve water for later.

#3. Stitch a Wound

It’s not the recommended way to stitch up that cut on your arm but in a pinch, if you don’t have a needle, you can make a safety pin work. Be extremely gentle and take care not to break it off as you pull.

#4. Secure Bait

If you find yourself in a survival situation where you need to use a trap to catch food, the last thing you want to do is risk the prey snagging the bait without setting off the trigger. You can use a safety pin to secure your bait to the trigger so there’s less chance of your prey getting away with a snack and leaving you with an empty belly.

 #5. Replace a Button

Although probably not a true survival situation, you can use a safety pin to replace a missing button on your shirt or pants.

#6. Sewing Awl

In a pinch, you can use larger safety pins as an awl for sewing heavier material such as leather, burlap, or canvas.

Straighten out the pin and use the sharp end to pierce the material, twisting it around a bit to make the hole large enough for your cordage. Push the cordage through the holes using the tip of the pin or your finger depending on which is easier.

#7. Hang Clothes to Dry

When we camp, there are times that it rains or that we need to hang wet clothes or other items overnight. If you drop your wallet in the stream or your jacket falls from your backpack into the mud. You can use clothespins to secure lightweight items to dry overnight from the inside of your tent using some cordage or even a bungee cord stretched between the poles.

#8. Fishing Hook

It’s not ideal but you can use a safety pin as a makeshift fishing hook by tying it to your fishing line and then opening the pin and bending it into the shape of a hook. Add your bait and drop the line in the water. It will only work with smaller fish obviously but it’s better than nothing in a survival situation.

#9. Secure DIY Bandage

If you are injured unexpectedly and need to bandage the wound but don’t have traditional bandages, a safety pin might be a lifesaver. Tear or cut a strip of clothing or other available clean material, wrap it around the wound and secure temporarily with safety pins.

#10. Escape Handcuffs or Locked Room

When SHTF, it’s entirely possible for you to be taken captive by someone who wants your supplies, property, or worse. In the absence of a good lock picking kit, you can use a safety pin to help you pick a lock and escape.

#11. Make a DIY Sling or Splint

If someone falls during a bug out or other type of survival situation and you need to immobilize their arm or shoulder, you can use a safety pin to attach their sleeve to another part of their clothing or put a stick on each side of a damaged finger and wrap with cloth and secure with a safety pin.

#12. Close or Attach a Makeshift Shelter

Again, in a survival situation, I really hope you’ll have better shelter building materials on hand but in a pinch, you can use safety pins to attach clothing or any other type of available cloth together to create a makeshift albeit very temporary shelter.

 #13. Reinforce Zippers

Replace a broken zipper pull on your bug out bag with a closed safety pin or use a safety pin to fasten two zippers together to keep them from working open during your bug out.

#14. Repair a Rip or Tear

Depending on the situation you are in, the landscape, and how quickly you need to move, you may not have time to properly fix a tear in your bug out bag, a loose pant leg hem, or that rip in the sleeve of your jacket from catching it on a branch. Safety pins come in really handy for temporarily keeping things together.

#15. Fix Unthreaded Drawstring

There’s nothing more important in a bad weather survival situation than staying warm. If you find yourself in extreme weather with a jacket hood or sweatshirt with no drawstring, you’ll be scrambling to keep it up and stay warm. Use a safety pin and any piece of cordage to replace the drawstring so you can keep your head covered and your hands free.

#16. Toothpick

It may not save your life, but it could save you some frustration and agony if you get a seed or something else stuck between your teeth in a survival situation. Take care not to puncture your gum and cause an additional issue.

#17. DIY Lance

If you don’t have a needle and you need to lance a boil, smashed fingernail, etc. you can heat a safety pin to sterilize it and use the tip as a lance.

Have we convinced you yet to include safety pins in your EDC kit? You can carry them just about anywhere very discreetly. Pin them inside the hem of your pant leg or the inside of a hat that is part of your EDC. Slide a couple in your wallet or pin into your shoelaces.

Do you have other survival uses for safety pins that we neglected in our list above? Ever use a safety pin for a really unusual repair before? Let us know in the comments below. We always love to hear good ideas from other preppers and homesteaders.


Other self-sufficiency and preparedness solutions recommended for you:

The Lost Ways (The vital self-sufficiency lessons our great grand-fathers left us)

Survival MD (Knowledge to survive any medical crisis situation)

Backyard Liberty (Liberal’s hidden agenda: more than just your guns…)

Alive After the Fall (Build yourself the only unlimited water source you’ll ever need)

The Lost ways II (4 Important Forgotten Skills used by our Ancestors that can help you in any crisis)

The Patriot Privacy Kit (Secure your privacy in just 10 simple steps)

Did you know that before the Winchester repeating rifle was invented, Walter Hunt patented the “combined piston breech and firing cock repeating gun”? Not only that, according to the Smithsonian, he

In a grid-down scenario, we may not have the easy access to our kitchen tools that we have relied on in the past. Most kitchen appliances are powered by electricity or gas and if those both go out due to an emergency you could find yourself living “where there is no kitchen”.

Not having access to your microwave shouldn’t cause you any panic though, because people have been living pretty well without these conveniences for a very long time. Even if you have stored 30 days worth of dehydrated food and water, chances are, you will want to eat something warm before it is all over. Even in the military we only ate MRE’s once a day when we were out in the field. MRE’s will keep you alive but eventually, you get tired of that and want something hot and delicious. I know that MRE’s can be heated up too, but the contents of a regular bag of MRE’s can’t hold a candle to a nice venison stew that has been cooking slowly over a fire all day.

With some simple planning and preparation, you can cook just about anything you need to keep you alive and healthy through any disruption. There are a few considerations and lots of options for cooking that we will discuss below.

Cooking Options

We are going to assume that any cooking that you will be doing is outside in this grid-down scenario. No cooking with open flame should be done indoors and that includes using your big stainless steel propane grill. Fumes are toxic and can hurt you so keep it outside for safety.


stassj-cooking-stirring-woodstove

Wood stoves – These are about the closest you can come to the power and convenience of a range or oven inside your house or retreat location. Yes, I know that I just said to cook outside, but your stove is vented outside already. This is a winter solution though because you won’t likely want to fire up the big wood-stove in the living room in the middle of August.  In much older homes, the kitchen was in a different part of the house because the heat would stifle everyone else. During the winter a wood stove is a perfect solution for cooking and you can easily fit a couple of pans on the top and regulate the heat easily. You can cook on a wood-stove with your regular pans without any problem.

Backyard Grill – This is my personal first line of defense if the power goes out. It is simple to use and already set up outside. The main drawback is the need for propane but I keep an extra 50lb. canister of propane at all times so that if my main source runs out I still have a spare. This spare propane would be on my list of basic household items that you need to stock up on also.

Some people use charcoal so an extra bag or two would be wise. It won’t last as long as a can of propane but having the ability to cook for a few days is always a smart idea. Optionally, if your house is heated with propane, you can purchase an adapter to run your grill but you probably are already using your oven in the house. It’s nice to have options.

tripod

A sturdy tripod will hold that cast iron cookware much more easily than you can.

Campfire – Since the dawn of time people have been cooking over an open fire on the ground. This would be my fallback option after the propane was gone or if I had something that was larger and needed to cook for a long time. Campfires don’t need to be fancy but having a pit surrounded with rocks to contain the fire is preferred. To cook on a campfire, you will want to invest in at least one piece of cast iron cookware. Two would be the best giving you the option to fry or cook a big stew. You will also want to have a method to suspend your cookware over the flames. This is where a great tripod like the one on the left here or a grate you can set on the ground over the coals. I prefer the tripod, but the grate is much simpler when you are using a skillet.

Camping stoves – These are a great solution too and use the same type of Coleman propane cylinders your lanterns take. They do have the drawback that the grill does though, and once your fuel is gone, they are worthless. You can use the grill grating itself over a regular campfire so don’t throw that away. We will talk more about that later. Backpacker stoves also come in handy in a pinch, but that would not be ideal for cooking larger meals. It will heat up single portions nicely though, and there are a lot of fuel options for the short-term emergency.

Rocket Stove – Rocket stoves are simple to build using materials you may have lying around or in the shed. These can be fueled with sticks and twigs and make a great surface that produces a lot of heat without a big footprint.

Lanterns – Anything that produces heat can warm your food and some lanterns give you the ability to use the heat escaping from the top to boil water or heat soup. This is yet another good option that may work for some people. Candles can also be used but this would be my last resort. They take forever but you are already using your candle so this is a way to get two uses out of your preparations.

Solar – I saved this one for last but solar cooking shouldn’t be discounted at all. If you have sun and dry weather this is a great way to heat up and cook meals if you have time to wait. You will want to build your own solar oven which is fairly simple or there are several you can buy online. If you just need to warm up a can of soup you can sit that in the sun on the driveway for 30 minutes and voila! Solar ovens can be made in numerous ways with lots of material.

Cooking Necessities

The first place we look is to our cooking containers, or what we are going to hold over our source of heat to contain this wonderful food you are getting ready to cook. Cast iron is my personal favorite but that isn’t practical if you are on the move. You can also cook with #10 cans if needed, just be sure that the plastic coating on the interior melts out first.

Aluminum foil is not only useful for creating a solar oven, but you can form bowls out of this to cook with or boil water in a pinch. Aluminum foil is a second cousin to Duct tape I believe because it has so many uses and should be on your list of supplies for your household. Can and bottle openers are nice. They aren’t necessary because if you are hungry enough, you will get that can open, but they are very convenient and do not cost anything at all. You will also want to have plenty of capacity for making a fire in the first place. Lighters are simple and cheap, but flint and strikers should be in your survival kits also.

Other tools you could use are oven mitt or pot holders to handle the pots on these cooking surfaces. Wooden spoons and spatulas won’t melt like plastic and you can even make these yourself if you have plenty of time on your hands and a sharp knife.

Cleanup

Now that the group has been fed how do you clean up? Sanitation is something that becomes more important with the severity and duration of the emergency. Germs are easily passed so cleaning your food utensils is an important consideration for the health of your survival group.  Assuming you have some water on hand for cooking, we can look back at how the pioneers cleaned their dishes.

The rare 1881 Iowa settlers manual has a tip for washing dishes when you’ve run out of soap. It’s in the cleaning chapter of the book and was written for some of the first people moving into Iowa to homestead in the 1880′s.

To wash dishes without soap, have your dishwater hot and add a very little milk, as this softens the water, gives the dishes a nice gloss and preserves the hands. It removes the grease, even that from beef, and yet no grease is ever found floating on the water as when soap is used.

For the most part, hot water and a sponge with abrasive on one side will do the trick. Boiling dishwater before doing dishes would be the safest way to make sure you’re not scrubbing your pots with Giardia. But as for me, 99% of the time, I’m content with just getting it hot enough to cut the grease. Your call. After scrubbing, strain your dishwater through a fine-mesh strainer (or a bandana) and broadcast the waste-water. In other words, fling it far and wide. You can use the rest of what’s left for compost.


On a different note, here are some other self-sufficiency and preparedness solutions recommended for you:

The Lost Ways (The vital self-sufficiency lessons our great grand-fathers left us)
Survival MD (Knowledge to survive any medical crisis situation)
Backyard Liberty (Liberal’s hidden agenda: more than just your guns…)
Alive After the Fall (Build yourself the only unlimited water source you’ll ever need)
The Lost ways II (4 Important Forgotten Skills used by our Ancestors that can help you in any crisis)
The Patriot Privacy Kit (Secure your privacy in just 10 simple steps)

In a grid-down scenario, we may not have the easy access to our kitchen tools that we have relied on in the past. Most kitchen appliances are powered by electricity

Wherever you are working or living at some point you will have to use vehicles, for most people they are part of their everyday lives. Driving itself can be a dangerous task in many places and as we have seen many kidnappings, robberies and assassinations occur when people are in or around their vehicles.  In times of civil unrest or if you’re traveling to a potentially hostile area your vehicle security and travel must be planned for and taken seriously.

Vehicles should be regarded as an important piece of your equipment and should be well maintained and never treated as a toy.  Before you take a vehicle out basic maintenance checks need to be done, like checking the battery, oil, fuel level, tires, water, spare tire, break down and vehicle emergency kit. You should always ensure you have a good means of communications and that you regularly check in with trusted people who can send assistance in the case of an emergency. You should also always know the routes you are driving and the location of any facilities along those routes that could be of use to you whether it’s a coffee shop with a bathroom or a hospital with an emergency room.

Basic Vehicle Security

Vehicles need to be secured or manned at all times, if they are left unattended, they, and the area around them, must be searched for IEDs, electronic surveillance devices, contraband and anything suspicious. The area around a vehicle must be searched as you approach it for any suspicious vehicles or people; the criminals may have found your car and are waiting for your approach it to kidnap or assassinate you. I always try to park my car as far away from others as possible, that way there is no cover for anyone to hide and if any other car is parked close to mine they are immediately suspicious.  If you keep the vehicle in a locked garage still always lock doors and trunk, you will also need to search the exterior of the garage for IEDs, electronic surveillance devices and signs of forced entry in a high-risk environment.

If the vehicle cannot be garaged, try to park it in a secure, guarded area or somewhere that is covered by surveillance cameras. Drive-ways and regularly used routes from your residence to main roads should regularly be search for IEDs and signs of criminal activity. A vehicle needs to be searched after being serviced or repaired and after being left unattended for any length of time, here are some guidelines on how to search a vehicle:

  • 100 Deadly Skills – Great information for people who want to make sure they can survive any dangerous situation.

    Always search the general area around a vehicle for any explosive devices or suspicious people waiting to ambush you. Always check the outside of a garage for any signs of a force entry before you go in and check garage doors and drive ways for signs of booby traps, land mines and ambushes. The roofs of garages need to secured!

  • Turn off all radios and cell phones and check the immediate area surrounding the car for disturbances, wires, oil/fluid stains, footprints, etc. It helps to keep vehicles a little dirty as you will be able to see smears in the dirt if someone was trying to break in.
  • Visual check through the windows for anything thing out-of-place or wires, etc.
  • Get down on your hands and knees and check underneath the vehicle, inside fenders, wheels and arches for any devices. Also check for cut tires, lose wheel nuts and devices placed under the wheels. This is where a flashlight and a search mirror can come in handy.
  • Check the exhaust as it is a very easy place to put an improvised explosive device. You can have bolts or wire mesh put in to exhausts to stop IEDs from being placed in them; if you do this, make sure the bolts or wire mess is not visible as this can draw attention to the car.
  • Slowly open the car doors and check the Interior of the vehicle even if there is no signs of a forced entry. Do the same for the trunk and make sure to search the spare tire and break down kit.
  • Open the hood slowly and check the engine. Again it might be helpful to keep the engine dirty as new wires and hand prints are easy to see.
  • Final turn on the engine and check all the electrics.

This is just a guide to searching vehicles but as you can see to do a thorough search can take time and would require someone to be watching the back of the searcher. Your best defense is to deny the criminal access to your vehicle but this can prove to be very difficult in the real world.

Vehicle Drills

If you are consider undertaking some advanced driving training, I see little need for evasive driver training but can see applications for people to learn to be able to handle vehicles at speed and in hazardous weather.  Again, vehicle drills cannot be learnt from manuals or videos, you will need to learn them from an experienced advanced trained driver. Always check out the instructor’s background, qualifications and reputation, look for those that offer sensible driving courses and not wannabe spy holidays.

The main thing you need to learn is how to drive safely and to be able to identify any possible threats and avoid them. In most large towns and cities you will not be able to perform such things as J turns or other evasive maneuvers due to lack of space and traffic, so you must always be aware of what is going on around you.  The main thing I tell people is to keep as much space as possible between you and the car in front as this can give you some space to maneuver in congested traffic.

When you watch the movies and there is a car chase and the cars are skidding all over the place check the state of the roads they are on. Chances are the roads will be wet, and the tires on the cars will have minimal tread. This is the same on most evasive driving courses, but these are also usually done on private roads or open areas where there is no other traffic.  Think about why you put decent tires on your vehicles; to stop them from skidding and spinning out of control right? When you are driving around you always want to be thinking of where you could take evasive action, in urban areas there will be few places where you could spin your car around and drive against the traffic flow; that’s Hollywood.

If the criminals or terrorists are in any way professional they will attack you when your car is penned in and you cannot take any evasive maneuvers, not on wide open roads. It’s a common street kid tactics in a lot of Latin American cities to rob cars at traffic lights that are at least two cars back from the stop light with other cars behind them; these cars are stuck and cannot escape. If street kids on bicycles with at most a rusty revolver have worked out how to jack people in cars don’t you think their big bothers have also?

I am regularly asked about whether I favor armored cars or not, as with everything they have their pros and cons. Armored cars do have an application, the first thing you need to consider is what level of armoring the car your buying or using has. I have come across people driving around in cars armored to stop pistol caliber rounds in areas where the bad guys carry assault weapons, they thought an armored car was all they needed and were unaware of the different levels of armoring. You will also need to confirm where the car is armored; doors, windows, floor, engine, roof etc. Some cars may only have some armored panels in the doors and rear seat, always check for yourself and do not believe what people tell you.

Now think like the criminals, if you knew your target was driving around in a SUV armored to B6 level are you going to shoot at them when they are driving around or wait for them stop and get out of the car, or stop them and make them get out of the car? Think about how can you get someone out of a car; what would you do if a female driver bumped into the back of your car, get out to inspect the damage and then possibly be kidnapped by her two armed accomplices crouched in the back seat of her car? Always be aware of decoys that are intended to make you stop and get out of your vehicle, such as accidents or even bodies next to the road. Basic rule, stay in your car and keep moving between safe areas.

A criminal tactic when targeting armored cash-in-transit vehicles is to box them in, cover the van in gasoline, then give those inside to option of throwing out the cash, surrendering or being burnt alive. An issue with armored vehicles is that you cannot shoot at the criminals from the inside. There was one incident I recall from the mid 1990’s where an unarmored van that was moving cash was stopped and ambushed in an Eastern European country, the fact the van was unarmored enabled the security personnel inside to be able to shoot through the sides of the van and drive off the criminals, which they could not have done if they had taken an armored van that day. There have also been numerous incidents where criminals have assassinated targets traveling in armored vehicles with IEDs, Rocket Propelled Grenades (RPGs) and improvised shaped charges. An armored vehicle can assist you in your security program but it should not be all there is to your security program.

Security Considerations when using vehicles

  • Always check the area around the vehicle before you approach it.
  • Search the vehicle prior to use for IEDs, electronic surveillance devices and contraband.
  • Always keep a spare set of keys for the vehicle on you in case the driver loses his or is taken out by the criminals.
  • Be aware of the vehicle’s capabilities; make sure the driver has experience driving that type of vehicle.
  • Always drive safely at the maximum, safest speed, within the legal speed limit.
  • Always carry out basic maintenance checks, before you go anywhere and check that communications work before leaving a safe area.
  • Make sure you know what to do if your car breaks down; will someone come to get you or will you call for roadside assistance?
  • In rural areas things that should be included in your break down kit should include cans of fix-a-flat, air compressor, jump leads, tire plugging kit, tube to siphon gas, gas cans and a tow rope.
  • Know which routes your taking and keep maps in the vehicle for all areas you’re traveling in. Also have alternative routes prepared that have been driven and checked out.
  • Inform personnel at a location 10 to 15 minutes, before your arrival.
  • Constantly check behind you for criminal surveillance vehicles and be suspicious of motorbikes, especially with two people on them.
  • When being followed by a motorbike always watch to see if both the rider’s hands are on the handle bars, if you only see one hand, what is the other holding or doing?
  • Make full use of your mirrors; put a mirror on the passenger side for the passenger to use.
  • Regularly carry out counter-surveillance drills and always be watching for any cars following you or suspicious people along regularly used routes.
  • Keep a good distance from the car in front, so you can drive around it in an emergency and try to avoid being blocked by other vehicles.
  • Never let the vehicle fuel tank to go below half full and know where all gas stations are along your route.
  • Keep doors locked when traveling between locations and in urban areas do not open windows or sunroof more than an inch, so things cannot be thrown in.
  • Always be prepared to take evasive action, be aware of danger points on your routes and drive towards the center of the road to have space for evasive maneuvers.
  • Blend in with your environment; don’t drive expensive cars in poor areas, etc.
  • Be suspicious of all roadblocks, temporary stop signs and car accidents, etc. Never stop to pick up hitchhikers or help other motorists, as these could be covers for an ambush or carjacking.
  • Keep vehicle keys secure and know who has all the spare keys and access to the vehicle.
  • Remember others can monitor tracking devices and help services such as OnStar, then get the details of where you are and you’re routine without the need for surveillance.
  • Be extra vigilant at traffic lights and in slow-moving traffic.
  • Keep the vehicle in a locked garage when not in use and lock all doors and the trunk.
  • Wherever legal reverse park; this will help if fast get away is required.
  • Always use seat belts, especially when driving at speed or taking evasive action.
  • Keep a safety knife handy to cut away seat belts and break windows in the case of a crash.
  • When driving on dangerous roads or taking evasive action open the vehicles windows to make escape easier in the event of a crash.

Wherever you are working or living at some point you will have to use vehicles, for most people they are part of their everyday lives. Driving itself can be a

In a survival situation, due to the increased time you will spend outside in the woods foraging for edible plants, hunting, trapping, and possibly living outside, you will have bites of various kinds fairly often. These will primarily be from insects such as ticks, fleas, spiders, mosquitoes, wasps, bees, and others.

There will also most likely be animal bites from domestic animals gone feral, like packs of dogs, coyote-dog mixes, wild cats, as well as wild animals such as foxes, bats, and snakes. Unfortunately in such a scenario the chance of getting a human bite also is increased significantly.

All of these bites have the potential to develop into very serious infections and in some cases can be fatal (think rabies). Being a Prepper involves being proactive as much as humanly possible, to minimize any future threats to you, your group’s, or your family’ survival.

One thing you can do right now is to make sure every one of your family members is properly immunized with a tetanus vaccine. No matter what your thoughts are about vaccines, tetanus is one that is indispensable. A tetanus vaccine is given every ten years with a booster every ten years until you are sixty-five years old.

Now is the time to get your tetanus vaccine; do not wait. In a post collapse situation all vaccines will most likely be totally unavailable. Almost all vaccines have to be refrigerated and will spoil and new production is unlikely.

Why do you need a tetanus vaccine?

The bacteria that causes tetanus is ubiquitous (this means it is everywhere) and comes from the bacteria Clostridium tetani. Clostridium t. This a normal inhabitant of soil and this explains why it is everywhere. Clostridium tetani enters the body through open wounds, bites, etc. Once in the body it produces a toxin (poison) called Tetanospasmin which is a neurotoxin (a toxin that damages the nervous system). This results in such violent muscle spasms that it can cause your jaw to lock closed in a violent clenching of your facial muscles, hence the common name of lockjaw. The spasms are so violent they can break bone, teeth, tear muscle, and before the advent of the tetanus vaccine was frequently fatal.

In a survival situation you will not be able to treat this and it will be fatal, and a miserable death at that.

That is why I am strongly encouraging you and your family or survival group to be proactive and get your tetanus boosters now, not tomorrow. If you are uncertain as to the date of your previous tetanus vaccine then get one now, it will not hurt you if it is too soon.

General Principles for All Bites and Stings

There are certain principles that will help concerning any type of bite you might encounter.

  • All bites should be cleaned thoroughly with soap and water if available or hydrogen peroxide.
  • If no soap is available, flush out any open bite with copious amounts of water.
  • A mix of one part Betadine to nine parts water can also be made and used to flush out any bite or wound.e application of an activated charcoal poultice to any sting or bite as soon as possible will help immensely. Activated charcoal is always helpful due to its incredible surface area and its ability to absorb toxins and substances of all types on its surface.
  • These poultices should be changed often, preventing them from drying out.
  • In an open animal bite with a macerated or chewed up surface the activated charcoal should be generously applied to the inside of the wound and a poultice over it. This will insure contact of the charcoal with all areas of the wound in order to better absorb the various toxins as well as the microorganisms from the animal’s mouth.
  • There is no downside to the use of activated charcoal; it is completely inert and cannot harm you in any way.
  • It does make a mess, but under these circumstances who really cares.

In the case of any allergic reactions, as a survival medic you will need to access the patient and determine the severity of the reaction. If a patient develops systemic (whole body) symptoms after a sting or a bite then this should be a clue that you may have to intervene to interrupt this allergic cascade before it becomes potentially life threatening.

Systemic symptoms such as lethargy (tired and listless behavior), severe swelling at the site of the bite, near it, or in the face and throat, rapid heartbeat, feeling faint, wheezing and difficulty breathing, generalized itching, etc. should all be treated as a medical emergency. If you have an EpiPen this is the time to immediately give it. Also give the patient an antihistamine such as Benadryl. The dose of Benadryl should be 25 mg every four hours as needed for a mild reaction or 50 mg every four hours for a severe reaction.

Limit the blood flow to the area of any bite. If it is on an arm or leg you should keep the limb elevated and if severe apply intermittent tourniquets, for no more than ten minutes at a time. After ten minutes loosen the tourniquet to avoid permanent damage to the areas “downstream” from it. Ice or any cold substance should be applied directly to the site to help decrease blood flow and also to decrease swelling.

There are many things in the Prepper world that we prepare for that are unlikely to happen; this is NOT one of those occurrences. The odds of you or one of your family or survival group members getting bit is very likely.


In a survival situation, due to the increased time you will spend outside in the woods foraging for edible plants, hunting, trapping, and possibly living outside, you will have bites

As a child I grew up in a house named The Orchard and although the land had long since been sold off several large apple trees remained which gave us a reasonable harvest each year. I have fond memories of the delicious fruit pies and crumbles my mother used to prepare. Growing fruit is one of the most efficient forms of gardening – once the trees are established you can expect an abundant supply for decades with only a little pruning and mulching to keep them happy.

Without doubt, the cheapest way to start a mini-orchard is to buy bare-rooted plants: those sold without a pot and delivered while the weather is still cold and the plants are dormant. As well as saving money, you will often find a much wider selection of varieties and sizes available as bare-rooted trees. Many wonderful types of apples, pears, plums etc can be grown by the home gardener that are never available in supermarkets and the trees can be trained to fit the area you have.

However, bare-rooted trees need to be planted correctly and given careful treatment during the first year in order to establish healthy root systems and give a reliable harvest…

apple-harvest[1]

Timing

The biggest stresses on a new fruit tree are usually below ground. Getting sufficient water and nutrients in the first few months after planting is essential and that’s why the timing is crucial. The number one priority is helping your new tree establish a healthy root system. The best time to plant bare-rooted trees is towards the end of winter or the first half of spring – once the ground is no longer frozen so it can be easily dug but before new growth starts.

It’s usually worth consulting a tree nursery that know your area and can advise on the window of time when they lift the young plants and deliver them and when conditions are right for your area. In the mild maritime climate where I live, trees can be planted from November onwards and this gives them a few extra weeks for the roots to establish but in harsher areas you’ll want to wait until spring. You will need to plant them quickly once they arrive – usually within a couple of days, though it’s possible to pack the roots with moist earth to extend this period if conditions outside aren’t favourable.

If you miss the ideal window of time for your area but still want to plant this year, it’s worth paying more for container-grown plants. These will already have roots that have grown into the soil around them and as long as you don’t disturb these too much when planting, they’ll be ready to draw up moisture and nutrients during warmer weather.victoria-plum[1]

Location, Location, Location

Fruit trees don’t like to be moved so it is important to get the location right first time. Things to consider are:

  • Sun or Partial Shade: Nearly all fruit trees require plenty of sun but by carefully scouring catalogues you’ll find there are some less well-know varieties that are tolerant of partial shade. Don’t just consider the ground – it’s the leaves that need sun and this often opens up possibilities for otherwise unproductive areas.
  • Soil: Most will want free-draining soil, enriched with compost. Avoid areas that regularly flood or higher ground that dries out quickly.
  • Wind and Snow: Be aware of the direction of prevailing wind and any large buildings nearby. A wall or fence may create a sheltered environment perfect for heat-loving fruits, or it could funnel icy winds during winter. Roofs can dump a ton of snow on an unsuspecting tree below, snapping its branches. Observe your garden closely to choose the best spot.
  • Other Plants: Trees are remarkably good at drawing up nutrients and water from the surrounding area. Unless you’re using raised beds, remember that a nearby fruit tree or bush may compete with your other plants.

Planting Tips

Many good fruit-tree suppliers will sell reasonably priced kits that include a stake, tie, mulch mat etc and I think it’s a false economy to skip these items.

Follow these simple steps to give your tree the best start:planting-fruit-tree[1]

  1. Dig a hole about a spade’s depth and around 3ft (1m) wide. Although it’s natural to dig a round hole, a square one is better as it encourages the roots to push out into the surrounding ground. Keep the soil you have removed in a wheelbarrow or on a large plastic sheet.
  2. Add a few inches of good garden compost and work it into the base of the hole using a garden fork. Mixing is important so that the tree’s roots don’t meet a sudden boundary between compost and regular soil. Also, mix some compost into the soil you removed.
  3. Look for the slightly darker ‘watermark’ on the tree’s trunk that indicates where the soil level was when it was first grown. Place the bare-rooted tree in the centre of the hole and a cane across the hole so you can check that this line is level with the soil around your hole as trees shouldn’t be planted deeper or shallower than they were first grown. If necessary, add or remove soil to achieve this. Most fruit trees will be grafted onto a rootstock and the join should always be above ground.
  4. Remove the tree and put in a thick wooden stake a couple of inches from the centre of the hole and on the side where the prevailing wind comes from. Hammer this firmly into the ground using a mallet.
  5. Place the tree back in the hole, position it so the trunk is close to the stake and start to shovel the soil-and-compost mixture back around the roots. Gently firm this in with your boots, being careful not to damage the roots. When it’s half full, pull the tree up an inch and then let it drop again as this helps the soil to fill in around the roots.
  6. Once all the soil has been added and firmed, use the supplied strap to fix the tree to the stake, leaving enough room for the tree trunk to grow but not so much that it wobbles about. Also add a protective tube around the trunk if animals are a problem. At this stage I also sprinkle a little seaweed meal fertilizer around and cover it with a bio-degradable hemp mat to suppress weeds.
  7. Water the soil well to stop the roots drying out and to further settle the soil around them.

The First Year for Fruit Trees

fruit-tree-planted[1]Fruit trees always seem to be such strong, healthy plants that we forget how vulnerable they are when first planted. Yet during the first year, the tree can easily die from not getting enough water or nutrients. Until the root system is at least as large as the tree it supports, it is particularly vulnerable to environmental stress.

During the first year or two, keep the tree well watered, especially during dry weather. A good soaking once or twice a week is much better than surface watering daily, though during very hot weather it can be worth doing both. It’s also vital to keep the area around the tree completely free of weeds and grass as they will compete with the young tree, which is why mulch mats are very effective.

Finally, don’t forget to remove all blossom from the tree in the first year. Although it’s tempting to let some fruit develop, doing so will again place more stress on the tree as it establishes and forgoing the first year’s fruit will result in a much healthier tree and better harvest in years to come.

Source: Growveg.com

The cheapest way to start a mini-orchard is to buy bare-rooted plants: those sold without a pot and delivered while the weather is still cold and the plants are dormant.

If the world goes to hell in a hand basket you may wish at some point that you had hidden supplies or items that you don’t want found. What if there are confiscations of gold like there were back in 30’s when President Roosevelt signed Executive Order 6102? What if you have a simple home robbery? What if you are forced to evacuate without enough time or the ability to take all of your valuables with you? What if there is a relatively normal “Natural Disaster” that blows your house away with all of your stuff?

These are all compelling reasons to plan for and create your own Survival Cache. A survival Cache (pronounced like Cash) is just a fancy sounding word for a hiding spot. Preppers for years have been devising new ways to bury items that they may need. Actually, burying treasure isn’t a new concept by any stretch of the imagination. People used to bury prized items all of the time. We didn’t even keep money in the bank until relatively recently and by that I mean history of the world relatively. If you take precautions, storing a cache or even multiple caches could give you supplies you need (like Hunger Games) or keep valuables safe from those who would try to take them.

The-Importance-of-Urban-Survival-Caches[1]

Plastic buckets like this hold a lot of supplies.

What should you put in your survival cache

This is the million dollar question isn’t it? Everyone will have their own ideas and needs and you don’t have to keep everything in one single cache. Actually, I would recommend you don’t if you have a lot of items. Burying items in a cache is useful in the scenarios I mentioned above, but they can also be used to store supplies along your route if you have a long distance to drive. Let’s say you are living in the suburbs and your plan was to Bug Out if anything serious started happening, but your retreat location was 400 miles away. You could bury fuel and additional food in a cache half-way to your destination. This would give you the ability to refuel your Bug Out Vehicle along the way. That is a great plan if you have a long distance to travel and for some reason, the gas stations are no longer operating. As long as you have properly stored your fuel for the long term, it could mean the difference between driving to your retreat and walking.

That makes sense for caches stored along a route, but what about something close. I know some preppers who are going to be storing gold and silver in buried caches. Others are going to bury firearms, first-aid supplies, maybe a change of clothes, first-aid kits and some food. This type of well-rounded cache would seem to make great sense if you are bugging out or have some fear that the items you store would be confiscated as in the case of firearms or precious metals.

The contents of your own survival cache should be designed to address the need of why you are hiding the cache in the first place. If you are looking for a resupply type of option, then fuel, ammunition and food might make the most sense. If you are simply trying to hide valuables, maybe you don’t worry about food at all. Design the cache to give you what you think you will need the most if you have to go and reclaim it.

How to protect the items in your survival cache

The topic of how to actually build a survival cache will be covered in another article. If you are looking for construction details, there are tons of YouTube videos out there. Regardless of the construction methods of your cache, you will want to ensure that whatever you store in the cache is safe and in the same condition as when you left it.

burial-tube[1]

A well stocked cache can give you vital supplies to survive.

The items you store in the cache and your cache location are going to dictate a lot of what you need to consider for protection. Are these items that will rust like weapons or ammo? Do you live in a humid climate or plan to bury your cache underground? Virtually any place you can store a survival cache is going to be prone to the elements unless you seal it in concrete and that kind of defeats the purpose of hiding it in the first place.

Water damage is I think the primary concern for anyone who is storing a cache. There are tons of “waterproof” caches you can build or even purchase but water has a tricky way of finding any crack if given enough time. Ideally you want to hide your cache in a location that is not going to be exposed to an excessive amount of water and ensure the contents inside are adequately protected and that your survival cache container has as water tight a seal as possible.

All of the items in your cache should be stored in plastic. Smaller items can be stored in ziploc bags and I would actually recommend at least two ziploc bags at a minimum. The freezer Ziploc bags are a heavier plastic and as long as abrasion isn’t an issue, which it shouldn’t, these will keep the water out nicely. I have also heard of people who go the next step and shrink-wrap items on top of the plastic. I might do this with a firearm for extra protection.

For firearms specifically, I have heard of people burying disassembled rifles coated in axle grease and packing a cleaning kit. I don’t know if you have to do all of that, but an excessive amount of lubricant would be very wise. For a pistol I would completely coat the weapon in your lubricant of choice, place the gun in a bag. Place that bag into another Ziploc bag and that should cover you unless you have a very leaky cache container. Into the container I would add several bags of desiccant. I would say the same for ammunition and any spare metal parts I have. There are waterproof bags available online with much denser plastic, but in most normal circumstances, I think two heavy-duty freezer quality Ziploc’s should be up to the challenge.

Quick and easy food grade items like MRE’s or canned food aren’t going to last as long as a hunk of metal, so you can’t really stick these in a tube and forget about them for 50 years. However, they should be protected in the same way, minus the gun oil of course. MRE’s already come in sealed bags, but I would still throw them in another water proof bag if possible. Clothes can be shoved into a water proof bag and as long as you don’t have your cache buried under the sea everything should stay nice and dry.

Where to hide your survival cache

So you have your survival cache of items and a container – now all you need is a place to hide it. The good news is that you literally have millions of options. The bad news is you have millions of options. Most cache’s are buried and this is because of the old adage. Out of sight, out of mind. If people don’t see your valuables they aren’t likely to find them. Of course you can hide valuables in your house as long as you choose a safe place but a survival cache usually has a different utility and needs to be handled in a more secure and hidden manner.

So, assuming you want to bury your cache, you need to try and find a location that has the following criteria:

  1. You will always have access to it. – Locations in cities are tough but not impossible. I would be very hesitant to hide a cache in an abandoned building. Fire or demolition could take your cache away and leave you with nothing but a sad look on your face. If you have to store this in a building try to ensure that you check on it often so you can move it if you notice it has been tampered with or if the status of the building is changing. For instance, if the building is for sale. Some people have suggested national parks as a good place to store a cache and that may work for a lot of people. They aren’t very likely to put a shopping mall or a highway through a national park.
  2. The landscape is not going to change significantly – This one requires some research depending on where your cache location is. If the cache is buried in your back yard, you have a lot less to worry about. If you have decided on a private piece of land, you might want to check to see that no zoning notices have been registered and before that you obtain permission. Like the example above, you don’t want to desperately need your cache only to find out they put a super Wal-Mart up last summer. Or, the land could be in a forest that is logged for trees. Good luck finding your cache if that happens unless you have a very significant landmark.
  3. Not in an area prone to flooding – I wouldn’t bury a survival cache in a river bank or actually too close to a river or major creek for this reason. Even if you have sealed your cache so that it is completely waterproof, there are chances your survival gear could be washed away forever. You don’t want to run to the location to grab your cache when it is a matter of life and death only to find that it is gone, probably due to that once in a century flood last year. Or maybe it isn’t gone, but its under 20 feet of water and now you have no way of getting to it since the local dive shop has burned down.

How to keep people from finding your cache

This is when it might get tricky. First you have to make sure nobody knows about your cache, then that nobody sees where you bury it and finally that nobody stumbles upon it accidentally. To keep the last thing from happening you should ensure that it is buried very well. Depending on the shape of your cache, I might dig a vertical hole instead of horizontally. To prevent people from finding it with metal detectors, you should dig your cache down very deep so that the top is 4 feet underground. You can then fill in a foot of dirt and bury an old piece of metal that you find at a junkyard. Add another 2 feet into the hole and add another piece of metal. The chances of anyone from that crazy TV show coming across your personal treasure should be remote, but this might through a random person with a metal detector off the trail. Additionally you can move large rocks over the cache location and this should prevent anyone with a detector as well.

Two is one and one is none is the old adage so I would consider having two caches you can get too if necessary. Worst case scenario, someone finds one but the chances of them finding both are next to impossible. I would make sure the distance between the two caches is significant though as in miles.

Take extra precaution when you are burying your cache. The last thing you need is for a curious person to see you walking into the woods with a big box and a shovel. If possible, you may do this at night or at a time when nobody is around in more urban settings. Depending on the location, you may draw less attention in broad daylight as opposed to night. I have often thought of going into my own yard with the headlamp on at 3 in the morning, but the chance of neighbors seeing me is still too great. I can always plant a new bush for my wife and the neighbors don’t notice me taking a little longer on the hole.

How to find your survival cache

Now that you have your survival cache buried, how will you make sure you can get back to it when you need to? In a perfect world you would know precisely where you dug your cache, but if you are hiding this along your route in unfamiliar territory, finding your way back might be more difficult. This is even more true if you are under duress.

For locations nearby, your memory and some landmarks may be sufficient. Make sure you have at least three points of reference. If you have buried your cache in the woods, I would try to locate them near a major rock on a hill off a trail. This way, you can find the trail or barring that, the hill and finally the rock. What about GPS? That works great until the grid goes down, but you can also incorporate Geocaching into your cache plans. This can give you a great way to get out of the house with your kids, learn how to read a map and check on the cache.

Maps are more foolproof if you know how to read one and have been very precise with your bearings. I would additionally take photos of the area in all seasons if possible. Also, this is not something you should set up and forget about for years. Make a point to check on your cache fairly often. You don’t necessarily have to dig it up, but you can put eyes on the location to make sure it hasn’t been disturbed.

I would dig your cache up every 5 years though to check on the contents. If this is simply a gun and ammo and you are certain it hasn’t been affected by water this might not be necessary. For clothes, food and spare boots I would check them for rot and fit and replace the food. 5 years is a long time.

Hopefully this gives you some ideas for hiding your own survival cache. I’d love to hear your comments below on your experiences with survival caches.

If the world goes to hell in a hand basket you may wish at some point that you had hidden supplies or items that you don’t want found. What if

Many people are scared that all of their efforts towards prepping would be futile if TEOTWAWKI never actually comes. The problem with this parochial view is that they never take into account the high possibilities of disasters such as floods, snowstorms or even power-grid failures. The other thing holding them back is the “Is this worth the cash?” argument they have with themselves.

Preppers actually learn to save money and prevent spending on things unnecessarily. We buy prepping supplies that are often used to sustain our life while it can still be kept long-term. Preppers also cultivate survival skills such as gardening and home repair which can save them a pretty penny in the long-run. Since increasing your survival odds is highly correlated to the amount of survival knowledge you have, most preppers will definitely invest their time in learning new skills.


There are many disasters happening and most of us are not aware of it. Hence, these are 8 reasons why prepping is good for you.

Reason #1: Cash conservation

The skills that you acquire – preferably practical skills to survive will help you to save the money needed to call that repairman to your house. Planting a garden is an excellent way to prep and it is extremely cost-effective. Instead of buying commercial food or constantly eating out, learn how to cook your favorite meal and plant your favorite fruits, you will not regret it!

Do you remember that Greece had to undergo a collapse in their economy which caused many lives to be at stake where those people who could not accept it commit suicide? There were many stakeholders pointing fingers to each other but the debt crisis was actually due to flawed accounting practices and not being transparent enough.

In my opinion, having a job which is more within your control such as being self-employed or starting a blog is one of the best defenses for an economic downturn. You can even start thinking of how used items can be made into something beneficial that we need to survive. Furthermore, you can start prepping with basically no cost at all by learning the skills needed and getting free gear from survival blog giveaways. The art of preparedness is basically how to live by yourself without depending on external sources such as lending money which is the main cause of bankruptcy.

Reason #2: Security better than insurance

When a SHTF situation occurs, your life would be threatened and most people will suffer the consequences of not sufficiently preparing. The suicide rate would spike even when an economic collapse happens where people who are indebted kill themselves just to get out of the loop of debt they got themselves into.

In preparedness, we never support the idea of lending money and we would fully advocate low-cost prepping. Keep a journal with you regarding the best prep skills, fix that leaking roof in your house and stop spending money unnecessarily! Feeling safe and peaceful would be much more frequent when you are much more prepared.

Even recently, retrenchment is rampant in our current economy where most people lost their active source of income. Preparing for a SHTF situation by having a side income, running your own business, stocking up on food and water or even having a surplus of cash would definitely help you to get back on your feet. Is this not better than conventional insurance? What if a snowstorm hit your place? Will your insurance be able to take the pain or would being prepared more likely to mitigate the amount of pain and loss?

Reason #3: Cultivation of critical thinking

When you are preparing for a crisis, you have to pan out what items you should bring and what are the steps you should do for survival. With the constant thought of how to prepare in your mind, you will naturally put in unremitting effort to cultivate the skills needed. What do I need to do to find a safe shelter? How can I ensure that my family would be able to survive at least for a week without external aid? All of these questions are at the very core of the preparedness journey. To increase your survival rate, you have no choice but to cultivate critical thinking, practice it in everyday life and survive!

Since we do not know how a TEOTWAWKI situation will look like, we have to be well-rounded and prepare for the worst to come. But of course, it is wiser to get ready for a more frequent disaster that may occur in your area. Use your intelligence to solve the problem.

Reason #4: Keeping your body healthy

The first rule of thumb to preparedness is keeping your body healthy so that you can think on your feet when a life threatening situation happen. This all involves knowing what food to eat and how much of it you can consume.


Basically, there are situations where we are met with water shortage. Storing water is very essential and learning how to purify water is a must. Keeping a body healthy means, you have to know what is the amount of water and food your body needs.

Learning the art of bush craft or how to scout will also be beneficial to your physical health while increasing your chance of survival. The very essence of preparedness is to have great physical capabilities. Can you walk for a few days non-stop in search for safety? If the answer is no, time to get on that treadmill.

Reason #5: Acceptance of the current condition

Knowing that an economic downturn and political tensions are inevitable, ultimately preppers do not complain but we do what we can now. The prepper community always keep their heads up for the recent news and practice practical skills that can help them survive.  If you are reading this post now, most likely you are one of the few people preparing rather than complaining. Preparing for the worst is something much better than complaining about it when the SHTF.

It would be great for you to bond with family and friends. Since you do not complain and you are capable of giving aid to your friends when a disaster strikes, they will trust you more. Since trust is a difficult thing to build and turning people off with your complaint is bad, it would be wise that you start prepping now.
By having enough supplies in your house and knowledge in your mental storehouse, you would have peace of mind appreciating every moment when no problems occur. Even if things do happen, you would accept it totally and put your supplies into good use.

Reason #6: Consistent supply of alternative energy

Preppers will also prep for power grid failures which will potentially happen in a TEOTWAWKI situation such as an EMP strike. Do you know how to make a cost-effective electric generator? How about getting that windmill to generate electricity? All these ideas are great to provide a constant supply of electricity which will potentially help you to save costs in the long-run.

The knowledge on how to get an alternative energy source in the most efficient way possible would definitely be great. Besides saving on certain amount of cash, you get the energy to keep yourself and your family comfortable when a power outage occurs.

Reason #7: Keep yourself safe

In preparedness, you have to learn how to shoot a gun and how to conceal it. There might be times when your life is at the line with robbers or terrorists threatening your very existence.

What happens when your car breaks down in a deserted highway with a winter storm? You would have prayed that you placed your EDC (Every Day Carry pack) or even a bug out bag in the trunk. Having some extra blankets and food to keep you warm would be great.

How about when your house catches fire? Where have you kept the important documents? This would be the time where you wished you packed your bug out bag with the important documents. When your life is at stake, you would not have time to think twice of what documents to keep. All you can do now is to prepare for the most frequent crisis and keep your faith that nothing bad would happen to a good person.

Reason #8: Save people around you (especially your loved one)

The practice of food storage can actually save you and your family’s life because food shortages can potentially happen. Do not always assume that you can purchase food in the local grocery shop, there might come a time even when an earthquake or flood happens where you will be thankful you had that supply of food.

Moreover, medicine would be scarce when the SHTF. When distribution channels are disturbed by a natural disaster for that matter, your local pharmacy or doctor may have their supplies wiped out. Hence, it is imperative that we keep a First Aid Kit and have the knowledge to use it. Who knows? You may come across a wound and get hurt when disaster strike, and knowing how to tend to your wound would be a matter of life and death!

Conclusion

I would like to congratulate you for reading this post! Most people would not even take the first step in gathering information regarding preparedness thinking that it is a waste of time. With this 8 reasons, I urge you to start preparing now because it would definitely be beneficial! What other benefits do you have in mind? Please share in the comment box below.


Other self-sufficiency and preparedness solutions recommended for you:

The vital self-sufficiency lessons our great grand-fathers left us

Knowledge to survive any medical crisis situation

Liberal’s hidden agenda: more than just your guns

Build yourself the only unlimited water source you’ll ever need

4 Important Forgotten Skills used by our Ancestors that can help you in any crisis

Secure your privacy in just 10 simple steps

Many people are scared that all of their efforts towards prepping would be futile if TEOTWAWKI never actually comes. The problem with this parochial view is that they never take