Each year as the weather gets cooler and the leaves start to fall, I along with millions of other hunters prepare for hunting season. Each of us I am sure, has dreams of landing that elusive big game that we have so long studied, chased, and in many cases, been made a fool of to our general frustration. As the seasons change this year I will be headed back to the woods in search of food for my family and when I hunt, I frequently use a tree stand.

Tree stands give the hunter certain advantages. For starters, they put you up higher so you have greater visibility to see further distances. This can allow you to spot game approaching from a much further distance than simply standing on the ground or hunting from a blind. On a side note, I have even considered their utility as a sentry post in a full on collapse scenario. Your height routinely puts you out of the radar of most deer in my experience. If they can’t smell you , the generally aren’t looking for you up in the trees. I have had more than one deer come in to the base of my stand and walk away without ever knowing I was there.

Part of my preparations for hunting involve checking on my gear that I use. Primarily, I want to ensure that my rifles are ready and that means a trip to the range or my buddies land to sight in a new scope I got for my muzzle-loader. I also check out my hunting clothing that will keep me dry and warm. This year I might need to purchase a new set of hunting overalls or gloves to keep as warm I can during the cold mornings and late nights. I also need to check out the hunting land and make sure the tree stand is safe and ready to keep me above the action for another hunting season.

Tree Stand Safety Checklist

Each year, the hunt is different. There are different paths the whitetail deer take through the land and the routes they travel should be investigated first. We hunt on a friend’s land that sits almost completely untouched by humans (that we know of anyway) until between September and January each year. I like to go out and take a look at the game trails and see where the deer are moving.

Check the stand location

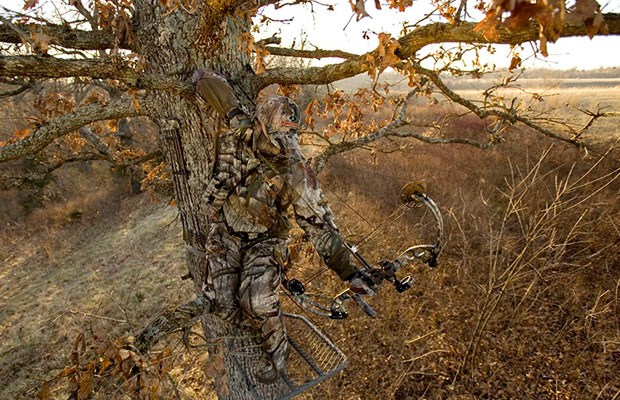
There are several different forms of tree stands from homemade, to ladder stands and climbing stands. For the purposes of this article, I am only referring to ladder stands and climbing stands primarily, but the safety checklist could apply generally to any hunting you are doing that requires equipment that places you at heights your head isn’t normally visiting. If you have built your own stand that sits up in a tree, I would even say that it is more important to ensure the safety before you go climbing up there on that first frosty, dark morning of opening day.

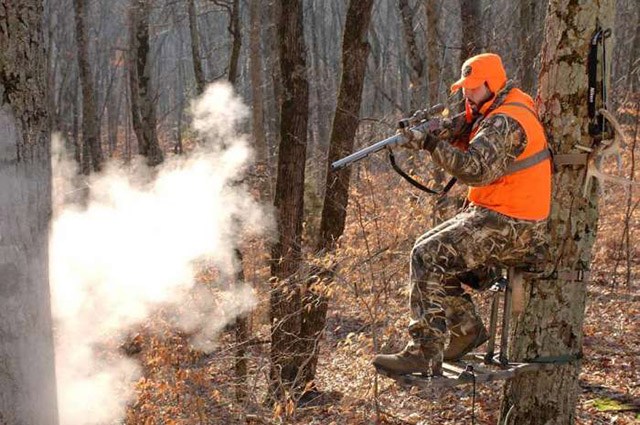
Stands can provide a stable platform with the advantage of high sight lines to shoot from.

For the location of my stand, I refer back to my pre-season visit to check on the activity sign I can see. I had situated my stand where I called a deer highway. Deer would come into the woods to my right in the morning and come up out of the woods to my left in the evening. My position for the last two years was good enough to let me see a half a dozen deer in that one location alone. Unfortunately for me, I wasn’t able to bring anywhere near that many home. Your stand location might need to change and if you find a better spot, you need to ensure the tree you are placing it on is alive, large enough around and there are no widow makers up above your head.

Check your tree stands operation

I use a ladder stand and ladder stands are pretty basic pieces of equipment. Mine stays in place over the year although I tell myself I am going to take it down at the end of each season and bring it home. There are different types of ladder stands but they are all pretty much made of metal and metal rusts if you give it enough time. If you have to pull your stand down, you can visually inspect the frame to make note of any areas that are rusting. If they are rusting significantly, you may want to consider either making repairs or purchasing a new stand.

Once a ladder stand is in place, there really shouldn’t be a whole lot of moving pieces, but bolts might need tightening. Trees blow in the wind and that force could weaken your stand if the pressure is great enough. You could be missing hardware that can be easily replaced now.

If you are using a climbing stand, you likely didn’t leave that out over the summer so now is a good time to find that perfect spot and make sure your tree is free of limbs that might have grown since last year that need trimming to either allow you to climb or get that shot that brings home the big one.

I don’t hunt without a harness. Better safe than sorry.

Check your equipment for wear

Ladder stands and climbing stands both can show wear on the metal surfaces that witness the most friction so check where metal connects for any wear that doesn’t look normal. Replace any padding or seats that are showing wear or in my case never were really that comfortable in the first place. I also secure my ladder stand to the tree with some light-duty ratchet straps. These should be released and inspected for any wear on the web strap. If there are any cuts in the strap, replace them with new straps just to be safe.

You might also have a line tied to your tree stand that allows you to pull your gear up to you. Make sure this is present and in good shape.

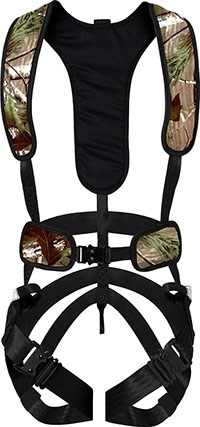
Plan on using a safety harness

Some hunters look at you funny when you mention a safety harness although, falling out of tree stands is generally the most common cause of injury (from tree stand use). If you have ever hunted, you have heard the stories of people who either took a step too far or fell asleep and ended up breaking their neck and I for one don’t want that to be me. I have fallen asleep on my tree stand on more than one occasion and the last way I want to wake up is on the ground with a broken neck. Yes, they aren’t that high up (unless you are in a climbing stand) but this is a safety checklist so safety is what we are going for here.

In addition to falling asleep in my stand when I am nice and warm in my toasty hunting apparel, I frequently hunt without the benefit of having my friends with me so a safety harness is just one more precaution I take to get me home safely from the hunt. I used to have the cheap version that came with my tree stand, but I soon switched to a much better system shown in the photo. The newer safety harness is so much easier to get on and off and fits me even when I have three layers of clothes on and look like the Michelin Man.

Hunting safety comes down to common sense, and like prepping, it is logical to prepare in advance for bad things happening. If you plan on hunting this year and like to get a little higher, make sure that you are able to come home to your family by perform some simple tree stand safety measures. It could keep you from having a bad day.

Each year as the weather gets cooler and the leaves start to fall, I along with millions of other hunters prepare for hunting season. Each of us I am sure,

I was given the opportunity to review the Coast HP550 focusing LED flashlight. I love reviewing new gear on Final Prepper but some flashlight reviews are highly technical to the point of using calibrated machines to measure beam intensity and throw. I don’t have any of that equipment so maybe we should put this review in the amateur category. I’ll let you know my overall impressions of the flashlight and you can make a determination for yourself if this is something you want to research further. My guess is that 99.9% of you don’t have the equipment to measure these flashlights either and that is perfectly fine. For this article and the Coast HP550 review, we’ll just keep things simple.

Speaking of simple, a flashlight is a simple device. It’s number one mission in life is to provide light. There are a million different shapes sizes and configurations of flashlights, but they all share common characteristics. You click a button or flip a switch and as long as they have power and a bulb, light comes out the end. Brilliantly simple, but very necessary. They are so necessary that we don’t even think of living without them do we? A flashlight is one of those items like duct tape that we simply have. You would be hard pressed to go into any house and not find a single flashlight, but we make sure we add them to any Prepper list of supplies we write down.

Flashlights have really changed over the years and the LED flashlights are the most common and powerful on the market. It used to be a good Maglite was the best thing you could get as a consumer, but the best old Maglite can’t hold a candle to the middle of the road LED flashlights of today.

The Coast HP550 is definitely a flashlight for today, but calling this piece of equipment a flashlight in the traditional sense seems to do it a disservice. I would say the Coast HP550 is more like a floodlight trapped in a flashlight body. At 1075 lumens, this light is better described as a search beam. You can find your electric panel in a black out with this, but it would be much better served looking for lost hikers in a forest, in a driving storm, if they are trapped in a well.

The Coast HP550 compared in size to a Maglite and two smaller flashlights.

The beam on the HP550 is incredibly intense and makes all the other flashlights I have pale in comparison. Like I said, I would use this to look for survivors in a collapsed building or a lost calf in a huge field. Now, to be fair most of my tactical flashlights aren’t designed to do the work of something like the HP550. My single AA powered light has a 90 lumens LED and I have one that holds 3 AAA batteries that goes up to 200 lumens, but the huge 1075 lumens bursting out of the HP550 requires 9, yes 9 AA batteries.

9 AA batteries are needed to power the HP550’s 1075 Lumens

The 9 battery requirement is what I see most people complain about. I can see that initially this would look like a lot, but if you are using rechargeable batteries like Sanyo’s Eneloop, and have plenty of them, the 9 battery issue is less of a mark against this flashlight. With 9 AA batteries, the Coast HP550 provides 6 hours and 15 minutes of run-time. That isn’t shabby at all in my opinion and I keep coming back to the brightness. You have to see 1075 lumens to believe it. 9 batteries, that I can recharge with a solar panel doesn’t seem too crazy to me for that power.

The Coast HP550 has a sliding head that focuses the beam from flood to bulls eye.

The Pure Beam Focusing Optic System with Slide Focus on the flashlight allows you to tweak the beam and create a superior beam quality from spot to flood. The spotlight can throw light up to 1151 feet. Try that with your old Maglite. Looking for someone hiding in the woods? This flashlight will help you find them with ease.

The case is made of aluminum and the size fits nicely in one hand. The button on the back takes its cues from its tactical cousins, but might be better placed on the main shaft. It isn’t a deal breaker for me as its easy to click on and off regardless. The flashlight isn’t waterproof, but I don’t go swimming with too many of my flashlights anyway. The simple seals will keep most water out and unless you dunk it in the pool, you shouldn’t have any problems.

The on/off switch also controls the two power levels.

If you don’t need to shine light all over the place, the HP550 also has a low setting of 53 lumens. That is plenty of light for routine chores like making sure the door to the chicken coop is closed or finding your way out to the shed. This power saver is a nice option to keep your batteries lasting longer. I think that in a perfect world there would be a middle setting, but I don’t know how you would easily do this with a single selector. I have flashlights that go from low to high to strobe and they never go to the right setting I want. I end up cycling through every one just to get the light off and that is a pain.

The Coast HP500 powerful LED

You can see three settings below where I had the light on the lowest setting, then high with the beam wide open, then I closed it to create a spotlight. The tree line is about 75 feet away and you can see how bright the light is.

The Coast HP500 on low power. The tree line is about 75 feet away.

Same distance with high power and the flood light option/ focusing beam open.

Same distance with focusing beam set to spot.

The bottom line for me is that the Coast HP550 is a tremendous light for the price. You can find the HP550 on Amazon, Costco and Sears for about $50. If you are looking for an excellent home flashlight that will shine a ton of light into the darkest places, this would make a great choice.

I was given the opportunity to review the Coast HP550 focusing LED flashlight. I love reviewing new gear on Final Prepper but some flashlight reviews are highly technical to the point


What is it that makes natural disasters so dangerous? Is it due the fact that it has the ability to destroy anything that stands in its way? Or does it have to deal with our inability of recognizing the signs of danger? Well, the answer is neither. The reason why a natural disaster is so dangerous is simply because we don’t prepare. A large percentage of the American population goes throughout their day-to-day lives without ever thinking of a natural disaster occurring.

That being said, it’s important to ask yourself, “How can I survive something I’ve never prepared for”? It would be like walking into a room to take an exam, you never studied for. The simple fact of the matter is, you can’t survive a natural disaster without preparing for it. This is why earthquakes, hurricanes, floods, and tornadoes rips cities apart, taking thousands of lives with it and causing billions of dollars in damage repairs.

Believe it or not, a natural disaster like an earthquake or flood can strike at any time, without warning. In other words, even if we tried to recognize the signs before a disaster struck our home, we could still be misled and miss it. Those are the ones that cause the most destruction in communities, neighborhoods, and homes.

Time is a friend to no one,” so don’t wait until the last-minute to start inspecting your home and run to the hardware store. Don’t Wait Until The Clock Hits Zero

Cyclone Storms (Hurricane)

Even a four-wheel drive truck can be swept away with a relatively small amount of water. Either that or it’s because this is a Chevy.

It only takes one storm to change your life and community forever. Tropical hurricanes are among one of nature’s fierce and deadliest phenomena. A hurricane is like a giant engine that uses warm, moist air as fuel. Which is why they only form over warm water areas near the Earth’s equator. When the wind speeds reach 74 mph, the storm is officially a tropical cyclone. It’s also important to note that, during a hurricane, homes face the risk of getting damaged and possibly destroyed by high winds and high waves smashing against the foundation. Windows will be shattered and homes can even fall to the ground if they’re built on a weak foundation in extreme storms, like Hurricane Katrina.

Beat The Clock Before It Gets to Zero

  • Have a backup plan in case of a power outage. A home generator can keep your home powered-up when the power goes out.
  • Secure loose rain gutters and downspouts and clear any clogged areas or debris to prevent water from happening.
  • Trim or remove damaged trees and limbs to keep you and your property safe.
  • Lastly, reinforce roofs, windows, and doors (garage doors included) to ensure you and your family’s safety.

Downpour (Flash flood)

Flooding can quickly cut off escape routes and leave your family stranded.

There are just a few places on Earth where people need not to be concerned about floods. Despite the fact that rain isn’t the only cause for floods, anywhere water is present can make an area vulnerable. For starters, a flood occurs when water overflows and inundates land that’s normally dry. Most floods, take hours or even days to develop, giving residents a small amount of time to prepare and evacuate from their homes.

Others, generate rather quickly and with little warning. These are the most dangerous types of flash floods, instantly turning an average street into a thundering wall of water sweeping everything in its path downstream. The time that flood water spends in a house and the pollutants created in flood waters can vary greatly and determine the likelihood of a successful restoration.

Make Sure You’re Prepared and Protected

  • Once a flood watch occurs, move furniture, valuables, and important documents to a safe place.
  • Head for higher ground and stay there.
  • Avoid walking or driving through flood waters. Just 5-6 inches of water can knock you down, and 2 feet of water can swipe your car away.
  • Don’t forget the sandbags.

Foreshock (Earthquake)

Search and rescue teams survey the rubble in Amatrice, central Italy, 24 August 2016, following a 6.2 magnitude earthquake

An earthquake like all natural disasters can be deadly, and strike without any warning. An earthquake is usually caused when rock underground suddenly breaks along a fault. This sudden release of energy causes seismic waves, which is what makes the ground shake. Another way to think about this analogy, is by picturing two bricks lined up next to each other and rubbing them together repeatedly. When parts of the brick (rock) break, the earthquake occurs.

Don’t Get Shaken Up and Caught Off Guard

  • Take cover. In each room in your home, identify the safest place to “drop, cover, and hold on” during an earthquake.
  • Strengthen your home. Use anchor bolts every 4 to 6 feet to secure home to foundation. Also remember to reinforce brick chimneys.
  • Secure your space. Keep breakable items in low or secure cabinets with latches.
  • Use flexible connections where gas lines meet appliances to avoid explosions.]

Tsunami (Harbor Water)

A tsunami is actually a wave caused by sudden movements of the ocean due to earthquakes, and landslides on the seafloor. In fact, major volcanic eruptions and large meteorite can trigger tsunami as well. On average, two tsunamis occur per year throughout the world which inflict damage near the source. Approximately every 15 years a destructive, ocean-wide tsunami occurs.

Tsunamis range in size from inches to feet. In some cases, a tsunami can grow over a hundred feet high before colliding with civilization. In deep water, for example, tsunamis are rarely over 3 feet (1 meter) and normally go unnoticed by ships due to their size. As these waves make their way closer to shore, the height can increase by over 10 times.

Surf Your Way to Safety 

  • Find out if your home, school, workplace, or other frequently visited locations are in hazardous.
  • Make an evacuation plan. Unfortunately, no home, building, or school can survive an attack by a 100 foot tall tsunami.
  • Determine whether or not your street is above sea level and the distance of your street from the coast or high-risk water areas.

Common Practices For All Natural Disasters

Do’s Don’ts
●  Keep your gas tank filled.

●  Stock up on food and water. Prep for two meals a day, and 16 ounces of water per person.

●  Create an emergency medical kit to clean cuts and bruises.

●  Learn evacuation routes.

●  Purchase batteries, radios, and other devices to stay up to date on the latest news.

●  Pack a grab & go bag with all important documentation.

● Drink contaminated water.

● Be selfish, help those around you.

● Leave food outdoors for a long period of time.

●  Forget to wash and sanitize all eating utensils.

●  Lose your personal documentation. After all, once it’s gone, there’s no getting it back.

●  Panic. This will only make things worse.

In the long run, a natural disaster can occur anywhere, at any time. For those of us who have families, set a location where you and your family will meet in case communication fails. Furthermore, if you live in areas that are prone to natural disasters, never second guess leaving your home in order to escape the dangers of Mother Nature’s attacks. A home can be replaced, but a life can’t.

Stay safe!

  What is it that makes natural disasters so dangerous? Is it due the fact that it has the ability to destroy anything that stands in its way? Or does it

Managed Livestock Breeding

Livestock keeping is one of the things that those interested in self-sufficiency regularly end up considering. There are factors involving breeding, especially, that can increase our success and let us custom-fit our livestock’s needs to our situations. While some aspects of controlled breeding may seem obvious, especially to experienced livestock keepers, other factors may not have been considered yet, or might lead to a spinoff idea (or a counter point). Those aspects also play a role in deciding which livestock we want – either species or “type” or specific breed.

There’s no one right or wrong way to do things, but applying managed breeding can be especially helpful on a small homestead and for those interested in sustainability. It’s something done on a large-scale by professionals, from meat cattle in Montana to rabbitries all over, and the factory farms that put eggs in the dairy coolers.

The Basics of Managing Breeding Seasons

Some animals are very like wild counterparts and have set breeding seasons. However, most of our domestic livestock are no longer locked into those cycles. That means we can apply the concept of controlled breeding or managed breeding – exposing females to studs at phased intervals that we choose to let us control every aspect thereafter.

The steps to controlled breeding are pretty simple. We work backwards through a lifespan or production cycle, looking at the conditions surrounding us and our animals, to include feed needs and forage, but with other considerations as well for varying life phases.

Seasonal availability of foods factors into wildlife breeding, and can play a part in managing our livestock as well.

We start with the yield we want, whether it’s milk, eggs or meat. Then we look at how long it takes to get there from birth.

The time it takes varies, species to breed to specific location, and by the yield we intend to harvest.

There’s a big difference in the time it will take a sub-adult goat doe to start making us milk than the time it will take a doe purchased after a breeding is confirmed, and between that dairy yearling and wethers raised for meat.

Whether for a secondary product (milk, eggs) or for meat, goats will get there faster than cattle; chickens faster than turkeys.


The amount of time that animal will continue producing also varies, both over a single completed cycle or annual cycles, and over lifetimes. We can manage breeding for replacements, inside a single-year cycle or on a multi-year cycle.

Feed quality also impacts production age, with forage-fed animals a little leaner and sometimes significantly slower to yield or with lower total yields. That can affect our management plans.

Chart: Laying hen production cycle by years of production

We might choose to plan kidding outside frigid & damp seasons so the young are at less risk; conversely, kids born in winter or early spring are closer to weaning as pasture becomes available for them, or we might plan on sheltered birthings when livestock is already penned and barned instead of caring for a pasture flock/herd as well as shed queens.

Different breeds within species reach their production sizes and ages in different times, too.

For example, meat goats can be milked, but they tend to produce a very high calorie, high fat milk in a very definite bell curve and for a shorter period of time than a dairy goat that lactates for 250-300 days. The dairy goat’s production will resemble a plateau for a portion of time, then taper off more gently. Knowing that, we might control buck exposure to meat does very differently.


Because of bagged feed and hay, and years of tinkering, we can control when they’re bred and thus condense our birthing and harvest seasons – or spread them out if that’s the goal.

Once we know the ages and plan the birth months, we count back through the gestation period to the ideal breeding season.


Factors in Controlled Breeding

Whether we’re old hats or just getting started, controlled breeding can help us. Counting backwards lets us consider what the pasture or barn looks like for birthing, our own schedules, other demands for our time such as busy garden and tree-crop harvests, predictable expenditures and income fluctuations, and even travel and vacations.

It lets us consider viable sperm counts in high summer heat compared to the rest of the year, body condition of the dams, and food availability of the type that our young – and their nursing mothers – need most in those cycles.

The two NRCS sheets from “Controlled Calving Seasons” here  are really nice examples of factors to consider, as well as nice visual representations.

The first page looks at the practice of controlled breeding with pro-con breakdowns for Winter, Spring and Autumn calving. The second page uses a pie graph to visually represent the life stages and nutrient demands of female cattle for beef production.

The time-frames differ, but most laying hens, meat breeding stock, and dairy goats have body stresses and peak production cycles similar to the dairy cattle shown here. The number of years they can repeat those cycles differs hugely, as do the amounts of feed, fencing, and human labor to reap the harvests.

Whether its meat or dairy, mammals or poultry, the basic tenets hold true. The goal is to help tailor breeding for times when livestock best fits our intended harvest goals and can be produced the most economically.

We can create the same breakdowns for when we allow hens to sit nests, taking into account the protein needs of the young as they grow as well as when we want a replacement nest of layers to get brooded so that we’re getting the most out of our feed.

We might also look at winter weather, or it might be pasture condition from typical summer droughts that most drive our timing. We might cycle the most and largest livestock around our water capabilities or freezer/canning capacity.

Available feed – and the nutrient content of feeds – and pasture conditions at different life stages should play a role in selecting breeding-birthing periods.

The general factors can be applied even if we don’t segregate breeding studs, by helping us choose what to do with each set of young.

By working through the factors such as in the NCIS sheets, we might discover that it’s far more economical to be culling one or another set, whether they’re intended for meat or to expand or replace dairy or egg producers.

We can earmark various litters or nests as keepers versus poussin or suckling harvests, fryers versus roasters, looking at when they’ll be producing or ready for harvest, and the inputs to get them there, and the “costs” on our pastures and breeding stock.

Example – Three Nests

Say we’re working toward sustainable laying flocks, and we know laying birds can produce in as little as 5 months (which is also a common meat harvest age for some breeds and species, especially free-range), but they might take as long as 8-9 months depending on species or breed, feed, the light amount and light quality, and the season they’re born.

Nest One – Laid & hatched in May

Feed: Whether it’s April showers-May flowers (and lots of bugs for the bug-hunting chicks, with relatively light growth they can easily get through) or bag feeds, they’re eating pretty good.

Production Month: It’s October before the first would start squatting and they might do their starter eggs before light really dims. Many breeds wouldn’t be ready to lay until December. A fair number won’t be laying their first eggs – or sizeable, yolked eggs – until they’re nearly a year old or older in spring due to winter’s light or feed.

Nest Two – laid and hatched in August
Feed: Some places still have flowers and bugs especially if we build bird-friendly feeder gardens/orchards and mulch walkways and pens so worms and critters will be in there decomposing the vegetation layers underneath, or maybe we’re restricted to worm bins and feed bags already; pastures tend to be tougher or becoming played over.

Production Month: It’s 5 months to January, 8 months to April, 9 months to May. In some climates, May might still be a little early on light needs, especially for new girls, but it’s close.

Note: I fed Nest Two 3-4 months less time than Nest One, with significant production for both starting the next spring (unaided). I might be better off harvesting Nest One for my freezer earlier in the year.

Nest Three – laid & hatched in October

Feed: Highly, highly variable by climate; most of U.S. and Canada are in grains and pumpkins and potatoes, tree seeds and fruits, with pastures thicker and taller and tougher or already munched down, and frosts already there to be a threat to young birds, or knocking on the door at birth. Then-maturing new layers are eating heavily during winter and spring’s regrowth months for a lot of places.

Production Month: It’s five months to March (which would be the earliest new layers x2 – both season and age by breed), 8-June, 9-July.

There are advantages and disadvantages to each.

Nest One gives me more eggs from the replacement flock the earliest in the next year, because the more mature hens are popping out in spring ready to be full-on laying stock even for late bloomers. Nest Two isn’t really far behind them, and if I bag feed exclusively or significantly, I saved a quarter of a year or so on them.

Nest Two will have lessened dependence on heat lamps early on, but climate will dictate whether they’re fully feathered for autumn-winter chill.

Nest Three is being fed for parts of autumn and the winter – when I have to feed all three nests anyway – and is still growing up during early spring and into early summer, but if I pasture, they get the bug-caterpillar season for some of their later-stage protein needs in addition to the potential of forage plots that include autumn grains and tree seeds-nuts that are full of good things for them.

From backyardchickens.com – The age of the birds entering winter corresponds not only to their size (flock integration) and feather cover (heat), but also the content and amount of feed they require during the stored-feed seasons.

Other Livestock & Aspects

That’s for laying hens. If they’re meat birds that I want to harvest at three to nine months by breed and type and feed system, I might run a smaller nest of all three, so there’s fresh waiting for chomping at intervals. Or, it might work better for me to raise a spring flock I can fatten all summer on less bagged feed, then freeze or can in autumn – leaving the seed-nut-grain forage for keepers and layers.

With dairy goats, I might control breeding so I stagger my does and births to get milk year-round. Or, maybe I plan kids for weaning and growing out for meat over summer pastures and so I can use the milk glut to fatten a pig or feed my dogs over summer.

I might choose to condensed breeding so that I can still travel over the holidays, or I might delay breeding so a neighbor isn’t babysitting during kiddings.

I might also time either mammals or fowl to account for the temperature, to lessen my reliance on heaters, and to allow for integration in winter after spring-summer separations. The joy of controlled breeding is that we decide whether it’s more or less convenient for us to provide heat and shelter and special feed for young and mothers separately during spring or summer, or to shelter them when the rest of the livestock is also penned and barned.

My separation and integration cycles might include my rooster or buck, for timing the next round(s) of raise-outs, for decreasing the number of snug houses I need, or to give my girls a winter break from the stud.

Existing coop systems might help me decide on breeding schedules, or instead I might design my coop systems to account for my intended production harvest – and thus controlled breeding in sets.

Infrastructure & Controlled Breeding

How I plan to raise something like poultry comes into play with infrastructure as well as timing the breeding. Controlled breeding goes down to the specific animals, even. For example, letting a broody hen nursemaid for me instead of incubating.

Is she senior enough to handle flock control or will I still need to separate each nest of young? Do I want to plan it so I have a separate flock of mothers with their nests? Does my flock have enough pasture and interests enough to keep them from harassing juniors in summer, but maybe not in winter?

I might plan my chicken lot with a primary coop or run, but smaller areas beside them or a fence-divided hen-house. That way I can let chickens sit and raise turkeys and ducks or their own young, but keep those hens better integrated, and have a “keeper clutch” that’s not quite up to body size for the main flock going in other attached sections to make transitioning them into the main flock a little less bloody.

Conversely, I might end up designing my breeding plan based upon existing infrastructure.

I might have every other input covered, but I just can’t afford to build adjoining chicken runs, to build a water system that fits my time budget for four pens of birds at different sizes plus the rooster, or to weatherproof or hen-proof a building to the level I’d need for a winter birth – not yet.

My intentions, needs and abilities matter, and affect or can be affected by the timing of my breeding, births, and harvest times.

Planned Parenthood – Critter Style

Managing breeding and birth and harvest periods can be big. With any luck, this article has had something for everyone, new or old hats. Hopefully the idea of separating studs from females is not entirely unheard of, but maybe some of the factors that play into our planning of those cycles introduced some aspect or consideration in that timing for everyone.

At base, maybe, everyone interested in livestock will at least crunch numbers and examine or reexamine their natural resources, and maybe even consider some of their infrastructure and inputs from a self-sufficiency aspect, then create a more efficient system.

Managed Livestock Breeding Livestock keeping is one of the things that those interested in self-sufficiency regularly end up considering. There are factors involving breeding, especially, that can increase our success and


We all prep for different scenarios, and start at different times in our lives. What made you start prepping? Did someone convince you that it’s a good idea? What’s your excuse for not prepping? Most of the people I try to get prepared have many excuses for not starting. Being 22 and just one semester away from getting my bachelor’s, the most common excuse I hear is I can’t afford it. Well I say. If there’s a will,  there’s a way and in this article I am going to share how I practice being a prepper in college.

I grew up in a small farm town of 3500 people. Growing up I wasn’t in boy scouts. I was just a kid that liked shooting guns. We always had a little bit of food set aside, and we would always rotate food. I never realized what it was for. I never recall them talking about any radical ideas for it, just thought it was a good idea to stocked. Just. In. Case.

For the past four and a half years I’ve lived in a small apartment (now in a duplex) in a college town with a population of nearly 91,000.

The first couple years of my college life I was on campus in the dorms. Luckily for me, being on a native American campus we have a good amount of mother nature on our campus. Mother nature always provides, but you have to know where and what.

I have a pretty small collective of friends that I fully trust, but I have several acquaintances and connections that give me opportunity. My close friends my age know I prep, but they always say it costs too much to start prepping. While they say this I think in my head how much they drink and go out. Obviously you still need to live life and enjoy it, but I believe at some point you have to prioritize for the well-being of yourself and your family’s safety. There’s plenty of money to be made, and plenty of deals to be had. Building one bug out bag takes a good amount of planning and strategy which takes time. Just having one bag puts you ahead of most people in urban areas. I built my several bags and prep’s by purchasing one piece at a time. There is no excuse for the lack of prepping.

Prepping doesn’t have to cost a fortune

I’ve always had a knack for finding good deals. In no way am I wealthy, but I grew up wheeling and dealing. I am constantly scouring Craigslist, Facebook marketplace, etc. I work hard for my money, and when it’s not enough I find side jobs come in handy. Most college towns have places where you can donate plasma. This is a good way to build some spending money. My part-time job is an auto detailer for a dealership. I’ve found that I’m quite good at it and I like doing it. It is becoming a lost art and there is a lot of money to be made.

Side jobs are likely necessary to have extra cash to spend on discretionary supplies. Competition is fierce for these spots.

Another misconception that is popular with college kids making excuses in my area is that it’s all about spending money. Prepping isn’t only material things. Sure it’s a big part of it, but it’s also a mentality. Everyday I think what if’s and different scenarios to challenge my mind. Prepping is a prepared state of mind. This website and others brought me very good insight as to what I could and should do in different emergency scenarios. Even if you can’t afford to build several bug out bags, buy firearms, stockpile food and water, then you should definitely be researching other aspirations. Knowledge is power and there is a lot of survival information to be had on the internet! Not everyone grew up as a boy scout, I know I didn’t. Knots can be as important as knowing how to skin an animal, or what plants are edible.

Friends of mine that try to prep dismiss the fact that upon the beginning stages of WROL it will be a blood bath at regular store such as: grocery stores, pharmacies, gun stores, etc. They all say oh I’ll just go grab some food at the store. No. It won’t work that way. This is why it is very important for us to prep. Even if you live in the dorms it would be a very good idea to have some canned food, bottled water, flashlights, and batteries hidden away. There’s plenty more you can prep for but I believe most people I talk to could not handle a stressful event such as SHTF. If you have a little prior knowledge to survival and your environment, then it should help you prepare mentally. Having a small stockpile of supplies can be a safety net, and should provide you a little bit of time to collect your thoughts as to what just happened and forming your game-plan.

Start small but build continuously

I am just now starting to buy some canned food to put aside just in case of a power outage. A single can of corn in my area is merely 69 cents. It is easy and cheap to stock up on canned foods to keep in your place of residence. The only problem I see is when you must bug out, the canned food will be very, very heavy. Make sure to keep your home stockpile separate from your bug out bag supplies. A good habit for both is to still use the supplies in both spots and replace them with new ones to keep the “best by” date as far out as possible.

It is easy and cheap to stock up on canned foods to keep in your place of residence.

My generation has lost the ability to be self-sufficient and prepared. For other college students reading this and wanting help to prep on a very tight budget, I urge you to read as much as you can. Free information will only be around as long as society holds up. To be clear I definitely live the “college experience”. I don’t go to parties or go out for nights of binge drinking. There is other ways to be social and they are much cheaper.

The biggest challenge in prepping for a college student is preparing for an active shooter. You don’t know when it’s coming, from where, or how many there are. Most college campuses don’t allow firearms or conceal carry. Some states are starting to allow conceal carry on campus which, in my opinion is a great idea. My state is one of those starting to allow that. Unfortunately for me I go to a Native American College that is federally owned so the law doesn’t hold there. How do you prep for an active shooter if you’re not allowed to have even a pocket knife, and you don’t want to break the law? This question brings me back to what I stated earlier about reading as much information as you can. The have been survivors of every school shooting and their stories are out there.

So I am constantly reading and building my knowledge of survival. Now what? Personally a bug out bag is my go to item to start with for any prep. Whether you believe in TEOTWAWKI or just wanna have a head start on a natural disaster there is always room for a bug out bag, and it is very important to have this bag with you at all times. I have found that Walmart can sell everything you would need for a bug out bag. Piece by piece you will complete it. That being said don’t be that person to go buy a “pre-made emergency bag” they are made in bulk and most likely won’t be very accepting to your specific needs. MRE’s are a good choice for any style of bag as well as freeze dried foods. You need to always consider where you would go, how far is it, and the terrain you would trek through. If you have found that there is several options for water I would choose Mountain House freeze-dried meals because, they are light and filling. If water sources will be scarce then MRE’s take much less water.

For the preppers who believe in the large-scale, scary things that could potentially happen remember that there’s always going to be someone wanting to take what you have. I once read a very good article on here that mentioned that no matter where you hunker down there will be people after it. You WILL be overrun. That has always stuck with me and because of it I am constantly thinking where would I go now? Where would I go next? I suggest knowing your terrain and various routes to get around area’s that are going to be most likely a huge mess.

A lot of the things I’ve talked about have been really similar. The constant repetition should help retain the information for all the young, hard-headed, minds I am trying motivate. I’ve only scratched the surface of what I could say, but for my first article I wanted to keep it short and to the point. Bottom line is if you keep making excuses you may find yourself scrambling when the stuff starts hitting the fan.

  We all prep for different scenarios, and start at different times in our lives. What made you start prepping? Did someone convince you that it’s a good idea? What’s your

I have been meaning to write this review for weeks but one thing or another keeps getting in the way. The Goal Zero Bolt is a great addition to your family’s emergency preps because it is both practical (who doesn’t need a flashlight) and needs only the sun to run for hours. You never need to worry about running out of batteries as the sun provides all the juice you need with the included solar panels.

The Goal Zero bolt is first a great LED flashlight that will put out 160 lumens from the 3 Watt, white CREE LED for 2 hours on high and 10 hours on low according to the manufacturer’s site. I fully charged mine and left it running over night and when I came out in the morning, it was still putting off light. Not much mind you but the battery did hold out for a very long time. Charging is simple and the Goal Zero bolt has two options to power up the internal Li-Ion 18650. One difference about this rechargeable flashlight is that you can actual swap out the battery if you ever have problems. While it isn’t one of the more standard sizes, you can find replacements all over the place. I was able to find this Li-Ion 18650 on Amazon for less than $10

The Li-Ion 18650 in the Bolt can be replaced if needed.

Charging the bolt only takes about 5-6 hours in direct sun so its perfect if you have a nice sunny day and a good place to set the included solar panels. The entire kit comes with the charging panels, usb-mini USB cable and a wall adapter. If you have other devices that use a Mini-USB, the included solar panels will charge that as well.


The Bolt has its own Mini-USB port on the side, so you only have to connect the panels to the flashlight and let it sit in the sun.

Mini-USB connector on the Goal Zero Bolt

The charging port is accessed by spinning a cover that exposes the port. When you are ready to charge the flashlight, just rotate the knob to expose the port and plug in the cable. When you are done, just rotate the knob again to cover the port. This flashlight isn’t waterproof so the feature is nice, but covering the port isn’t really protecting it from too much more than casual dirt.

Two charging panels will recharge the Goal Zero bolt in about 5 hours.

The solar panels can lay on the ground or you could hang them from a tree or any other surface to get ideal sun exposure. The case for the panels seems very solidly built with Velcro closures for when you aren’t using the solar panels. You also have plenty of tie-off options if you wanted to lash this to your pack or hang the panels somewhere.

The Goal Zero Bolt is 6.5 inches long and weighs 6 ounces. I wanted to show you this comparison to some other flashlights I have so you could see the size. This is not an EDC flashlight in my opinion but I think it is great for around the home or car. I actually used mine last night to get a chicken out of the tree, but that is a story for another day…

The Final Verdict

There are so many flashlights out there and each can have a particular use. I seldom find any single piece of equipment that is perfect at everything. The Goal Zero Bolt isn’t waterproof and its size factor preclude its use in some situations, but I don’t think that is what it was designed for. If you are looking for a great, bright flashlight to use around the house that you will probably never need batteries for, the Goal Zero is great. If you want something to strap to your gun, this isn’t your flashlight.

The Goal Zero does a great job at shining light. The advantage of the included solar panels should be obvious if you were ever in a situation where you couldn’t get to the store and your lights were out or you need to charge anything else with a Mini-USB port. Set the Bolt with the charger out in the sun during the day and you will have a good flashlight to help you see at night.

I think you will agree that this is a great light. I also included  video from Goal Zero to show you some additional uses of this flashlight.

I have been meaning to write this review for weeks but one thing or another keeps getting in the way. The Goal Zero Bolt is a great addition to your

Though we all want to live, most of us do not have the skills to conquer a world where the adage “Survival of the Fittest” is a daily task. We have been too complacent with the idea of comfort that a slight inconvenience is enough to make us jump, be depressed, or worse, find ourselves in a life-threatening encounter. A single power outage or a couple of days of being submerged in murky flood water is enough to send us into a sphere where we fear for our own lives. How will we react and retaliate should we find ourselves in the wild with nothing but our guts and our survival know-how’s?

As uncertainties that are man-made and natural come more and more often, even newbies in the game of prepping can take considerable strides in building their survival strategies. In the wild, a small misstep or miscalculation is enough to cause you to lose your life in a matter of seconds. More importantly, studies have shown that more than incurring accidents, deaths in the wild are often caused by lack of information, preparedness, and proper execution. Even the U.S. Military adheres to the notion that surviving the wild is a decision; meaning it is bound by consistent sets of going with the best survivalist options.

Camp out and swim about

Begin befriending the wild by setting up a camp trip or a hike with your family, friends, or even a group of people you barely know. This way, you get a firsthand experience about going beyond the comforts of your home. Do your research about this trip, and plan your essentials with the least possible items so that you will be able to move more easily and faster, too. Aim to house all the things you need in a carry-all, waterproof backpack. While you may not realize it, being outdoors is way better than reading mountains of books and sources in the survivalist game. Before setting out, get to take a number of laps in your pool or a nearby body of water. The ability to swim is a newbie survivalist’s skill that can spell doom or boom in this game.

Pack wax for building a fire fast

Fire is scientifically proven to give off a sense of security and safety, so you would have to master the manner by which you can build it fast. Waterproof matches are widely available, however, you still need something else to build fire to keep you warm, and to be able to cook food and boil water. An easy way to make this feat possible is by toting cotton pads dipped in wax or filling Altoid tins with cardboard and wax. Apart from being an emergency light source, it could also ward off animals in the wild that may lurk in your territory.

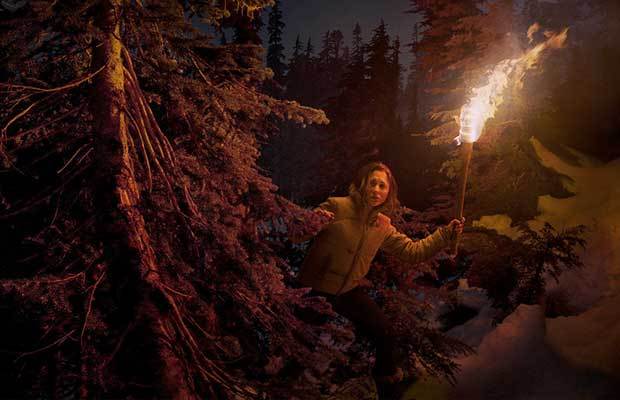
The ability to make fire cannot be overemphasized.

Hold that high-proof alcoholic drink

More than an enjoyable drink should disaster strike, an alcoholic drink above 90-proof is highly flammable and a favorable ally in sterilizing cuts or wounds. It may even be used as a bug repellant, an anesthetic to toothache, a facial astringent, and relieves sting from poison ivy. To ensure that your alcohol supply will serve its purpose, store them in a cool, dark place. Make sure that you don’t open them as it will lose its strength after six to eight months.

Counter hypothermia with bubble wrap blanket

Instead of lugging three cotton blankets for insulation, score a bubble wrap with the size of a blanket. The air bubbles that makes up this household packing material has been proven to insulate a person better by up to 70% more than thick blankets. Hypothermia is very likely to happen when you’re in the middle of a cold, usually open area. Not being able to address this readily and properly will result in loss of consciousness, and may even lead to death, before you know it.

Power up an AA battery compartment with AAA batteries

Disasters usually bring power outage, and you would have to rely on battery-powered radios and emergency lamps. Should you run out of AA batteries, you can simply stick aluminum foil that is rolled into balls to fill the gaps left by AAA batteries.

63 one-gallon bottles of water can save a group weighing 500 pounds

While you still have time, perfect your skill in building a raft out of empty water bottles. Make sure that the bottles have the same size so that they fit well together. It is important that you determine the number of people who are going to be on the raft for this to be successful. The rule of thumb is that you would need a single bottle that houses one gallon for every 8 pounds.  For a group of individuals with a collective weight of 500 pounds, for instance, you would need to get hold of about 63 one-gallon bottles with lids tightly placed.

Plan how you will use the bottles by keeping in mind that you need to have 3 or four layers to build a raft. The base should be widest and must be secured with waterproof tape horizontally and vertically. The other layers should be slightly smaller so that the raft will stay afloat. Once done, try it out on a pool or a body of water.

Defend yourself with your house keys

While it is highly advisable that you formally learn self-defense through martial arts or even holding a gun, a lot of people either have no time or find it unnecessary to learn these survival drills. Adults, children and even elderly family members can put house keys in their fists as they get ready for a possible attack once disaster and unrest kicks in. Other household self-defense items are scissors and pepper sprays from your trusted alarm system store. Arming yourself without arousing suspicion is a must in surviving the wild. You surely don’t want uncalled for attention as you plan your evacuation, or head out to your secret destination, right?

Watch out for dogs gone wild more than venomous snakes and other animal attacks

Having to figure out a way to escape a snake is one stereotypical scene in the survival game. Snake bites from venom comprise of 7,000 to 8,000 medical incidences yearly. A sting from a box jellyfish on the other hand, can cause fatal cardiac arrest when left untreated. If you think slathering insect repellant is a task you can do away with, think again. Bug lotion actually decreases your chances of being one of the 200+ million malaria victims, annually. The most surprising numbers though in animal attack department comes from the staggering 4.5 million cases that account for dog bites in the U.S. on yearly basis.

You don’t only have to worry about two-legged predators.

Bleach and condoms can secure your water supply

78% of the human body is composed of water; hence you must prioritize this in your ride with the wild side. Should you be in the middle of nowhere and happen to fish a condom out of your bag or pocket, consider yourself lucky. A single condom can hold one-day supply of water. Seek water from springs and even collecting morning dew found in grass. Following grazing animals near dusk and dawn are also ways to get to a place where you can get decent water.

If you are still packing your bug-out pack, bring household bleach with you. The Centers for Disease Control and Prevention (CDC) recommends that you can purify water with using a couple of drops of bleach. Before re-hydration, let the water sit for about 30 minutes to ensure that the bleach has dispersed well.

Want more protein? Try insects

Crazy as it may sound, edible insects are packed with 65-80% protein – a far cry from the 20% protein requirement that beef can give. Not bad for 4 species for every 1 human being, right? If you can go past your food preferences, you’d have more than your fill since insects are easier to hunt and locate. For those who are convinced, a good way to jump-start this emergency food plan is to get your palette acquainted with exotic food finds that have bugs in them. Critters, scorpions and even ants are some of the popular tummy-friendly food choices you can befriend and hopefully, love.

Go for to-go food to set your “Survive and Conquer” mood

Truth be told, food is one thing that even seasoned preppers worry about and seriously work for. While the protein-content of insects sounds inviting, we cannot seem to find the strength and motivation to dig into them. For newbie (and even seasoned) preppers, compact backpacks packed with an ample, generously portioned food kits is a practical, and highly manageable way to be able to survive and conquer the wild. Food not only replenishes the energy we need to run around and stay on top of the game. A totable food storage guarantees a newbie survivalist that while s/he may have to go unimaginable lengths to make it to another day, s/he can find a little time for comfort, and a tiny window to let the stress subside. By seeking the aid of survival food kits, novice preppers would be able to focus more on getting their safety gears in place rather than having to be overwhelmed, and left hanging with the long list of a survivalist’s concerns.

Live the ‘Survive and Conquer’ lifestyle, one day at a time

Being a prepper is no longer confined to people who are building larger than life underground shelters, or those who seriously secure their food storage that will last for more than two decades. Even newbies are now getting the hang of being a prepper as it is transforming into a lifestyle and a necessity; rather than an idea that is far-flung and overrated. These really easy and handy tips that novice preppers can look into and learn from in order to increase their chances of making it through the world of the wild. As newbies, it is best to start with the most basic and most familiar prepping lessons that will make your survival story a more attainable reality.

Though we all want to live, most of us do not have the skills to conquer a world where the adage “Survival of the Fittest” is a daily task. We

I am asked regularly what equipment people should have or need for tactical or hostile situations. I am not a gear-queer and tell people to make maximum use of what they have in their everyday environment, there is no need for camouflage knife, forks, and spoons. I am a great believer in the saying that “The more you know, the less you need” and I tell my students always look for equipment that is multi-use or think how something can be adapted for multiple uses.

Let me ask you a question… What makes equipment tactical? For me all that makes equipment tactical is the word “Tactical” which, is overly used these days by stores and manufactures to sell Chinese made junk. Apart from firearms and ammunition a lot of useful equipment can be found in most hardware or kitchen stores.

The advantage of kit from hardware or kitchen stores is that it’s meant to be used and worked with, not just talked about, and played with as is the case with a lot of tacticool kit. For example, I always buy my flashlights from hardware stores, they are generally a lot cheaper than tacticool flashlights and take AA batteries etc. that are more widely available than fancy lithium batteries. From a tactical perspective, you don’t need powerful flashlights, they need to be powerful enough for the job, you want to see, not be seen!

Camouflage and tactical black kit may look cool when you showing it off to your buddies but, try finding the camo flashlight or zippo you dropped in the bush when you need it… As, long as kit does not shine or reflect light it will be fine. When buying, equipment think about if you drop it, which you will, would it be easy to find! In potentially hostile environments all but essential equipment needs to be packed or in your pouches or pockets, so your orange spork should not be tucked in your hat band!

The below personal tactical gear list is taken from a proposal I put together for counterinsurgency / tactical team in West Africa a few years ago, this should give you a few hints on kit etc. I have made some explanations on why I have included some of the items, and not every item will be applicable to everyone in every situation, so use this as a guide and adapt it. This is a tactical gear list for operational personnel and I am sure some reading this will say it’s not applicable for most preppers etc. OK, then don’t read it, but remember not so long ago Libya, Syria and The Donbass (Eastern Ukraine) were peaceable countries, whose populations would not have believed you if you told them civil wars would tear them apart.

Discover in this video how this will affect you.

100 Deadly Skills: Survival Edition: The SEAL Operative’s Guide to Surviving in the Wild and Being Prepared for Any Disaster

From a U.S perspective look at what happened in New Orleans with hurricane Katrina in 2005 or the situation in South Chicago. Not so far afield look at what’s happening in Mexico, could this happen in the U.S., to an extent yes… The Mexican Cartels in the U.S. generally keep things amongst their own communities, they are making plenty of money and compared to Mexico they are relatively safe. But with the strengthening of security on the U.S./Mexican border, which will lead to human and drug trafficking routes being cut, things could spill over. What trafficking routes are left will be fought over and the now unemployed narcos will be seeking other sources of income.

Such situations can lead to what can be classed as “Bosnification”. Now when society breaks down, who takes charge? Sadly, in most places its usually the organized criminals; they are organized, armed and willing to take risks. After the Soviet Union collapsed Mafia groups took control in one way or another of local governments throughout the former USSR. Many of the irregular units fighting in the civil wars in the Balkans in the 1990’s were formed by what could be classed as Mafia bosses. You can see it these days in Iraq, Libya and Syria where local militias have taken control of areas and change sides on a regular basis, and in the meantime the local populations have to deal with their BS and taxes.

In Mexico, in theory, there is the Military, Federal Police, State, and Municipal Police to enforce the laws but much of the country is controlled by drug Cartels and their offshoots. I have worked in Mexico and the police there have an extremely difficult job. I have trained some very effective police tactical units in Mexico who in the long run were disbanded or became ineffective due to being targeted by criminals. State and local police generally live in the areas they work in, if not from and grown up in those areas, which makes it easy for the Cartels to identify them and their families. Even if the officers want to do their jobs properly are they going to put their families lives at risk to do so, or just take their pay check and look the other way? In many situations where regular law and order has broken down, be it in Mexico or elsewhere it has been up to the local communities to protect themselves.

Now, when considering what equipment you need, put it into four different layers and think what gear you need, rather than what you want. I have used British Army Infantry terminology to help explain this section, each layer would be added on as required.

  • Personal Items: Think about what should be on your person and at hand at all the time; knife, pistol, pistol magazines, cell phone/radio, lighter, personal water filter, basic first aid kit.
  • Assault Order: This would consist of the essential kit needed to conduct a short-term military type tasking in a potentially hostile environment; rifle, spare magazines, water bottles, comprehensive first aid kit, protective clothing etc.
  • Combat Order: This is the Assault Order with rations and personal equipment, that enable the you to live and fight for a period of 24 hours.
  • Marching Order: This is the Combat Order with the addition of a field equipment such as backpack, sleeping bag, poncho, cooking stove, spare socks etc. required for two week operations without resupply, except for ammunition, rations, and water.

As I stated earlier this kit list was put together for a government team who had access to military weapons, I know in most places civilians will not be able to get AK’s and CS grenades, so make use of what you have. If all I had access to was a double barred shotgun I would be happy, it’s a very effective weapon if you know how to use it and have your strategies planned! If you have access to firearms buy weapons that you can get spare parts and magazines for, in common calibers. I have heard people applauding the FN 5.7 as the best pistol on the market, and I will admit it’s a very nice weapon, but trying to get the ammo at the best of times can be a pain, during a SHTF situation, it might be easier to find rocking horse shit… I would suggest you stick to 9mm, .40 or .45 etc…

Team Formation & Equipment

Team operatives need to be carefully selected not only for physical abilities but also for social skills and their ability to blend in with other people. This means the best operatives are usually average height and weight and look like normal people. The operatives need to be physically fit and should be trained in light infantry tactics, first aid, communications etc. The operatives will need a high standard of self-discipline and intelligence; they will need to be mentally flexible enough to adapt to rapidly changing situations. The operators will need to be able to work by themselves or in team with minimal equipment and support. Our suggested size for an operational team is six operatives, this size team should be able to handle most tasks and be able to be split into two three-man independent fire teams. The team should consist of a team leader, a second in command and four operatives.

Equipment

The operatives need to be able to operate with minimal equipment and be able to adapt everyday objects to meet their needs. The operatives should be as lightly equipped as possible, too much gear will only slow them down. When on operations they should only carry what is necessary, if they don’t need it, don’t carry it. Below is a list of equipment the operative should have access to for cover and overt operations, they will not need everything for every operation.

Personal Equipment

  1. Communications; Radios, cell/mobile phones. Note: Consider if the cell phone networks will be working in SHTF situations. Remember with radios, the more powerful they are the easier they are to intercept from a distance. Make maximum use of smart phone apps if they do not compromise operational security. All communications equipment needs to be secured at all times.
  2. Power; mobile power sources need to be available for charging communication devices etc. Consider solar options.
  3. A reliable wrist watch
  4. Two good quality high capacity pistols with minimum of 6 magazines: We recommend two identical full size service weapons.
  5. Concealable/duty pistol holsters; strong side and shoulder rigs.
  6. One folding stock rifle/carbine with minimum 6 magazines. We recommend AK-47 type platforms. Note: AK platform was chosen for this location due to availability, always chose weapons you can get spare parts and ammunition for.
  7. Chest rig capable of holding 6 rifle magazines and two water bottles
  8. Plenty of ammunition for operations and training.
  9. Weapon cleaning kit
  10. Waterproof flashlight and batteries
  11. Personal first aid equipment
  12. Quality fixed blade knife
  13. Quality multi-pliers
  14. Quality pruning shears/secateurs. Note: used for building hides and clearing trails of brush that can make noise etc.
  15. Quality compass, Maps of operational areas, GPS with software updates.
  16. Minimum two 1 liter water bottles, water purification tablets or personal filters.
  17. A level 3A concealable bullet proof vest. Note: protective clothing should not inhibit movement and remember the heat factor!
  18. Smoke/CS grenades.
  19. Two Carabiners & 20 meters of 9.2 mm climbing rope
  20. Scrim net/sniper veil
  21. Backpack
  22. poncho
  23. sleeping bag
  24. stove etc.

Team equipment

  1. Spotting scopes
  2. Night vision
  3. Stills and videos cameras
  4. Bolt cutters/entry tools

Dress

Operatives should dress to blend in with their environments; civilian clothes should be used for tactical operations especially when working in close proximity of civilians. A simple green or brown shirt can blend in to bush just as well as camouflage if the operative is properly trained. Our preference for civilian cloths over military fatigues is because if you are performing an operation in a suburban/urban area you have to blend in with the public and if you are wondering around the streets in military fatigues and face paint you will draw attention.

For footwear, we suggest to wear what the general population is wearing, something light that is good for running and swimming in. Tactical boots can draw attention and their aggressive tread leave obvious ground sign. If using running shoes ensure any reflective material is removed.

The only specialist clothing we would recommend would be a fire proof balaclava and gloves. The balaclava can be used for concealing your identity and hiding the shine from your face on rural operations. Good gloves amongst other things gives you extra grip on your weapon and again hides the shine from your hands on rural operations etc. Tactical clothes for direct action operations should be fire proof and of a good quality.

Cash

Cash and assets will need to be available for operational expenses and to pay sources for information or services provided. Operatives should sign for all cash and assets and get receipts or at least record all expenses.

Safe Houses

Teams and operatives will need places to work from, live and train. Locations will need to be secure and defend-able. A threat assessment needs to be compiled on all locations uses by the team; weak spots must be identified and dealt with. Escape routes need to be identified from the safe houses to other safe locations or ERV’s. All potential surveillance and sniper locations around the safe house need to be identified and monitored. Doors and windows on all floors need to be secured, reinforced or blocked if they are not used. The safe houses should regularly be searched for listening devices, cameras or IED’s. When entering a safe house that has been left unoccupied even for a short period of time the whole place needs to be search for intruders, signs of intruders or forced entry. If a safe house is broken into it should not be used again. Fire alarms and firefighting equipment needs to be available and in working order. Above all the safe house does not want to draw attention; it needs to appear to be a normal house. It is difficult if not impossible to find the perfect safe house, find the best you can and take all precautions.

Transportation

All vehicles used by the operatives needs to blend in with the environment they will be working in and not draw attention. When working in vehicles you should where manpower allows always have two operatives in a vehicle. One would be the driver, who should always stay in the vehicle, behind the wheel ready to drive away in an emergency and the other would act as escort or navigator. Windows where possible should be tinted for surveillance purposes. The vehicles should be registered to front companies and not to the operatives or the agency they are working for, so they cannot be traced back to you by the terrorists. Vehicles should be reliable and regularly serviced, all should have a good break down kit. You will also need a recovery plan for immobilized vehicles and stranded personnel. When a vehicle is left unattended the area around it needs to be searched and then the vehicle needs to be searched for IED’s, tracking devices or contraband.

In urban areas, public transport should be used as it is good for identifying terrorist surveillance, losing anyone who has you under surveillance and is not usually an expected mode of transport for an operative.

Conclusion

Hopefully this article has given you a few things to think about. The main thing I try to stress to people about equipment is keep it simple and keep it to what you need… Remember, the more you know, the less you need!


On a different note, here’s some other self-sufficiency and preparedness solutions recommended for you:

The Lost Ways (The vital self-sufficiency lessons our great grand-fathers left us)
Survival MD (Knowledge to survive any medical crisis situation)
Backyard Liberty (Liberal’s hidden agenda: more than just your guns…)
Alive After the Fall (Build yourself the only unlimited water source you’ll ever need)
The Lost ways II (4 Important Forgotten Skills used by our Ancestors that can help you in any crisis)
The Patriot Privacy Kit (Secure your privacy in just 10 simple steps)

I am asked regularly what equipment people should have or need for tactical or hostile situations. I am not a gear-queer and tell people to make maximum use of what

So I’ve hit a breaking point; I finally ran out of the razor blades that I bought in bulk  last year and took a quick trip to Sam’s Club.

Only this time I lost it, I don’t know what it was that hit me but as I stood there scratching the razor burn from the last shave with my “ultra high tech razor with five blades for the smoothest shave you’ll ever get”;  I just could not bring myself to shell out 40 dollars for razor blades.

I’d had it!

I was through!

I was growing a beard!

Well two weeks later, a combination of severe itching and a wife that is not a fan of the  “Grizzly Adams” look  sent me high tailing it back to the store.

But to be honest I had never planned on keeping the beard, and had been trying to figure out a more efficient and cost effective way to manage my facial hair.

And then it hit me, I found a way to stock up on supplies that are useful to me now, will be useful to me later, last a very long time, and will save me money in the process.

And it something that was completely normal just a few generations ago but is now seen is more of a novelty than a functional ( and better) alternative.

I’m talking about wet shaving

Sounds silly right?

My wife thought so too at first, but then we did the math.

A pack of my normal razors cost $38.98 for 16 blades; that’s  $2.44 per blade and each cartridge lasts me two shaves; so that’s $1.22 per shave.

A pack of double bladed razors for my safety razor runs $2.48 for 10 blades; which is $..25 per blade;  after testing I can  comfortably say that I get one shave per blade. ( and you can buy them even cheaper in bulk)

The math alone makes this a completely logical investment, as long as you learn how to use it properly.

Also, manufacturers are hyping up the “more blades equal a better shave B.S.”, pretty soon we’ll all end up with razors like this…:

I have been wet shaving with a safety razor and boars hair brush (the image to the right) for about a month now and couldn’t be happier with the results.

Yesterday I actually went back and shaved with my old razor and I think it is safe to say that I am now a life long fan of wet shaving and will be ditching my disposable.

With that being said, there are a few pro’s and con’s you should know about if you are interested reviving this lost art.

The Good:

A better shave; even with one blade I noticed that my skin was much less irritated that when using my normal 5 blade model.

Economical; the double edge blades are much more economical than the cartridges.

Shelf Life; Did you ever stop to think that your razors have a shelf life?  Most of the fancy razors have lubricating strips and  rubber pieces that can go bad over time.

Multiple uses; these double bladed razors are ultra sharp and can be used for more than just shaving your face, unlike their cartridge cousins (minus a few prison modifications of course).

Nostalgia; something about holding one of these reminds me of watching my Papa shave when I was young and makes me feel connected ( this is more of a personal pro but some of you may feel the same).

The Bad:

Shock factor:  The initial cost of a handle can be very expensive, but unlike modern razors, these are meant to last a lifetime.  I purchased my razor from a beauty supply store for around 12.00 just for testing purposes and while it seems to be pretty sturdy, I will soon be  switching over to a Safety Razor  from Merkur. The only problem is picking which one I want.  A good handle can cost you anywhere from $20-$100 and the sets that include the brush, stand, and lather cup, start at around $60 and go upwards of $200.  BUT if you buy a good razor it is something that you will be able to pass down for generations.

Time: Shaving used to be an art. Now it is a pain in the rear.  To properly wet shave you need to set aside time  so if you don’t think that you can set aside a good 15-30 minutes for a thorough shave, you might want to keep at the hack and slash method. ( see below for the technique that I use)

Learning curve:  Properly learning the technique to a wet shave is  not something you pick up overnight. There is a definite learning curve  that I am still trying to get over.

More chance to cut yourself: You are much more likely to cut yourself with a one of these butterfly type safety razors than with a cartridge, Not necessarily because the blade is more dangerous but because they are far less forgiving than a modern razor.

The Bottom Line

Wet shaving may not be for everyone, but it is a great skill to have.  The two main things  you need to concern yourself with are the initial cost of purchasing the supplies and whether or not you are willing to dedicate the time required to do a full shave.

You can stock up on razor blades now and even buy a few extra cheap razor handles to keep stashed away. That way you can have them for your personal use now and as a bartering tool after TSHTF.  Never under estimate the face value of a clean shave.  If you want to get started and skip going the cheapest route I would suggest getting this kit (it is probably the one I am going to end up with):

P.S. Like I said earlier there is a technique and finesse that you need to learn in order to be successful with this type of shave

The Technique

Prep your beard. If you want a clean shave, you need to prep your beard adequately. The goal during beard prep is to soften your whiskers so shaving is easier and causes less irritation. The best way to soften your beard is to to shave right when you get out of the shower. The hot water from your shower should hydrate and soften your beard enough for shaving. If you haven’t showered, at least wet your beard with some hot water. A hot towel is a great way to soften your beard.

Lather up. Take a small dollop (about the size of nickel) of your shave cream and place it in a mug. Take your brush that you’ve pre-soaked with water and swirl the cream around until you get a nice thick lather. Apply the lather with your brush in swirling motions. When your face is nice and covered, take a few strokes to smooth everything out.

The shave. Unlike shaving with cartridge razors, shaving with a safety razor actually requires some skill and technique. Once mastered, though, you should be shaving effectively in no time. The four keys to a successful shave with a safety razor are 1) use as little pressure as possible; 2) angle the blade as far away from your face as possible; 3) shave with the grain; and 4) go for beard reduction, not beard removal. This will take some getting used to if you have used cartridges your entire life.

You don’t need to use pressure because the weight of the safety razor is sufficient to cut your beard. If you press down, you’ll end up hacking up your face. To help counter the tendency to apply pressure, try holding the razor by the tip of the handle.

Angling your razor is probably the trickiest part. The proper angle is somewhere around 30 and 45 degrees. To get the proper razor angle, put the top of the razor head directly on your cheek, with the handle parallel with the floor. Now slowly lower the handle until the blade can cut your whisker. Practice on your arm if you’re not comfortable practicing on your face.

While shaving against the grain can get you that smooth feel, you risk slicing up your face and causing ingrown hairs. When you’re first starting out, shave with the grain of your beard. If you lather up and pass the razor more than once over your face, you’re guaranteed to get a smooth finish.

The goal with shaving should be gradual beard reduction, not beard removal in one deft swoop. Most men try to get rid of their beard in once pass of the razor. This hack-and-go technique is what causes the majority of skin irritations. If you want to avoid skin irritation, lather up and pass your razor over your face several times. Your face will thank you.

Post-shave. Rinse your face off with some cold water to close your pores. Treat your face to a nice aftershave. There are several to choose from, so pick the one you like best. Aftershave helps reduce any irritation that may have occurred and will leave your skin looking healthy.

There is much more to a shave than just the technique.

Anyone else practice wet shaving?

Or if you have a suggestion for a good razor handle model, leave me a comment and let me know!

So I’ve hit a breaking point; I finally ran out of the razor blades that I bought in bulk  last year and took a quick trip to Sam’s Club. Only this

I am always being asked which is better for close quarters self-defense a gun or a knife. Both are deadly weapons if used properly but what is properly. At a close quarter’s range, which is conversational range, say about 10 to 15 feet, the main thing will be if the weapons are deployed or not. Whichever one is deployed first gives the user the advantage. For the shooter at this distance you can forget the textbook formal line up the front sight shooting techniques, they won’t work and for the person with the knife forget the Dojo sparing techniques. A lot would have to do with strategies, which seem never to be covered in formal firearms or self-defense training and then non-PC aggressive action!

Knives are excellent close quarter’s weapons and have a lot of advantages over guns, like being legal availability in most places for one. If traveling internationally 98% of the time you can’t take firearms but should be able to pick up a pocket knife at the end location. The tactical knife does not need to be a $200 + custom tactical blade, if you go to Wal-Mart you can get a paring knife that can be concealed and can slash and stab very well for under $10!

While being in Eastern Europe in the mid 90’s I was surprised to hear from several law enforcement sources that the gypsy kids trained with knives, were skilled and were a not to be taken lightly. While in West Africa last year we were running all out tactical drills including hostage rescue with machetes, where the bush was thick it was very easy to stealthy get within a striking distance of a target. The proper use of knives relies on speed, surprise and aggression.

So, on the street for argument sake, who would have the advantage, the person with the knife or the gun?

  • Whoever was not caught off guard to start with!
  • Formally trained shooter against martial artists: Even!
  • Street wise shooter against martial artists: The Gun!
  • Formally trained shooter against someone who can use a knife properly: The knife!
  • Street wise shooter against someone who can use a knife properly: Depends on the strategies, training and luck!

I tell my students and clients to do everything possible to avoid any hostile situation as there are no good end results… Someone usually goes to jail and someone usually goes to the hospital or the morgue!

Stay safe!


I am always being asked which is better for close quarters self-defense a gun or a knife. Both are deadly weapons if used properly but what is properly. At a

It is March now and we are fast approaching swim suit season. Are you dreading going to the pool and exposing yourself to friends and family? Even worse, do you simply no longer care at all? Most of us aren’t in the shape we want to be in and if this doesn’t apply to you, don’t worry about it. If like most of us, you have some things you want to improve and are struggling with motivation or keep coming up with excuses then this post is for you.

I am not a spring chicken anymore but I am nowhere near over the hill. I have a lot of life left in me and I want to make the most of it. I have known for some time that I needed to exercise more and truthfully, I am not a couch potato; don’t really watch TV at all. I am fairly sedentary with my work though so I need to exercise as much as possible to offset the hours of sitting and staring at a computer. I eat relatively well, lots of fresh foods and not too much junk, but I do like my desserts. That combined with my inactivity had given me a little extra weight I needed to get rid of and if you have any thoughts about being in the best shape to run or fight or perform a lot of manual work like we could expect in a SHTF scenario you don’t want to be unprepared. Isn’t that what we are always talking about on Final Prepper?

It isn’t the weight so much as strength. In my life I have always struggled a little with weight although I have never obsessed to the point of actually being the weight I wanted to be. I couldn’t tell you the last time I had a six pack. Well, on my stomach that is… In more times than I can imagine I have dieted and gone to the gym and had periods where I slimmed down and others where I bulked up. Not with muscle so much either, unless you are talking table muscle. Each time I would find some motivation and I would get back at it and make decent progress for a while, but that perfect body in my mind never matched what was in the mirror. Genetics and laziness had it in for me.

Recently, I decided to get back on the horse again for two reasons. The first is that I seriously wanted to be in shape. The second is my daughter wanted to run the Warrior Dash with me. I accepted and that was all the motivation I needed to start working out again. Running a 5K isn’t too bad at all but you add some obstacles in there and things get interesting. There are no shortage of people who aren’t in the best shape that get out there too, but I wanted to push myself to be better and stronger than I was last time.

Before I started my workout this time though I tried to set different goals for myself. Instead of imagining myself with a trimmed, cut physique you see in magazines, I imagined myself as simply being strong. I decided that I could really live with 10 extra pounds as long as I could physically lift more or have longer stamina for the tasks I needed to do. Instead of looking in the mirror and taking selfies like so many people I was just going to focus on getting stronger. I would leave the skinny and obsession about appearances for someone else.

The Goals

My goals were simpler in my opinion. I wanted to be able to run 3 miles easily, do 100 push ups , 200 sit-ups and 10 pull-ups each day. If I could do that I reasoned I would be in pretty darn good shape considering everything else. Why did I pick these and not something like being able to  bench-press 400lbs? Well, one of the prerequisites of this goal was that I didn’t want to have to rely on the gym or anyone else for my fitness. I have had several gym memberships and for me I think they were a waste. If you can’t lift your own weight, why go to the gym and get on a machine? I can run on the streets where I live for free. Pushups, sit-ups and pull-ups are all free too, I just needed a pull-up bar which I already had.

Even though I didn’t want to go to the gym, that doesn’t mean I didn’t have some help. I wanted to see what free fitness apps were available that could help me with my workout program and I found and use the following:
Running is something that I used to do fairly regularly. Actually, this is my 3rd 5K which I know is no Boston Marathon, but it’s enough for me to be able to get out and run 3 miles easily. I don’t need to do any more than that. When I first started running again I had been inactive for a pretty good while except the daily walks I mentioned so I wanted an app that would ramp me back up to a 5K. I found the 5K Runner program and really loved it. You start out very slow and each day, the program will guide you to run a little more until you are finally running a 5K. You can play your own playlists or listen to music while you run and the 5K runner will tell you exactly when to run and when to slow down and walk. All you need to provide is the place to run and to get your butt out there and do it.
Pushups for me were a nightly routine that I would do more or less each night unless I forgot or was tired. My routine was anything but and I wanted something that could coach me to more push ups. I would crank out 20 or 30 and call it quits, but I found Pushups 0-100. This app is great and similar to the 5K Runner app, it starts you out slow and daily builds the number of push ups you are doing. Each day you perform 5 sets. The middle set has the most push ups and the last set is hard to complete. You get badges when you reach different levels, but one cool thing is that not only does it tell you how many push ups you do each day, but it keeps a running count of all your push ups to date. Its pretty cool when you see the total go over 1000 push ups. The whole program takes just 10 weeks and at the end you will be doing 5 sets of 20 for 100 push ups.
Situps was the next app and wouldn’t you know the makers of the Pushup app had a free app for sit-ups too! Situps 0-200 follows the exact same principle as the push ups where you start out gradually through 6 sets of varying reps until you finish week 10 by doing 8 sets of 25 sit-ups for a grand total of 200 sit-up’s. You get badges along the way to motivate you and the app keeps track of how many sit-ups you have done and lets you know automatically how much time to rest and prompts you when it is time to do another set. I just lay this in the floor next to me, crank out my sit-ups and press “did it” when I have finished. Sit-ups will let me know how long to rest and then ping when it is time to crank out some more. Even if you have another app open, the timer still works and you are alerted.
Another app I use to strengthen my core is one called 30 days. This app has a little different approach to progressing you through work-outs and offers a lot of additional exercises in one app. I got this primarily to work on Planks. For those that don’t know Planks are reported by some to be better than sit-ups at strengthening a larger set of muscles and it looks easier. What you don’t realize at first is how hard it can be holding a plank position for a minute or two or over three. 30 Days lets you select your exercise and you can add multiples to your plan. Once selected, 30 Days gets you to do as many of that exercise as possible. For me and the Plank it was to hold the plank position for as long as I could. 30 days times you and when you are finished, 30 Days takes your time and figures out a workout plan for you based upon that time.
Lastly for the legs I have another app for squats made by the same people who brought you push ups and sit-ups above. Same concept and same execution. Squats 0-100 gives you a set number of reps and sets and builds on that until you are stronger. And there are others out there if you want to bump your workouts to the next level. There are push ups and sit-ups extreme versions that cost $1.99 each but increase the reps and intensity. Why squats? This is another exercise that uses your own body weight and will strengthen you without machines. This plus running and even the planks will increase strength and stamina.

No Magic Pill

No, these apps are not magic and you could do all these exercises without any app at all I know. You have to motivate yourself to get up and push yourself to not only exercise, but complete each of these plans. What will that give you? It will give you more energy and strength. Will it make you look like Kim Kardashian? Nope, but it will get you in shape. Being in shape, able to lift your own body weight and last all day through grueling work is what is important. Selfies from the gym aren’t.

Do you have any favorite apps or exercises you use?

It is March now and we are fast approaching swim suit season. Are you dreading going to the pool and exposing yourself to friends and family? Even worse, do you


Seems everyone online is focused on prepping for a nuclear war these days. Shows the stupidity of humanity that this is even a thing but it is, so I thought I’d share the contents of my radiological medical response kit. There are plenty of excellent sources out there covering the other issues around this topic but get a hard copy of Nuclear War Survival Skills. There is a free download is the 1987 version. There is a 2012 updated version for purchase but I do feel some books require owning as hard copies and this is one of them.

My kit started in 2008 before I became a prepper after attending a compulsory Canadian Government conference for a few days on the Medical Emergency Treatment for Exposures to Radiation (METER) . I am sure some of you have had more recent training and I’d love to read about USA and UK equivalent training. The course enrolment in 2008 was managers of trauma hospitals and emergency services and included a dirty bomb table top exercise. It was fascinating stuff and great speakers. I am including some more recent information from the Ontario Government Radiation Response Plan.

I did not use FEMA for this article but this slide show is interesting if you want more background of a general nature on Medical Management of Radiologic Casualties

I am including some directions to take materials and over the counter medications to limit radiation dosing but you should only take these on medical advice and under medical supervision. No self-treatment even in the apocalypse!

Treating a Casualty`

Read More: Generic Procedures for Medical Response During a Nuclear or Radioactive Emergency.

I am not going through the types and methods of exposure, or the protective materials/clothing/masks. Look that information up but there are a few things the average person might overlook. I am giving the general ideas here and some will not work in a nuclear war but work great if it was a dirty bomb or power plant incident so adapt as required.

Exposure to Radiation

If treating an exposed casualty keep them outside an established Cold Zone (an area where outside material, clothing, foot wear never enters. The area of treatment is a Hot Zone so protect yourself as best you can while there. Try to avoid treating for prolonged periods near the casualty as they might be radioactive enough to give you a lethal dose. Have your Cold Zone at least 5 metres (About 20 feet) away from any casualties and preferably with a concrete wall in between. Alter this if contamination is everywhere but even if they have driven to you still remember they might be a radioactive source internally or externally.

Decontamination is supposed to occur after treatment of any regular injuries but honestly I would decontaminate first to avoid exposing yourself while treating. Minimum here is double gloves and plastic suit with duct tape sealing the arms and legs. An NBC mask would be great but goggles and a N95 mask might be all you have. None of these supplies should be reused if possible or left anywhere near the Cold Zone after use. Be checked or check yourself every 5-10 minutes to make sure your gear is intact. Approach the casualty with the wind to your back if possible. Remove all their clothes by cutting gently to avoid making anything airborne and dispose away from the casualty and the Cold Zone.

Use potassium iodide to block your thyroid’s absorption of radiation.

Water is not recommended for decontamination but likely it will be all you can find to achieve removal of visible and invisible external contamination. Pour clean water over them and hose them down if you can. Try to make sure this water runs away from the Cold Zone and think about any drains it might enter. If you have enough consider using wet wipes rather than water and will you have enough clean water anyway for this sort of thing in a nuclear war? The goal is to remove anything visible and then hopefully wash off any invisible sources of radiation. This will not make them safe to enter the Cold Zone as they might have absorbed, ingested, and/or inhaled radioactive material and remain deadly to you. A few hours to a day will tell as they will show obvious signs they are going to die. If you can keep them outside the Cold Zone for at least 24 hours and a week would be good but again depends on who it is and circumstances locally.

Treat injuries but place Cold Zone equipment in minimal amounts on doubled clean tarps not the ground. Remember not to kneel down or rest against walls or the casualty. Ideally the casualty should be doing all of these interventions themselves with you shouting encouragement and throw gear to them. If you have to move them then place them on a thick clean tarp and a sheet and literally wrap them up entirely to avoid contact for the transport.

They are contaminated until a Geiger counter says they are not or several days have gone by and they are showing no major progressive radiation illness. Until then treat them as if they are radiative to you. Do not forget this ever. As the hours and days go by the threat of this lessens but it does not take much source material to kill.

Radiation Sickness

Occurs a few hours to several weeks after exposure and are mainly the signs and symptoms from dead stem cells that you will see. Of interest if you have seen Threads or any film it takes 2-4 days before you see gastric signs. Diarrhea and abdominal pain take about 48 hours for most lethal doses to appear so being fine a day afterwards means nothing for survival. Gastric symptoms lead to a horrible death in about ten days so if they get to two weeks it looks good but… it takes 30 to 60 days before you know they will not die from blood failure. The earlier lack of appetite, nausea, vomiting (persistent), and lack of energy occur the more likely it is the casualty will die.

See graph page 21

The most useful sign is their consciousness as it gets hit hard early by lethal and high radiation. It can kill in 24-48 hours but expect drowsiness and feeling very ill even in none lethal exposures. Diarrhoea is always a bad sign for survival and remember that poop might well be radioactive so keep away from it and keep it away from your Cold Zone.

Bleeding and vomiting and diarrhea can all occur within minutes of high level exposure. Interestingly a type of pneumonia can occur after about 50 days and pulmonary fibrosis can occur about a year afterwards. Carry a few N95 or similar masks with you everywhere you go as inhaling is the easiest way to become contaminated in a nuclear incident.

Radiation Symptoms and Management.

Treatment

This gets complex but basics are needed such as an antiemetic (Gravol). Antipyretic such as Tylenol but do not use Aspirin as they are likely to bleed and this really won’t help that. Keep hydrated and warm. Treat other injuries as best you can. Use ciprofloxacin and/or cephalosporin antibiotics and consider also using Vancomycin (Gram Positive antibiotic) and Amphotericin B (anti-fungal). You will need a Doctor to prescribe these but Vets have these and there are sources available to treat your tropical fish that might help in a pinch. Antivirals (acyclovir) are good but there is no information on using HIV treatments for Acute Radiation Sickness but if available I would consider it. The casualty is going to feel really ill from this therapy but worth a try if available and if not obviously dying.

Cutaneous Syndrome

Typically a hand or foot might develop this even if there are no signs of systemic Acute Radiation Sickness. Of note the First Aider is at high risk from this if the casualty has high doses. This is basically a really bad burn that swells and then develops tissue death. Treat with removal of dead tissue, ingesting steroids, eating lots of protein, and avoiding nicotine (vasoconstrictor). Pain killers will be nice here as it is agony so consider early amputation if loss of the area is clear.

My Radioactive Medical Response Kit

Most radioactive elements are not easily absorbed by the bowels but Iodine, Tritium, and Cesium are 100% absorbed. Strontium is about 30% absorbed while most other elements about 10%. This is an ongoing issue in a radioactive environment so consider using double bag clean soil and secure water barrels to construct your Fall Out shelter with and using these for food production later on after clear vegetation and soil from your garden (this is arguable as might put you at risk of inhaling)

Metamucil. High fiber intake promotes bowel clearance to flush out any ingested radioactive materials. Start as soon as you think there is a radiation issue. Vegans clear the bowel in less than 24 hours and meat eaters about five days.

Use Potassium Iodide tablets to block radioactive iodine from being absorbed by the thyroid gland in the neck. Ontario Government gave me free ones but I’d go for 14 days supply for all members of the group and a 28 day supply for all people under the age of 25. Make sure they are not allergic to iodine (shell fish) and it only works if taken before exposure and only helps the thyroid not the entire body. A 130mg tablet provides protection after six hours and last about 36 hours. One tablet for adults a day and half a tablet ages 3-18. Under 3 years give a quarter of a tablet. Under one month an eight of a tablet. Only used if intake of radioactive Iodine is likely. 130mg of Potassium Iodide is equivalent to 170mg of Potassium Iodate.

Drink fresh water in large quantities (3-4 litres a day) as it helps flush some elements out and you need to be hydrated if you get sick. Urinate outside the Shelter and think about drainage away from the Shelter. Not likely to be radioactive but no point doing all this and overlooking the portable toilet in the shelter that is emptied every week. The goal is to reduce all radioactive exposure as far as possible and for as long as possible.

Barium Sulphate (not commonly available but see if you can get a friendly ICU nurse to get you a supply). Not an enema but the oral version as it is really good at binding to Strontium and excreting it via the bowels. Your poop will by clay like and you should consider it to be radioactive. Use one oral dose of 300mg but repeat is ingestion reoccurs. I’d basic this on where the food is from and if your poop is normal again but honestly do not eat or drink anything that is not from your stores to avoid this fate. It causes constipation so a mild laxative added to the Metamucil is a good move.

Use Prussian Blue by mouth as it is absorbed in the bowel instead of Cesium, Thallium, and Thorium which is then pooped out. Your poop is highly radioactive in this case. Use about 3gm per day for a minimum of 30 days. It is not absorbed by the body and is relatively harmless. It will cause constipation and your poop will turn blue. If used, maintain a high potassium diet as it rips this out of you as well and that can easily kill you.

Maalox or similar. You want colloidal Aluminum Phosphate or Aluminum Hydroxide (antacids). Hard to find these days as the anti-aluminum movement due to Alzheimer’s risks means many brands no longer contain Aluminum. Read the label. Use about a 2.5 gm dose once a day for five days. It binds to the radioactive elements in the bowel allowing you to excrete them in your poop .

Sodium Bicarbonate. This helps depleted or enriched uranium leave the body by the kidney. I can only find intravenous doses but it seems a spoonful a day for a week might help if you can stomach it. The dose is two tablets every four hours until three days after there are no symptoms but tablets might be hard to find. Use pure sodium bicarbonate powder and check the label for additives.

You might consider charcoal ingestion but this is not recommended for radioactive contamination as it does not do much to block absorption and can lead to vomiting and then aspiration of radioactive material into your lungs which is a far worse issue than in the bowels.

I also have the ability to stop all treatment humanely. Well that is my kit and the background to it. Enjoy!

  Seems everyone online is focused on prepping for a nuclear war these days. Shows the stupidity of humanity that this is even a thing but it is, so I thought