
You can make rope or natural cordage (rope and string) from many different fibers including (Bast) Dogbane, Milkweed, Nettles, Hemp, Flax; (Leaves) Cattail, Yucca, Agave, Douglas Iris; (Bark) Willow, Maple, Basswood, Cedar; (Root) Leather Root, Beach Lupine; (Whole stem) Tule, straw, Juncus. Each material has specific requirements for extracting and preparing the fibers, but there are only two basic ways for using the fibers to make rope or cord: braiding (or plaiting) and twining. Braiding was usually done with flat, split materials such as cattail or flattened straw. The instructions in this article will deal only with twining to make rope, specifically with two ply (S-twist, Z-ply, also called right-handed) natural cordage.
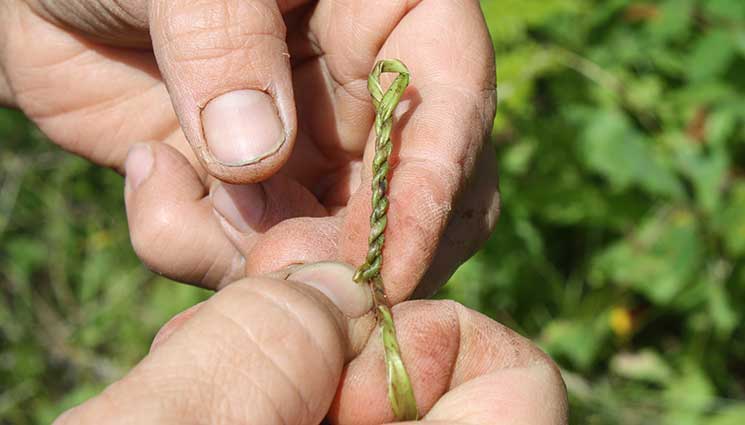
After preparing a bundle of fiber half the thickness of the finished cord, place your hands six to twelve inches apart and about one third of the way from one end. Twisting the fibers clockwise with both hands, wind the bundle tight (making single-ply natural cordage).
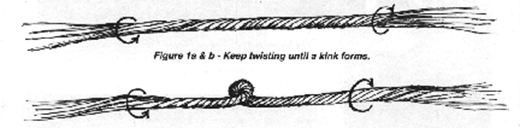
Bring your hands closer together and keep twisting. The kink should rotate on its own in a counterclockwise direction. Twist until two or three rotations occur. This is the start of a two-ply cord. At this time you can attach the end to something (or someone) which can rotate (free-end) and keep twisting with both hands turning clockwise OR you can attach the end to something solid (fixed-end) and begin twisting and counter-rotating (see below).
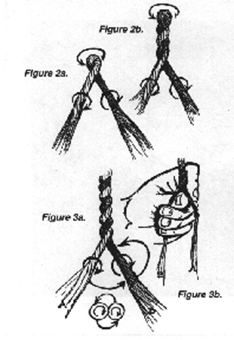 Counter-rotating, one form of finger-twisting, involves each hand applying a clockwise (S) twist into a ply, while passing the right ply over, and the left ply under (counter-clockwise or Z-plying). Your left hand twists ply A clockwise, while your right hand does the same with ply B’. At the same time, you pass ply B over and behind your left thumb and lock it in place with your remaining fingers. You then take A in your right hand and B in your left and repeat, over and over and over again. These two methods are particularly handy to make rope with larger and coarser materials such as cattail and tule.
Finger-twisting finer material to make rope or natural cordage is usually done completely in the hand, with the finished string being wound on a bobbin or netting needle as you go. Your left hand acts to control tension while your right hand does the twisting.
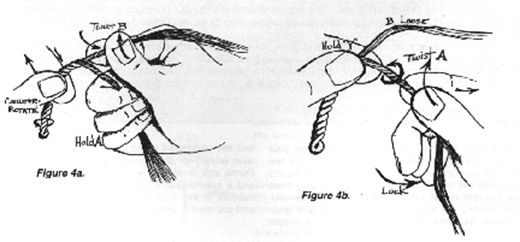
Begin as you did before, then place the Y (the point where the two plys come together) between your left thumb and fore finger. Take the lower of the two ply strands and twist it tightly clockwise until it begins to kink. Lock the twist in by closing your remaining three fingers over the strand. Then, while holding the twisted ply A securely, twist ply B with your right thumb and forefinger. As you twist, you should feel the completed string begin to twist counter-clockwise . Follow this motion with your left thumb and forefinger while maintaining even tension and a symmetrical Y. Next move your left thumb up to the fork in the Y as before and repeat steps 1 and 2 until you need to add more fiber.
Splicing
If you began your cord off-center, then one side will run out of fiber first. As you get to within about 3 inches of the end of this short ply, prepare another bundle of fibers the same size as you began with, but taper the end of the bundle for about 4 inches. Lay this bundle parallel to the bundle being replaced, and sticking out about an inch beyond the Y.

Continue twisting the cordage as before. You should also add in if one ply be-comes thinner than the other, or if both plies become thinner than they started. In these cases add just enough fiber to bring them back to correct size. Ideally, your cord should stay the same size throughout, although aboriginal cordage did vary about fifty percent in nets. Bow strings and fish lines under heavy pull should be very even. It is also possible to add to both sides at the same time by bending a bundle of fiber in half and placing the Y of the bundle into the V of the Y, but it is harder to keep from making a lump at this point. After your string is finished, you can cut or burn (carefully) off the overlap ends to make your string less fuzzy.
Finger-twisting methods are best used to make rope when a relatively small amount is being made and/or has to be very tight and even, and when very stiff or coarse materials are being used, such as cattail or tule. When you want to make rope in mass quantities, it is much faster and easier on the hands to use the leg (thigh) rolling method. The principle is the same, S-twist, Z-ply, but the twist is applied by rolling on the leg, rather than twisting between the thumb and finger. You can continue to work without getting cramps in your hand muscles, and you can (with practice) work faster (about ten feet per hour). The critical element in making this method work is having the right surface on which to roll. Traditionally the bare left thigh is used. If you do not want to expose your skin, or if your legs are hairy, you can use pants, but these should be tight around your leg, so they won’t bunch up as you roll, and they should have a rough enough surface to give traction. Keeping them damp is also critical. I keep a bucket of water next to me while I work.
Roll both plies away from you with the palm of your right hand (pre-roll each separately). Your left hand holds the Y and follows the movement.
Bring the two plies together by moving the left hand forward and back. If the two plies did not get tightly rolled the first time, carefully pick up both plies and repeat step one first.
When the plies are tight and touching, bring the right palm back towards you, counter-rotating the two plies into two-ply cordage.
Before you begin, prepare as much fiber as you will be using during that session. Once you get into the rhythm of the work of making rope or cordage, you won’t want to stop and clean material.
More Information
In addition to the article above, I found a nice little video from SHTFBlog.com that demonstrates how to do this with a cattail leaf.