Following World War II, the small shortwave frequency bands allotted to amateur radio operators became crowded, and this is still true today. “Ham” operators were forced to switch to “single side band” transmission, which occupies only half the space of the familiar “AM” transmissions used throughout the commercial shortwave bands. In emergencies, the best information available on the radio may be from amateur operators, many of whom maintain emergency equipment for disaster situations.
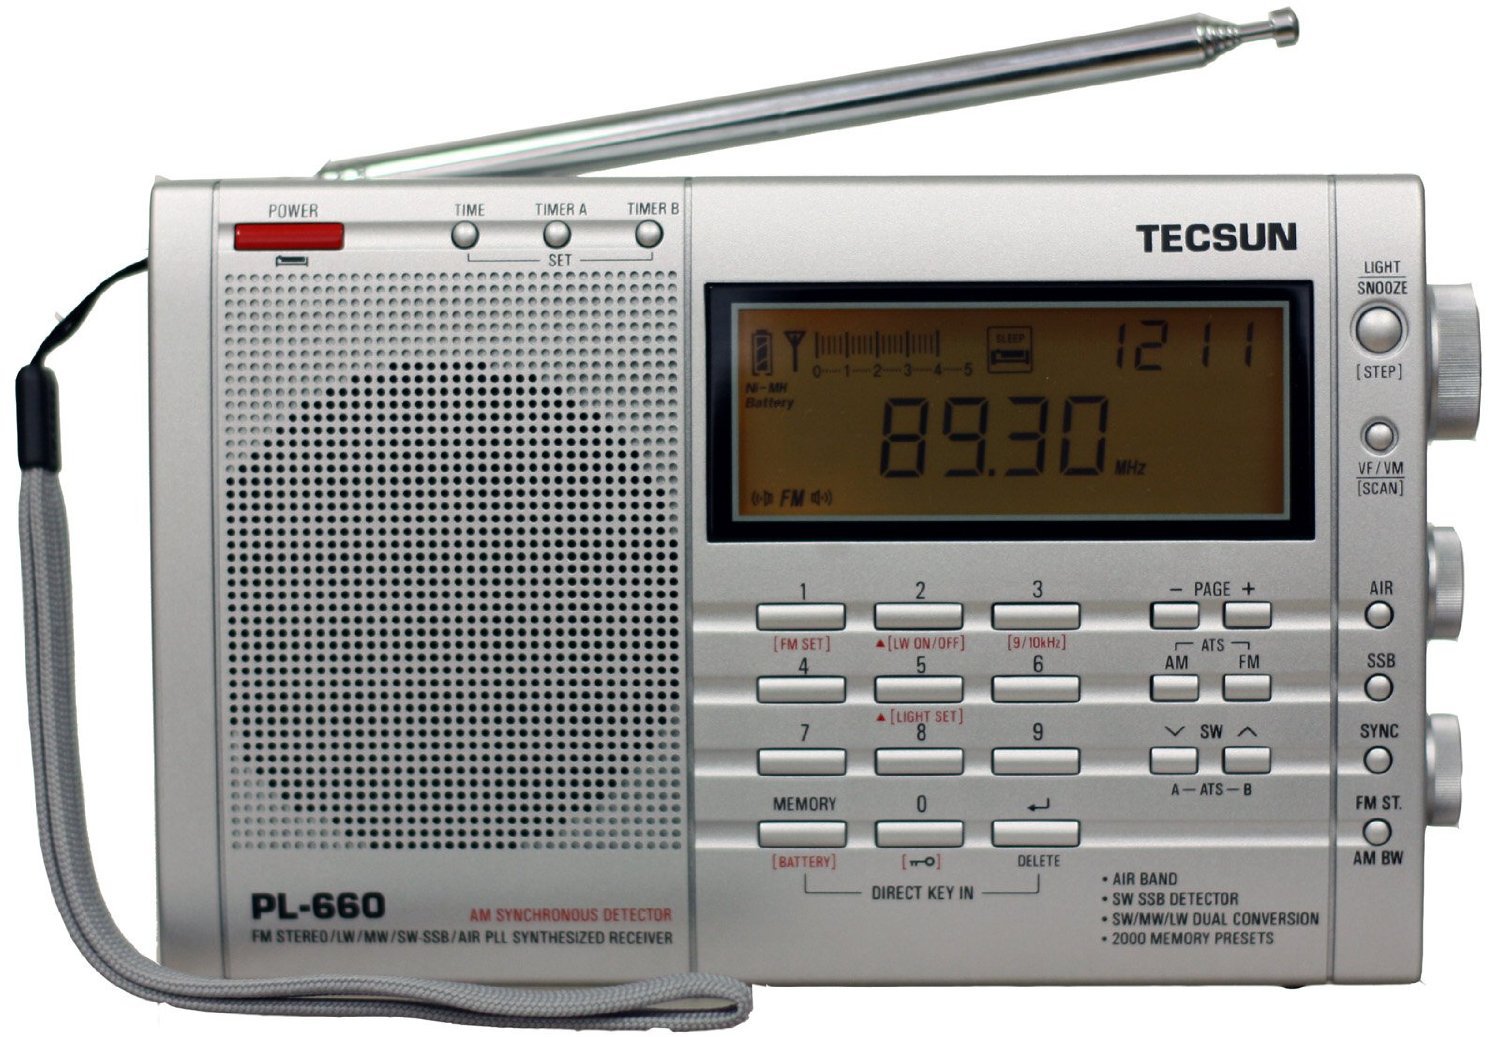
Many “shortwave sets” do not receive single side band, and I recommend that anyone serious about preparedness consider acquiring one that will receive single sideband signals. Single sideband – capable sets are a little more expensive – typically in the $100 to $200 range, but in a crisis, are likely to be very much worth the extra expense.
A set which is single sideband capable will have “SSB” in the specifications, and have a switch marked “SSB” as well. If those markings are absent, it is almost certain that set will not receive single side band signals.
Single Side Band communications do not have to be complicated or overly expensive.
WHAT IS A “SINGLE SIDEBAND” SIGNAL?
Let’s start with the traditional AM or amplitude modulated signal, which is standard throughout the commercial shortwave bands.
An AM station transmits a single, strong, steady signal when it is SILENT. That is the “carrier” signal. The carrier is on the station’s assigned frequency, such as 7,490 kilo-Hertz (7.490 mega-Hertz.)
When voice or music is transmitted, that carrier remains constant, unchanged in any way. The voice or music produces two small “clouds” of mixed frequencies on either side of the carrier. These “clouds” of mixed frequencies are each about 3 kilo-Hertz wide for voice, and maybe 6-10 kilo-Hertz wide if music is playing.
You know how every cell in your body contains, in the DNA, the full blueprint for how your body is built? Well each of those two “clouds” of mixed frequency contains the FULL information needed to convey the voice or music. Both “clouds” of mixed frequencies are not actually needed just to convey the voice or music. Even more surprising, that strong carrier frequency isn’t needed either.
Those two “clouds” of mixed frequencies are called “sidebands,” and they are referred to as “upper sideband” (USB) or “lower sideband” (LSB.)
Amateur stations usually just transmit one of the sidebands,and no carrier, and this takes up the least space on the busy amateur bands.
TUNING SINGLE SIDEBAND SIGNALS
Single sideband (SSB) transmissions require a little fiddling at the SSB receiver to hear the incoming signal as normal speech. Doing this does not require a technical background, though it is like learning a new electronics gadget – it requires a little practice. To begin tuning an SSB radio, the SSB switch is moved to ON. There is a helper knob called “FINE” or “fine tuning” and it’s a good idea to center that small knob.
In a normal AM radio, for best reception, you tune the dial, or punch in the exact frequency on the keypad, so you are CENTERED on that station’s frequency. In SSB, you tune to the UPPER SIDE or the LOWER SIDE of the signal, instead.
Normally, you will not know which side to tune, upper or lower , but once you hear a garbled voice you want to “clarify,” you try tuning the radio to one side, or the other. You will hear somewhat garbled speech, and you use the FINE helper knob to clarify the voice. If that doesn’t work, you tune to the OPPOSITE side of that signal, and try clarifying with the FINE knob again. That’s what it takes to tune an SSB signal.
If the above procedures don’t work for you, it may be that instead of tuning to one SIDE of the garbled voice signal, you have tuned to the center. Experiment and you will soon be able to know how to tune to the sides of the signal. THE “STEP” SETTING Today’s shortwave receivers with keypad tuning, even if they have a tuning knob as well, MUST be set to the smallest tuning “step,” which is usually 1 kilo-Hertz.
Any larger tuning step size will prevent properly tuning a single sideband signal. The radio’s manual will tell you how to set the tuning step, and once set, there should be no need to change it. You will know if the step setting is too high because signals will disappear when you attempt to tune to one side or the other. Watch the frequency readout, and you will see how many kilohertz each movement of the knob or tuning arrow button changes the frequency.
PERIODS OF SILENCE IN A SINGLE SIDEBAND SIGNAL
One difference you will notice with a single sideband transmission is that during gaps in the speech, you will hear background noise, as if the station isn’t transmitting. That is normal with an SSB signal, and is not a problem with either the remote station or your radio. Because an SSB transmitter does not transmit a carrier when no words are being said, there is nothing being transmitted.
BONUS – YOU CAN HEAR MORSE CODE TOO
When your receiver’s SSB switch is on, your set can receive the many amateur radio Morse code stations as well. While this isn’t of interest to many, those who have learned code for some other purpose, say scouting or military service for example, will be able to receive Morse stations with the SSB switch on.
WHAT FREQUENCIES TO LISTEN TO FOR AMATEUR SSB SIGNALS
“CB” operators will sometimes use AM, and sometimes SSB. Valuable emergency information can be obtained from CB operators too.
AM SIGNALS CAN BE HEARD WHEN THE SSB SWITCH IS ON
If you come across an AM station when the SSB switch is on, you will hear atone mixed with the voice. Switch SSB off for listening to that particular AM station.
EMERGENCY POWER
Unfortunately, at time of writing, manufacturers tend to provide no solar charging or hand crank generator features with their SSB-capable radios. This makes powering the radio when the AC power is down more complicated, but SSB-capable radios are in the price range where an EXTERNAL POWER JACK is available. There are so many variations of emergency power sources that I can’t give an exhaustive list of options here. But I can give a couple of general rules:
POLARITY is CRITICAL. There is no way to know if a given radio is protected for accidentally applying the wrong polarity to the external power jack, so you must be absolutely sure what the polarity at your external power cable plug is before connecting to the radio. An inexpensive hardware store voltmeter is a good investment for preppers, and can show polarity. You don’t want to destroy your radio inadvertently. See the polarity test illustration on the following page.

Testing the polarity on your batteries.
IMPORTANT: See also the TIPS FOR USING METERS in Appendix A below.
VOLTAGE is CRITICAL. Just as with polarity, you must not feed your radio external power which can damage or destroy it. A radio may be able to tolerate, say, 15% over-voltage, but even there, you may shorten its life. The good news is many radios will still operate at as little as 60% of normal voltage. This means that a USB (5-volt) power source can power a 6-volt radio.
(I use “Enersys” 2-volt sealed lead-acid cells to make up the voltage I need for my radios. Using 2-volt cells allows me to make up any voltage needed for equipment which uses a variety of voltages. See diagram below.)

Back up power supply.
Whenever the solar cells or hand-crank generator are in contact with radio circuitry. In a radio with a crank, the hand-crank generator is connected to the batteries inside. However, there is an important detail – a built-in hand crank generator or solar panel has a built-in REGULATOR so it cannot harm the radio. An EXTERNAL hand crank generator or solar panel, unless specified by the manufacturer as having regulated output, must be assumed to NOT have regulated output. What this means is, use external hand crank generators or solar panels without certified regulated output ONLY for charging batteries removed from the radio.
Note that standalone hand-crank generators are commercially available. USB SOLAR and HAND-CRANK CHARGERS (5 volts) have literally taken over the emergency power marketplace for small equipment. This means that when shopping for emergency radio power, special attention must be paid to the VOLTAGE RATINGS of a charger you are considering. USB power is always 5 volts. This will work fine with a radio rated at 5 or6 volts, but may not work well, if at all, with a 9- volt radio. It is probably OK for a 4.5 volt radio. USB CHARGERS may or may not charge a 6-volt battery set.
Hand crank generators will give you an alternate way to recharge batteries.
GETTING HELP
With both the SSB tuning issue, and putting together a safe and effective emergency power setup, I recommend contacting a local amateur radio club. If there is none, amateur radio operators will often have unique antennas set up at their homes. Local shops which handle electronic parts in particular (e.g. Radio Shack) are also likely to know some of the local ham operators. Many ham operators are glad to help with matters related to their hobby
APPENDIX “A” – TIPS FOR BUYING AND USING METERS
This appendix may be a little dense for readers who just want to tune their radios to an SSB station. However, readers who are interested in external emergency power for radios and other equipment will need to have some familiarity with meters.
Meters would include “multimeter” (usually volts, amps/milliamps, and ohms), and battery testers. Both are very important for emergency preparedness and many are not outrageously expensive. Here are my recommendations for buying and using them:
- Having more than one of each type of meter is very wise. Meters can fail just as any other equipment, and there are really no substitute products for meters. I recommend purchasing two lower priced models in place of one high-priced model.
- Both analog (moving needle) and digital (numeric window) meters will do the job. Analog meters are more sensitive to rough handling or dropping. Try to avoid static electricity when using a digital meter. Frequently touching something that is grounded to discharge your body is one way to do that.
- Meters can sometimes be repaired, but in an emergency situation, it’s best to assume meters will not be repairable , other than perhaps repairing broken test leads.
- Having both multimeter and battery checkers on hand is highly recommended.
- Unless you have a fairly good background in electricity/electronics, I recommend NOT using either the current (amp/milliamp) or resistance (ohm) or “diode” scales. Applying voltage to those scales will at least result in a blown fuse if you’re lucky, or maybe a totally ruined meter. (This causes lots of tears!)
- Most multimeter have both AC and DC voltage scales. Take your time and be sure which type of voltage you are about to measure. (If you meter is set for DC voltage, it will give a false reading of zero with an AC voltage source.)
- If you have any doubt whatsoever about the maximum voltage level you are about to measure, start the meter on the highest voltage scale, and reduce the scale setting in steps until you get an understandable voltage reading. Meter movements (analog) or digital circuitry can be destroyed by applying more voltage than the scale is set for. Very important for battery checkers when measuring any batteries other than simple single cells. (Such as lantern batteries,and other multi-cell batteries. Also be very careful to set the 9-volt scale for “transistor” batteries which are small but contain multiple cells!)
- Some multimeter may be “auto-ranging,” meaning they will select their own scale. If your meter appears to be an auto-ranging unit, read the manual about what the maximum voltage limits are for that particular meter.