
Beekeeping for Beginners
In recent years, beekeeping has grown as a hobby to help families grow healthier plants while also helping the families be more self-reliant.
You might be thinking that beekeeping is going to be too advanced but in reality, it takes about the same amount of time and means as gardening or other outdoor hobbies.
Check out these tips on how you can start your own beehive at your home and reap the rewards!

Keep your hive off the ground.
Where Will You Keep Them
Bees are like any other pet that you might have and need a place to stay. Think about where you’ll put them in your yard. Is your yard big enough for a beehive? Are they going to be a problem for children? Do you have zoning laws that speak to beekeeping? All these are questions you’ll have to answer.
You’ll also need to consider your neighbors. While it might be OK with the city laws, no one wants to be the troublemaker in the neighborhood. Consider if your neighbors have allergies to bees, if the hive will be too close to their yard, etc. Many times, making a beehive a different color helps them be unrecognizable and out of the mind of your neighbors. You can also set up hedges or walls around your hive forcing bees to come back to the hive at a higher level – flying above the human height range.
A Strong Hive
A strong population is crucial to successful beekeeping. The typical population will reach 75.000 bees during the summer and around 30,000 gathering bees. A good colony is docile when managed and shouldn’t swarm very often. A good colony will produce 50-100 pounds of surplus honey each season. Avoid collecting a lot of honey in the fall – this is what bees use during the winter to survive.
Keep Your Hives Off the Ground
When you’re planning the location of your hives, it’s recommended that you have your hives off the ground to protect them from other animals. A simple stand made of 2x4s will do the job. Not to mention having them higher on the ground will be easier on your back and help you keep the bottoms cleaner.
Learn How Bees Naturally Form a Hive
Bees will typically create hives in cavities of about 2-3 cubic feet. Typically the honey will be stored on top of the hive and around the outside. The main brood food for the bees is usually stored below the honey. The queen bee will usually lay her eggs and raise her young at the very bottom of the nest. Knowing and researching the basic structure of a hive will help you know where to harvest and where to let things be. This will also affect how you design your bee hives – instead of combs hanging down off of a board, you’ll have to imagine that it’s a sphere like a natural hive.

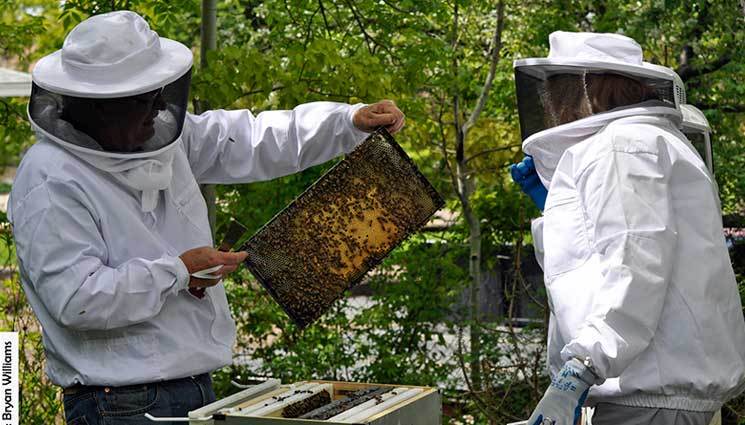
Protective Gear
You’ll Need Protective Gear
Obviously, you’ll need some type of veil to keep bees from becoming entangled in your hair. You’ll also want to get a sturdy lightweight jacket (ideally that attaches to your veil). You don’t necessarily need a jumpsuit to do light beekeeping work. A jumpsuit is a great idea when you’re going to be doing a lot of manual labor with the hive – moving it, rearranging them, etc.
The Smoker
A beekeeper’s smoker is one of your most vital tools. It’s basically a cylinder with a bellows attached. A slow burning fire is inside the cylinder (made of pine needles, smoker fuel, old burlap, etc.). When you gently squeeze the smoker it will push a puff of smoke towards the bees and two things will happen. First, they will try to get away. Their natural instinct is to get out of the way of fires and they’ll leave if at all possible. Worker bees will duck into the hive trying to eat as much honey as possible before the bail. The second thing that the smoke will do is interfere with the bee’s communication signals. This will allow you to do your work in the hive without a hive that can communicate and swarm.
Building the Hive
You can either purchase a pre-built hive or build your own. Basically, the hive consists of long sheets that lay side by side like folders in a cabinet. They can easily be pulled out and scraped off.
What Type of Bees
The most common bee for beekeeping beginners is the Italian Honey Bee. They are gentle, very productive, and easy to manage. They are the most common bee available for purchase. Carniolans are dark bees and demand slightly more time. They are very gentle and winterize better. Their population builds fast in the spring and you’ll need to plan accordingly. Russian bees are also gentle and somewhat erratic. They are slower to build in the spring but build fast when they do.
Your Advice
Now, we’ve covered some basics you should consider when figuring if beekeeping is for you. There are a lot of other items to consider including a starter hive, equipment and more.
In recent years, beekeeping has grown as a hobby to help families grow healthier plants while also helping the families be more self-reliant.You might be thinking that beekeeping is going
 The amount of daytime light during the middle months of winter may be too little for plants to survive healthily. The problem is compounded if your house is not situated to receive the most light. Move your plants close to windows and areas that get adequate sunlight during winter. To promote the entry of more light, ensure you clean the windows thoroughly. Clean off any dust that might have settled on the leaves of the plants to maximize their light absorption.
 People make a mistake of soaking their indoor plants with water during winter. This can damage your plants during the cold months. This is because water loss due to evaporation is nearly nonexistent. Besides, plants tend to grow slower during winter. Combined, these factors demand that you reduce the watering routine of your plants. A golden rule to determine when to water the plants involves sticking your finger about two inches into the soil. If it results in a dry finger then you need to water.
 If yours are indoor tropical plants, it would be wise to spray them with a light mist a couple of times a day – preferably twice or thrice a day. This is because tropical plants thrive in humid conditions. Alternatively, you can place the plants in a humid environment such as the bathroom or where there is a water feature.
 As we mentioned previously, all plants have reduced growth rate during winter. This means their nutritional need will also reduce. In case your plants are healthy, there is no need to fertilize them. If you really need to then you can dilute the fertilizer by at least 50 percent before applying. A better time to fertilize is during the fall.
 Summer plants are usually vegetative and bushy in response to the higher temperatures. As the temperatures start to plummet, they begin to die in preparation for what we call floral hibernation. You cannot prevent this process from happening. However, you can help the plants by clearing away any debris. You must also shield the delicate parts of the plant to protect them from biting cold.
 The extreme winter temperatures can take a toll on your garden soil causing it to crack. The frost caused by cold temperatures can harden the ground especially the soil type in your garden. Such cracks are bad news, especially for bulb beds. This is because the cracks in the soil can cause the bulbs to rise to the surface. The result will be catastrophic to your plants. A good tip is to spread new mulch (I’d preferably evergreen boughs) on the garden to protect the soil and the plants. The mulch will also prove help in the coming spring.
 Trimming is an important practice when it comes to taking care of your plants during winter. This is especially true with annual flowers, vegetables, and plants. While trimming, remove blackened stems and withering foliage completely. Such dying stems and foliage provide hiding grounds for pest and diseases that could compromise the health of your plants.