This article continues where Part 2 left off in discussing how you can move through environments without leaving signs that you were there. This could come in handy if you are fleeing from people who are trying to track you.
Minimizing Your Trail
We have, thus far, introduced five different types of sign that can be used to track and locate a group on the move. Without trying to throw you a curve, there is a sixth type that just is as damaging, or more so. That is, the ability to visually locate you. If I see you standing on a ridge line or moving through open country, it matters little that I haven’t picked up your trail (yet). Because I saw you, I can now move in your direction and cut for sign. This means that your route movements and manner of dress are just as important as the physical sign you are depositing along your route.
There are many things you can do to lower your profile (visibility to others) and to reduce your tracks while on the move. Part 3 will address the physical sign and Part 4 will deal with your group’s visibility profile while on the move.
The Obvious
Be alert to soft soils – whether saturated with water, damp, dry or powdery (such as moon dust). Any soil type that permits the sole of your shoe to leave a clear imprint of the tread may require some type of obfuscation or outright avoidance.
Whenever possible, use hard packed soils, rocky ground, or terrain that has pebbles or gravel. In areas where rocks or pebbles rise above the soil level, you can walk long distances without leaving any trace at all.
Dry Washes and Creeks
Normally dry washes and creeks tend to reinvent themselves after a heavy downpour; sometimes violently so. Sandy areas will be wiped clean of any tracks, but damp silt deposits may remain along the margins. These can leave sharp impressions of tracks.
Hiking through a wash can be a convenient way of concealing your movement because it places you below the surrounding terrain, and there are times when it may become necessary to use them. There are, however, two important caveats: First, it is far easier to travel downhill in a sandy wash than uphill. The expenditure of energy while you are gaining elevation could be two or three times greater than what is required on a hard pack surface of equal distance and elevation gain. Second, any tracks that you leave in a dry wash could remain there for days or weeks. It will be more difficult for an inexperienced tracker to determine the age of the tracks, but they will, nevertheless, reveal your route. If the planned route takes you near a wash, my general advice is to travel above and parallel to it.
Using Booties or Carpet
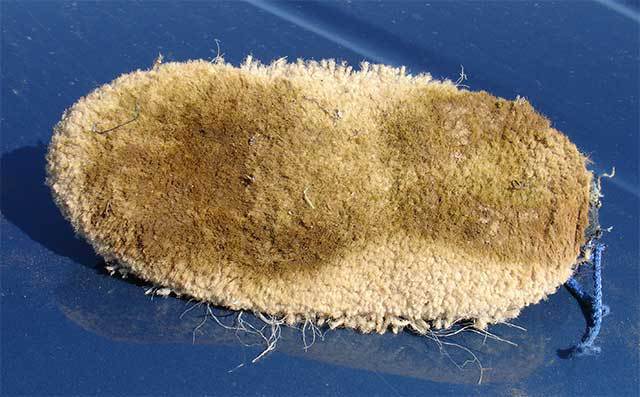
In this image, the wet sole of a carpet shoe shows the outline of the shoe it was covering. The only reason this group was located was because they created a visible trail through an area of wet grass. Prior to entering the grassy area, there was no sign.
In Part One I introduced the concept of using burlap, booties and carpet shoes to mask tracks on soil types where shoe tread can be easily seen.
Burlap can be effective for relatively short distances (perhaps 10 to 20 miles), but will break down on rough terrain that is dominated by sharp-edged rock or gravel, course granite or pumice. Once burlap begins to unravel you will be leaving a trail of threads behind you. In addition, wrapping or removing burlap from your trail shoes simply takes too long.
In the case of booties made from felt type material, a worn out bootie sole will allow the tread of your shoe to make direct contact with the soil. This is not to say that booties cannot be effective, but their application should be limited to terrain where there is little likelihood of encountering sharp, jagged or coarse rocks. Bear in mind also, booties are relatively thin and will not be effective if worn over aggressive boot treads such as lug soles.
The ideal solution is a carpet shoe made with medium to high density pile that has a height of ½ inch or greater. The upper portion should be a sturdy material, such as denim or a rip-stop weave. Ideally, the carpet sole will be about ½ inch wider and longer (at the toe and heel) than the shoe it will cover. The key to securing a carpet shoe to your foot is the use of good quality Velcro strips sewn onto the upper fabric. Depending on the type of hiking shoe it will be worn over, you may choose to have either an open heel or opening at the top. Although you won’t find them listed in the yellow pages, there is a veritable cottage industry along the U.S./Mexico border dedicated to manufacturing carpet shoes and booties, so producing them for yourself will be a DIY project. Experiment with carpet remnants and scrap material to see what works and fits best for your foot.
Why you should avoid bunching up
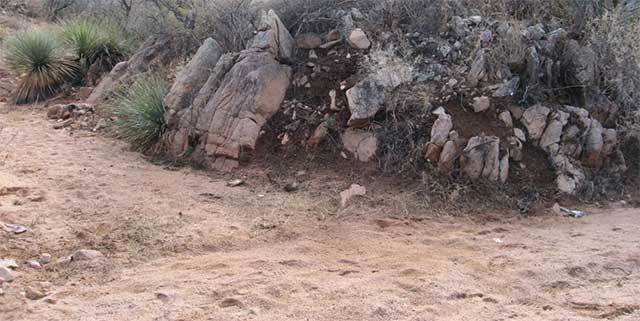
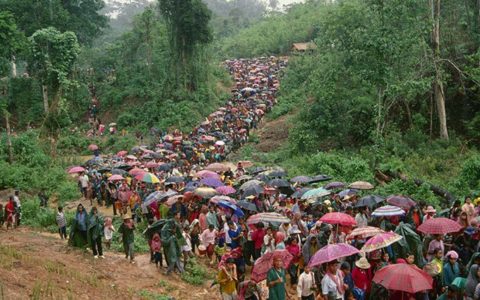
This photo shows where a very large smuggling group gathered in a wash before crossing a 2-track road.
Photos like the one above illustrate what happens when there is no trail discipline. All of the tracks you see are the result of a single group (estimated to be in excess of two dozen people) that was allowed to bunch up before crossing a road. This is what you call a “bright trail.” In addition to the many tracks, the group also carelessly left bits of trash. In a SHTF scenario, any group that leaves trail sign like this certainly risking detection and could be gambling with their safety.
When to Walk Single File
The vast majority of your movement on a trail should be in single file formation. This is often necessitated by terrain features and dense ground cover, such as brush and trees. There are, however, three circumstances that justify a deviation from this mode, but the decision to abandon single file should be determined by your point or scout and based upon their judgment. The three circumstances are: Jumping trail, moving through tall grass, and crossing roads. The most obvious reason for maintaining a single file is that it is minimizes the spread of your tracks, making it far easier to police them up. From a practical standpoint, it is far easier to keep track of everyone in a file formation than when spread out, and a narrow column keeps foot sign confined to a single trail, making it easier to police careless tracks. Spreading the trail with ten people walking abreast means that you are producing ten sets of tracks. It becomes an impossible task to police these tracks if the group is moving abreast of each other.
Determining When to Abandon a Trail
Your primary objective is to keep your group safe and to survive the journey to your destination. Abandoning a trail does not mean you are abandoning that objective. It may mean that circumstances in front or behind you have made the continued use of a trail untenable.
Jumping trail
This describes a calculated maneuver that may be required when you believe your present route is untenable. For example, your “tail-end Charlie” has spotted a group in trail of you at some distance. You may determine that their rate of closure is such that maintaining your present speed and course will result in unacceptable risk. The need to conceal your tracks has now become a matter of some urgency. There is no cause for panic, but you need to locate a point where you can break off (or ‘jump’) the trail. Whether you choose to jump trail going uphill or downhill will depend on terrain features where you are.
You will want your group to be able to individually depart from the trail in a lateral movement (left or right, up or downhill), but in such a way that you are not creating visible sign. The last person to jump trail should be the scout or “Charlie.” Their role will be to ensure that no visible signs of trail departure can be detected. Once again, the use of booties or carpet may be needed until the group is able to reassemble at a point of concealment.
If you are under pressure from a group in trail of you, you may not have a wide range of jump locations that you would consider ‘ideal.’ One thing is certain, however; that is to put a natural obstacle, such as a hill, between yourself and the trailing group so that when you do abandon your route the maneuver will not be visible.
I dislike making recommendations based upon hypothetical terrain conditions, but I will risk this one suggestion:
Given the opportunity, break from your trail on an uphill course. The primary reason is that high ground is tactically superior.
- You will be better able to observe the group that is closing on your position.
- It will be more difficult for someone standing at the base of a hill to spot you. Brush, trees, rocks and the natural curvature of the hill work in your favor.
- Their behavior (which you can now observe) will reveal whether they have been tracking you.
- You will be able to assess their threat level and make appropriate decisions.
Crossing roads
At some point on your journey, perhaps often, you will encounter roads that require crossing. Roads with frequent curves and bends, especially in hilly country, can sharply limit your ability to detect other groups that may be using it. Do you cross the road in single file, time the crossing so that each person makes it to concealment on the other side before the next one crosses, or do you make a mad dash to cover on the other side?
Let’s say that you must cross the road from a point of concealment on one side, to a tree line or similar concealment point on the other side. The total distance, including the roadway and shoulders or banks, is 70 feet. At a normal, unhurried pace, you can cover that distance in 20 seconds. Our hypothetical group of ten people would, therefore, require 200 seconds (03:20) from start to end to complete the crossing in single file mode. That is a very long time.
A faster and safer method is to spread the group laterally and cross the road simultaneously. Total crossing time: 20 seconds. Crossing points such as these are a good time to use booties or carpet. This will obfuscate the tracks on both sides the road.
Tall grasses and weeds
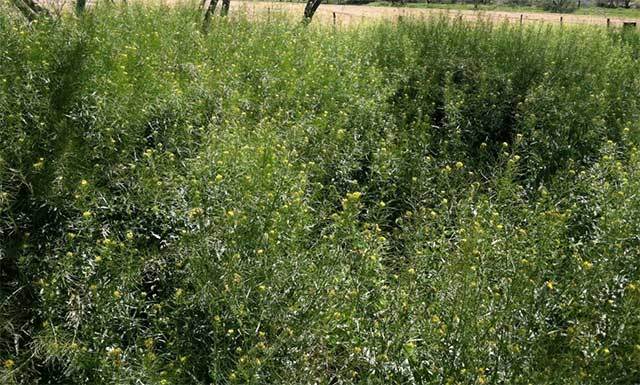
Moving single file through tall stands of grass or weeds risks the creation of a very distinct path.
As I pointed out earlier, moving through large stands of grass and weeds in single file can create a very visible trail that may not recover very quickly, if at all. If the field cannot be avoided, it will be better if each person enters and emerges from the field at a different point; that is, you will be spreading the trail in a “line abreast” maneuver that permits each member to be separated by several feet. Provided that each member of the group is not ‘barging’ through the field, this tactic will make it much more difficult for a group in trail of you to locate your path.
There is one caveat. Because weeds and grasses are easily crushed, you must move slowly through the field and watch where you place your feet. Step over or around clumps.
How to prevent skids
Although the shortest distance between to points is always a straight line, it does not mean that you should attack a steep hill or decline in a straight line path. Apart from the increased exertion and risk of injury while climbing or descending a steep angle, you risk the creation of skid marks that will be very difficult, of not impossible, to conceal.
It will be much easier if you use a “switchback” method that allows you to keep your angle of ascent/descent relatively shallow. This will greatly reduce the risk of skids and conserve energy. It is important to note that scuffing of soil is harder to prevent when you are going downhill – even if you are using a switchback course of descent. The simple reason is that gravity is a force multiplier and increases the impact of each step on the soil or rubble that you are crossing. Repeated impact on the same spot by several people will loosen the soil and may dislodge rocks.
Proper brushing out of tracks
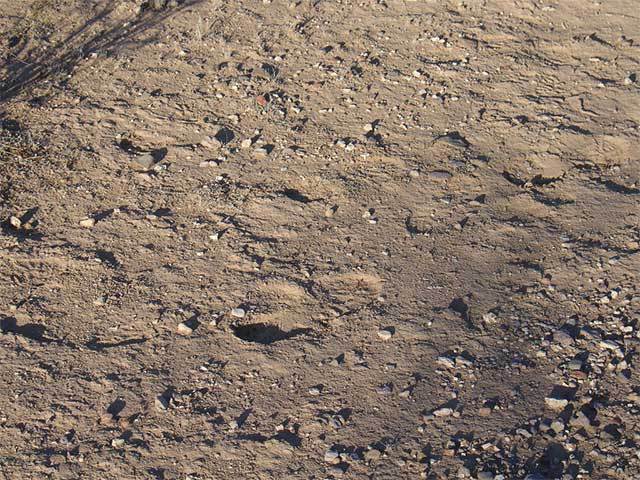
This photo shows the tracks of three individuals moving through silt. Note the heavy toe impressions – they were moving hurriedly toward nearby cover.
As noted in several places, tracks laid down on soft, damp soil or mud will be difficult or impossible to remove. The best method I have found for removing or obscuring tracks on loose and hard packed soil is to use a soft hand towel. I’m referring to the type that matches a bath towel, except that it would be 26 to 28 inches in length. A gentle flip of the wrist will propel the towel onto the track with enough force to obscure or remove it without causing a major displacement of other soil (or rock) on the trail. At minimum, this type of motion will fill in the track with loose soil, giving it the appearance of an old track. Ideally, it will completely obscure the track. In the photo above, there is no practical way to remove these tracks without it being obvious. The shoe impressions are simply too deep for this type of soil.
It is a certainty that you cannot avoid leaving some type of sign along your trail. Whether it is a dislodged rock, a muddy print or an accidental piece of trail trash, you will at some point leave evidence. The techniques described in Part 3 will help you cover your tracks to the best possible extent. If practiced and adhered to, they may well give you the edge you need to complete your journey safely.
In Part 4 we will take a look at lowering your group’s profile while on the move. In the meantime, I welcome your comments and questions.