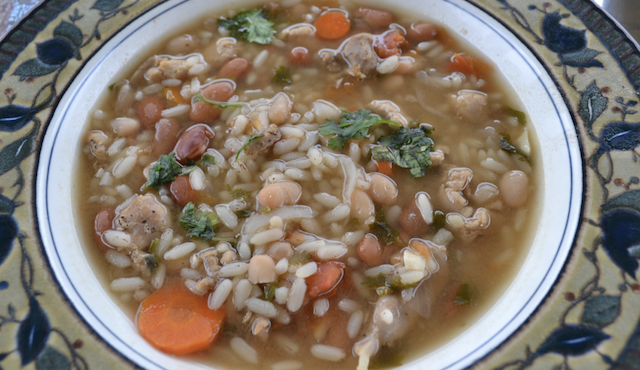
HomePosts Tagged "Food" (Page 2)

I wanted to share this bean and rice survival soup recipe, because it’s an inexpensive and easy one to prep, store, and make when you’re ready to use it. Once it’s in the jar and stored, you will only need water and heat to have a hearty bowl of soup loaded with carbohydrates and proteins.

A great perk of this recipe is that it’s highly adaptable. You don’t like rice? Simply omit it. Or, you want it spicy and full of robust flavor? Add your choice of seasonings to the jar, which I will get into greater detail further down in the article.

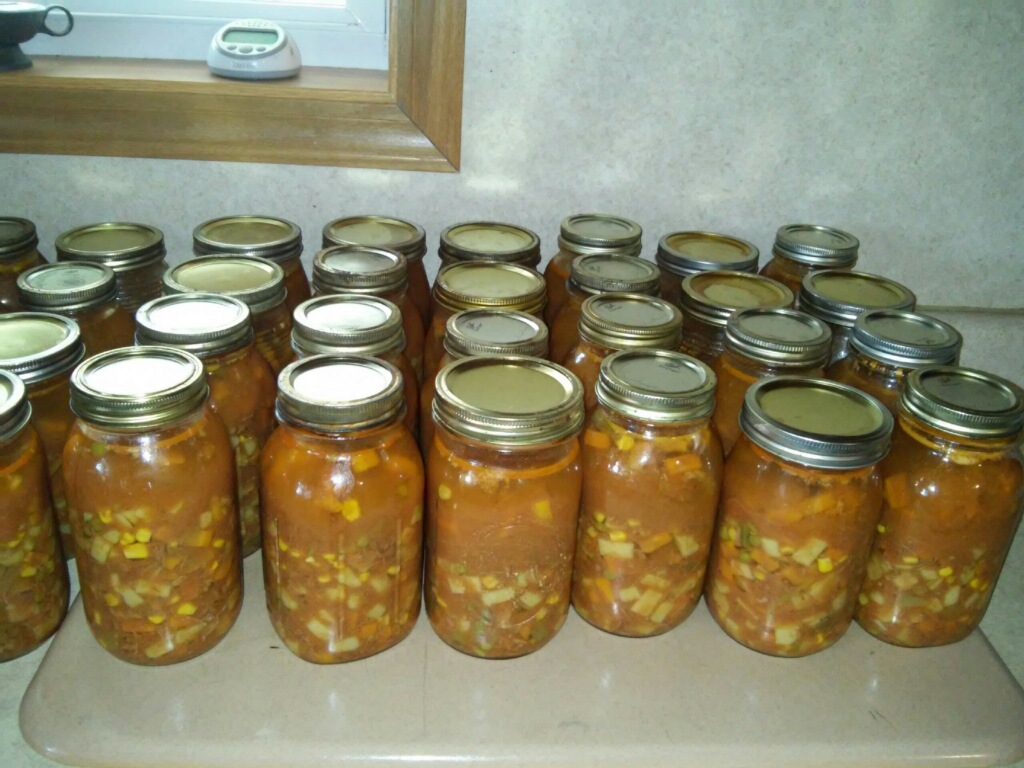
Another way to adapt this recipe is the batch size. The first instructions I am about to share is for a large batch, which makes it appealing to preppers for survival because it makes about 270 meals for under $300. Based on a 2000-calorie per day recommendation, and assuming it’s the only available edible item in sight, it’s approximately 90 days worth of meals for one person.

Read more: Healthy Soil + Healthy Plants = Healthy You

I’m also going to share a much smaller batch that can be made for around $10-15, give or take a couple dollars. The cost will depend on what you add or omit, as well as the cost of groceries in your area. I will be demonstrating the smaller batch in photos.

Bean and Rice Survival Soup

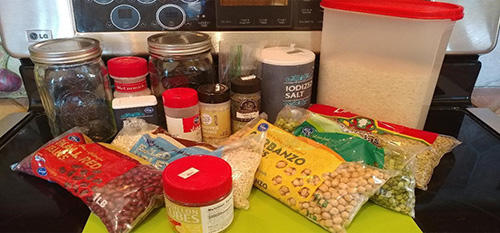
First, the basic recipe for the large batch:

  • 4 20-pound bags of white rice
  • 22 1-pound bags of red kidney beans
  • 22 1-pound bags of barley
  • 22 1-pound bags of lentils
  • 6 1-pound bags of green split peas
  • 6 1-pound bags of chickpeas (Garbanzo beans)
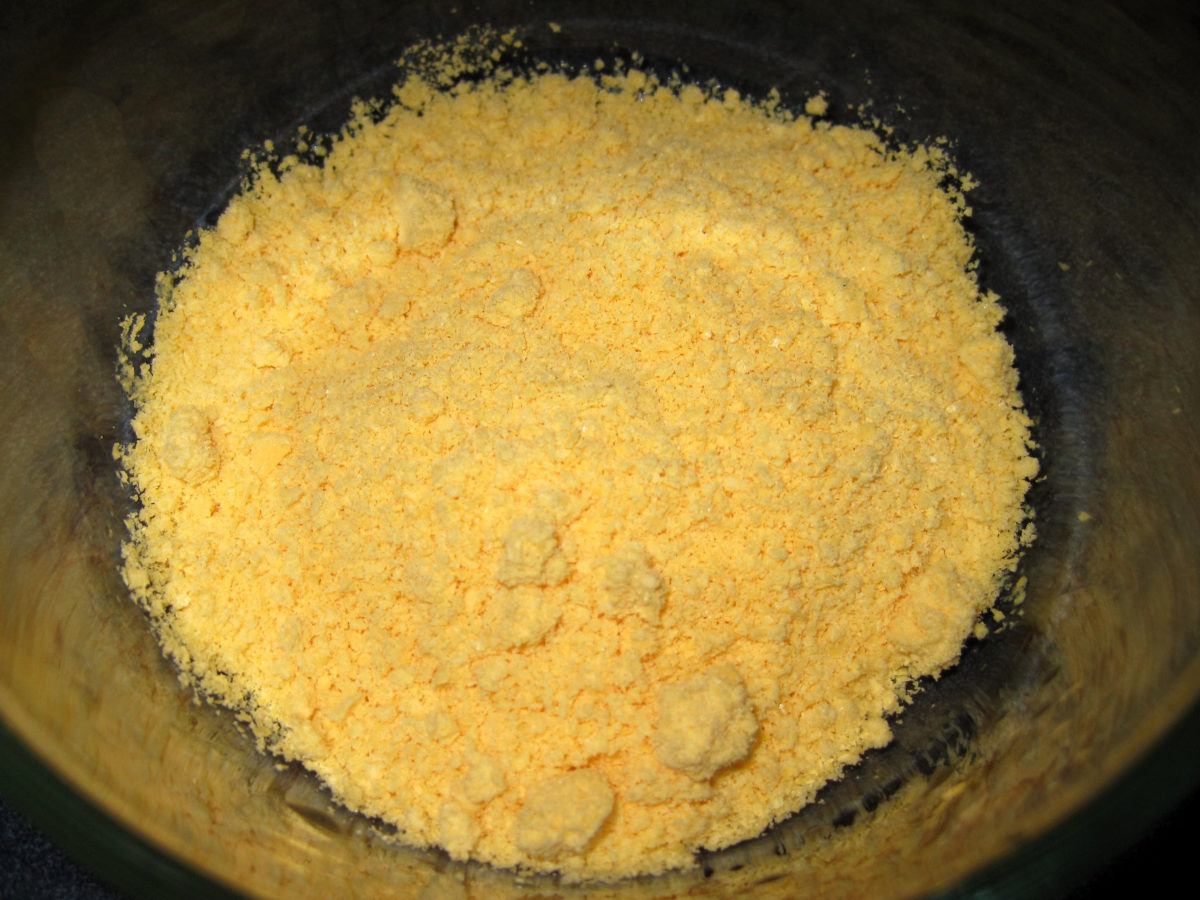
  • 30 pounds of dry bouillon (chicken, beef, or vegetable)
  • Seasonings of choice (example: garlic, salt, pepper, cumin, oregano, or other dried spices and herbs)

And, the smaller batch recipe:

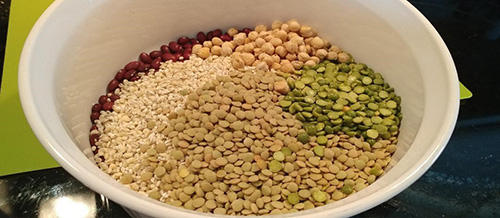
  • 2/3 cup kidney beans
  • 2 cup barley
  • 1 cup lentils
  • 1/4 cup green split peas
  • 1/4 cup chickpeas
  • 1 1/2 cup rice
  • Bouillon (chicken, beef, or vegetable)
  • *Seasonings of your choice

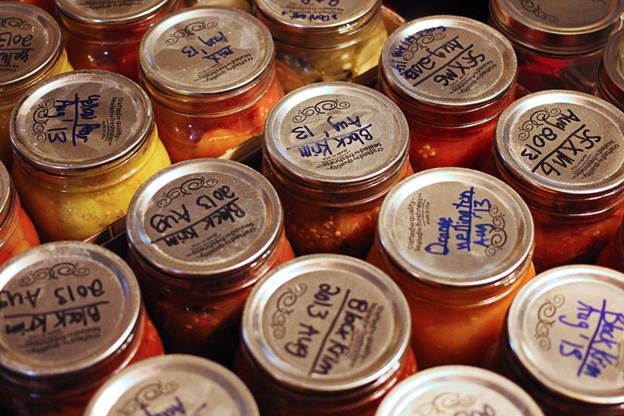
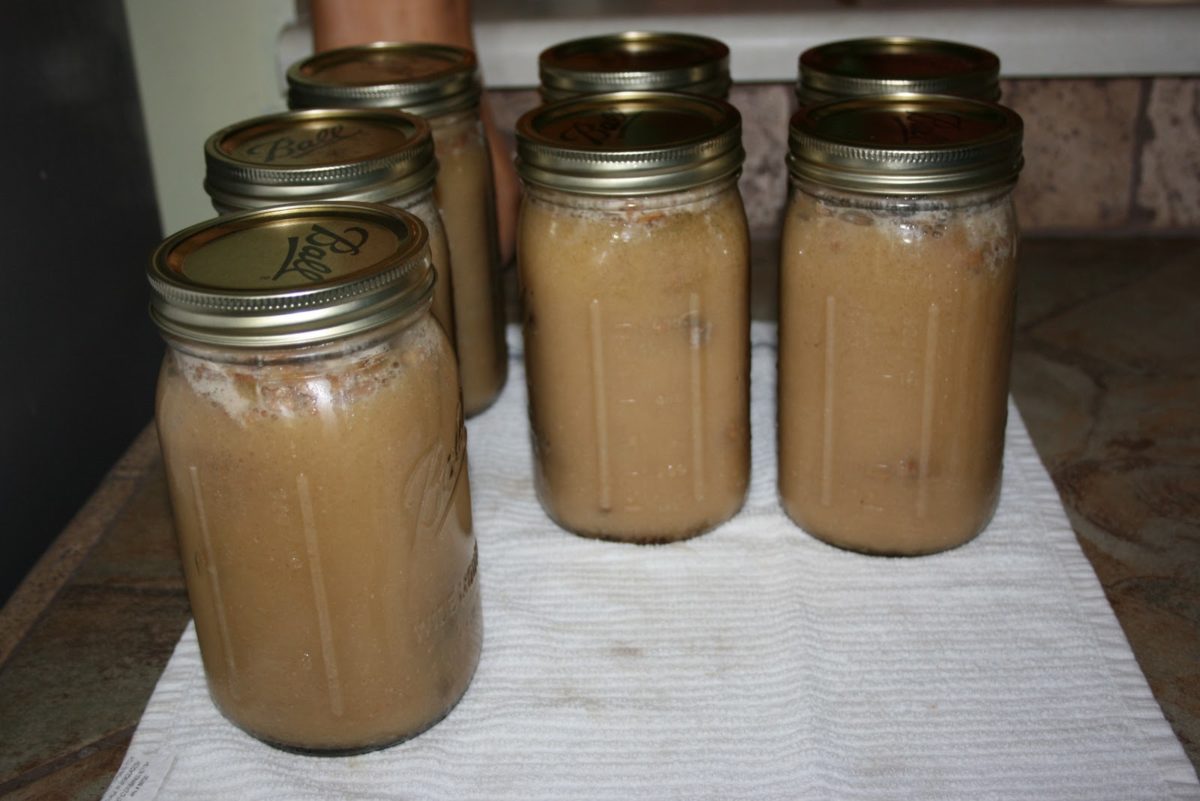
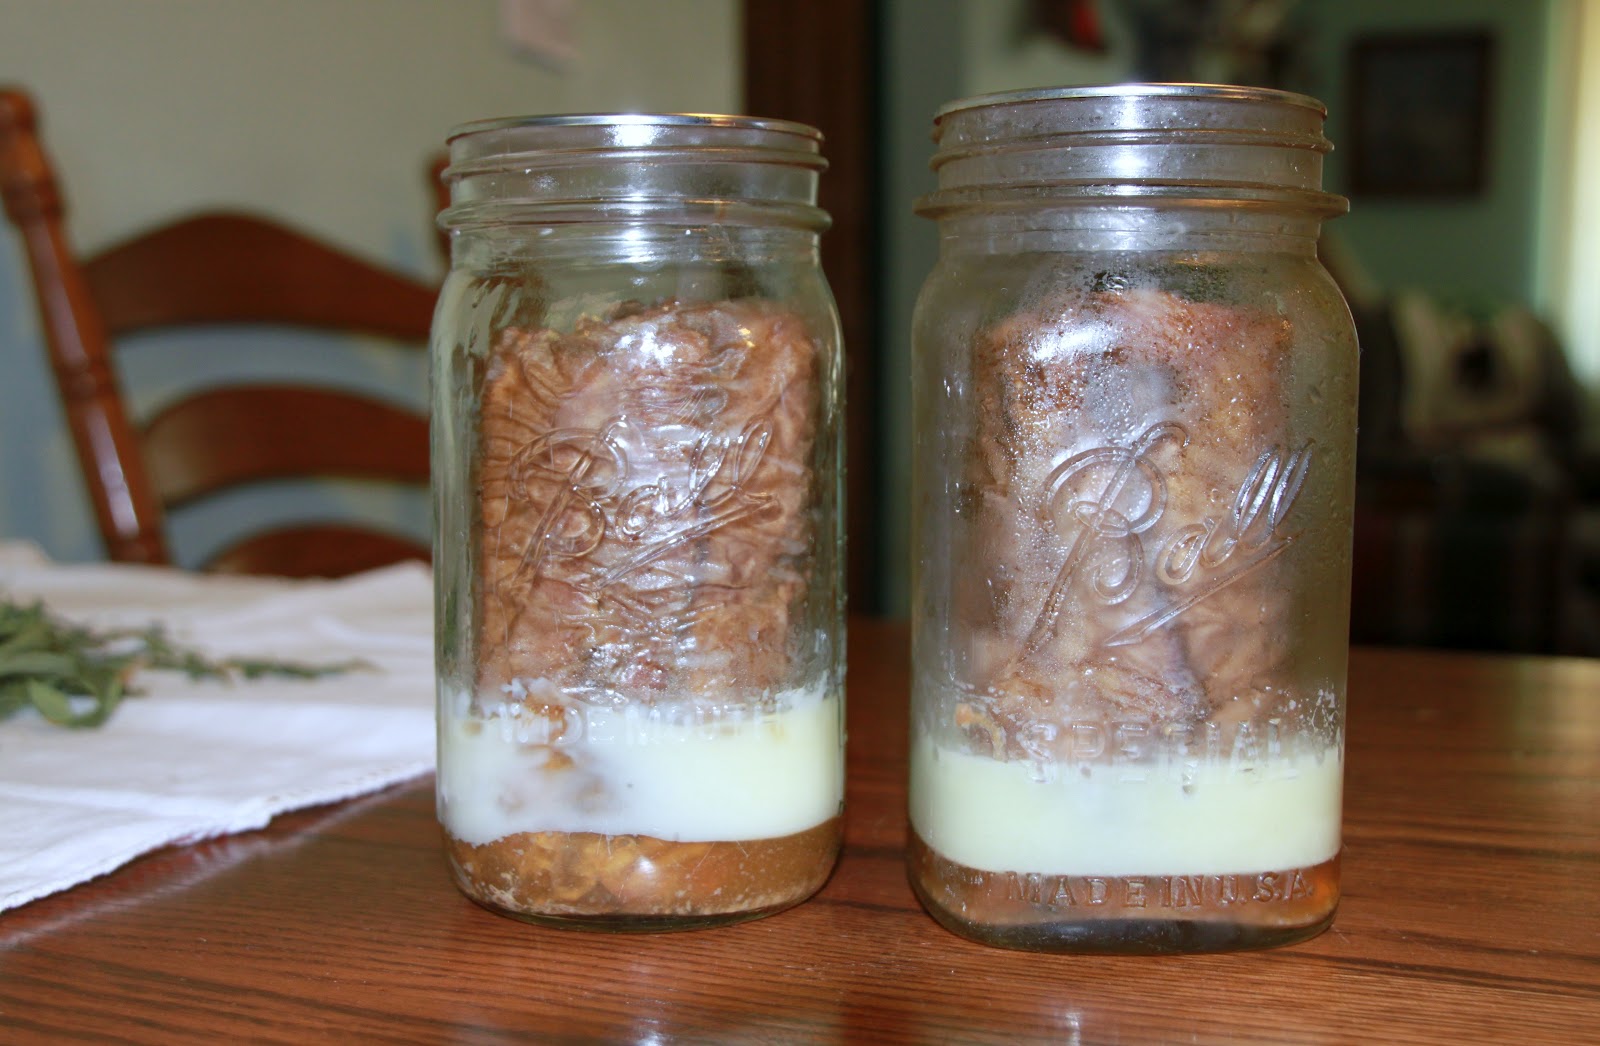
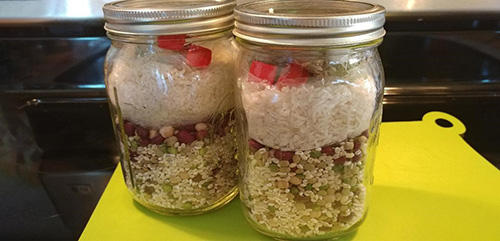
This all fits in 2 individual quart jars.

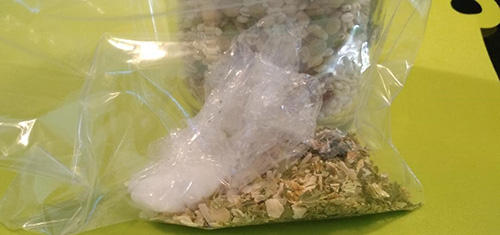
*The seasonings I chose (per quart jar) was 2 bouillon cubes, 1 teaspoon of salt, about 1 tablespoon of dried onions, about 1 tablespoon of dried celery flakes, 1 teaspoon tarragon, 1 teaspoon of black pepper, and 2 teaspoons of garlic powder. For the record, this is a relatively bland batch of seasonings. If you like spice and bold flavor, add more according to your own liking.

Now, that you have an idea what goes in it…what is the best way to store it?

Read more: The vital self-sufficiency lessons our great grand-fathers left us

Prepping For Storage

The prep is the same for both size batches, and is as follows:

#1. Mix all the beans in a large container.

Bean and Rice Survival Soup

#2. Fill a mason jar just under half way.

Bean and Rice Survival Soup

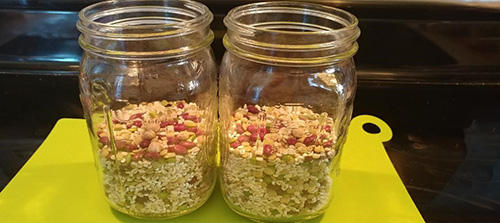
#3. Put 1-1.5 cups of rice in a baggie, then add the bag to the jar, leaving enough room to add a baggie of seasoning. The reason to separate the rice and seasoning is because the beans need to cook much longer than the rice, and this will allow you to add the rice later avoiding mushy rice.

Bean and Rice Survival Soup

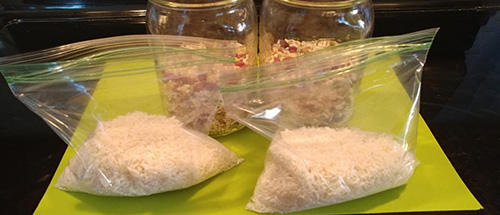
#4. Place the seasonings and bouillon you choose into a little baggie. Separating the spices also allows you to remove expired seasonings and replace them.

Bean and Rice Survival Soup

Bean and Rice Survival Soup

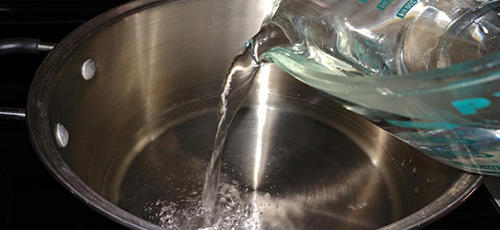
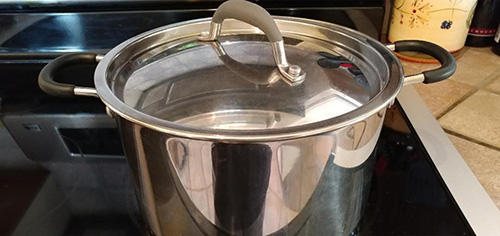
To make an individual pot of soup from this recipe, you will need the ingredients in the jar, and at least 3 quarts of water. Then follow these easy directions:

#1. Pour the water into your pot and place on a heat source.

Bean and Rice Survival Soup

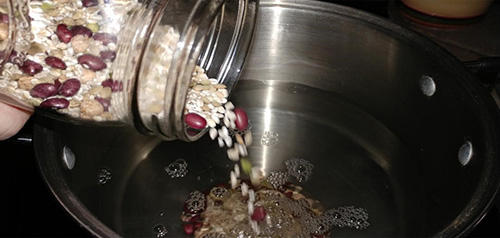
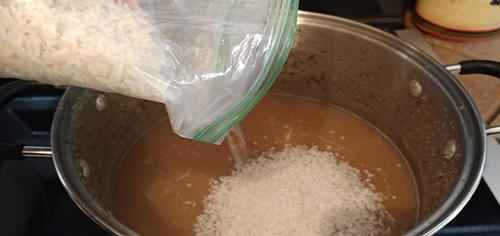
#2. Add the beans to the water.

Bean and Rice Survival Soup

#3. Empty your seasoning packet, a little at a time if you prefer to taste as you go.

Bean and Rice Survival Soup

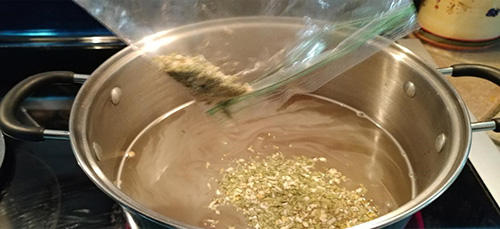
#4. Cover and simmer on a low heat, until the beans are soft, about 1 to 1.5 hours.

Bean and Rice Survival Soup

#5. Then add the rice, and simmer for another 20 minutes, or until done.

Bean and Rice Survival Soup

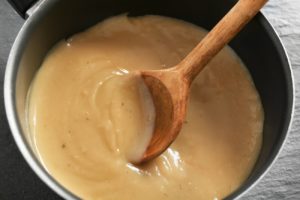
The finished soup is fairly thick. If you prefer a more brothy soup, add an additional quart of water in the beginning. But, I would then also add more seasonings as well.

Bean and Rice Survival Soup

Shelf Life of the Ingredients

Keep in mind the shelf life for all ingredients that you add, such as:

  • Dried beans – 10 years to indefinitely (depending who you believe)
  • White rice – 4-5 years, unless vacuum sealed (then about 10 years)
  • Spices – most ground, dried, or whole spices are good for 2-5 years

Read more: 4 Important Forgotten Skills used by our Ancestors that can help you in any crisis

So, as long as you separating the dried spices from the beans and rice, the above recipes should last a minimum of 2 years, depending on the spice.

However, there is no need to toss the entire batch. After 2-5 years, just change out the seasonings and start over for the expiration date.

If you do not want to store the batches in quart jars, you can also place the batches in quart or gallon size baggies. However, critters can get through bags much easier than glass jars. So, make sure to store the bags of ingredients in an airtight storage bin.

Optional Additions to the Soup

If circumstances allow, you can always add fresh ingredients, such as meat or veggies. Personally, I like a good ham added to bean soup.

But, if you’re in survival mode, that might not be an option. So, having more seasonings in the jar will allow for more flavor to develop, and you might not even miss the meat.

And, even though it will be an abundance of bean and rice soup, altering the seasonings between the batches will give you a bit of variety, which is especially nice if you are truly in a state of survival and don’t have anything else to eat.

However, having batches of this on hand is also great for the temporary survival situations, such as a bad storm knocking your power out for a week or two. One jar, a pot, water, and a source of heat is all you need to eat inexpensively and healthy for a while.


Other self-sufficiency and preparedness solutions recommended for you:

Healthy Soil + Healthy Plants = Healthy You

The vital self-sufficiency lessons our great grand-fathers left us

Knowledge to survive any medical crisis situation

Liberal’s hidden agenda: more than just your guns

Build yourself the only unlimited water source you’ll ever need

4 Important Forgotten Skills used by our Ancestors that can help you in any crisis

Secure your privacy in just 10 simple steps

I wanted to share this bean and rice survival soup recipe, because it’s an inexpensive and easy one to prep, store, and make when you’re ready to use it. Once

In the case of a SHTF event, we could live without internet, cars and gadgets. We could survive without electricity, air conditioning, heating systems and hot water. But we couldn’t make it without enough food supplies. Canned tuna, frozen beans and boiled potatoes can only last so far. All these supplies are bound to end sooner or later, leaving us exposed to starvation. So how can preppers improve on this aspect and ensure their food supply doesn’t run out after three days? The answer is raising livestock. Our ancestors didn’t have supermarkets, had never heard about take-away, fast-food, processed food or preservatives. In this respect, we have a great deal of things to learn from them.

Related: Healthy Soil + Healthy Plants = Healthy You

Their survival depended on livestock, fruits, vegetables, plants and seeds. Nowadays you can learn about all of these by getting an agriculture degree. But back then, knowledge was passed down from generation to generation and people had to learn from trial and error rather than from a YouTube tutorial. If you want to make sure you are truly ready for anything read all about the livestock you should raise and why. It’s never too late to start researching livestock and becoming an expert in the field. Who knows, if you start right now, you might be taking the first step in keeping your family alive when disaster strikes.

Chickens

If we would have to advise you what livestock you should raise and why, based on rate of growth criteria, chicken would win by far. They manage to double their number with every year and they don’t require a complicated set up or high maintenance. They are great because they yield plentiful supplies of meat and eggs in relation to how much food they require. For example, a hen could supply you with 10 to 12 eggs for each five pounds of food.

Related: The Many Benefits of Raising Chickens

Another great benefit of raising chicken is that the birds are not picky about what they eat. They will happily peck on anything that they can find, from insects and weeds to leftovers from your dinner. The only drawback with this is that they can easily damage your garden, so you might want to fence them in to keep that from happening.

raisingchickens

Another pro for raising chicken is that they don’t need a lot of space or sturdy fences. However, you should keep in mind that these fowls will learn how to fly, so you might want to build a six-foot fence or add a top to their pen. You should also watch out for predators: foxes, owls, rats and opossums will all try to take a swing at your chicken if they’re not protected enough.

Pigs

Also dubbed the best garbage disposers, pigs will munch anything you put in front of them: kitchen leftovers, greens, roots and grains, just to name a few. In exchange for these, in return, they will give you bacon, ham and plenty of meat. Not only unpretentious eaters, pigs don’t need too much room either, despite their great size. The best time to buy a piglet is in the spring in order to give it time to grow and develop to more than 220 pounds over the summer.

pigs

All the maintenance pigs require is feeding and watering two times a day as well as cleaning their pens every few days. Butchering a hog that weighs over 200 pounds is no easy task. But you’ll only be reaping the benefits. Almost every part of the pig is edible and ready to be turned into steaks, broths, aspic, bacon, ribs, sausages, pork loins and trotters. Even the skin is edible, although most people are reticent to eat it because pigs are not among the cleanest animals. Bear in mind that they might test your olfactory tolerance before you manage to fatten them up and transform them into pork chops.

Rabbits

Not only pretty faces, rabbits are clean, quiet and prolific. Ideal for small spaces, rabbits will thrive in modest sized cages and as long as their manure is cleaned out regularly, they will remain odor-free. These furry animals are extremely rewarding for the amount of care and food they require. Rabbits feed on hay, which should be cut in three-inch lengths and stacked into the hay-racks that must be kept full at all times. They will also eat dried bread or crusts and, as it may be expected, they enjoy nibbling on carrots and roots.

rabbits

A buck and two does will yield as much as 50 rabbits per year, which translates into roughly 170 pounds of meat. Not too shabby for the effort you have to put in every day. Rabbits can be consumed as soon as they are seven or eight months old, but you can wait and make a more consistent stew from a three-year old buck. While they can withstand harsh cold weather, they are not big fans of wet or hot conditions. Keep in mind that they will need a cool place in the summer that has plenty of ventilation and fresh water supplies.

Sheep

Docile and quiet, sheep thrive on grassland, which is a huge selling point. They don’t require high maintenance and offer excellent products in return: meat, milk (which can be made into cheese), skin, wool and manure. Because they are amazing grazers, they are very economical. An acre of pasture can feed as much as four animals, without including the lambs. An adult ewe will be able to yield as much as 100 pounds of meat and 7 to 9 pounds of wool.

raisingsheetp

Care-taking is kept to a minimum, but you might want to prepare yourself for yearly shearing. Ewes might also need assistance in delivering their lambs and in making sure they are looked after. You should also keep an eye on the lambs which are extremely vulnerable in the first weeks and stand for an easy prey for natural predators. Easy to feed and look after, odourless and calm, sheep are definitely a top choice when it comes to livestock you should raise.


Other self-sufficiency and preparedness solutions recommended for you:

Healthy Soil + Healthy Plants = Healthy You

The vital self-sufficiency lessons our great grand-fathers left us

Knowledge to survive any medical crisis situation

Liberal’s hidden agenda: more than just your guns

Build yourself the only unlimited water source you’ll ever need

4 Important Forgotten Skills used by our Ancestors that can help you in any crisis

Secure your privacy in just 10 simple steps

In the case of a SHTF event, we could live without internet, cars and gadgets. We could survive without electricity, air conditioning, heating systems and hot water. But we couldn’t

How do you know if your canned food has gone bad? If only it were as simple as checking the expiration date! Sorry friends, but that expiration date is just a recommendation. In truth, canned food can spoil due to many factors other than time spent on the shelf. For example…

  • Dropping your canned food can create a hole or leak that allows bacteria to grow.
  • Storing your cans at the wrong temperature can cause metals to start seeping into your food.
  • Using the wrong methods or improper hygiene while canning will doom your food from the start!

This isn’t to scare you into thinking that all canned food is out to give you Botulism. Rather, we want to remind you to inspect your food before taking a bite!

This book could have been called The Pioneer’s Book of Medicine. Learn here why.

Once we run through the telltale signs that canned food has spoiled, you’ll always know what to look for.

1. Bulging

Press on the lid of your can. Do you sense pressure or swelling? Or does the lid top “pop” or move up and down? These could all be signs of a serious food hazard! When bacteria breed, they release harmful toxins which cause the tin can to bulge.

From these toxins, humans can contract some nasty strains of food poisoning including the most lethal form of food poisoning called Botulism.

2. Loud Hissing

A soft, brief hissing sound when opening a can is fine–this is just the vacuum seal being released. However, a loud hissing sound is another sign of toxic gas caused by bacteria.

If you experience this hissing, stop – do not proceed. If you continue, you risk spreading the bacteria around your kitchen.

3. Spurting Liquid When Opened

When you open a can of green beans or tuna, there is always some liquid that pools at the top and spills out just a little bit. That’s natural. What isn’t natural, however, is spurting liquid that erupts like a geyser. This is a red flag that there has been an abnormal build up of pressure inside the can, likely caused by bacteria.

This Book Is The Noah’s Ark Of Prepping and it’s making Americans healthier by the day. Learn more here.

4. Corrosion

When metal cans corrode, metallic chemicals like Bisphenol A (BPA) start seeping into your food while also creating holes that allow bacteria to grow. Corrosion can be caused by improper temperature storage or being covered in soot or ash that moistens the cans. To spot corrosion, look for small rusty holes on the can.

5. Dents

When a dent is made on a can, it’s like a mini explosion going off on the inside. The air distribution is suddenly shifted and this can result in the can’s seal becoming compromised. If the seal is loosened, then air can escape and bacteria can enter, affecting both the taste and safety of the food inside.

6. Leaks

Leaks are the easiest way to tell if your can has been compromised! Don’t just look for liquid seeping out, also check for sticky areas which might be a clue that there was once a leak.

If there are holes, cracks, or issues with the seal that are big enough to cause a leak, then your food has been exposed to air, bacteria, and possibly egg-laying bugs that are attracted to the can’s contents.

7. Bad Smell

Smell your food every time you open a can. Obviously, rotten smells will gross you out and stop you from eating the potentially spoiled food. But also, acidic or metallic smells will strike you as unnatural. On an evolutionary level, your body is designed to detect “off” smells. Trust your senses!

You are as healthy as the soil feeding your plants. This book teaches you everything from the soil up. Get your printed copy here.

8. Bubbles

One or two small bubbles on the surface of canned food might just be from the agitation of opening the can. But if you find a light to moderate layer of foamy bubbles, then your food has spoiled.

These bubbles are caused by the release of waste or gas from the bacteria that has been partying inside the can. Treat this food like toxic waste and don’t even attempt to taste it.

9. Strange Colors

Your food should be the same color going in the can as it is coming out of the can–that’s the whole point of preserving in a can! Discoloration is a clear sign of contamination whether it be from metals, bacteria, or air. You don’t want to ingest that!

10. Mushy or Moldy Looking

If there is mold in or on your canned food, it means that your food wasn’t canned properly. The wrong tools or the wrong methods were used which resulted in the growth of mold that has begun to turn your food into mush.

In this case, it’s not enough just to scrape the mold off the top because you don’t know what other hygienic or handling issues occurred during canning.

How to Keep your Food from Spoiling

Store your cans in a dry, cool, dark place – Ideally, you want a clean storage shed, pantry or a basement that maintains a temperature between 40-60 degrees F. Most homes are around 70 degrees–which is okay–but in general, the lower the temperature, the longer your food will last.

Store your cans off the ground – Leaving your canned food on the ground exposes them to condensation, floods, and temperature changes. Shelves are your friend.

Physically rotate your food as often as possible – In other words, crack open the older cans first and replace them with newer cans. Don’t let cans of food go forgotten in the back.

If you want to learn more about home canning, check out these 9 things to know before you start.

Conclusion

Whether you’re stockpiling for the apocalypse, canning for winter, or eating from cans on a regular basis, make sure you really ingrain these signs into your brain!

Teach your partner and teach your kids these signs, too. They are survival skills that could save you and your family from enduring a serious illness.


Other self-sufficiency and preparedness solutions recommended for you:

The Lost Ways (The vital self-sufficiency lessons our great grand-fathers left us)

Survival MD (Knowledge to survive any medical crisis situation)

Backyard Liberty (Liberal’s hidden agenda: more than just your guns…)

Alive After the Fall (Build yourself the only unlimited water source you’ll ever need)

The Lost ways II (4 Important Forgotten Skills used by our Ancestors that can help you in any crisis)

The Patriot Privacy Kit (Secure your privacy in just 10 simple steps)

How do you know if your canned food has gone bad? If only it were as simple as checking the expiration date! Sorry friends, but that expiration date is just

Oh, how I love food! Let me count the ways.

Actually, I don’t like food-food, but the homemade variety. And nothing beats a meal cooked during an SHTF situation.

Yes, I know how that sounds, but admit it that the best meal you’ve ever eaten was back when your can was on the line. Even spam taste better when it’s eating from tin plate set beside a romantic 24-hours emergency candle.

Which brings us to the topic du jour – how to make spam at home.

I know most of you people have enough cans in your emergency supplies pantry to make it through WWIII, but wouldn’t it be neat to learn how to make some yourself instead of buying? Sure it would, and I am going to show you how easy it is to make this stuff. What can I say about spam? The dish is so popular that it inspired songs and even phrases like the one we use each day: “for when the spam hits the fan.”

Now, as for the recipe, I have to warn you that it takes a little bit of muscle to pull this through because everything will have to chop, diced, and ground. So, without further ado, here’s how to prepare emergency spam. Ingredients:

  • Pork shoulder (about two-and-a-half pounds). You can use other pork cuts as well. Just be sure that your cut of choice has enough fat on it.
  • Good-quality ham (about three ounces).
  • Tender Quick Meat Cure (bought mine from Amazon. Aim from one tablespoon at first and then half a tablespoon later.
  • Garlic (two cloves are more than enough for this recipe).

Already gathered your ingredients? Great! Then it’s time for phase two of our spam cookery.

How to prepare homemade spam

Step 1.

Get your oven ready. Pre-heat to 300 degrees Fahrenheit.

Step 2.

Tend to the meat. Take your pork shoulder or cut of choice and cut it into small cubes.

Step 3.

Set up your grinder. After you finish installing the thingy, grind the pork shoulder cubes. If you prefer your mixture to be less chunky, grind the meat one more time.

Step 4.

Ham and garlic. Take your ham and mince it. Place it afterward in a food processor. Now mince your garlic and add it to the ham.

Step 5.

Finely mince the ham and garlic. Don’t make it into a paste, though.

Step 6.

Grab a large bowl and wash your hands. Place the ground pork meat, ham, and garlic in a large bowl. Add one tablespoon of Tender Quick Meat Cure and use your hands to mix the ingredients. If the mix seems too loose, add half of spoon of Tender Quick Meat Cure.

Step 7.

It’s time to shape your ham. Grab a baking tray from the pantry. For this recipe, I used a small ceramic terrine tray my wife got from her mother. Put the mixture inside the tray and use your hands to spread the mixture over the entire surface.


Step 8.

It’s oven time! By now, your oven should have reached the desired temp. Cover you spam tray with an aluminum foil. Make sure it’s wrapped around nice and tight, especially around the handles. Now, take a large baking tray from the pantry and place the spam tray smack in the middle. Fill the larger with water (should be ¾ full). Place in the oven for three to four hours. Check the larger tray every half an hour and make sure that there’s still water there.

Step 9.

Time’s up! Let’s pop the lid. This is the most important part of making ham. Remove the tray from the oven and allow it to cool for a bit. After that, use some gloves or something to get the spam tray out of the bigger tray. Have to warn you that this part’s a little bit disgusting. Take the aluminum foil off the spam tray. That yellowish goo on top of your meat is pure fat. Take a ladle or a large spoon and remove the excess fat. Temporarily place it in a plate or bowl. After it cools down, throw it in the garbage because it cannot be reused. Don’t forget to leave a thin layer on fat on top of your spam.

Step 10.

Bag and tag. Grab yourself a lid from the pantry and place it on top of the spam tray. All you need to do know is to find some sort of weight to put on top of the lid. This prevents the blob inside from expanding and from drawing too much moisture from the air. I used two small bricks to weigh down the lid, but you can use anything you have on hand as long as it’s heavy and keep the lid shut.

Step 11.

The ice-man cometh! Place the tray with the weight on top inside the fridge. You can also turn this into full-blackout recipe by swapping the fridge with a cool and dry place. Don’t worry about the meat turning bad because it’s packed with enough salt.


That’s it!

If you’ve gone through every step, you should have fresh, homemade spam in 24 hours or less. Now, bear in mind that this is not the canned spam variety which means that it doesn’t have a very long shelf life. However, if you know a little bit about canning, you can go for the kill.

I haven’t gotten around to canning my span mostly because I don’t know a thing about how to seal those blasted things. My mother told me that there’s a special tool for that job, but I’ve yet to discover it. Anyway, it’s not like there’s enough spam to can – my family made quick work of it.

Like my recipe? Let me know your thoughts in the comment section. Also, if you know of any canning method, I’ll be grateful if you would care to share it.


Other Self-sufficiency and Preparedness solutions recommended for you:

The Lost Ways (The vital self-sufficiency lessons our great grand-fathers left us)
Survival MD (Knowledge to survive any medical crisis situation)
Backyard Liberty (Liberal’s hidden agenda: more than just your guns…)
Alive After the Fall (Build yourself the only unlimited water source you’ll ever need)
The Lost ways II (4 Important Forgotten Skills used by our Ancestors that can help you in any crisis)
The Patriot Privacy Kit (Secure your privacy in just 10 simple steps)

Nothing beats a cooked meal during a SHTF situation. You have no idea how easy it is to make this stuff.

Everybody has his guilty pleasure – mine is powdered eggs. Yes, I know that nothing beats fresh-laid chicken eggs, because they’re packed with calcium, albumin, and so on and so forth. But what can you do? The heart asks pleasure first, as the saying goes, and I wouldn’t even consider coming down for breakfast if I’m all out of powdered eggs for my killer omelet.

There are very good reasons why I chose this instead of regular eggs, apart from the fact that they tout more or less the same nutritional values as their ‘living’ counterparts – they can be stockpiled for months if not years; can fit into any B.O.B, no matter how big or small it is and, most importantly, powdered eggs will be worth their weight in gold during an SHTF situation when all supermarkets will run out of the fresh variety.

Now, before showing you how I managed to make my first few jars of powdered eggs, I should warn you that this recipe will require a small investment because you’ll need a contraption called a dehydrator.

Wait! Don’t close this article yet. I was talking about a maybe a few tens (bought mine from Costco for $30). That’s about it as far as the financial part is concerned. Trust me when I say that this investment will pay off – imagine not having to hunt online discounts on survival foods such as powdered eggs. And, most importantly, if you know how to cook ‘em, you won’t notice any difference in taste.

Anyway, here’s what you will need to do in order to obtain a near-endless supply of powdered eggs.

Gathering your ingredients and kitchen supplies

To pull this off, you will need the following:

  • Eggs (I used two dozen for my first batch).
  • A teaspoon of vegetable cooking oil or butter.
  • The dehydrator.
  • A food processor.
  • A blender or fork for whipping up the eggs.
  • Canning jars.
  • Skillet.

Done gathering the ingredients? Great! Here’s what you’ll need to do next.

How to prepare powdered eggs

Step 1. Start by cracking open the eggs in a large bowl.

Step 2. Whip up the eggs using a mixer or a fork. I would advise you to use a blender since it’s quite tricky to whip up that many eggs using a simple fork and takes less time.

Step 3. Put the skillet on the cooking machine and add a little bit of veggie oil or butter. If you don’t have a non-stick pan, use both or stick to butter.

Step 4. Set the heat to medium-low and wait for the oil to heat up. If you’re using butter, you should put the whipped eggs inside when the butter’s all melted.

Step 5. Add the whipped eggs.

Step 6. Wait until the eggs begin to bind, then use a wooden spoon or spatula to sort of shred the omelet mass. Keep stirring and separating the eggs. It takes about 10 minutes or so. Yup, basically it’s like doing scrambled eggs. Now, if you want your eggs to be extra puffy, you can add a splash of milk to the bowl while you’re whisking them.

Step 6. Move the scrambled eggs to a clean plate with a bit of paper tissue underneath and allow them to cool.

Step 7. Once the eggs have cooled down, transfer them to your food processor and set it on “pulse.” Give your scrambled eggs a couple of spins. After a couple of seconds, you should have a puffy mass of diced eggs.

Step 8. Turn on your dehydrator and set it to 125 degrees Fahrenheit. Wait for it to reach the desired temperature (mine has a green LED bulb in the front which sort of lights up when the device reaches the right temp). Don’t forget to remove the dehydrator’s lid before heating it up.

Step 9. Transfer the eggs from your food processor to the dehydrator. Put on the lid and wait. It takes about four or five hours for the machinery to remove all the moisture from the eggs. Once they’re done, the eggs will have a brittle aspect.

Step 10.  Put the eggs back into the food processor and give them a spin or two to turn them into powder. Enjoy!

There’s another way of making powdered eggs. Works great if you’re on the run or not in the mood of going through all the steps. As you will see, the dehydrator you’re just bought comes with a fruit roll sheet (yup, you can use it to get the moisture out of fruits and make your own trail mix).

Now, get half a dozen eggs and whisk them. Put the fruit roll sheet on top of your dehydrator and set it to 145 degrees Fahrenheit. When the thing’s beginning to heat you, dip a paper towel in some veggie oil and grease the surface of your fruit roll sheet.

Add the whisked eggs (careful not to spill your mix inside the device). You don’t need to put the lid on. Leave it like this for 14 to 16 hours. Swing by from time to time to see if everything’s okay. When they’re done, they’ll have the same brittle texture as in the steps described above. All you need to do now is to transfer them to your food processor (don’t bother waiting for them to cool down), give them a good shake, and that’s it.

As for storing, you can use regular canning jars or zip-lock bags. If you want to make survival packs for your bug out bag or household survival kit, you can try using a vacuum sealer.

For the cooking part, all you’ll need to do would be to rehydrate them – I personally like to add them to a small pan with boiled water and sort of make poached, scrambled eggs. Yes, I know it sounds unappetizing, but nothing a little bit of salt, pepper, and a slice of homemade spam can’t fix.

Hope you’ve liked my article on how to make powdered eggs at home. If there’s anything more to add, be sure to hit me up in the comments section.

Powdered eggs will be worth their weight in gold during an SHTF situation when all supermarkets will run out of the fresh variety.

Do you wanna know the secret behind a great camping trip? Well, apart from flying solo or going with you SO, there’s also that sprinkle of magic called food. Yes, I know that most of you prefer a quick snack (MREs, poached eggs, may a couple of veggies), but what if I told you that you could actually enjoy a meal fit for a king’s table while backpacking?

Granted, it sounds like a contradiction in terms since camping has always been about leaving behind the hustle and bustle of the big city, which, incidentally includes fancy eateries and heavy cooking gear.

Well, the recipe I’m about to show you will not only blow your mind but will surely make the question the ways you chose to cook your Sunday roast. Anyway, as the title suggests, the only cooking tools you’ll need are the ones that should be included in your backpack or bug out bag.

Now, for those of you who are wondering about the cooking machine, I would recommend a simple and, if possible, firebox. Of course, you can always try your luck with a gas-powered stove.

For my part, I went with option A, since nothing beats that smoky flavor that only charcoal can provide. Moreover, since this is a 7-hour roast, I don’t think it would be a good idea to pack extra gas tanks just to cook one hunk of meat.

So, without further ado, here’s how to prepare your first 7-hour roast beef.

Gathering the ingredients

A simple dish calls for basic ingredients: salt, pepper, a bit of vegetable oil, and a dash of thyme (pairs divinely with beef). As for the cut, T-bone’s good, but a chuck steak’s better. As I said – simple stuff.

Now, for the rest of the stuff: one firebox filled with charcoal, one firestarter, and your camping pan (make sure that it’s one of those models that come with clamps). If you don’t have such a pan, you can always take a regular one from home and use a metallic bowl as a lid – clamp it in place using regular paper clips.

So, did you gather your stuff? Great! Now find a good spot and let’s work some magic.

How to prepare a 7-hour beef roast

Step 1. Find a good spot to set up your firebox.

Remember your grills safety training. We don’t wildfires now, do we? Best would be to pick a barren spot, away from trees or any vegetation. When you’re done, place a piece of paper on the bottom of the firebox and stack some tinder.

Fire it up and start shoveling coals once the fire picks up in speed. I wouldn’t recommend using lighter fluid or whatever, because your roast is going to end up tasting like gasoline.

Step 2.  Prepare the roast beef.

If you’re not in a hurry, you can marinate the roast beef for a couple of hours before the cooking part. I would venture to say that two-and-a-half hours are more than enough for the marinade to get into the beef. Regarding the latter, don’t overcomplicate things; in a zip-lock bag, add water, sugar, salt, pepper, some chili flakes for a kick, a couple of crushed garlic cloves, and two tablespoons of veggie oil.

Bag the meat, give it a couple of shakes, and store in the shade, away from insects. Now, if you want to skip this extra step, you can go ahead and start preparing the meat for pan-frying.  To do that, unpack your meat, season on all sides with salt and pepper. Don’t forget to rub the chunk with a little bit of veggie oil.

Step 3. Pan-frying the meat.

Once the fire has started to gain momentum, drizzle some oil in your frying pan and place on top. When the oil reaches the cooking temp, take the beef chuck, and place in the pan (fat part down). You only need to sear the meat – two minutes on each side is more than enough. When it’s done, take it out of the frying pan.

Step 4. Oven-roasting

In the same frying pan, add some more oil, and a splash of water. Make sure that there are still coals in your firebox. Next, you will need to place the meat in the pan, pop the lid, secure it with paper clips, if you have any, and to place it over your firebox.

Leave for 30 minutes to cook. After that, grab some hot coals from the firebox and place them on top of the frying pan’s lid – this will ensure that your beef will be cooked on both sides.

Now, there’s not much left to do but to sit and wait. Keep an eye on the coals and add some more if you feel like the fire’s ‘losing its touch.’ The first time I made this dish, I was with the whole gang: wife, kids, best friend, his SO, dogs, and, yes, even the cat (taught it how to walk on a leash). Our pastime of choice was obviously cracking open a few cold ones and reminiscing.

Well, if you really want to make more out of your camping trip, you can spend this time looking for side-dishes that pairs well with the beef like wild mushrooms or even fish.

Anyway, do keep in mind that this is going to take a while, so, there’s no point to guarding the firebox.

Step 5. Twist and turn.

After about four-and-a-half hours, remove the coals from the lid. Pop it open and flip your roast. Careful not to drop it or it’s bye-bye dinner. When you’re done, put the lid back again and continue cooking it for about two-and-a-half hours. Don’t forget about the coals.

Advice: if you want to add a crunchy crust to your meat, you can ditch the lid after six-and-a-half hours. Flip the meat every now and then. If you run out of the liquid, add a little bit of water. Otherwise, the meat will dry up and, eventually, turn into ashes (true story!).

Step 6. Gravy all around!

When the beef’s done the cooking, don’t throw away the liquid in the frying pan. Use it instead to prepare a mouthwatering gravy that will everyone a run for their money. Yeah, I know that this qualifies as an extra step, far from the simple dish – simple tools ideal, but trust me when I say that the gravy made from beef feet is the best thing that ever happened to your mouth.

So, here’s what you’ll need to do in order to prepare a simple gravy:

  1. Pour your beef stock in a separate container.
  2. Add a little bit of butter to the same pan.
  3. Wait for the butter to melt then add the stock.
  4. Let it simmer for a couple of minutes.
  5. Add half a cup of all-purpose flour and whisk the mixture.
  6. When the composition becomes silky-smooth, add another half a cup of all-purpose flour.
  7. Give a few more whisks and allow it to cook for another minute or so.
  8. Add salt and pepper.

Advice: if you prefer smoother gravy, you can strain it a couple of times through a sieve or a piece of gauze.

That’s it! You now have a nice cup of gravy which pairs wonderfully with the 7-hour beef.

Additional considerations on the 7-hour beef roast

As you see, preparing this dish is easy, and you only need a handful of tools to get the job done. Now, you’re probably wondering about how to serve this ginormous beef roast. It’s all up to you, of course, but it would be a shame not to make some pulled meat sandwiches. Yes, I know that you usually prepare those with pork, but, hey, beef’s good too. So, here’s what to do in order to prepare some juicy pulled beef sandwiches from your roast.

Step 1. Get yourself a couple of bread slices.

Step 2. Put a metal plate over your firebox and drizzle it with some cold water. You can also add some veggie oil.

Step 3. Grill the slices on both sides. Don’t burn them, though.

Step 4. Put some of that gravy on each slice.

Step 5. Place your roast in a small tray and use two forks to pull the meat apart. Better you do this while the meat’s still hot.

Step 6.  Take some meat shreds and place on each bread slice. Add more gravy if you like. Now, if you fancy carrying around more veggies and ingredients, you can garnish the sandwich with onion rings and a piece of cedar cheese.

Well, campers, that’s about it for my 7-hour roast beef recipe. Hope you’ve enjoyed it as much as I did cooking it. Sorry for not posting any clips or anything, but there was hardly anything left to be shot after everyone dug in (beer will do that for you). Anyway, if you have any questions or think that the recipe can be improved in any way, don’t be a stranger and hit the comments section.

I know that most of you prefer a quick snack, but what if I told you that you could actually enjoy a meal fit for a king’s table while backpacking?

I don’t need to remind just how darn important it is to know what to cook when the power goes out. There are so many recipes on the grand world-wide-web that you need only type in “gimme food” in Google to figure out your next step.

The trouble with these “whip-up” dishes, as I like to call them, is that they have a very limited shelf life, despite being bagged and refrigerated. In my searches for the next cannable superstar (be sure to check out my article on canning and pickling pork meat), I’ve stumbled upon a most interesting recipe – the so-called Poor Man’s Hamburger. According to its description, it should be an Amish dish, although I find it very hard to make a connection.

Anyway, the recipe’s pretty straightforward and if you have a good pressure canner, you can keep this stuff in your pantry for at least three months if not more. The weird part about preparing this recipe is who or rather what gets the spotlight – though it’s a meat-based dish, the gravy’s actually the one who steps into the limelight.

Crazy, right? Not in the very least! As you’re about to see, the gravy you get is what you might consider a great SHTF asset – it can very easily be combined with the meat of all sorts (chicken, beef jerky, spam) but it can also be eaten, well, plain, as a sort of early-morning broth.

Before we get to the cooking part, I should warn you that this recipe takes time. If you have something big planned that day, I will leave it for another day, preferably a lazy Sunday. So, without further ado, here’s what you’ll need to do in order to prepare Cannish, aka the canned version of the Amish Poor Man’s burger.

Gathering your utensils and ingredients

For this recipe, you’ll need the following tools:

  • Canning jar (the bigger, the better).
  • Plastic container (I would go for a 35 quart because you’ll have a lot of stuff to mix)
  • Food processor.
  • Oven grill (if you don’t have one, you can always use the top part of an old BBQ which you can place it over a tray).
  • Mouth rim (you’ll need this to shape your burger patties).
  • Skillet (for cooking the gravy).
  • Aluminum foil.
  • Lots and lots of patients.

As for the ingredients, go raid the pantry or the local farmer’s market of the following supplies:

  • Celery (around five cups).
  • Onions (five cups will do).
  • Saltines (I used one and a half pounds of saltine or six packs).
  • Eggs (two dozen).
  • Milk (five cups).
  • Lots of salt and pepper.
  • Ground beef (this recipe calls for at least 30 pounds. That’s around two or three big-ass rolls).
  • Canned mushrooms (five cans).
  • All-purpose flour.

Yes, I know it’s a very long list, but as I’ve told you, this is the kind of recipe that kind of makes you spend the entire day in the kitchen. Still, do bear in mind that will also be some waiting time, which would be right after you stick those burger patties into the over. All done with the tools and ingredients? Great! Let’s get right down to business.

How to prepare Cannish

Step 1. Grab a cutting board, a sharp knife, and get to chopping. Have your food processor ready, because everything you’ll chop or crush from this point forward will require a little bit of mixing.

Step 2. Leave the chopped onions and celery aside for the moment. As for the saltines, you can either use a mortar and pestle to crush them or place everything inside a zip-lock bag and use a rolling pin to beat the living daylights out of it. When you’re done, add them to the food processor, and give them a good mix (I scrambled them for 10 or 15 seconds to make sure that there are no chunks left).

Step 3. Grab yourself a large bowl and crack open two dozen eggs. Whisk the shit out of them.

Step 4. Measure five cups of milk.

Step 5. It’s now time to put everything together. Place the plastic container on your work table and add your chopped celery & onions, saltines, whisked eggs, and milk.

Step 6. Get dirty! You have two choices for the mixing part – wooden spoon or hands. I personally prefer the latter (make sure you’ve washed your hands before dipping them in the mix).

Step 7. Add some salt and pepper to the container (I used two tablespoons of rock salt and one and a half tablespoon of grounded black pepper) and continue mixing.

Step 8. Stick the container in the mix in the fridge for 30 minutes. It will be easier to handle once you get to the patty-making part.

Step 9. Get your ground beef out of the freezer and use a knife to remove the membranes. Add the meat to your plastic container and use your hands or a wooden spoon to bind the mixture. FYI, it’s easier to do this if you dip your hands in ice-cold water. Fill a small bowl with cold tap water and keep it next to your container.

Step 10. Start making patties. Take a handful of meat and stick in the metal rim. If you’re skilled patty—maker, you can ditch the ring, and form them by hand. Don’t make them too big or thick. Remember that your goal will be to place each cooked patty inside the canning jars. You shouldn’t also take into account that this type of meat is packed with fat, which will kind of end up in the oven tray.

Step 11. Stick the formed patties in the fridge for 15 or 20 minutes. To prevent them from sticking to each other, create patty layers separated by baking parchment.

Step 12. Get the patties out of the fridge and arrange them on your grill. If you use the exact amount of ingredients, you’ll end up with 28 or 29 burger patties.

Step 13. Preheat your over to 375 degrees Fahrenheit.

Step 14. Place the BBQ grill with a tray in the oven and bake for 35 minutes. Don’t forget to flip the patties after 15 minutes. Depending on your rig, this step can take anything from 2 to 6 hours. In my case, it took about three and a half hours to bake all the burger patties. When they’re done, place them in a large roasting pan. Cover it with two layers of aluminum foil. Allow the burgers to cool down.

Step 15. In the meantime, get a skillet and prepare the gravy. Here’s how to do it. Get one and a half cup of fat from the patties and add it to the skillet. Set your heat to medium-low. After the fat begins to warm up, and half a cup of all-purpose flour.

Use a spoon to stir. Don’t rush it! Gravy’s something that takes a lot of patience. If you see that the mix is about to go up in flames, lift the pan off the stove, and put it back again. You’ll know that the gravy base is done when it turns light brown.

Step 16. It’s time to prepare the mushroom soup. In a big pot, pour the contents of five mushroom soups cans. Using an empty can as a measuring cup, add five cups to the shroom soup and bring it to a boil.

Step 17. While the shroom soup’s still hot, grab a ladle and carefully add it to the browned flour mixture. The secret to not ending up with burned gravy is to stir while pouring shroom soup with the ladle. It may take a while longer, but it’s worth it. If you feel that the mix is too thick for the spoon, use a whisk instead.

Step 18. When you’re done adding every last drop of shroom soup, give the mix a good whisk, and let it bubble for five more minutes before killing the flame.

Step 19. Take a breather. Smoke if you have them. After the gravy cools down a bit, it’s time to put everything together.

Step 20. Give those canning jars a good wash. You can either submerge them in a tub filled with water and dish detergent or boil the Hell out of them before using. Your call.

Step 21. Place five burger patties in each canning jar and cover with gravy. Put the lid on, tighten it, and allow the jars to cool down overnight before placing them in the fridge or pantry.

Congratulations! You’ve just made your first batch of canned Amish Poor Man’s burgers. Your kitchen probably looks like a scene from WW2 or something, but who cares when you have delish marinated burgers. If stored probably, you won’t have to worry about running of food, at least for a couple of months. Although the canning part allows you to store this stuff in any place outside of the fridge, I would strongly advise you to keep your jars refrigerated and to consume it in two months’ time.

Another thing about this recipe is that it will take a while to figure out how to make the gravy base. For my part, I had to discard the contents of two skillets and ended up using more than three cups of fat before I was able to make a ‘stable’ base. As I’ve mentioned, the trick is to gently stir the mix and to lift the skillet every now and then. If the weather’s nice, you can always skip the oven part and cook your patties over a charcoal barbeque.

As for the mix, if you can’t find any saltines, you can always replace them with other types of crackers. Just make sure that they’re salty. The dish can be eaten hot off the oven but, if you want to get more kicks out of it, stick in the fridge and leave it overnight. By morning, the patties would have sucked in all that delicious gravy. You can heat them up in your microwave or in a pan with boiling water.

That’s it for my Cannish recipe! What do you guys think about this SHTF dish? Hit the comments section and let me know your thoughts.

Before you go, you may also like:

This is more than just about your guns…
How to survive any medical crisis situation with ease
10 Easy Steps to Secure your privacy
Secret Military Solution For Power Independence

DIY Unlimited water source
Why a food reserve is way better than the Federal Reserve
Lost Skills of our Ancestors that still work today

Anyway, the recipe’s pretty straightforward and if you have a good pressure canner, you can keep this stuff in your pantry for at least three months if not more.

I would lie if I said that I don’t envy all those wonderful homesteaders who managed to put a couple of bucks outside for the root cellar. Yeah, those things are really great (if you have them, of course) and not to mention very useful during any kind of shit hits the fan situation – a hole in the ground, some stones, a couple of shelves, and you’ve got yourself a gigantic fridge capable of storing veggies, legumes, pickles, and whatnots.

Ingenious, that’s what it is! However, if your home doesn’t come with a root cellar, building one from scratch takes a lot of time, energy, and, yes, a shit-load of money.

Fortunately, there is a way to tap into Mom Nature’s icy powers without the need to fork over too much cash. Being a very determined guy, I have searched high and low for ways to recreate a root cellar without actually having to build one. Sounds crazy, right? Not in the least, as you’re about to see.

The idea to write this short and sweet piece came to me after watching a documentary on National Geographic about ancient food storage methods. Can’t remember the name of the show, but there were these two guys traveling around the world and interviewing homesteaders about how they make food last longer.

In the last part of the show, there was this man from China who was quite a bit of a local celebrity, thanks to his top-notch Kimchi. For those of you who don’t know, Kimchi is Asia’s version of pickled cabbage. However, instead of using canning jars, homesteaders would place the thinly-sliced cabbage inside a ceramic jar, which would later seal with wax before burying it in the Earth.

So, with this in mind, I snooped around the Internet and found a simple and cheap way of making a mini version of the root cellar using only an old metal barrel. Here’s how to whip up a backyard cellar in order to store your veggies.

Gathering the necessary materials

For this project, you’ll need the following:

  • A shovel.
  • A barrel (I would go with a galvanized metal barrel because they’re easier to clean and fare much better underground compared to the plastic ones).
  • Rocks (shape and size don’t matter).
  • Straw.
  • Several pieces of plywood to cover the lid.

Ready with the gear? Neat! Let’s get to work, then.

How to build a mini root cellar in the backyard

Step 1. Find a suitable place to dig a hole. I would advise you to place your barrel\future root cellar in a sunny spot. You should also make sure that there are no water pipes or electrical lines running nearby.

Step 2. Once you found a suitable location, grab your shovel and start digging. The hole will need to take the shape of the barrel. As for depth, it all depends on the size of the barrel. Just be sure that the rim stays on top, with the remaining underground.

Step 3. After you’ve finished digging the hole, remove any deep roots or pebbles from the bottom. Moreover, ensure that the end of your pit is dry.

Test the ground – if it feels moist to the touch, it means that there’s water underneath which is a big no-no. I know it’s annoying, but if this happens, you will need to find another location for your root cellar. Mark the spot in case you’re thinking about adding a well to your property.

Step 4. Fill the bottom with the rocks you’ve brought.

Step 5. Place the barrel on top of the rocks. Ensure that the body of your barrel remains below the freezing line while keeping the rim up top.

Step 6. Place some earth around the barrel to seal it in. Don’t put on the lid yet.

Step 7. Prepare the veggies or fruits for storage. If you’re not sure about the thingamajig’s cooling action, you can try it out on a couple of potatoes.

Step 8. Place a handful of straw on the bottom of the barrel.

Step 9. Place your veggies on the straw. You can add more vegetables if you like. Just remember to put some straw between your veggie layers.

Step 10. Put the lid on the barrel, put the plywood boards on top, and cover with dirt. Congrats! You’ve just made your first backyard root cellar.

Additional Consideration on Mini Root Cellars

Building’s the easy part, but knowing what and how to store – that’s a bit challenging. The first rule of the game is never to mix your veggies with fruits. If you plan on storing fruits, you should consider placing a second root cellar.

The reason why fruits and veggies should never be placed in the same barrel is because of ethylene, a plant hormone which induces ripening in fruits. The same substance that makes fruits yummy-yum-yum will cause your veggies to ripen and rot a lot faster.

A root cellar built in this fashion will allow you to store food at a decent temp (somewhere between 32- and 40-degrees Fahrenheit), with humidity at around 95 percent.

For this reason, you’ll be able to store even short-lived veggies such as cauliflower, brussels sprouts, celery, kale, endive or leaks. If the seal holds, you can look forward to a scrumptious carrot-based dish even after six months. As far as fruits are concerned, you should ensure that your root cellar has a bit of moister compared to the one used to store veggies.

After consuming every veggie or fruit from the barrel, I would recommend giving it a good wash with the power hose and use plenty of detergent. I can’s put my finger on it, but I believe that this kind of contraption can also be used the summer to keep your fruits and veggies cool.

In most cases, the mini root cellar can extend the shelf life of fruits and veggies by at least a couple of months, with one exception – kale. If you’re planning on storing some kale, keep in mind that you can’t keep it in for more than two weeks.

Think I’ve missed something? Have another way of building a root cellar in your backyard? Hit the comments section and let me know.

If you didn’t start digging, you may also want to check out this offer coming from our partners at Easy Cellar. As well as the many benefits of having one in your backyard.

A hole in the ground, some stones, a couple of shelves, and you’ve got yourself a gigantic fridge capable of storing veggies, legumes, pickles, and whatnots.

Wait! Before closing this article, hear me out. Yes, I know it sounds utterly disgusting, but you would be surprised to discover than dandelions are, at the same time, yummy and quite healthy.

In fact, according to some researchers who have nothing better to do than to test out just how edible wild plants are, dandelions are packed with zinc, potassium, iron, and calcium. If that wasn’t enough to convince you, then get this – dandelions are the second-best source of natural beta-carotene after carrots.

Even more, research indicates that tinctures and teas made from the stems and flowers can reduce blood pressure and help patients with diabetes better manage their blood sugar.

Anyway, because I’m always on the lookout for ‘exotic’ emergency food recipe, I’ve stumbled upon this little jewel while doing a bit of research on healing plants. It’s true that dandelion tea is great for the digestive system, but when mixed with a bit of flour and baked until golden-brown and crispy, it becomes a treat worthy of a king’s feast.

Interestingly enough, although tea made from dandelion flowers is a bit on the bitter side, bread is very sweet. Don’t know if it’s because of the extra honey or the taste of baked dandelions. Anyway, here’s how to prepare a loaf of delicious dandelion bread (has quite a ring to it, don’t you think?).

Gathering the ingredients

To make dandelion bread, you will need the following:

  • One cup of freshly-picked dandelions.
  • Half a cup of honey.
  • Three tablespoons of veggie oil.
  • One egg.
  • Half a teaspoon of salt.
  • One and quarter cup of cow’s milk.
  • Two cups of regular flour.
  • Two teaspoons of baking powder.

Are you ready with the ingredients? Well, time’s a-wasting. Let’s get cooking!

How to make dandelion bread

Step 1. Go out the back and pick up some dandelions (just enough to fill a cup). Discard the roots because you’ll only need the flowers and the stems. Head to the kitchen, toss them in a strainer, and give them a good wash. Make sure that there’s no dirt left on them.

Step 2. Place your dandelions in a bowl and grab a cutting board and a sharp knife.

Step 3. Use your knife to separate the flowers from the stem. You can toss the stems into the garbage or add them to the compost pile. Your choice.

Step 4. Mince the dandelion petals. Don’t worry about getting a couple of stems in the mix.

Step 5. Pre-heat your oven. Aim for 400 degrees Fahrenheit.

Step 6. Grab a large bowl from your pantry. Add the flour and your minced dandelion flowers. Give it a good stir and add a pinch of salt. Last, add the baking soda and continue mixing.

Step 7. Get a deep plate. Add your milk, honey, oil, and egg. Use a whisk or a fork to combine the ingredients. You can add a little more honey if you like your bread sweet.

Step 8. Pour the milk, egg, honey and oil mixture over the dandelions and flour. Use a fork or your hand to incorporate all of the ingredients. If the mix feels too gooey, add a quarter cup of flour and keep mixing.

Step 9. Grab a bread pan from your pantry and put some baking parchment inside. To prevent the parchment from sticking to the pan, brush the inner part with sunflower oil before arranging the paper.

Step 10. Transfer the mix to the baking pan and use a spoon or spatula to spread the mix.

Step 11. If you like all-cereal bread, you grab a handful of sunflower seeds or your favorite mix and sprinkle some on top of the bread.

Step 12. Stick the pan inside the oven and set your timer to 15 minutes. Bear in mind that, in some cases, it may take a while longer. The bread loaf should have a golden-brown color.

Step 13. After the surface begins to change color, lower the oven’s temp to 350 degrees Fahrenheit. Close the hatch and leave it in for another 20 minutes. There’s a quick and easy way to find out if your dandelion loaf’s done. Works for any kind of pastry, by the way.

Grab a toothpick or a clean piece of wood and stick it in the thickest part of the dough. Take out the stick and look at it. If there’s dough on it, leave the loaf for another 10 to 15 minutes in the oven. Don’t forget to lower the temperature to 300 degrees Fahrenheit. If the toothpick comes out clean, it means that it’s ready.

Step 14. Take the loaf out of the oven and allow it to cool for a bit before cutting it.

Congrats! You’ve just made your first dandelion bread loaf. What I like about this recipe is how easy it is to make it. With regular bread, you would need to use yeast in order to make the dough grow. More than that, it takes a bit longer to prepare, since you need to allow the yeast to act before placing it in the oven.

Word of caution before preparing this recipe – take care when choosing your dandelions. Unripe dandelions aka those that kids pick up and blow on it to make the flowers fly are very toxic.

Only use mature flower – you can easily recognize them by their yellow tint. Giving them flowers a quick wash will get rid of most dirt and earth. However, I would recommend submerging them in cold water and leaving them to soak overnight. Give them a rinse before adding them to the flour and baking soda mix.

Dandelion bread’s very tasty and pairs off nicely with smoked salmon and Velveeta cheese. It makes for an excellent breakfast with a thin layer of butter or margarine, of course.

As for storage, I placed a couple of leftovers in a vacuum-sealed bag (be sure to check out my piece on vacuum sealers) and tossed them in the pantry. Two weeks later, the bread’s still crunchy and highly edible.

Like my kick-ass dandelion bread recipe? Hit the comments section and let me know what you think.

Dandelions are packed with zinc, potassium, iron, and calcium. If that wasn’t enough to convince you, then get this – dandelions are the second-best source of natural beta-carotene after carrots.

I admit that I’m somewhat of a hoarder when it comes to food. No shame in this, only the fact that I’m on round-the-clock freezer and fridge cleaning duty. Yeah, I know it’s kind of a bummer to take a garbage bag and throw away that awfully good food just because you consider your family’s needs nor the fridge’s capacity (true story).

Anyway, after cleaning the fridge this morning, a thought stroke me: what if there’s some magical way of telling if the food’s safe to eat or not? Well, that would spare the trouble of having to clean the damned thing each week, not to mention the fact that I would probably save a lot of money.

As a prepper, you probably know by now that food past its prime is unsafe to eat, no matter how SHTF-ish the situation gets. This is the reason I’ve spent the rest of my day searching for a way to tell apart rotten from safe to eat food. Yes, I needed to ask Google for directions because I’m really bad at colors and, because of this damned cold, my sense of smell is close to nonexistence.

So, before you grab your garbage back to summer-clean your fridge, freezer or both, you may want to take a closer look at my kick-ass list on how to figure out if your food’s still good or packing a six-shooter.

  1. Soggy edges

Could never tell for sure how off my veggies were. I always assumed that as long as they don’t give off a funky smell, they’re good for eating. Dead wrong! Apparently, soggy edges, especially in green-leafed veggies like lettuce, kale, spinach, watercress or cabbage is, in fact, the first sign of spoilage.

Yes, I know that it’s a no-brainer, but as I discovered, people usually disregard this part, telling themselves that the veggie’s safe to eat if you cut around the soggy part. So, if you see any sogginess, brown patches or if the vegetable sort of deflates, it means that it has gone bad and, therefore must be thrown in the trash can.

  1. Discoloration

Of course, nothing spells “spoilage” better than an unnatural color. However, in some cases (red bell pepper) it’s hard to tell if that’s part of the vegetable’s life cycle or a tell-tale sign of spoilage. The best way to see how fresh your veggie is would be to make a small nick on the green part. Pull it aside. If it’s green on the inside, it means it’s safe to safe. On the other hand, if it has a brownish tint to it, do yourself a favor and throw it in the trash.

  1. Molding

While you’re cleaning your fridge and freeze, you may want to take a closer look at the bread and any other pastry you may be hoarding. See, no matter how well you keep your bread, there’s always that chance of mold growing on it. If you see any, throw it away as fast as you.

Heard a doozie some time ago that moldy bread may be safe to eat, at least for a couple of days, if you remove the moldy part and stick the loaf in the oven for 10 minutes. That’s a big no-no, and I would advise you to throw away the bread as well as the other stuff it came in contact with.

  1. Limpness

Veggies such as green beans have a limp-type of aspect after being kept in the fridge for too long. If you see any of that, it means that the legume is way past its prime, meaning that it has lost all nutritional value and could severely compromise your health if consumed. Yes, I know that most of you are in the habit of quick-freezing green beans and other stalky veggies.

Still, the freezer’s not always the best option for long-term food storage. Sure, it can extend the shelf-life by a couple of weeks or even months but, eventually, all of it will go bad. In case of veggies look for paleness and a thick layer of ice. As for meat, ice plus a violet tint equals garbage bag.

  1. Foul smell

The nose always knows! If you pick off any strange odor coming from your food, then it’s more than safe to assume that it really has gone bad. Meat will give off a rotten smell, while veggies will smell just like forest fungi. The same smell can emanate from eggs and eggplants. Keep in mind that eating rotten stuff can result in food poisoning or worse.

  1. To float or not to float?

In some cases, it’s quite difficult to figure out if they’re spoiled or not. Take eggs for instance. If there’s no expiration label on them, it’s nearly impossible to tell the difference between a fresh and an old one. Luckily there’s a test you can use to figure out if the eggs are safe to eat or not. Fill a bowl with cold water and place all your eggs inside. If they went under and lay flat on their sides, it means that they’re fresh. If not, then you should consider going to the store to buy a new carton.

  1. Discoloration in meat

There’s a bit of an argument on this one. While some say that meat discoloration is solely the result of poor packaging and exposure to air and, therefore safe to it, others argue that meat turned grey or brown should be tossed in the trash. Can’t say for sure which side is right, but my humble opinion, it’s not a good idea to begin experimenting on food. Best to throw away anything that has an unusual color.

That’s it for my short and sweet guide on how to tell if the food’s still edible or not. As always, if you feel that’s, I’ve missed something crucial, do hit the comments section and speak your mind.

Before you grab your garbage back to summer-clean your fridge, freezer, or both, you may want to take a closer look at my kick-ass list on how to figure out

There’s nothing more American than bacon, and don’t even try to deny that. We love it, cherish it, and with good reason since breakfast isn’t the same without those mouth-watering, fat-laden pork strips. I know that for the most part bacon’s a big dietary no-no, but what would life be if we couldn’t indulge on simple things like bacon?

Yup, you’ve guessed it – since he’s a big fan of bacon and, to that end, he has searched high and low for all kinds of wacky ways to make those juicy strips last longer. That’s the trouble with bacon I guess – you’ve got to cook it as fast as possible. Otherwise, you will end up with some bad to the bone meat (insert guitar riff here), along with a lot of crushed breakfast dreams and hopes.

Anyway, since yours truly hasn’t better things to do around the house than looking for ways to preserve food, in one of my scavenger hunts, I’ve stumbled upon a kick-ass bacon storage method. Of course, I couldn’t resist the urge of writing about it and sharing it with you wonderful people. What stroke me the most was the method’s simplicity.

Come to think of it; it’s almost elegant. What’s even better is that, according to the guy who recommended it, by following a couple of simple steps you can potentially increase the bacon’s shelf life by at least 15 years if not more.

As far as the ingredients are concerned, I’ve only tried it on a single batch of common supermarket bacon. Still, if you’re the kind of person that fancies pancetta or prosciutto over bacon, you could try canning those as well (as someone who a lot of cooks, I can tell you that there’s virtually no difference between the three types of meats, except for the fancy names).

Well, time’s a-wasting, and you’ve grown tired of hearing me talk about my buds and exploits. So, without further ado, here’s the well-kept, military-grade secret of storing bacon.

Ingredients and materials:

  • Bacon (as much as you can find).
  • Pressure canner (I use a traditional one).
  • Canning jar (be sure they’re sterilized).
  • Parchment paper (use the unbleached kind. I don’t have some nearby, use masking paper instead).

How to prepare

Step 1. Get your pressure cooker ready. If you opted for the no-power version, it would be a good idea to bring it to a boil before placing the canned bacon inside. As for the electric version, plug it in, pour water inside, and set the pressure between 10 and 15 PSI.

Step 2. Take the parchment roll and use a pair of scissors or sharp knife to cut a long piece (it should be at least 18 inches in length).

Step 3. Get your bacon out of the fridge and separate the slices.

Step 4. Arrange the bacon slices on the parchment. Don’t leave any gaps between them. You’ll see in a moment why this is essential.

Step 5. After arranging the bacon on the parchment, fold over both paper and bacon in half. By the way, someone suggested that you can make the bacon last longer in the fridge or even in a space without refrigeration by coating each piece with a very thin layer of maple syrup.

‘Twould be better to do this after placing the bacon on the parchment paper. Otherwise, the pieces will be a sticker and, therefore, harder to arrange on paper.

Step 6. Upon folding the paper into half, grab the other hand and start rolling it. Just like you do with the newspaper when the dog goes number two on your grandma’s Persian rug. Tuck in the excess paper at both ends to ensure that the parchments don’t unravel inside the jar.

Step 7. Put the Bacon Parchment of Absolute Truth and Might inside a CLEAN and STERILIZED canning jar. Regarding the latter part, there are various ways to do it. If you’re just as lazy as I am, fill a tub with hot water, pour liquid detergent, and dump your canning jars inside. Let them soak for about half a day.

Afterward, take them out and rinse out the excess detergent. Still, if you want to take the high road, you can always boil the living Hell out of those jars before using them for canning. The choice is entirely up to you.

Step 8. Put the lid on each jar and tighten them gently. You won’t need to apply too much force as your pressure canner will do all the heavy lifting.

Step 9. If the water inside your pressure canner has reached the boiling point, carefully place the cans inside. Put the lid on, set the pressure to 10 PSI, and let them simmer for approximately 90 minutes.

Step 10. When it’s over, kill the fire, pop the lid off the pressure cooker, and carefully remove each jar. Place them on a wooden support or something and allow them to cool down. Word of caution – don’t try to force-cool the jars. Heard my mother-in-law say that ‘cooked’ jars are liable to blow up in your face if you run them under cool water or submerge them in ice.

Your best choice would be to leave them be for the time being. Another thing I should mention is that the canned bacon will leave quite a lot of fat on the bottom of the jar. Don’t concern yourself with that part, ‘cause it’s normal.

That’s it! You now know how to can bacon, prepper-style. As I’ve mentioned, this method extends the bacon’s shelf life by at least 15 years. Perhaps even more. To store, either place the canning jars inside the fridge or stick them in the pantry you usually keep your emergency supplies.

Works both ways. To eat, pop the lid, unroll the bacon, cook, and enjoy. I personally like to eat plain canned bacon – it’s less smoky compared to the fresh variety, but has a gentle aroma that reminds me of meatloaf.

What’s your take on this awesome canning method? Let me know what you think in the comment section.

What’s even better is that, according to the guy who recommended it, by following a couple of simple steps you can potentially increase the bacon’s shelf life by at least

One thing you learn as a prepper is that any new skill you acquire will come handy one the day, cooking including. Sure, not all of us have the talent of whipping up a terrine or a souffle, but at least we learn to go by without actually having to starve to death or wasting away money on takeaways.

For my part, I actually managed to pick up a thing or two about the art of preparing delish and nutritious meals during one of those long blackouts. Yes, I’m still here, and no, the city council hasn’t gotten around to fixing the problem yet.

Now, for most of us, cooking’s not that big of a deal – get online, pick a recipe, follow the steps, and, Shazam, dinner’s ready! Still, the rules of engagement tend to change a bit if you’re forced to do the same thing during a power outage.

No electricity means that you will not be able to use the mixer, microwave, electric oven, toaster, and whatever cooking appliance running on electricity. Such a situation calls for some serious improv and, in today’s article, I’m going to show you my favorite blackout dishes and how to cook ‘em.

So, without further ado, here are my top 7 choices in no-power food.

  1. Oats

Yes, I know they’re not palatable, but they do wonder for the body. Most importantly, you can prepare anywhere and at any time, power or no power. Just let them soak overnight in a bowl of water. You can serve them for breakfast or dinner with assorted nuts, honey, and dehydrated fruits.


2. Gazpacho

Great Spanish dish and stupidly easy to make. I personally like to have fresh gazpacho year-round, since it’s packed with vitamins and minerals. More than that, this over glorified tomato soup is a wonderful thirst quencher during those hot summer days.

So, grab yourself a couple of diced tomatoes cans and empty them inside a large bowl (don’t forget to drain all of the juice). All that remains is to add one chopped onion, a thinly-sliced cucumber, a dash of cayenne pepper, salt, and pepper. If you’re looking for a bit a hit, you can add one teaspoon of Tabasco. Finish the dish by adding a little bit of olive oil, chopped parsley, and some lemon juice. That’s it!

3. Corn salad

This is what I like to call the lazy man’s easy way out of the kitchen. I usually like to prepare this dish when my wife’s away – kids love it, and it takes me about five minutes to get everything ready. So, it’s a win-win. Take a can of corn, drain the excess liquid, and put the contents inside a large bowl.

Chop any veggies you have left in the fridge (I like to add onions, red and yellow bell peppers, and tomatoes to my salad). For extra flavor, you can add a can of black beans. Toss it around a little, add a sprinkle of olive oil, and serve. If you fancy a bit of dressing, you can quickly make one by combining apple cider vinegar, olive oil, dried basil, pepper, and salt in a bowl.

4. A simple salad with apples and white beans

By far, my wife’s favorite Sunday morning salad. Super easy to make: pour the contents of white beans can in a large bowl and add some apple chunks. To finish the dish, you need only add some olive oil, fresh thyme, a handful of walnuts, salt, pepper, and scallions. Give it a good mix and serve.


5. Good, old grains and beans salad

This is one of the first recipes I learned during the first bout of blackouts. It’s very handy to know since anyone has at least one can of beans and a grain sack around the house. Take out your portable stove from the B.O.B and boil water in a small pan. Add the grains and let them cook for about 10 minutes.

Drain the grains and allow them to cool down. In a large bowl, combine one can of beans (works great with both black and grain beans) and the pre-cooked grains. Add salt, pepper, and a sprinkle of olive oil. If you wanna add consistency to your dish, throw in a couple of diced veggies, and chickpeas.

6. Chickpea or white beans spread

If you ever get tired of PB & J sandwiches, you might want to give this recipe a try. Empty the contents of a chickpea or white beans jar inside a bowl. Use a fork or potato masher to make them into a coarse paste.

Add some olive oil, parleys, a little bit of mint, half a tablespoon of garlic powder, and some oregano. You can serve this spread with white bread, toast, and even crackers. I personally like to serve it with oven-baked white bread – if you want to get all fancy, take a clove of garlic and smear each slice of bread before adding the spread.


7. Tuna salad with canned corn and green lettuce

Personally, I prefer this recipe over all those BS, new age stuff with salmon or whatever. Grab yourself green lettuce and wash it thoroughly with cold water. Using your hands, rip it into big chunks. Add a can of tuna over the salad (don’t drain the oil inside) and a can of sweet corn.

To finish this dish, pour half a tablespoon of olive or sunflower seed oil, salt, and lemon juice. Toss it around and serve. This is what I like to call the ultimate detox dish – very healthy and tuna being packed with omega-3 fatty acids and all that, it’s a breath of fresh air after eating spare ribs and burgers.

Hope you’ve enjoyed my list of blackout dishes. Think I’ve missed something? Hit the comment section and let me know.

No electricity means that you will not be able to use the mixer, microwave, electric oven, toaster, and whatever cooking appliance running on electricity. Such a situation calls for some