
DIY Oil Lamp for Emergency Lighting
No matter what type of SHTF you are prepping for, expect the power grid to eventually cease to function. Many preppers stockpile oil lamps, and that is a great idea, but learning how to make oil lamps yourself will allow you to put back even more off grid light sources for a fraction of the price of store bought ones.
In addition to creating DIY oil lamps now (so they are ready immediately ready for use), you can also stockpile kits so more lamps can be put together in mere moments for use during a long-term disaster.
What Kind of Containers Are Used for DIY Oil Lamps?
You can use about any glass container on hand or purchased cheaply at a local dollar store or yard sale. Typically…
- Mason jars
- glass food jars
- …and wine bottles
…are used to make inexpensive oil lamps at home.
Can Kerosene Be Used in Oil Lamps?
Kerosene is often cheaper than commercially manufactured lamp oils but, lamp oil does not boast an unpleasant odor and burns far cleaner than kerosene.
Kerosene is far safer to outdoors than indoors. When using kerosene indoors, proper ventilation is essential to avoid asphyxiation and quite possibly, death. In some countries, kerosene is referred to as paraffin.
Can You Use Vegetable Oil in an Oil Lamp?
Nearly any common type of cooking oil can be used as fuel in a DIY oil lamp. Also, butter, Crisco, lard, and even ghee, due to their animal fat content, can be used.
What Oil Can You Use in an Oil Lamp?
If you do not want to use kerosene, lamp oil or olive oil, there are many other fuel options that are equally readily available and inexpensive to use:
- Hemp Oil
- Tallow
- Coconut Oil
- Nut Oils
- Fish Oil
- Lard
- Vegetable Oil
- Castor Oil
- Seed Oils
Can Mineral Oil Be Used in Oil Lamps?
Mineral oil will ignite fairly easily, especially when blended with other types of safe burning oils.
What Can I Use for an Oil Lamp Wick?
A DIY oil lamp, just like a mass produced oil lamp or a candle, must have a wick in order to burn. The wick draws up the oil to use as fuel to make a flame. Wicks are made of fibrous material, like plant fibers, linen, and papyrus when commercially manufactured.
It is best to weight the bottom of the wick so that it does not move around in the oil. I often use a pop can tab, piece of cork, or washer to tie onto the base of the wick to help keep it weighed down and as immobile as possible.
You can also wrap craft wire around the lip of a Mason jar and then run two pieces of wire across the mouth of the jar to run the wick through to help hold it in place.
Yet another way to help hold the wick in place it to poke a hole through the lid of a Mason jar and thread the wick through it before securing the lid in place with a ring.
DIY Oil Lamp Instructions
Equipment
-
Hammer
Ingredients
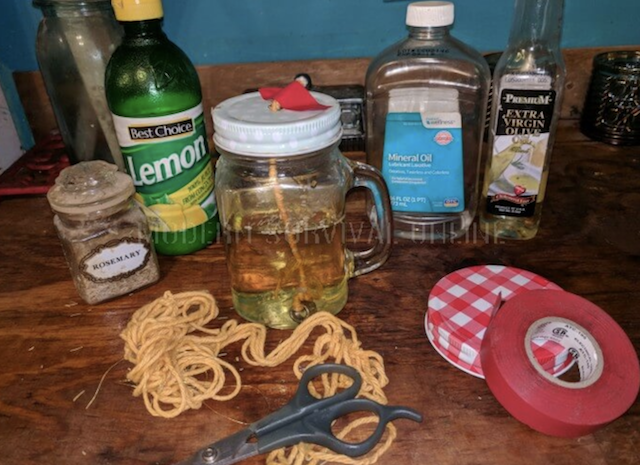
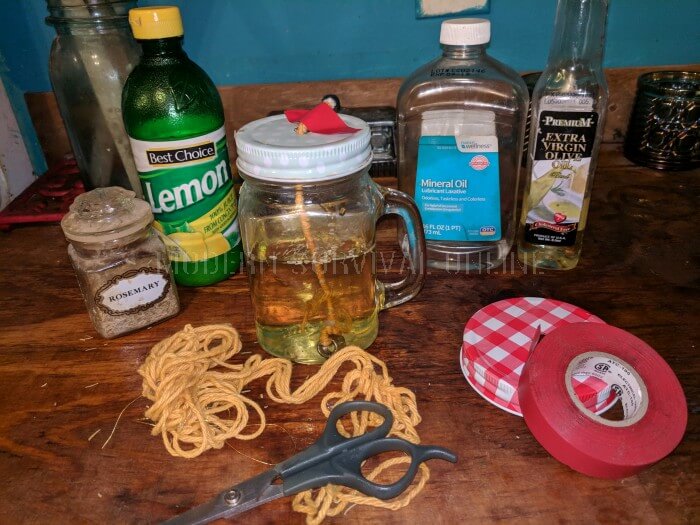
- 1 Mason jar
- 1 Mason jar lid
- 1 Mason jar ring
- Olive oil
- Scissors
- Cotton, cording, or other suggested wick material
- Nail
- Vice, two bricks, or two blocks of wood
- Washer, nut, or piece of cork
Instructions
-
Put the Mason jar lid in a vise or upside down between two bricks or pieces of wood so the center area is exposed.
-
Use the hammer and nail (or a power drill and a bit if you prefer) to punch a hole in the middle of the Mason jar lid large enough for your wick to fit through.
-
Set the lid aside and remove the tools from your workspace.
-
Slide the wick through the hole so the top end is sticking out. I suggest temporarily taping the wick in place so it does not fall back inside when being placed in the DIY oil lamp or unravel while during placement.
-
Fill the glass jar with your chosen lamp oil.For the best results, fill the jar only a little more than ¾ of the way full. I recommend using olive oil.
-
Tie the washer or nut around the bottom end of the wick.
-
Gently place the lid with the wick through it into the DIY oil lamp container. Line the weighted bottom up so it is as centered as possible in the base of the Mason jar. I suggest keeping your thumb on the taped portion of the top of the wick to make sure it stays secured in place.
-
Screw the ring onto the Mason jar around the lid while holding the top of the wick firmly in place.
Notes
I often give these inexpensive and handy oil lamps as gifts to loved ones, and to folks I am attempting to introduce to prepping.
If you want to know more about oil lamps and their safety, I’ve included this handy FAQ where I answer some common questions.
Can Oil Lamps Explode?
When using any of the natural DIY oil lamp fuel choices noted above (especially olive oil) such an incident would be highly unlikely. But, the possibility of “liquid fire” traveling along the floor, furniture, clothing, and the human body could happen if the lamp is knocked over or exposed to intense wind or blowing.
Are Oil Lamps Safe To Use Indoors?
Commercially manufactured lamp oil is designed and tested to ensure they can be safely burned indoors even without ventilation. Kerosene is not safe to burn indoors without proper ventilation.
Do Oil Lamps Give Off Carbon Monoxide?
Oil lamps can emit small amounts of carbon monoxide.
Do Any Vegetable Oils Catch Fire?
Like olive oil, vegetables oils are not really considered flammable. When used as a fuel in a DIY oil lamp, place a thick wick into the lamp so it becomes thoroughly saturated and helps to ignite the oil placed inside the lamp. Once started, vegetable oil should burn steadily for many hours.
Is Olive Oil Safer Than Kerosene in Oil Lamps?
The short answer is – yes. Oil lamps that use olive oil as a fuel will be far less likely to ignite if the flame drops down into the oil in the glass container. It would be rare to olive oil to catch on fire while being burnt as an oil lamp fuel. Kerosene will offer a brighter light, but DIY oil lamps using olive oil are generally bright enough to read by in the dark.
Olive oil will also smolder and put itself out and is largely considered a low volatility lamp oil fuel. Olive oil should not burn unless its temperature reaches a minimum of 550 degrees.
It is strongly recommended NOT to use K-1 kerosene in oil lamps and lanterns that will be used indoors because they contain impurities, including sulfur and red dye, that causes fumes that may be harmful and cause headaches.
What Is Lamp Oil Made From?
Commercially manufactured lamp oil is used as fuel in lamps, lanterns, and outdoor torches, oil lamps and lanterns. Generally, store-bought lamp oil has a petroleum base that has been professionally refined to enable it to burn in a soot free and odorless manner.
Is Olive Oil Better Than Vegetable Oil as a Lamp Fuel?
Olive oil has a lower smoke point than vegetable oil, which can be advantageous when using the DIY oil lamp indoors.
Are Baby Oil and Mineral Oil the Same?
Mineral oil is made out of paraffin oil (not paraffin like kerosene) Nunol, white mineral oil, and liquid petroleum. Mineral oil is classified as a hydrocarbon compound. The only real differences between mineral oil and baby oil are density and fragrance.
What Kind of Oil Was Used in Ancient Lamps?
Long before factories mass produced lamp oil, both beeswax and animal fat were used to fuel lamps. To a slightly lesser degree, olive oil, grapeseed oil, coconut oil, and sesame oil were also used. In the Mediterranean region, coconut oil was almost exclusively used as lamp oil.
What Is the Cleanest Burning Lamp Oil?
Olive oil seems to be the cleanest burning oil lamp fuel. For my fellow Christians, you might recall that is was olive oil Aaron used to generate light in the temple in the book of Exodus. The cleanest burning fuel is olive oil, the fuel that Aaron was directed to use for temple light in the book of Exodus.
Does Lamp Oil Go Bad?
Lamp oil, regardless of which type you choose from the suggestions given here, basically has an indefinite shelf life – as long as it is stored properly. Keep a firm fitting lid on your lamp oil or oil lamp when not in use and store it at room temperature in a dry place.
Is Coal Oil the Same As Kerosene?
Cannel coal oil is a form of petroleum that is made from a particular type of bitumen soft coal. Kerosene is refined from liquid petroleum (or crude oil) directly. In my opinion, coal oil has a far worse stench than kerosene.
What Is Florasense Lamp Oil?
Florasense lamp oil is an odorless commercially produced lamp oil that is quite popular for use both indoors and out. Florasense lamp oil is known to produce a bright glowing light when used in either manufactured oil lamps or the DIY oil lamp version you can make cheaply in large quantities.
Can You Burn Essential Oils in an Oil Lamp?
Unlike vegetable or animal fat cooking oils, essential oils are plant extracts and should only be heated to room temperature for aroma or natural medicinal purposes and not to create light or heat.
Why Does My Oil Lamp Wick Burn So Fast?
If the wick appears to be burning down too quickly, it is most likely a fuel oil issue. If the chosen oil is burning at too fast of a rate, pour it out and choose a safe indoor oil with a lower ignition temperature.
Can You Make Your Own Oil Lamp or Candle Wick?
To make a wick for your DIY oil lamp, roll up cotton fabric, newspaper, wood, twine, toilet paper, or paper towels as tightly as you can. Tie the wick together using twine or dental floss so that it does not lose its shape and density.
For best results when making your own wick, soak the material in a brine made of equal parts salt and water first and allow it to dry thoroughly. This process helps to prevent the wick from burning too quickly. Some folks use equal parts of not just water and salt, but an equal part boric acid, when making a wick stabilizer brine.
How Do You Trim an Oil Lamp Wick?
To trim a wick to fit a DIY oil lamp, cut it across the top, curving it just slightly at the ends using a pair of sharp scissors. The flame created by your DIY oil lamp should be about ½ of an inch tall to that it does not burn too quickly yet still produces a good quality light.
Do Oil Lamps Smell?
If you are experiencing a strong odor coming from your oil lamp, the flame may be either too high or too low or a poor quality lamp oil was used. If there is a lot of soot like smoke also showing, the wick may be over exposed.
Other self-sufficiency and preparedness solutions recommended for you:
The vital self-sufficiency lessons our great grand-fathers left us
Knowledge to survive any medical crisis situation
Liberal’s hidden agenda: more than just your guns
Build yourself the only unlimited water source you’ll ever need
4 Important Forgotten Skills used by our Ancestors that can help you in any crisis
No matter what type of SHTF you are prepping for, expect the power grid to eventually cease to function. Many preppers stockpile oil lamps, and that is a great idea,