HomePosts Tagged "off-grid"

I haven’t been able to understand why the expression “to live like an Amish” has a pejorative meaning. Not until I started to love like a prepper. They are simple folk, trying to live a very simple life; some may call them minimalists, but I can’t see why they’re mock just because they chose to live without electronic gadgets, electricity, and as far away as possible from the hustle and bustle of the city. I would be lying If I were to say that I’m envious about their life choices.

Yes, I am a prepper and, even more than that, a person who’s ready to sacrifice comfort for safety, if the situation demands it, but not willingly. Sure, I can make do without a tablet, the latest Samsung Galaxy with four motion-triggered cameras or going to the cinema every weekend to see a movie, but there are some things I just can’t part with (well, not right away).

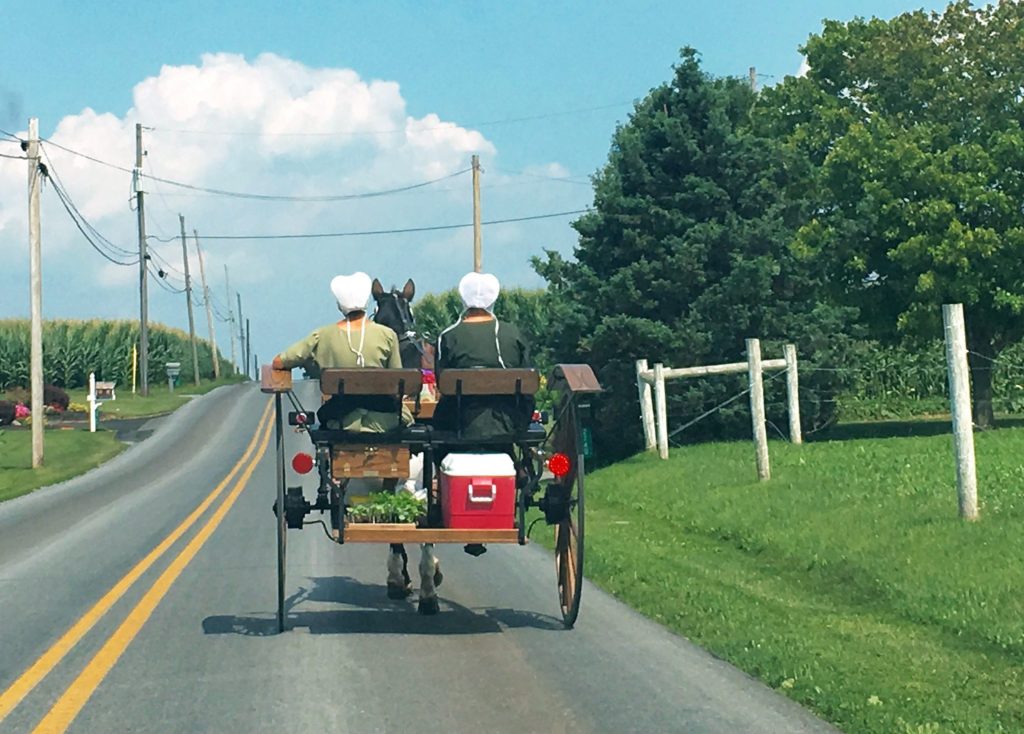
Anyway, the other day, as I was taking my daughter back from school, I stopped at a light downtown. Even though it was well after two o’clock, the traffic was downright infernal – you know what that means; lots and lots of patience. So, while standing there, waiting for the green light, I noticed that the driver on my right side kept sliding his hand out of the window in an attempt to snap a picture.  Nothing curious about that considering that, sometimes, becoming stuck in a traffic jam brings out the artist inside all of us.

However, the man kept on doing this, whilst talking to someone on the driver’s seat. When I looked in the direction of his camera I saw the embodiment of ‘screw you, I do what I want with my life.’ Standing in the dicky of four-wheeled coach, there were two men – father and son, I gathered. Both of them were dressed in black from head to toe, had these thick, bushy beards, glasses, and clergymen hats.

What amazed me was the fact that although most of the drivers were snapping pictures and mocking them, they went on about their business as if nothing was wrong. I can’t imagine being that calm when someone is calling me names. But, then again, I can very well assume that this isn’t the first, nor the last time that they had to deal with people staring at them as if they were zoo animals.

Well, long story short, once I got home, I started to read a bit about the Amish community.  And, as you’ve probably guessed it by now, the article you see before you is the result of, shall I call it, an exploration into America’s most conservative community. So, without further ado, here are 6 life and survival lesson I’ve learned from the Amish. Enjoy!

Family and togetherness mean a lot more than all the treasures of this world

Last time I paid my folks a visit, I sort of got one of those Hollywoodian flashbacks. More than 20 years ago, I was in the living room with my mom, dad, and grandma. ‘Twas around the time of the prom. I wanted to tell my parents that right after the party, I was going to hit it off with my girlfriend and two classmates.

As you would imagine, my parents were not too thrilled about this. Dad was adamant about me getting back home. Guess he would have rather seen me hitting the books for my college entry exam then reenacting Adam’s intro of Summer of ‘69. Long story short, we argued, a lot, and everything ended with me saying some very nasty things about my family.

This is one of the things I kinda envy the Amish – no matter how shitty things are; they stay together. Everything they do, they do for the family. More than that, they do not believe in stuff like “hey, I have this thing, but you can’t have it, because you will have to work for it just like I did.” Nope. If one family makes more than it needs, it will wholeheartedly share with the rest of the community, especially with the more unfortunate ones.

I can’t say that my family is perfect. No, we don’t argue all the time, scream at each other, say things like “I’m going to leave you and take the kids with me,” but tempers do flare from time to time. In those moments I come to realize that we have everything we need and we should try to play nice with each other. I mean, the Amish communities are like stepping into a time machine and ending up in pre-colonial America- no electricity, no Internet, no gadgets. And yet, they still have more tightly-knitted families than 90 percent of the people I know or grew up with.

You really don’t need to become a member of the Amish community to figure out the meaning of “family.” Just talk or read some books about them. Trust me – after doing this, you won’t be that eager to raise your voice at your wife, punish your kids for stuff they didn’t do or laugh in your neighbor’s face when he asks for help. Remember the saying: “give an inch and take a mile.”

The Amish rehashed “self-reliance.”

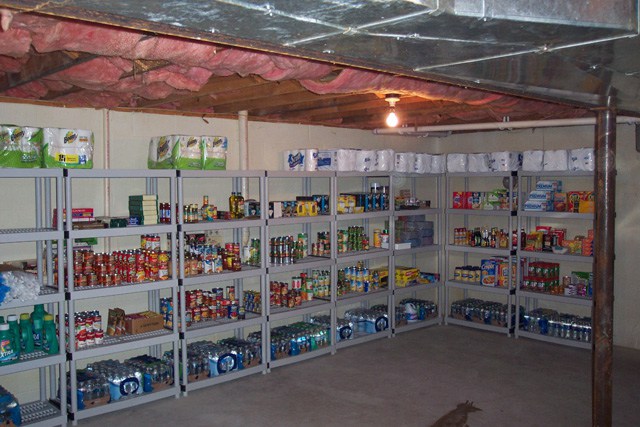
There’s no such thing as being too self-reliant, whether it refers to cooking your own meals, washing your stuff or learning to make things rather than buying them from the store. Emerson’s Walden may have been a good read for a lot of preppers, but for the Amish, that book’s almost sacred. Imagine living in a very small community with no money, no debit or credit cards, and no stores. Sounds interesting, does it not? Well, in traditional Amish communities, a family’s only way to obtain certain goods they need around the house, say lamp oil, is trading. And yes, everything being trading within the boundaries of this community is produced or manufactured there.

And let me tell you, those people really know their business – I’ve seen Amish canned goods, oil lamps, furniture, tobacco, bread, coffee, and even toys for the little ones.

There’s a lesson in this, folks – when you do decide that it’s time to drop off the grid, you must ensure that you know how to make stuff. Otherwise, it’s just what I like to call prepping with benefits.

Treating your livestock as if it’s part of the family

Can’t really say that I like livestock that much – sure, baby goats and horses are gorgeous, but not as cute as kitten or puppies. What struck me the most when watching YouTube videos about the Amish community is the bond they share with their livestock. When I was a kid, my grandma used to tell me these stories about her parents keeping animals like baby horses, goats, sheep or chicklings inside the house during the winter.

Sure, it’s a heartwarming story, but I didn’t take it for granted. However, after seeing these people care for their livestock, I kind of began to believe in them. If there’s one worthy takeaway, it’s learning how to see if your livestock is healthy or there’s an illness running amok.

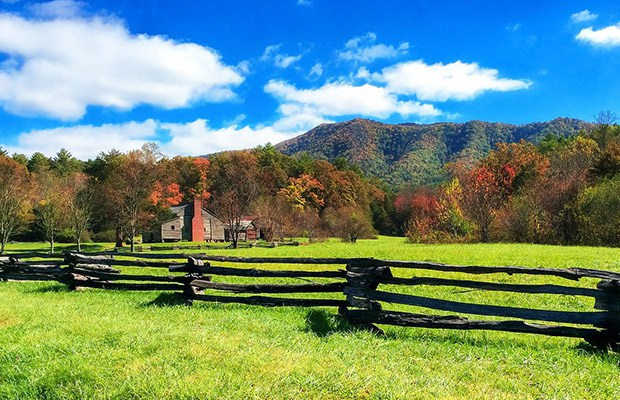
Overcomplicated farming is not a recipe for success

We are literally surrounded by supermarkets, farmer market’s, and hypermarkets, yet all the food we eat tastes like cardboard. Granted, we have the means to feed millions of people thanks to the advancement in farming technology, but all this stuff doesn’t mean anything if the final product lacks the very stuff our bodies so desperately need. I wholeheartedly recommend viewing a video on Amish farming methods. To say that it’s fascinating, would be a major understatement. They have no need for trucks, tractors, cultivators, subsoiler, rollers or spike harrow – they toil from dusk till dawn to sow the ground with horse-pulled plows. That’s it! Yes, I know that it’s very hard work, but, my God, their veggies are astounding. I’ve seen cantaloupes the size of a basketball and beets as big as my beer belly. Their secret – plenty of hard work, dedication, and using all-natural solutions.

Hand sewing is not just something you see in the movies

Nowadays, nobody pays too much attention to sewing – if your parka needs stitching, you just take it to tailor’s shop, and that’s basically it. If I were to ask someone about hand sewing, he would probably look at me as if I’m from another planet or something. The only thing close to actual hand sewing was this old lady who had a stand at an exposition hosted by our local history museum. She could make anything from tunics, socks, underpants to carpets and upholstery. However, for the Amish, hand sewing is a vital skill. Although the women do the heavy lifting, the men also know how to sew back a ripped button or patch a hole in their shirts.

I am well aware of the fact that hand sewing clothes and other things is not a skill that can be learned overnight. Heck, some members of the Amish communities spend half a century honing their skills and perfecting their techniques. So, the next time you see an Amish couple in your hometown, don’t mock their sense of fashion – just remember that everything they wear is made by the head. The same thing cannot be said about us town folk, who buy every piece of garment from Mall stores.

That hard work is a virtue, not just a 9-to-5 undertaking

The next time you complain that your cushy 9-to-5 is exhausting, think about the fact that the regular Amish workday begins at five in the morning and ends well after sunset. And it doesn’t matter if the weather’s nice or really bad or if that person woke up with a major headache because he drank too much last night – for the Amish community, work is sacred. And, dare I say, the results speak for themselves. I’ve never seen an Amish home in disarray or a family that has nothing to eat or to wear.

If that’s not enough for you, get a load of this – Amish don’t work just for themselves. They work for the entire community. Sure, your land and livestock are important, but so is the rest. For instance, if a new couple moved into ‘town,’ the entire community helps them settle in. Yup that means even giving them a hand to raise a house or a barn.

By the way, if you need new furniture, you may want to try out your local Amish store or get in touch with a member of the community. Why? Because their furniture’s all-wood, not that cheap crap manufacturers use to whip up low-quality beds or couches. It’s a win-win.

That about wraps it up for life and survival lessons learned from the Amish. What do you think about this topic? Hit the comments section and let me know.

I haven’t been able to understand why the expression “to live like an Amish” has a pejorative meaning. Not until I started to live like a prepper.

For preppers, a home’s location is of utmost importance. Your home is your headquarters, your castle and sanctuary. It’s the one place you hope to feel in control when chaos breaks out.

Serious preppers are beginning to invest in purpose-built retreats that are off the grid and away from the fray. But make no mistakes about it. These retreats aren’t about relaxation and taking in a scenic view. The sole intent is to have a place that is made to stand on its own if humanity were to falter. In this article we will highlight 7 factors to consider if you are looking for the best property for preppers.

Determining Access to your property

Professional movers like North American have helped thousands of people move to urban areas and remote locations. One important piece of advice they give to preppers looking for a remote retreat is to always consider access. How will you and others access your retreat location?

gate-solid-wood

Thinking about how you will control access to your retreat property is an important consideration.

For most people, it’s fairly easy to get vehicles and moving trucks to a new home. Preppers that live in non-traditional areas like a hillside may need to work out additional logistics to get a home setup or built. This can actually be a benefit since it will also be difficult for others to get on the property. However, be prepared to construct your own roads if you’re looking for raw land to build on. This could have major consequences on price.

If a property is heavily wooded there could be hidden access points. It’s important to walk the entire perimeter of the property looking for entry points and notating where fencing or barbwire will be needed to block access.

Must have sustainable Water Supply

water

A sustainable and abundant source of water is a must.

Having a ready supply of clean water is the biggest priority during natural disasters, riots, war and every other emergency situation. Preppers understand that they need to have a long-term solution that goes beyond storing gallons of bottled water.

It may be difficult to find a piece of property along a stream, river or lake that isn’t already in a developed area. Flooding is also a concern in these locations. The better option is to have a well. Currently, about 15% of Americans have private water sources. However, you will want to check the local health department for information on water regulations and testing guidelines in the immediate area.

What are the Security Issues of your property?

Securing your property is necessary for protecting your people and supplies. Many preppers look for property that’s already fenced off with access controlled by a security gate. If the property has no perimeter barrier that will need to be factored in before deciding on an asking price. It’s also important to bear in mind that vegetation is no substitute for fencing. It can slow people and animals down, but it won’t keep them out.

Do you have adequate Storage for your supplies

storage

Tiny Homes are catching on, but they don’t have anywhere near the amount of storage you would need for your prepper property.

From food containers to firearms, preppers know the importance of stocking up on supplies. The problem is you need a place to store everything so your supplies aren’t compromised. Many prepper real estate consultants suggest that people consider properties with at least five acres in order to have enough space of living, farming and storage.

How you store food could have serious implications on survival, strength, health and morale. Properties that already have a storage shed or barn that can be secured will put you ahead of the curve. Dark, underground cellars offer good storage for canned goods, but you may need a climate-controlled space with low moisture levels for wheat, grains, legumes and fresh produce storage.

What is your Off the Grid Power Supply?

solarpanels

Mounting Solar panels on roofs or moveable frames allow for easy access for maintenance.

During a worst case scenario, the power grid will likely go down. People that have prepared in advance by putting together an independent power supply will have all of the modern day conveniences, including security systems and device chargers.

Homes that have already been outfitted with solar panels, wind turbines, thermal heating and gas-powered generators are essentially move-in ready. If power supplies aren’t in place you’ll have to assess the area to gauge its wind and solar power potential. Ideally, you’ll want a variety of power sources and ample power storage for times when the wind and sun aren’t in abundance.

Soil Conditions for crops

goodsoil

The soil quality will be a major factor in your ability to raise your own food.

Like water, food is a necessity for sustaining life. You can go much longer without food (at least three weeks), but the fact remains that your rations won’t last forever. Eventually, your stock of food supplies will be depleted, and you’ll have to rely solely off the land.

Many people overlook the health of the soil on a property even though finding a spot that can support crop growth and has good drainage is critical. If the property already has fruit trees or a garden that’s a very good sign. Remember, your store bought food supply will only last so long. You have to stock up on seeds and consider how your land can produce sustenance.

Bonus – Underground Bunker

The ultimate property feature for preppers is an underground bunker. In the event there is a nuclear bombing or biological warfare a bunker is a last resort for surviving the fallout. Bunkers can be standalone structures or connected into the power grid. When connecting electrical and plumbing sources it’s important to ensure all the spaces around conduits and PVC pipes are thoroughly sealed with silicon caulking.

For preppers, a home’s location is of utmost importance. Your home is your headquarters, your castle and sanctuary. It’s the one place you hope to feel in control when chaos

As a prepper you’ve thought about the necessities for survival, but have you thought about your comfort? Imagine a long-term situation where you have food and water, but survival is a constant struggle. Will lack of sleep and uncomfortable surroundings take a toll on you over time? You might be sleep-deprived because of a need to stand guard against those who would do you harm, or simply because you’re not able to maintain a comfortable living environment. The inability to keep food from spoiling might result in a constant need to find food, robbing you of opportunities to rest. And, in harsh conditions, can you keep yourself clean and healthy? You may have considered bugging out, but you know that your home has most of what you need to survive, even if you’re not a serious prepper.

To get straight to the point; a reliable, sustainable, and ample alternative supply of electricity can solve the problems mentioned above and allow you the potential of living comfortably when the SHTF. A security system may include cameras, motion sensors, and trip wires to set off alarms. A surveillance system can keep an eye on your garden and animals in addition to your home, and alert you to an intrusion. Devices and systems relieve you of the need to stand guard.

An alternative source of electricity adds to your comfort by allowing you to cook meals indoors, and boil water, making it safe for drinking. You can use propane, wood, or charcoal for cooking if you have an ample supply of those, or you could use a solar oven, but nothing is as convenient as using electricity for indoor cooking.

The ability to preserve food means that you won’t have to hunt, harvest, and process food daily, providing opportunities for rest. With ample rest you’ll feel and perform better. A reliable supply of electricity allows you to use a refrigerator and freezer for food preservation. You may also need refrigeration to keep medicine from spoiling.

The biggest challenges, that is to say devices that use the most electricity, are air conditioning and heating equipment. The system described here is not large enough to handle whole-house heating and cooling systems. If you have a fireplace, you probably consider that as your source of alternative heat. If not, you may consider a wood- or pellet-burning stove. Each option has its advantages and disadvantages. If you rely on fuel such as propane or kerosene, do you have enough for a long-term situation? How much can you store safely, and how long will it last? Will you be able to replenish your supply when it runs low? Weigh your decision carefully, implement it, and then stock up on wood, pellets, or fuel. I chose to install a pellet stove. It can run up to 12 hours unattended and maintains a relatively constant output. I can safely store enough pellets to get me through the winter, and left-overs can be used the following winter. Most importantly, I’ll get a good night’s sleep, and I won’t be inhaling dangerous fumes.

Kill A Watt Electricity Usage Monitor

You’ll also need electricity for communication devices, computers and tablets, TV, and Radio. Be sure to keep energy-efficiency in mind when shopping for any of these items. Energy-Star tags are helpful, but I’d rather measure energy use myself using a Kill-A-Watt meter. A Kill-A-Watt meter is a low-cost device that measures energy use over time (kilowatt-hours). You can find it at Wal-Mart or on Ebay.

Emergencies can occur at any time, in the middle of the night for example, and may include broken glass and structural damage to your home. The importance of good lighting cannot be overemphasized. You certainly don’t want to complicate an emergency situation with an injury.

Right-Sizing the Solar Electric System and Trade-Offs

If you want the same level of comfort as you had with grid-supplied electricity, you’ll pay a high price. To avoid the high cost, I’ll describe a system that will result in comfortable living, but there will be trade-offs. The system I’m outlining here can best be described as a mid-sized off-grid solar electric system. It’s not connected to your house wiring, so you’ll need extension cords, power strips, and light fixtures. I keep all of these items in a plastic container, so I won’t be fumbling around for them when grid power fails. I think you’ll agree that this modest system offers good trade-offs where comfort and cost are concerned. Don’t be fooled by pre-packaged systems that won’t actually meet your needs.

Home Heating

I’ve already listed alternatives to your existing whole-house system. In exceptionally cold weather you may want to use an electric blanket, and limit heating to one or two rooms. Table top and window fans are the most energy-efficient way to move heated or cool air.

Heating Water

As a substitute for your water heater, heating water over a fireplace or on a wood stove are good options. Since you won’t be using a fireplace or a wood stove when the weather is warm, you can heat water with one or more of your kitchen appliances, but the best option for heating water involves using the sun.

Harnessing the heat of the sun for water.

I’ve installed a PVC tubing grid in the attic portion of my storage shed for heating water. Mine is not the most efficient system, but I wanted a solution that would be out of sight and maintenance free. I use a hose to force water through the system when city water is available, but I can also use an electric pump. A fifty-gallon plastic barrel and a couple of hoses round out the system. Either way I can have a warm shower just about any afternoon or evening, using little or no electricity.

Other Decisions and Trade-Offs

I’ll begin by establishing some basic needs that will apply to many people, and then I’ll provide design details for a system large enough to meet those needs. Finally, I’ll discuss the cost, and some design options. I’ll assume that you’ve already ruled out a generator. You know that choosing a generator means that you’ll have to purchase, transport, and store a lot of fuel. What happens when the fuel runs out? Will noise from the generator attract unwanted attention, or mask the sound of approaching intruders? Instead, this is about a quiet and sustainable solution. You may only need to darken your windows to hide the fact that you’re living comfortably.

Honda EU2000I 2000 Watt Super Quiet Inverter Generator

Prerequisites

To keep the size, and therefore the cost, of a solar electric system down, there are a few things you can do. Often, adding insulation to an existing home can reduce the need for heating and cooling. Lights to be used with the system should be energy-efficient CFL or LED types. If your washing machine and other appliances are old, replace them with energy-efficient ones. Use a hotplate or microwave oven, instead of your gas or electric stove.

Identifying Your Needs

Once you’ve listed the devices you want to use, and estimated how long each device will run each day, you can calculate the total energy you’ll need by simple math. For example; a fan rated at 35 watts, running for 3 hours each day, will need 3 times 35, or 105 watt-hours each day. Likewise, a 10 watt lamp, running for 6 hours each day, would need 10 times 6, or 60 watt-hours each day. Adding the daily requirements of both equals a total need of 165 watt-hours per day. The following chart is an example of total daily energy use, where energy availability is limited. It assumes cold-weather conditions, where circulating warm air, or powering a pellet-stove in my case, is the largest single energy requirement.

4 10 watt LED bulbs 4 hrs each 160 wh per day
1 40 watt Laptop Computer 2 hrs 80 wh per day
1 120 watt Blower Motor (stove) 12 hrs 1440 wh per day
1 105 watt (intermittent) Chest Freezer 6 hrs 630 wh per day
1 80 watt Television 2 hrs 160 wh per day
1 30 watt Modem 2 hrs 60 wh per day
1 6 watt Clock Radio 24 hrs 144 wh per day
1 26 watt Cell Phone Charger 1 hr 26 wh per day
1 1000 watt Hot Plate 0.75 hr 750 wh per day
1 900 watt Toaster 0.10 hours 90 wh per day
1 1000 watt Microwave Oven 0.15 hours 150 wh per day

During periods of warm weather, when the stove is not used, my daily average load is greatly reduced. When the stove is used less, I can use devices not listed here, such as a vacuum cleaner and washing machine, and still not exceed the capacity of the system.

Determining the daily energy use of the Chest Freezer is a little tricky because its compressor runs intermittently. This is where a Kill-A-Watt meter comes in handy. Simply connect the Kill-A-Watt meter to the chest freezer and take note of how much energy it uses (in kilowatt-hours) over a 24 hour period. You can do the same for other devices that use electricity intermittently. (One kilowatt-hour equals one thousand watt-hours).

Tip: In a situation where keeping energy use to a minimum is important, move your chest freezer or refrigerator to the coolest part of your home. The compressor will run less, cutting energy use.

Renogy 400 Watt 12 Volt Monocrystalline Solar Starter Kit

Tip: When you have a choice, use energy during the day and limit night-time use. During the day, when the sun is shining, energy travels from the solar panels to the load. Nighttime energy comes from the batteries, and therefore is subject to charging and discharging losses and battery inefficiencies. Cooking, pumping water, and washing clothes are examples of tasks that can be relegated to daytime hours. Do this, and you’ll help to offset the negative effect of cloudy days and system losses.

Selecting the System Components

In the example above, the total energy used each day (the sum of the energy used by each device), is 3690 watt-hours. To determine how many solar panels you need, divide the need by the total hours of peak sunlight, in this case it’s 3690 by 4 ½, or 820 watts of solar panel capacity. Solar panels come in different sizes. Seven 120 watt solar panels will provide a little more power than you need, (840 watt-hours per day), while five 160 watt solar panels will provide a little less (800 watt-hours per day).

GM Deep Cycle 12v 125ah SLA rechargeable Battery for Use with Pv Solar Panels

Next, calculate the size of the battery bank you’ll need. Since batteries are rated in amp-hours, convert amp-hours to watt-hours. As an example: For a 12 volt deep discharge battery rated at 100 amp hours, calculate watt-hours by multiplying volts times amps. In this example, that single battery can theoretically supply 1200 watt hours. However, to avoid damage and maintain high life expectancy of the battery, you should not discharge the battery below 50%. This leaves you with 600 usable watt-hours for a fully charged battery. Because of battery inefficiencies, plan on the actual usable energy to be at least 10% less, or 540 usable watt-hours. Since you need a total capacity of 3690 watt-hours, you’ll need 7 batteries (7 times 540 ), to provide 3780 watt-hours of storage.

In the event that the cost of a system large enough to meet your needs is prohibitive, you may opt to cut back a bit on energy usage. There are many ways to do that. Preparing meals in a microwave oven, instead of on a hot plate, is one way:

Using a 1000 watt microwave oven for 15 minutes results in an energy use of 250 watt-hours.

Using a 1000 watt hot plate for 45 minutes results in an energy use of 750 watt-hours.

Read More: Cooking when the Grid goes Down

A slow-cooker (crock-pot) might seem like an energy-efficient choice, but remember, using a small amount of electricity over a long period of time is the energy-equivalent of using a large amount of electricity over a short period of time. A slow cooker might be a good option when something needs to be simmered for an hour or two.

The chart lists a small chest freezer, and no upright refrigerator/freezer. Upright refrigerator/freezers are inefficient because the cold literally “falls out” each time the door is opened. A chest freezer is much more efficient, and a 6 cubic foot chest freezer uses much less electricity than a 12 cubic foot chest freezer. A chest freezer not only keeps frozen food frozen, it makes ice for use in an ice chest for items that need to be kept cold, but not frozen.

How Much Will it Cost?

I’ll assume that you’re doing all of the work yourself, and will not include labor costs.

Once you’ve calculated your needs, you may choose to build larger or smaller than the system described here. Adding solar panels helps to improve system performance by increasing charging power, and adding batteries helps to improve performance by increasing the storage capacity. If you want to maintain a system output in excess of 3690 watt-hours each day, consider adding at least one more solar panel and two more batteries. Anticipate extended periods of cloud cover.

The per-watt cost for solar panels is currently between one and two dollars. Therefore, 820 watts of solar panel capacity will cost between $820 and $1,640. Shop around for the best price. Sometimes you’ll find sales or special deals.

Having explored various battery types and compared costs, I’ve determined that the best value when considering cost vs storage capacity to be GC-2 deep-discharge batteries. GC-2 batteries are rated at six volts, so you’ll need a series-parallel wiring arrangement. It’s easy to do. For the system described here, you’ll need at least 6 of the GC-2 batteries for a total watt-hour storage capacity of just over 3700. GC stands for “Golf Cart”. These are available under several different brand names and at many stores, including SAMs Club. You’ll pay about $100 per battery, for a total cost of $600.

Consider 8 batteries if your budget will allow it. Although you can get by with 6 batteries, making your battery bank larger than your calculated need offers three advantages. 1. A larger battery bank helps to compensate for extended periods of cloud cover. 2. The load on the battery bank will be distributed over more batteries, resulting in an efficiency boost. 3. Distributing the load across more batteries will extend the life of the battery bank.

The next component is a charge controller. A charge controller uses power from the solar panels to safely and efficiently charge the batteries, and prevents overcharging. A charge controller helps to extend the life of the batteries.

Top of the line charge controllers have advanced features which can, in some cases, dramatically improve system performance. However, these features come at a high price, and not all advanced features are beneficial to a system such as the one described here. For now we’ll consider a reasonably priced, but good, charge controller.

Renogy Tracer 4210 40 Amp MPPT Charge Controller, 12/24V 100VDC Input

The charge controller you’ll need will be one that can handle the maximum current that your solar panel array can produce. For the system we’re describing here, a 60 amp charge controller will do the job, and leave room for expansion. While it’s not your only option, a Morningstar Tri-Star 60 will do nicely. I highly recommend the remote meter option, and the battery temperature option. The cost for the controller, with options, is about $350.

So far, I’ve listed all of the major components for a 12 volt DC system, but you’ll probably want to add an inverter. An inverter converts 12 volts DC (your battery bank voltage), to 120 volts AC. In making your decision, you should understand the pros and cons of two basic types, MSW, (Modified Sine Wave), and PSW (Pure Sine Wave). PSW inverters can safely power sensitive devices, but are much more costly than MSW inverters. A TV or Radio can be powered with a MSW Inverter, but you’ll probably hear an annoying buzz in the sound, and the picture may have streaks. Motors may run at the wrong speed, or overheat when using a MSW inverter. Inverters are rated by how much AC power they can provide. If you opt for a 600 watt inverter, you won’t be able to use a toaster, microwave oven, or any other device that requires more than 600 watts. If you want to watch TV, use some lights, and power a chest freezer at the same time, the total power (the sum of the individual power requirements), cannot exceed the capacity of the inverter.

My preference is an inverter that doesn’t harm sensitive devices, has enough power to handle most high-power devices, and can power most of my devices simultaneously. An Exeltech 1100 watt PSW Inverter can handle just about any load I’ll connect to it, but not all at the same time. For example; if I decide to use my 1000 watt microwave oven, I can’t use my 900 watt toaster at the same time. The total would be 1900 watts, exceeding the capacity of the inverter by 800 watts. My choice was to accept that inconvenience, rather than to pay an additional $1100 for a more powerful inverter. The cost of the Exeltech inverter is about $575, which is about $1100 cheaper than a good quality 2000 watt PSW Inverter. I’m aware of lower-cost PSW inverters, but I’m not sure if they match the quality, performance, and reliability of Exeltech products.

Tip: Some electric motors have a high starting current requirement. If the inverter you purchase can’t provide that initial starting surge, the device will not run.

Mounting the Solar Panels, Wiring, and other Considerations

Solar panel mounting can be as simple as bolting them to a south-facing roof for less than $50, or more complicated if you intend to build a mounting framework. Your creativity can help to keep the cost low.

Wire, wiring hardware, fuses, and a lightning protection device round out the requirements for a complete system. Because of the high current flow, battery wiring is the heaviest (thickest), wire. The wire you’ll use between the solar panels and the charge controller should be able to handle the maximum output current from your solar panels, and should be rated for outdoor use. Your local hardware store should have what you need. Since it’s a 12 volt system as far as the panels and batteries are concerned, I opted for low-cost automotive fuses and in-line fuse holders. I used heavy-duty terminal blocks, the kind you find in circuit breaker boxes, to tie the wiring together. You’ll need battery terminals or lugs, tie-wraps, tape, and other hardware. The cost of the wiring depends upon how far the solar panels are from the controller, but you may get everything you need for less than $300.

The total cost of your system, not including labor, should be in the neighborhood of $3000. You may choose to build with fewer panels and fewer batteries and add to the system at a later time. If you start small, buy a charge controller large enough to handle a bigger system so you don’t have to replace it when you expand. For less than $1000 you could build a system that can provide power for lights, TV, radio, fan, computer, and other small devices, but with limited use of course. For a little bit more than that you could power a small chest-freezer or refrigerator, in addition to those other devices.

The total cost may seem expensive compared to the cost of a generator, but don’t forget it’s sustainable and there are no operational costs. Assuming no physical damage or vandalism, solar panels will last 25 years. The batteries, with good care, can last in excess of 5 years. A properly constructed system will be almost maintenance-free.

Become an expert (or at least knowledgeable)

If you think a system like this is right for you, start by learning all you can, especially about batteries. Batteries are the most expensive component when you consider that they’ll need to be replaced more than once for the life of your system. Most importantly, know when to shut down your system to prevent over-discharge. Learn about battery types, paying special attention to those that last longer, but at a higher cost. Compare inverters and read reviews on them. Purchase reliable components, because you can’t afford a failure when the SHTF.

When you’ve built your system, test the heck out of it. This is where the Charge Controller’s remote meter comes in handy. Simulate grid power failures and see how long your system can power the loads. Upgrade if you’re not satisfied with the run-time.

Tip: As a capacity test I’ve connected two light bulbs, one 60-watt and one 100-watt bulb. A load of 160 watts over a 24 hour period equals a daily load of 3840 watt-hours. I’ve connected a Kill-A-Watt meter to the inverter’s output to keep track of the power that the system delivers. In bright sunlight the solar panels provide enough power to charge the batteries and power the load simultaneously. However, batteries charge more quickly if no additional loads are present. I record test results each time, which helps me determine when my batteries need to be replaced.

Failure Considerations

Perhaps the biggest threats to your system are lightning, and EMP events. You will, no doubt, use a lightning protection device, but it may not save your system in the event of a direct hit. An EMP event would have to be close and strong, to do any damage. In either case, it’s not likely that the solar panels and batteries would be damaged. The most vulnerable component is the charge controller. Here’s the good news: In the event that a replacement charge controller is not readily available, you can connect the solar panels directly to the battery bank. You’ll have to monitor the battery voltage, disconnecting the solar panels (charging source), when the batteries are fully charged. It’s inconvenient, but at least you won’t be without electricity. You shouldn’t have to worry about disconnecting the loads when the battery SOC falls below 50%, because most inverters will automatically disconnect at that point. You might also consider a low-cost MSW inverter as a back-up for your primary inverter.

Bartering

Assuming that you have an ample supply of electricity, you might consider charging batteries for your neighbors. I’m assuming a SHTF situation where those around you are also trying to live comfortably. A fully-charged automotive or deep-discharge battery might be used for lighting, to power a TV or radio, a fan, tablet computer, etc.

Taking it to the next level

If you build the system described here and then wait for a SHTF situation, you’re wasting a great resource. Why not use the system every day, and cut your electric bill? I’ve added two components to the system described here and accomplished just that.

I use an IOTA Automatic Transfer Switch to select either grid-supplied power or inverter-supplied power to run my refrigerator. When my batteries are above 50% SOC (state of charge), the refrigerator gets power from the batteries, via the inverter. When the battery SOC drops below 50%, the refrigerator is powered by the grid. I use a Morningstar Relay Driver to monitor battery voltage, and switch the inverter on or off. I can fine-tune the upper and lower thresholds as I see fit. When the transfer switch senses the loss of power (because the inverter is switched off), it automatically switches to grid power for the refrigerator. The Relay Driver is programmed to not turn on the inverter again until the batteries are once again fully charged. This happens automatically. It’s a wondrous thing to observe.

Should you decide to build the system I’ve described, or something like it, you’ll probably have many questions. The Wholesale Solar website has a wealth of information for solar do-it-yourselfer.

Summary

How much does electricity contribute to your survival? Try switching it off for a week and see how well you cope. With electricity you’ll live comfortably, not just survive, while the world around you crumbles. A good night’s sleep, vital to your long-term survival, is made possible because of sensors, appliances, and automatic systems. If you wait until things get bad you’ll be forced to use the resources you have, not the system you planned to install someday. Surviving a crisis doesn’t need to be unbearable, or even uncomfortable. It won’t be if you prepare in advance.

Perhaps some will say “I’m looking for ways to survive, while you’re talking about watching TV, wrapped in an electric blanket, after a hot meal and a warm shower.” I get it, but I want to live for a few more decades, and I plan do it in comfort.


As a prepper you’ve thought about the necessities for survival, but have you thought about your comfort? Imagine a long-term situation where you have food and water, but survival is

A perennial problem faced by suburban and rural dwellers is obtaining water in the absence of utility provided electric power. Standby generators require fuel of some type, which will eventually run out, and deep drilled wells are poorly suited for use with hand pumps of most types.

As a prepper, this has always been a concern for me as I live in a rural setting, but in a house constructed with the modern “central-everything” design concepts. I do have a gasoline-powered generator, and maintain supplies enough for a few weeks of continuous running. After that, it’s carrying buckets to the stream.

This has led to my experimenting with some alternatives for my survival homestead, and based upon my current deployment I may just go off-grid for water completely. Most of the components I had lying around with the exception of the pump, and the batteries: those items set me back around $450.

Read more: The vital self-sufficiency lessons our great grand-fathers left us

The basics of my survival homestead:

  • Frame house with a huge, unfinished second story, currently just storage.
  • Drilled well: 270 finished depth, water table at approximately 50 feet down
  • Standard 220 VAC submerged pump at 100 feet depth
  • The usual captive air pressure tank with associated plumbing and pump pressure relay

So the conundrum is: how to extract perfectly clean water from this well at minimum cost, and without completely changing the plumbing. (I may want to sell and move further out, so any new owner will probably want things as standard as possible)

What I have come up with to date, experimental at this point is a solar/battery-powered pump that stores water in an elevated container, allowing gravity to supply the pressure. Keep in mind though: water is heavy! Be sure to reinforce your structure as needed! I’d consider this a relatively high level overview as opposed to a design doc, so tailor as needed for your own situation.

Stuff.

  • A 12/24 VDC submersible pump with 230 foot lift:
  • 100 feet of 1/2 “ pex tubing
  • Renogy 100 Watts 12 Volts Monocrystalline Solar Starter Kit (Amazon. Harbor Freight, etc)
  • 2 – 12VDC marine deep cycle batteries, connected in parallel
  • A second pitless adapter installed on the well casing
  • 2 – ½” Pex to brass adapter sized for the pitless adapter being used, (1/2 <> 1” in my case)
  • Pitless adapter top plug
  • A second strain relief for the well cap wiring pass through.
  • SharkBite check valve ½”
  • SharkBite Tee for ½” PEX
  • A used but good queen water-bed mattress (for experimenting only! Gets brittle when cold)
  • I will probably use plastic 55 gal drums for anything permanent.
  • 100 feet #8, 2 conductor, jacketed, direct burial stranded wire
  • 2 – reducing adapters – ½” pex > 1” brass
  • Zurn pressure reducer (had on hand – Zurn 1-NR3DU Wilkins 1-Inch Pressure Reducer Valve 15-75-75PSI)
  • 2 – SharkBite ½” gate valve
  • Limit switches (Amazon Model: a14061600ux0543)
  • Assorted connectors, plumbing bits, and crimpers

Read more: Build yourself the only unlimited water source you’ll ever need

Installing the new pump

welldetails

Drawing 1 – Well details:

The first thing is to install the new pitless adapter in the well casing, just follow the instruction that came with it, In my case, I needed a 1-3/4” hole saw.

Using a string with a weight on it find the depth of the torque arrestor above the standard pump.

Using the same string with a float find the water level in the well casing.

Cut a piece of PEX approximately three feet shorter than the depth of the torque arrestor but be sure it’s still well below the water height. If it very close you may have to re-examine the well suitability.

Connect the two-conductor wire to the new pump following the instructions meticulously: you do NOT want the fitting to leak.

Connect the piece of pex to the new pump. Use stainless clamps or crimp collers.

Connect the PEX to the pitless adapter using suitable adapter hardware.

Run a piece of paracord through the lifting eye on the pump, either use twice the needed length so you can pull it free later or a bowline if you want to keep it in place.

Secure the line to something sturdy, it’s there in case the pump slips out of your hands.

Drop the pump and attached wire down the well. Be very sure it doesn’t come to rest on the torque arrestor! If it does, pull it and adjust the length of the PEX.

Install the solar array where ever you want: mine are on a south-facing roof with a 45 degree pitch.

Install the solar panel charge converter somewhere out of the weather; connect the wiring as described in the instructions.

Run #8 stranded wires from the charge converter to the battery bank.

Turn the charge converter on and make sure the batteries are charging. A voltmeter is sufficient. Mine reads 13.8VDC across the battery terminals in bright sun.

Connect the new well wires to the batteries to ensure the pump works correctly.

If yes, disconnect the pump for now.

water-flow-detail

Drawing 4 – Water Flow Detail:

Connect the remaining PEX to the pitless adapter outlet, tape the pump wire to the PEX, and bury the entire run below the frost line for the area.

Run it into your basement or crawlspace using whatever critter-proof method you wish.

Install a large water container in a location above your typical faucet height. The higher the location the greater the water pressure.

I’ve been experimenting with a water-bed mattress because, 1 – I had it already, 2 – it distributes weight well.

storagedetails

Drawing 2 – Storage Details:

Run the PEX and wiring up to whatever storage container you are using, install the check valve, (flow toward the storage tank!), then the PEX Tee after the check valve, and then from the check valve outlet side into the tank, using suitable fittings to provide for a secure, leak free connection. Inside the container, if it’s not flexible like the mattress, install an addition piece of tubing that just barely reaches the bottom of the container.

Install the limit switch with a float or similar to open the pump circuit when the water level reaches the maximum desired height in the container. Typically you would use the normally closed contacts that will open when the float is lifted. There is a multitude of ways to do this, I happened to have the switches already.

chargedetails

Drawing 3 – Charge Details:

Now run the wiring to the batteries, and connect, observing the correct polarity as during the initial test.

On the original house water supply plumbing cut and insert a tee in the line from the pressure tank going to the house plumbing. Install one of the gate valves in the Tee side going to the new storage. The object is to connect the new storage container outlet Tee to the standard supply plumbing after the pressure tank check valve, see drawing 4.


Other self-sufficiency and preparedness solutions recommended for you:

Healthy Soil + Healthy Plants = Healthy You

The vital self-sufficiency lessons our great grand-fathers left us

Knowledge to survive any medical crisis situation

Liberal’s hidden agenda: more than just your guns

Build yourself the only unlimited water source you’ll ever need

4 Important Forgotten Skills used by our Ancestors that can help you in any crisis

Secure your privacy in just 10 simple steps

A perennial problem faced by suburban and rural dwellers is obtaining water in the absence of utility provided electric power. Standby generators require fuel of some type, which will eventually

Welcome back to the last installment of our series on the 5 things you need to go off grid where we are discussing preparations you can make right now that could possibly save your life if you find yourself without the conveniences of the grid. As I stated in other articles, we frequently hear people planning of a simpler, more self-reliant life where they can live untied from the complex systems of our current 21st century lifestyles. For obvious reasons, this dream is one that many of us strive for, but frequently are unable to obtain.

In a disaster though, that dream of being untied and self-sufficient may not be something we opt for by making various lifestyle and geographic changes; it may come to us without much advance warning whether we are ready or not. The news of the impending blizzard in New York is a perfect example of the possibility of disaster. In extreme cases, the conveniences of the grid might be unavailable to people for an extended time. If a disaster strikes, what would you need to have prepared ahead of time to make it through your own off grid scenario?

To briefly catch everyone up; our first article talked about the importance of water and having a renewable source if we have any hope of lasting a long time without the benefits of modern utilities. The second article dealt with food and creating systems now that would feed you if the grocery stores never opened again. The third article focused on sanitation and hygiene so that as much as possible we reduced our exposure, and conversely our risk of infection from disease. The fourth article discussed topics of shelter. The last item we will discuss is the need to have an alternate source of power.

Electricity

It is hard to imagine our days without the benefits of electricity. We have become so reliant on this source of energy that most of our modern lifestyles are dependent upon having a reliable source every single place we go. Without electricity, the obvious things like light bulbs and microwaves no longer work, but I wouldn’t have a job without electricity. In the past when I worked in various other careers, if there was a disruption in power, there was always something to do. Usually this involved cleaning in some capacity or reorganizing supplies.

Now, in my current profession if the power went out I wouldn’t be able to do any of my job responsibilities. I rely on power which enables the internet for every aspect of my job, from computer to phone. Meetings are held over the internet as well as presentations and conference calls with our VOIP phones. Our service is a web based application and without internet, nobody can access your service. Zip. Zilch, Nada. It is that way for many millions of other people, but outside of work, almost every other system relies on power too. ATM machines, wireless internet routers, gas pumps, cash registers, credit card transactions and on and on. We can’t really conduct many of the main transactions of commerce without power, but we also rely on power in our homes for simple survival.

Having a backup source of power is important if some event or circumstances take down the power grid. In the example of the anticipated blizzard in New England, power could be lost for millions making an already undesirable situation worse. To prepare for power outages or blackouts I think there are several layers of backup power and associated items you can consider. They might be too late for the people in New York, but you can make plans now to prevent a disruption in your future.

When the elecricity goes out, so do the lights. Make sure you have backup lighting options.

Short Term Power Outage Supplies (up to 8 hours)

For this relatively short duration you shouldn’t have to worry about more than simple navigation (light source) and minor power needs. Batteries should all be topped off in anticipation of outage if possible.

Small generators will greatly improve short-term outage conditions.

Medium Term Power Outage Supplies (1-3 days)

Alternate sources of power will most likely be needed for essentials. You can plug an inverter into your car’s auxiliary outlet and power a decent amount of items. Plan for storing fuel.

  • 1000 Watt Inverter connected to car battery for charging devices/running small appliances
  • Spare fuel to run vehicle (min 25 gallons)
  • 5 – 5 Gallon gas cans
  • PRI – G gas treatment for long-term fuel storage.
  • 2000 W Generator
  • Headlamps for each individual – infinitely easier and more practical than flashlights. Allows for hands free tasks.
  • Propane lanterns – great outdoor lighting option or use within well-ventilated area. They also put off a decent amount of heat.
  • Battery Recharger – It is important to get one that can charge multiple battery sizes if you have different battery uses.

Long Term Disruption in Power Supplies (4 or more days)

Larger generators and solar are good options to consider for longer outages.

So there you have it. 5 areas to consider now if you want to be prepared for an unexpected Off grid moment in your life. Are there other areas to consider? Of course, but I think this covers some of the most major bases we have. If you have a plan for Water, food to feed your family, Shelter from the elements, Sanitation to keep diseases at bay and Electricity, I think you have a good handle on the crises and should be able to weather the disruption. There are security aspects too, but those are dealt with in other posts on the Final Prepper that can be read here, if you are interested.

I hope this series was informative or helpful in some way. As always, I love to hear comments so please let me know what you think and stay safe!

Welcome back to the last installment of our series on the 5 things you need to go off grid where we are discussing preparations you can make right now that

Like some of you reading the Final Prepper, I have long wanted the ‘Prepper dream’ of a large tract of mostly wooded land, complete with a large stream or river gently rolling through the property. In this imaginary paradise full of wild game and fertile soil, I would set up my modest log cabin complete with all the amenities (underground man cave/survival bunker) that we could purchase or build which would allow us to go off-grid and be able to live as self-reliant as possible. Naturally, I roll up to my homestead in the woods in my brand new Devolro Tundra, complete with Realtree paint job – family in tow, breathe in the fresh air and smile with contentment.

For me, those dreams are on hold, but definitely not forgotten.

There are those who are searching right now for the perfect piece of land and who may have already made plans to move their family, but for the large majority of the rest of us, this is simply not possible. Oh, I know there are those out there who will say anything is possible if you just put your mind and priorities to it and I agree that there is truth in that saying. Maybe I should say that it is far too much trouble now for me to do what is necessary to move, for a lot of factors I won’t get into in this post. I did want to discuss going off-grid from another standpoint though and that is from the perspective of events or circumstances out of our control.

What if you don’t get to choose when you go off-grid. What if the grid suddenly up and leaves you without so much as a dear John letter? For those of us who have dreamed of that self-reliant way of life by that picturesque cabin in the forest, our reality could be our suburban homes are rendered Grid-less in some future disaster and when that happens, will you have what it takes to live off the grid?

There are common elements to living off-grid and I want to discuss these today and how you can take steps now in anticipation of a future disruption in the status quo. Today we will begin a five-part discussion on the 5 things you need to go off-grid and how to make your home prepared for that possibility right where you are, without the trouble of moving or chopping down a lot of trees. Oh, and the Devolro is optional too… unfortunately.

Water

To go off the grid, it helps to have sufficient water collection capacity.

To go off the grid, it helps to have sufficient water collection capacity.

This may come as no surprise to most of you but water is a necessity. If you and “the grid” go through a nasty breakup, you will still need the basics for survival. Water is one of the easiest items to stock up on now, but finding it, collecting it, transporting it and making it safe to drink, make this no trivial item when the taps are shut off.

High capacity water storage tanks like this 530-gallon tank from Bushman would solve a lot of grid-down water problems.

Source – A source of water is an absolute necessity and as much as I like to point to rain barrels as one potential option, you will need to make sure that the capacity you are collecting is enough to last you from rain to rain. The beautiful thing about rainwater collection is that collection is virtually zero work once you have the system set up and it is possible to get an insane amount of water from the mildest of downpours. For every 1” of rain on 1000 square feet of roof, you can collect around 600 gallons. If you have moderate rains, this could keep a family of 4 in water for a long time. (1 gallon per person per day x 30 days) = 30 X 4 people = 120 gallons of water minimum per month. With only one inch of rain and the right capacity of a rain barrel system, this could keep you stocked with plenty of water for 5 months! Double the capacity and you have doubled the supply. The Tank Depot has great slimline water tanks from Bushman that will fit nice and snug to your house and comes in several colors that hold 530 gallons of water each. Two of those are an approximately $1700 investment that could hold 1160 gallons.

Not everyone has that much money to plunk down on a thousand-gallon water storage tanks so there are other options, sizes and price points. You can purchase nice decorative rain barrels that hold closer to 50 gallons at your local hardware store or purchase used food-grade barrels and build your own system from much cheaper. There are more videos of rain barrel videos on YouTube than you can shake a stick at.

Collection – If you are unable to collect rainwater and are forced to go acquire it somewhere you will need containers to hold the water you are transporting. One thing to consider here is that water is heavy in quantity. Sure, you can carry that single liter water bottle around all day but if you are humping it to the water hole you probably want to get enough so that your efforts aren’t wasted. At the very least, you don’t want to have to go out every day to get water if you don’t have to. There could be threats to your life going out so take that into consideration.

A means to transport the water is best and I think a heavy duty rolling yard cart would be ideal unless you have your own mules. You could load 20 gallons of water easily in 5-gallon water containers or buckets in one trip and wheel that back to your home. If you had to carry your own water and didn’t have the benefit of a cart, I doubt many people would be carrying more than 5 gallons at a time. Additionally, if you are carrying water without a cart, you want something with handles. Don’t be that guy schlepping off to the water hole with 2 liter Pepsi bottles tied with your paracord around your neck. That would work, but seriously???

Filtering water doesn’t get much easier than gravity-fed units like this Berkey Light.

Filtration – This is the part of the water problem that will cause more illnesses to survivors after you and the grid are splitsville I think and that is drinking contaminated water. There are virtually no untainted sources of water unless you tap into a spring right as it is coming out of the ground or a well. For anyone collecting water from a pond, river or stream and even those rain barrels, you will need to disinfect your water. The absolutely easiest way to make a lot of water safe for drinking, in my opinion, is a gravity filter like the Big Berkey line of water filters.

I have the Berkey light and it doesn’t get much simpler than pouring water in the top. Gravity feeds the water through the special filter elements and the water collects in the bottom reservoir ready for drinking. The only work you have to do in the filtering process is to pour. The filters have a life of about 4 years assuming 4 gallons a day and usually only require gentle cleaning if your water is nasty. You can purchase replacement berkey filters now, to have on-hand.

Options? If you don’t have water filters, you can absolutely boil water or use bleach to disinfect but that takes time, energy (building a fire) or you have to worry that you either have too much or not enough bleach to water ratio. For me, simpler is better.

Tomorrow we will discuss the second aspect of going off the grid. I hope you will come back and join us and as always, please comment with questions or opinions below.

Like some of you reading the Final Prepper, I have long wanted the ‘Prepper dream’ of a large tract of mostly wooded land, complete with a large stream or river