
Today we are going to discuss creating a self-replicating food supply for your backyard flock. Yes, we are talking about becoming worm farmers – mealworms, to be exact (not to be confused with our previous discussion about setting up vermiculture composting systems with red worms).
Mealworms are the larval stage of the darkling beetle, and they make a great treat and food source for your backyard poultry. With very little time and cost, you can have a simple setup in place that allows you to raise a batch of mealworms that will continuously reproduce and give you an excess supply to harvest and feed to your poultry.
And if you have kids, grandkids, or are a mentor to neighborhood youth, a mealworm farm can make a great weekend science experiment that can be monitored throughout the year and bring insights to the marvels of the natural world. Who doesn’t like hearing a 3-year-old say “pupa”?
The Life Cycle
When initially setting up your first mealworm farm, you will need to get some live worms. There are many sources – everything from a pet store, online ordering, and even a farmer’s stack of grain might have some to be had. We took the easy route and ordered 5,000 online. You can find just about anything on e-Bay.
As shown below, the basic life cycle of mealworms goes from Egg, to Larva (mealworms), to Pupa, to Beetle.

Timeline
Mealworms go through a complete metamorphosis during their life cycle. The female adult darkling beetle (Tenebrio molitor) lays eggs (they will lay 100 – 500 during their short life) which can take anywhere from 4 to 19 days to hatch, based on temperature and humidity conditions. The egg develops into a tiny mealworm that then eats, grows, and sheds it skin multiple times (9-20 times) before becoming a pupa. The pupa then develops into a darkling beetle (up to 20 days). Cycle complete.
Farm Setup
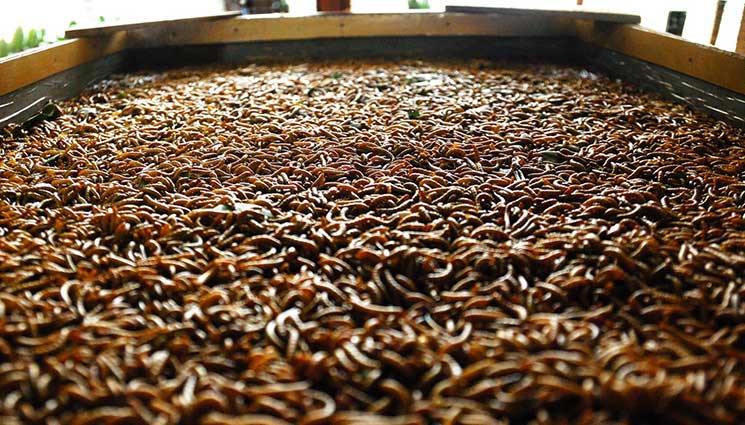
The setup for the mealworm farm is very basic. All you need is a plastic storage tub or other container (some even use old aquariums) that can house a large number of mealworms and give them space to grow and multiply over time. They sit in a layer of bedding and consume the scrap food that you provide on occasion. Ventilation and humidity levels need to be monitored to make sure optimum growth conditions occur, but from our experience so far, they are pretty low maintenance and only take a few minutes every couple of days to check on.

Materials Needed:
- Large shallow plastic container or aquarium with lid that allows for ventilation
- Screening material for the lid (for ventilation)
- 2-3″ of bedding (mixture of wheat bran, oats, chicken crumbles)
- 1000+ large mealworms
- Food scraps (carrot chunks, potatoes, bread, etc.)
When setting up your system for the first time, it is highly recommended that the bedding be sterilized to kill any pests that could be living in the grain. The problem people most often run into are grain mites. Grain mites are tiny and they bite. You do not want grain mites! For our bedding, we used a mixture of ground-up chicken feed and oats, which we ground up in an old coffee grinder. Many people use wheat bran. To sterilize, spread out the bedding material on a cookie sheet and placed it in a warm oven (at 130 -150ºF) for 20 minutes. Once sterilized, place your bedding material into your plastic tub or aquarium. Add mealworms and some food scraps. We’ve used carrots, potatoes, celery, squash, and watermelon rinds. The food scraps are not only a source of food for the mealworms, they also provide necessary humidity. Some humidity is important, but you don’t want your food scraps to get moldy, so check on your bin every few days and replace the scraps.


As the population grows in your mealworm farm, they will eat up some of their bedding as well. Every few months we add a few more inches of fresh, sterilized bedding. The ideal temperature for mealworm growth and production is 80ºF. During the warm summer months, we keep ours in our garage. During the cooler months, we keep it in the house, in our laundry room.

Harvesting and Generational Continuation
We let our initial mealworm farm grow for about 2 or 3 months before we started harvesting mealworms.
There are 2 methods of harvesting that we employ to not only gather worms for feeding to the chickens but also ensure we have a continuous supply of mealworms for next generations.
- Manual Harvesting
Harvesting by hand might be slow and tedious, but it does allow us to pick the choicest treats and ensure we get the maximum potential out of each worm. We have also grabbed “bulk” handfuls at times when the bin is teeming with worms. We try our best to get only mealworms and leave the pupa and beetles to reproduce. Sometimes we end up grabbing some bedding and other stages of the life cycle, but we don’t worry too much about it, since it is all edible for the chickens.
- Food Slice Transport
The other method we use is to place a food chunk (apple/carrot/squash) into the bin for a few minutes and let the mealworms start to feast. Then we pick up the whole chunk and move it to a new bin for the next growth cycle/farm. Keep in mind that adult beetles also like this food and sometimes will have to be picked off.
The mealworm farm is more productive during the warmer summer months. Excess summer harvests can be stored in the freezer to provide for feed during the cooler months when the production slows down.
An important word of caution: We have read about some individuals developing respiratory allergies to mealworms after prolonged exposure. The best way to avoid this is to minimize your exposure and/or wear a mask if you will be tending to your mealworm bin for any length of time. Also make sure to wash your hands after working with your farm.
Additional Resources:
Exotic Nutrition: How to Raise Mealworms