Why zucchini ? One good reason? It is the season.

This food is low in saturated fat and sodium, and very low in cholesterol. It is also a good source of protein, vitamin A, thiamin, niacin, phosphorus and copper, and a very good source of dietary fiber, vitamin C, vitamin K, riboflavin, vitamin B6, folate, magnesium, potassium and manganese.

The health benefits of zucchini include improved digestion, slows down aging, lowers blood sugar levels, supports healthy circulation and a healthy heart, improves eye health, boosts energy, benefits for weight loss, improves thyroid and adrenal functions, protects against oxidation and inflammation.

If you are a vegetable gardener, chances are you have experienced such an abundance of zucchini so great that even a ravenous family of squash lovers could never keep up with it. Right now, the garden is simply loaded with the prolific dark green veggies. And if not, you can pick up baskets full of them at a great price at your local market.

Some zucchini trivia

Biologically, zucchinis are closely related to cucumbers and watermelons. Zucchini is technically a fruit and not a vegetable.

They have been consumed in Central and South America, as well as Italy, for thousands of years, but only became popular in North America over the past 50 years, perhaps when gardeners realized what a bounty they could receive in a tiny amount of garden space. Zucchini is part of what is known by the Native Americans as the “Three Sisters” – three plants that grow well together – corn, summer squash, and beans.

Zucchini is packed with nutrients.

Here are some of the nutritional benefits of zucchini.

  • A huge 1 cup serving of zucchini, including the skin, contains 20 calories, 1.5 grams of protein, 4.2 grams of carbohydrates, and 1.4 grams of fiber.
  • Zucchini was proven in studies to be a top food source for antioxidants such as lutein, zeaxanthin, beta-cryptoxanthin, alpha-carotene, and beta carotene.
  • Zucchini is extremely high in natural pectin, which provides protection against diabetes and can help regulate insulin and blood sugar levels.
  • Zucchini contains Vitamins C, B6, B2, A, and K, as well as manganese, potassium, magnesium, folate, and phosphorus.

Growing zucchini is easy!

Zucchini is not just easy to grow – it can actually take over your garden if you’re not careful! Some people plant zucchini away from other parts of the garden for this reason. You should allow plenty of room for the vines to spread. If you are using the square foot gardening method, thin to one plant per square foot.

Here are some ways to use zucchini.

Zucchini is one of those multi-purpose harvests that can be used in a variety of ways. Whether you prefer it sweet or savory, there’s a place for zucchini in your kitchen.

If you end up with one of the baseball bat zucchinis hiding under the leaves in your garden, cut out the center and remove the seeds. Very large zucchini can become woody and flavorless. Try using over-large zucchini in recipes that call for shredded zucchini – this helps to mask the texture.


Try using shredded zucchini in place of recipes that call for shredded potatoes. You can also mix shredded zucchini half and half with shredded potatoes to make hash browns or potato patties.

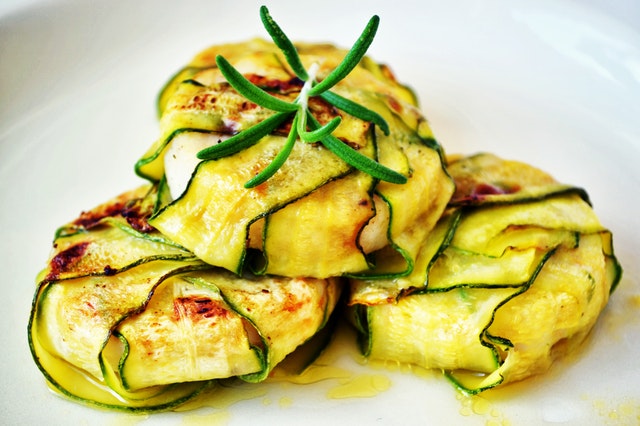
Slice a zucchini in half and fill it with all manner of sweet or savory fillings to make baked zucchini boats.

Uncooked zucchini spears are great for dipping and make a tasty addition to a veggie tray. If the zucchini is a small, tender fruit, you can leave the peel on for an extra hit of fiber. For a bigger zucchini, it’s best to peel it for use raw, because the skin will be tough and unpleasant in texture.


With the garden in full zucchini overload, we’ve been scrambling to figure out ways to use it that are just a little different than the usual sauteed or grilled versions.

Here are our top, kid-tested zucchini recipes.

Zucchini Fritters

Ingredients:

  • 2 cups of coarsely shredded zucchini
  • 1 cup of shredded cheddar cheese
  • 1 cup of whole wheat flour
  • 2 tsp of garlic powder
  • 2 tsp of onion powder
  • 2 tsp of MSG-free seasoning salt
  • fresh ground black pepper to taste
  • 1/8 cup of cooking oil

Directions:

  1. In a large bowl, mix together flour and seasonings.
  2. Stir in zucchini and cheese, using your hands to combine well.
  3. Meanwhile, heat the cooking oil until it sizzles when a drop of water is added.
  4. Form the zucchini mixture into patties and place them in the hot oil, taking care not to splatter yourself.
  5. Fry on each side for about 3-4 minutes or until a dark golden brown.
  6. Drain the fritters on a paper towel.
  7. Serve with sour cream or yogurt garlic dip (see recipe below)

Baked variation:

  1. Form the zucchini fritters as instructed above.
  2. Preheat the oven to 400*F
  3. Lightly oil a cookie sheet.
  4. Place the fritters on the cookie sheet and brush them lightly with oil.
  5. Bake for approximately 10 minutes on each side or until dark golden brown.


Yogurt-Garlic Dip

Ingredients:

  • 1 cup of plain yogurt, drained until thick
  • 1 tsp of garlic powder
  • 1 tbsp of dried rubbed dill weed

Directions:

  1. With a fork, mix the seasoning into the yogurt.
  2. Place in the refrigerator for at least one hour to allow the flavor to develop.
  3. Serve with fresh veggies or zucchini fritters.


Zucchini-Carrot Muffins

Ingredients:

  • 1 1/2 cups of shredded zucchini
  • 1/2 cup of shredded carrot
  • 1/4 cup of milk
  • 1 tbsp of white vinegar
  • 1 1/2 cups of whole wheat flour
  • 1/2 cup of white flour
  • 1/2 teaspoon baking soda
  • 1/2 teaspoon baking powder
  • 1/2 teaspoon salt
  • 2 tsp cinnamon
  • 1/2 tsp of nutmeg
  • dash of powdered clove
  • 2/3 cup melted coconut oil
  • 1/2 cup muscovado sugar
  • 1 tsp of vanilla extract
  • turbinado sugar to taste


Directions:

  1. Grease muffin tin with butter or additional coconut oil.
  2. Preheat oven to 375*F.
  3. In a small bowl, add the vinegar to the milk and allow it to sit for 5 minutes.
  4. In a large bowl, mix together oil, sugar, and vanilla, then stir in the milk mixture, the carrots, and the zucchini.
  5. In another bowl mix together flours, spices, salt, baking powder, and baking soda.
  6. Stir the dry ingredients into the wet ingredients until just combined – you will have a lumpy batter.
  7. Let the batter sit for 10 minutes to allow it to rise.
  8. Spoon the batter into the prepared muffin tin, sprinkle lightly with turbinado sugar, and then bake for 20 minutes or until a knife inserted in the middle comes out clean.


Zucchini Chips

Ingredients:

  • 1 pound of zucchini, thinly sliced
  • 1 tbsp of olive oil
  • 1/4 cup of grated Parmesan cheese
  • 1/4 cup of Panko bread crumbs
  • salt and pepper to taste


Directions:

  1. Preheat the oven to 450* F.
  2. Line a baking sheet with tinfoil, then lightly spray it with oil.
  3. Place the zucchini on the baking sheet then lightly brush with olive oil.
  4. In a bowl, mix together Parmesan, bread crumbs, salt, and pepper.
  5. Sprinkle the mixture on top of the zucchini slices.
  6. Bake until the zucchini is browned and crisp, about 25 minutes.
  7. Serve immediately.


There are several ways to preserve zucchini.

You may have so much you need to save it for later. Here are 3 ways to put it back.

Dehydration

Zucchini can be dehydrated either in thin slices or shredded. Either way, prep your zucchini, then mix well with salt. Place the salted zucchini in a colander over a bowl and put it in the refrigerator for a minimum of two hours. (I usually leave it overnight). This will remove a great deal of the moisture. Put a thin layer of zucchini on the shelves of your dehydrator and dry overnight on low, or until the zucchini is completely dry. When you’re ready to use it, reconstitute it by covering it in boiling water for 15 minutes. Drain and use as you would fresh zucchini.

Freezing

Unlike most vegetables, there is no need to blanch zucchini before freezing it. Simply shred it, drain it (don’t add salt in case you want to use it in sweet dishes like zucchini bread or muffins) and then place it on a cookie sheet in a single layer. Put this in the freezer for two hours, then relocate the frozen shreds into large freezer bags.

Canning

Zucchini really doesn’t take to canning well. However, you can use it in place of cucumbers for your favorite pickle or relish recipes. The large zucchinis that are a little bit tougher actually work better for zucchini pickles because they hold their firmness better.

Ingredients:

  • 3 pounds of zucchini
  • 1/2 cup of onion, thinly sliced
  • 6 cloves of garlic, smashed
  • 6 tsp of pickling salt (or another non-iodized salt)
  • 2 cups of apple cider vinegar
  • 1 1/2 cups of white vinegar
  • 2 cups of turbinado sugar
  • 1 tsp of mustard seeds
  • 1 tsp of black peppercorns
  • 1/4 teaspoon ground turmeric
  • 6 dried chili peppers or 2 tsp of crushed chilis
  • 6 sprigs of fresh dill


Directions:

  1. Thinly slice your zucchini (about 1/4 inch or less in thickness).
  2. Salt the zucchini, add the onion slices and place it in a colander over a bowl in the refrigerator for 2 hours to remove the liquid.
  3. Meanwhile place into each sanitized jar: 1 tsp of salt, 1 red chili, 1 clove of garlic, and 1 sprig of dill.
  4. In a saucepan on the stove, combine sugar, vinegar, turmeric, mustard seeds, and peppercorns. Bring to a boil.
  5. Making sure the jars are still warm from being sanitized, fill them with drained zucchini and onion mixture, allowing 1 inch of headspace.
  6. Pour the boiling liquid over the contents of the jar. Wipe the rims and cap your jars with snap lids and rings.
  7. Process in a water bath canner for 15 minutes (pints), making adjustments for your altitude.


What do you think?

Do you grow zucchini in your yard? What do you like to make with zucchini? Please share your thoughts in the comments.


Special thanks to Daisy Luther for this wonderful article. 

Why zucchini ? One good reason? It is the season. This food is low in saturated fat and sodium, and very low in cholesterol. It is also a good source of protein,

I really have to say that although I’m the kind of guy that would rather stick to a cup of tea when the cold hits, having a couple of pain meds around really helped me pick up the pace when I wasn’t quite feeling like myself.

The need for a painkiller becomes even direr in case of an SHTF situation. Sure, pain meds are great when you need to deal with a pulled muscle or soreness after an intense hike, but they become vital when you have an injury to tend. Because I was foolish enough to carry heavy boxes during my time as an intern, I now have a very sore back and a taste for pain relievers, especially ibuprofen.

Now, the problem with painkillers is knowing how to pick your poison. There are tons of pain meds on the market but, unfortunately, to some, most of them are regulated by Federal Law. That means no Vicodin if you haven’t received a Schedule II or III from your doc.

Every so often, the popping-pills-just-because-they’re-for-pain style has landed more people in the ER compared to those who experienced a nasty med side-effect. Yes, it can happen. If you read the label carefully, you will see that even stuff as basic as aspirin comes with a truck-full of side-effects.

True story: my late aunt was once rushed to the ER because she heard ringing in her ears for three days straight. Turns out that she was in that one percent of patients who have experienced auditory hallucinations after taking aspirin.

So, before you go out buying every over-the-counter painkiller you can find (won’t even consider discussing the heavy stuff like Vicodin) you will need to do a little research about known side-effects. Painkillers aren’t good if they end up causing more pain or killing you! So, before taking pills like Tic-Tacs, be sure to check in with your doc to see what kind of pain meds agree with your body.

Related – Even SWAT Teams are helpless against THIS

The list may be shorter than you think. One more thing before we tackle today’s topic – never, ever, buy meds online. Don’t get fooled by those flashy ads, giveaways or price cutbacks. The chances are that you will end up with sugar pills or God knows what. Also, if you care about your body, you would do well to stay away from stronger painkillers, even though you can order them online without a prescription.

Now, for those who are interested in stockpiling more pain meds, here’s my list of must-have over-the-counter painkillers and what they’re good for.

  1. Ibuprofen

Commercial name(s): Nurofen, Advil, Motrin.

Recommended daily dose (adult): 800 milligrams per dose or according to the doc’s prescription.

Recommended daily dose (child): 400 milligrams per dose or according to the doc’s prescription

Probably the most common painkiller on the market is the over glorified Ibuprofen. Because it is an NSAID (a nonsteroidal anti-inflammatory drug), Ibuprofen is very effective at decreasing swelling and fever in addition to taking away the ouchie. It’s commonly used to treat stuff like tooth pains, muscle aches, cramps, headaches, and minor back pains. Careful about using Ibuprofen, though.

Some studies have pointed out that this med can cause renal failure if the patient has kidney problems. You should also refrain from using Ibuprofen if you have heart issues, as it is known to produce blood clots in a patient with cardiovascular issues.

Don’t be like yours truly and take it on an empty stomach because you’ll end up with one Hell of a tummy ache. A box of 30 x 800 mg pills costs around 14 bucks and, the best news is that you can buy as much as you want because no one is going to ask you about a prescription.

Related –4 Important Forgotten Skills used by our Ancestors that can help you in any crises

2. Aspirin

Commercial name: Aspirin®

Recommended daily dose (adult): one or two tablets every 4 hours or two tablets every 6 hours

Recommended daily dose (child): same as adults. In case of children under 12, check with your doc.

You can’t get any more basic than aspirin when it comes to over-the-counter pain meds. Although it can be used in case of an emergency for reducing fever or swelling, aspirin is mostly used for muscle pains, headaches, toothaches, and cold-induced fever.

Be sure to drink plenty of water when taking the pill.

FYI: if you’re a hiking buff like me, you can reduce some of that soreness by taking aspirin in conjunction with paracetamol. Together, they’re great painkillers and will speed up your recovery. Be sure to take them before the soreness kicks in. Otherwise, you would end up just taking two pills.

3. Acetaminophen

Commercial name(s): Tylenol, Calpol, Panadol, Paracetamol, Bromo Seltzer, Actamin, and Tempra.

Recommended daily dose (adult): 1000 milligrams at one time.

Recommended daily dose (child): 5 doses in 24 hours based on the child’s weight.

Though it’s placed in the same pot as Ibuprofen (considered to be an NSAID), acetaminophen has more in common with aspirin. It’s very effective at relieving paint and breaking the cold- or flu-induced fever. Its effectiveness can be boosted when used with aspirin. Careful about taking too much because it can severely damage your liver.

Related –The vital self-sufficiency lessons our great grand-fathers left us

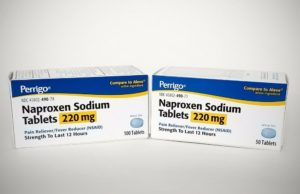
4. Naproxen

Commercial name(s): Naprosyn®

Recommended daily dose (adult): 750 milligrams for the first dose, then 250 milligrams every 8 hours.

Recommended daily dose (child): 1 gram per day or 5 milligrams per kilogram twice a day.

Naproxen is an NSAID commonly used to relieve pain and to bring down swelling and fever. Since it’s considered to be more kick-ass compared to Ibuprofen, it’s also used to treat other conditions such as tendonitis, gout, rheumatoid arthritis, and back pain (hooray for me!).

Be careful about taking too many pills, as it can lead to kidney failure. The best thing about using Naproxen over Ibuprofen is that the first starts working in 30 minutes or less, whereas the latter begins to act in 45 to 60 minutes.

Enough meds for you? Well, take it from someone who learned this the hard way: there’s no such thing as too many painkillers around the house. So, what are you waiting for? Go and stock, but remember to check in with your doc first before doing anything stupid.


Self-sufficiency and Preparedness solutions recommended for you:

The Lost Ways (The vital self-sufficiency lessons our great grand-fathers left us)

Survival MD (Knowledge to survive any medical crisis situation)

Backyard Liberty (Liberal’s hidden agenda: more than just your guns…)

Alive After the Fall (Build yourself the only unlimited water source you’ll ever need)

The Lost ways II (4 Important Forgotten Skills used by our Ancestors that can help you in any crisis)

The Patriot Privacy Kit (Secure your privacy in just 10 simple steps)

One thing before we tackle today’s topic – never, ever, buy meds online. Don’t get fooled by those flashy ads, giveaways or price cutbacks.

Portable backpacking camp stoves can be an invaluable tool for preppers for many obvious reasons.

  • Sometimes you don’t have the ability to build a campfire, and sometimes you don’t have the time.
  • Some stoves use natural fuels more efficiently than a traditional campfire
  • Sometimes it’s just nice to be able to whip out a small stove and make a quick hot drink or heat water for a freeze dried meal.

Whatever your reason, be it camping, long-distance hiking, bugging out, or a grid down emergency, or even something else, a small camping stove should be part of your survival kit. However, there are a great many different ones out there, all using different types of fuel. We are going to look at six, all of which can be easily tossed into a bugout bag, or stashed with your camping gear.

The Top Backpacking Stoves for fast cooking when you need it the most

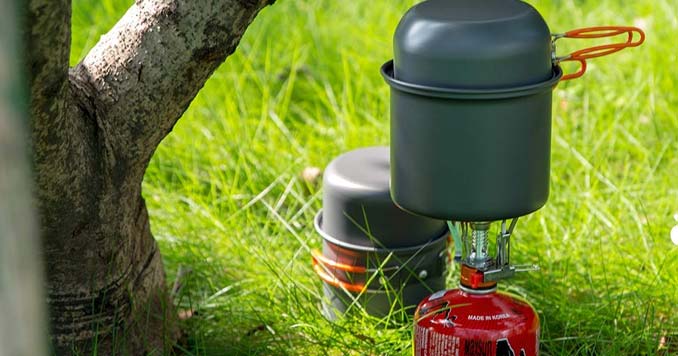
Etekcity Camping Stove

Etekcity Camping Stove

This lightweight little gem uses common 7/16” thread butane or butane/propane canisters that are widely available in camping and backpacking supply stores. While relying on stored fuel for SHTF is limiting, this fuel is easy to stockpile, and the reality of a camping stove in your emergency gear is more focused on the short term than long term use. In other words, this is the stove you use to heat your food when you are bugging out, or when the power goes out.

Because of the small burner size of this stove, you aren’t going to be whipping out your favorite cast iron skillet and frying up some bacon with it. It will work best with lightweight camping cookware or military mess kits. This further drives home the fact that this is a strictly short term or emergency stove. You are basically going to use it to heat water or reheat canned foods. You can do more complex cooking tasks with it, but you are sorely limited by the kind of cookware you can use on it.

Overall though, if you need a basic stove to toss in your BOB, or in the back of your car for an emergency, and have the kind of fast cooking foods in your cache that work best with this kind of stove, you will be just fine.

Find the Etekcity on Amazon

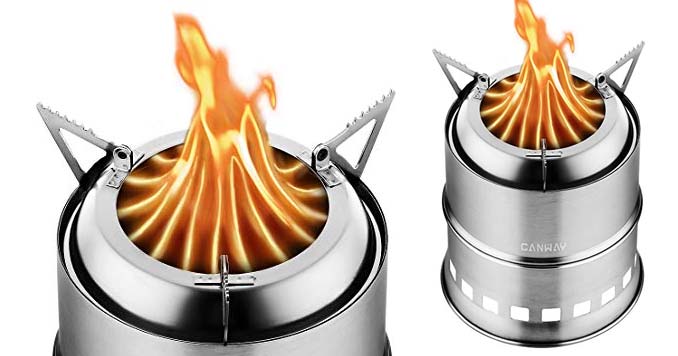
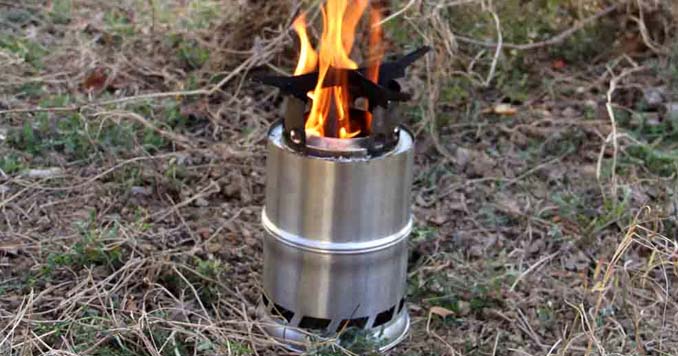
 Canway Camping Stove

Canway Rocket Stove

So-called “rocket stoves” have long been one of my favorite choices for an emergency stove. Capable of burning almost any dry organic matter (leaves, twigs, pinecones, etc…), they allow a prepper to use fuel that would commonly be ignored, which increases the utility of such stoves.

The Canway stove is an inexpensive and easy to pack away stove. Because fuel can be readily scavenged in most places, you really only need to pack a way to start a fire (although it couldn’t hurt to pack a small amount of wood or such, so you are certain of having fuel).

Like any camping stove, you are somewhat restricted on the weight you can put on it. But again, our goal here is a portable emergency stove. One big disadvantage would be operating in very wet climates or deserts where fuel might be scarce. However, those are fringe situations, so for most folks under most circumstances, this is a great little stove. I’d prefer something with a different fuel source if I were certain of not being able to find fuel.

Find the Canway on Amazon

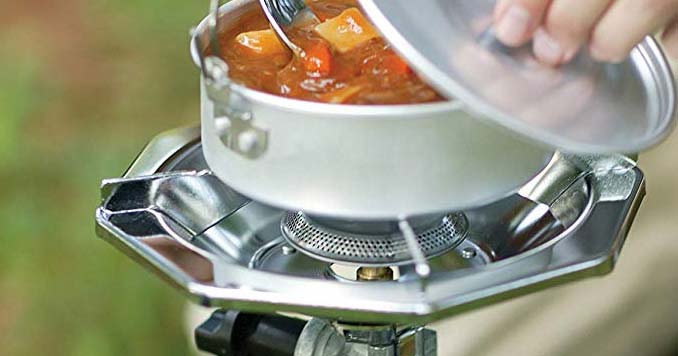
Coleman Bottle Top Propane Stove

Coleman Stove

A classic camping stove, the Coleman bottle top stove is a bit clunky for a BOB, but it fits in great with other emergency gear if you are already invested in equipment that uses one pound disposable propane bottles.

And therein lies the rub. If you are already using those bottles, great. If not, this is not the stove for you. It is a tad clunky, and while that is a benefit for rough handling, the stove and bottle take up precious room in a BOB that could be used for other things.

Honestly, this is a stove better suited to keep in your vehicle, at home, or in your rural cabin. The bulky nature of the propane canisters alone should be enough to keep it out of any emergency kit that doesn’t include a vehicle to haul it around in. On the other hand, it is a great stove using a common fuel supply. Just use it where it works best, and not where it will be an irritant.

Find the Coleman on Amazon

Lixada Camping Stove

Lixada Camping Stove

This combines two of my favorite stoves – a wood burner, and an alcohol stove. While not as efficient as a proper rocket stove, the wood burning option is just too good to pass up. Plus, it uses the kinds of small sticks and such that often get passed over for campfires.

But what is really
great about the Lixada stove is the alcohol burner unit. Almost identical to the stoves issued by the Swedish Army during the height of the Cold War, these alcohol stoves burn common isopropyl or denatured alcohol, are indoor safe, and are more than suitable for common on the go cooking tasks.

Having used nearly identical stoves, I really enjoy the fact that a small bottle of fuel alcohol can last for a number of days, while still giving me the ability to have plenty of hot drinks and meals.
In fact, I’ve used these kinds of stoves extensively in the sometimes unpleasant climate of the Puget Sound, and keep one for indoor use when the power goes out.

By combining an easy to transport stove that uses wood or alcohol, Lixada gives the prepper a lot of great options for an emergency or camping stove.

Find the Lixada on Amazon

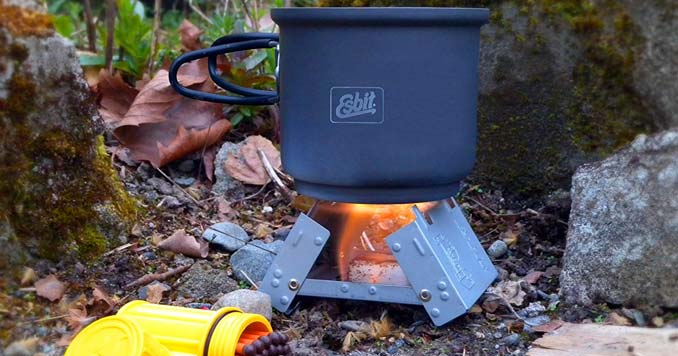
Esbit Folding Stove

Esbit Folding Stove

Esbit and similar solid fuel tablet stoves have been used by military and campers around the world for decades. The ultimate in minimalist stove design, these pocket sized stoves can be tucked away almost anywhere, along with their fuel. This might be the ultimate bugout bag or small survival kit stove, but it of course will have some drawbacks.

The upside to a stove you can stick in your coat pocket is that well, it is a stove you can stick in your coat pocket. You aren’t likely to cook a gourmet meal over this thing, but you can make plenty of hot water, heat up canned foods, and the like, but as with every other stove we’ve looked at, your big limitation is on cookware, rather than the energy output of the stove.

That said, an Esbit also makes a great backup stove. Since a stove and enough fuel to cook with for several days takes up about the space of an AR-15 magazine, you would be well advised to at least pack one as a spare, or stick one in your glovebox. You never know when a stove will come in handy.

Find the Esbit on Amazon

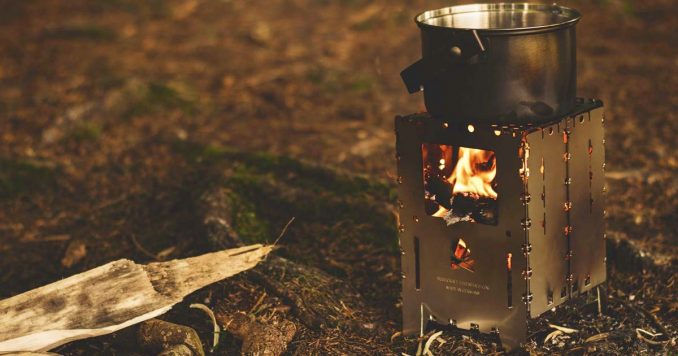
Bushcraft Essentials XL Outdoor Stove Bushbox

Backpack Camp Stove

The Bushcraft Essentials XL stove is by far the most expensive one on the list, but what I like about it is it’s probably the easiest one to fit into a backpack or pocket. The German-made stove is quick and easy set up; you just unfold it and the stainless steel plates drop right into place.

The other great thing about this stove is you can use pretty much any organic matter as fuel so you don’t have to worry about carrying extra fuel. When your done cooking, just fold it up and slide it into your pack.

Find the Bushcraft Stove on Amazon

Choosing An Emergency Camp Stove

If you are looking for a stove for your bugout bag, all the stoves reviewed here, except for the Coleman are perfect for sticking in a bugout bag or small survival kit. Which one you choose is largely up to you.

There is a lot to be said for a stove that  allows burning scraps of wood or other biomass, but that won’t always be an option. For instance, if you are keeping a stove for a grid down emergency, a biomass stove won’t work very well indoors. An alcohol stove on the other hand will.

Stoves using some sort of fuel source have the advantage of a reliable, packaged fuel that can generally be counted on to do the job. Of course, once that fuel is gone,
your stove isn’t of much use, and fuel containers can take up valuable space in an emergency kit.

On the flip side, carrying enough fuel for several days or even a couple weeks generally won’t take up much room, and as it is a consumable, your pack will grow lighter with each use.

Your choice in an emergency stove boils (hehe get it, boils?) down to what kind of space you have set aside for a stove, and what your personal choices are in fuel, and these are only choices you can make.

Ultralight Backing Stoves: Are they part of your Bug Out Survival Gear?

Emergency camping stoves do not have to be expensive, or complicated. Many are made for military or backpacking markets, which lead to lightweight, easy to use and efficient products that do the primary job of heating water or prepared foods very well.

While you are somewhat limited by the small size of these stoves, you’ll find for emergency and grid down situations; they will be the difference between a hot meal
or one that tastes like cold MRE’s and sadness.

The peace of mind a good stove in your emergency kit is invaluable, and just knowing that it is there if you ever need it can be a real relief. The morale boost of a hot meal in an emergency, or the life-saving ability to boil water cannot be measured in dollars, but rather measured in personal satisfaction.

If you don’t already have a stove in your emergency kit or BOB, you should. If you already do, then you are that much ahead of the game!

Portable backpacking camp stoves can be an invaluable tool for preppers for many obvious reasons. Sometimes you don’t have the ability to build a campfire, and sometimes you don’t have