Home2022September

The Advantages of Growing in Containers

I find you can grow most in a container and some crops are even better off in a container. I may combine the soil with the crop’s preference: good acid soil for my blueberry bushes and loose sandy soil for root crops such as carrots and radishes. Each plant gets the amount of water it needs and they’re sitting next to each other with only a little space in between.

Container gardening encourages the planting of a few new varieties per season without giving them a large amount of room. However, my passion for container gardening is weeding. I get very few weeds in my pots and they’re easy to deal with when I do. I also get fewer pests and soil-borne diseases.

What Can I Grow in Containers?

You can grow most of anything in containers but with very little care and some plants are doing exceptionally well, while others are paying more attention. Be not afraid of doing something. Let’s start with the easiest to grow.

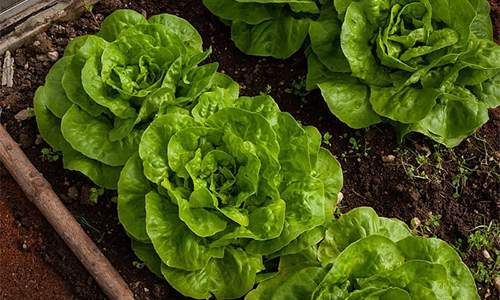
Leafy Greens like are easily grown in buckets or a dish pan. I like starting them early in the spring and planting them in the fall again with a few phased plantings along the way. They normally bolt as soon as the weather turns hot but by keeping them inside on the coldest nights I can prolong the growing season in the winter.

Here Are the Greens I Plant in Containers:61 Fruits and Veggies You Can Grow in Buckets

Herbs and Microgreens61 Fruits and Veggies You Can Grow in Buckets

In my place, I could never get away with growing watercress in the ground, but it’s easier in a container. I just have to make sure it gets the right amount of sunlight, so I can enjoy it most of the year in my salads.

I also grow a nice variety of microgreens and sprouts for my salads, including broccoli sprouts, cress, red clover, and spicy salad mix. I grow my microgreens on a patio shelf, which gives me even more room for the rest of the greenhouse. There they get plenty of late afternoon sun without burning or drying out.

My herb garden also thrives mainly in containers. I like being able to pick any herbs I want from the back patio instead of having to plan ahead and make a costly trip to the shop, only to have my supermarket herbs going bad in a couple of days.

61 Fruits and Veggies You Can Grow in Buckets

My rosemary bush generally lives in its bucket during the year but most of my herbs are replanted throughout the spring and fall. Once again, if you want, you could bring them in during extreme weather, or bring in a small plant to keep going through the winter. I have a small tower garden containing most of my herbs and taking up very little room on the patio.

My French tarragon grows relatively well in a six-gallon bucket, but a larger container would probably be preferable. It likes a little more room for the roots. My container garden contains:

61 Fruits and Veggies You Can Grow in Buckets

Vegetable Crops

61 Fruits and Veggies You Can Grow in Buckets

My favorite bucket plants are peppers and tomatoes. In the spring and fall, both do very well, when temperatures are not too high. If the daytime temperature is too high, tomatoes won’t set fruit and that seems to be more of a concern in containers where the soil is often colder. But in the spring and early fall, I can get a bit longer season by shifting the plant to a shady location when the temperatures get too hot.

One problem with certain vegetables grown from containers is pollination. Usually, there would be no problem if you have multiple pots of tomatoes. But if you have only one tomato plant or one cucumber, or whatever, you may need to hand pollinate. It is easily done with an artist’s brush, but usually, the wind or insects will take care of it for you.

For climbing vines like pole beans, cucumber, and some tomatoes, I place them next to the fence or I give them a tomato cage for support.

With a little extra care these vegetables grow well in containers:

61 Fruits and Veggies You Can Grow in Buckets

Root Crops That Grow Well in Containers

I have tried to grow root crops mostly wherever I have lived with limited success, generally from rocky or clay soil. But root crops are much more likely to do well in a bucket or deep dish pan, as you can easily monitor the soil, moisture, and nutrients. I’m not growing a lot of root crops but they’re doing well.
61 Fruits and Veggies You Can Grow in Buckets

Fruits That Grow Well in Containers61 Fruits and Veggies You Can Grow in Buckets

I wish I had planted my original fruit trees in containers but I was eager to plant and select locations around the property when we purchased the land. Originally, I planted a mango tree that produces a few fruits for the squirrels, a sour carambola that overproduces, and a fig tree that succumbed to the lawn mower. I would have much more range and more bright places to grow vegetables now if I had planted them in containers.

However, I have learned my lesson and now I’ve got quite a few fruits in containers. Those fruits perform really well in containers, surprisingly:

61 Fruits and Veggies You Can Grow in Buckets

Special Care for Container Plants

61 Fruits and Veggies You Can Grow in Buckets

Plants with containers are a little different from growing in the ground. A hot day will very easily strip the soil of all moisture. I make sure there is plenty of drainage on my containers and I water them frequently. If the plant starts to wilt, the leaves become brittle, or the soil becomes dry, give them water.

Another factor is fertilizer for container gardens. Your plants need nutrients, particularly if the same soil is reused annually. Organic fertilizers, compost, and other nutrients are accessible. You need to be mindful of and prepare for what the plant wants.

Leafy greens need a lot of nitrogen and a few other nutrients. But fruiting vegetables require other nutrients to bear fruit. I typically fertilize the individual plants according to the recommendations. This takes longer but allows for optimum yield per plant.

Container Sizes

Most plants in a 5-gallon bucket or dishpan will do well, but some plants need more space. Plants with a tap root prefer a deeper container, and some need space to spread out. When preparing your garden and selecting the container, take the plant growth patterns into consideration.

Save the Seed Envelope

If you are buying seeds, read the tags and save them. Typically for seeds, I file the seed envelope for later consultation. Label your container with a stake showing what you’ve planted and when in a permanent marker or paint. After a few weeks have passed, it is easy to forget that all the leaves look alike.


Other Self-sufficiency and Preparedness solutions recommended for you:

The Lost Ways (The vital self-sufficiency lessons our great grand-fathers left us)
Survival MD (Knowledge to survive any medical crisis situation)
Backyard Liberty (Liberal’s hidden agenda: more than just your guns…)
Alive After the Fall (Build yourself the only unlimited water source you’ll ever need)
The Lost ways II (4 Important Forgotten Skills used by our Ancestors that can help you in any crisis)
The Patriot Privacy Kit (Secure your privacy in just 10 simple steps)

The Advantages of Growing in Containers I find you can grow most in a container and some crops are even better off in a container. I may combine the soil with

Take a look at what our pioneer ancestors ate and the chances are you’re not going to envy them very much. Compared to the food on offer in any modern American grocery store, the frontier diet was pretty basic. Choices were more limited and meals were a lot more basic.
As preppers, though, we should be giving the pioneer diet a close look. After all, these were meals that could be cooked from simple ingredients without a lot of equipment. They didn’t rely on modern preservation methods – no freezing, refrigeration, or synthetic chemicals. Maybe most of all, the pioneers ate food that was ideal for a physically active lifestyle that involved a lot of hard work outdoors.

Let’s be honest here: Who was physically tougher – a modern professional who eats all the latest health food crazes, or a 19th-century farmer living on a simple, traditional diet? That isn’t a hard question to answer. Now think about your lifestyle after the SHTF. It’s going to be a lot closer to that pioneer farmers than to anything the modern diet evolved to suit. If you want to stay healthy and well-fed in a crisis, you could do a lot worse than turning to the recipes our frontier ancestors used. Here are a few to get you started.

Soda Biscuits

Making bread takes time and effort – and a good bit of skill. Soda biscuits are much easier. They don’t take long to make, they’re tasty and they’re versatile. You can serve them with meat and gravy, or dip them in syrup as a dessert or sweet breakfast item.

Ingredients:

  • 4 cups flour
  • 1 tsp baking soda
  • 1 tsp salt
  • Milk or buttermilk

Put the flour in a mixing bowl and add milk, one tablespoon at a time, until you have a stiff dough. Mix the baking soda with a tablespoon of milk and then mix that with the dough. Add the salt and knead it thoroughly to get everything well mixed.

Roll the dough out to about half an inch thick and cut it into biscuits. You can use a cookie cutter or just slice it into squares or triangles. Bake in an oven preheated to 425°F, or in a Dutch oven, for about 12-15 minutes. When the sides are brown and the biscuits are no longer doughy, they’re done.

Related: How to Make Dandelion Bread (Recipe Inside)

Corn Dodgers

Pioneer Recipes Every Prepper Should LearnThese small cornbread pieces can be eaten as a snack or served with stew, chili, or even thick soups. They’re tasty, filling, and simple to make.

Ingredients:

  • 2 cups cornmeal
  • 2 tablespoons butter
  • 1 tablespoon sugar
  • ½ tsp salt
  • 2 cups of milk
  • 1 tsp baking powder

Mix all the ingredients, except the baking powder, in a hot Dutch oven. Once the butter has melted and it’s all thoroughly mixed, remove from the heat and let it stand for about five minutes, then mix in the baking powder. With a tablespoon, drop spoonfuls of the mix into another Dutch oven or skillet and cook until the edges turn brown.

Mormon Johnnycake

Pioneer Recipes Every Prepper Should Learn

Is it a pancake? Is it a dumpling? Who cares? These are light but filling, very tasty, and extremely versatile. Spread with syrup, or break into chunks and drop into a stew before you serve it.

Ingredients:

  • 2 cups cornmeal
  • ½ cup flour
  • 1 tsp baking soda
  • 1 tsp salt
  • 2 cups buttermilk
  • 2 tablespoon molasses
  • 2 eggs if you have them

Mix all the dry ingredients; then add the milk and molasses. If you have eggs, they’ll make the finished product even fluffier. Once the batter is thoroughly mixed, pour it into a greased 9” skillet and cook on high heat for around 20 minutes.

RelatedA Gold Storm Is Coming  (Even the most prepared Americans will be blindsided by what’s about to happen.)

Potato Cakes

Pioneer Recipes Every Prepper Should LearnPotatoes are robust vegetables that are easily stored through the winter. They’re also a great source of carbohydrates and can be used to bulk out flour reserves by making tasty potato cakes. These are great with apple sauce or even maple syrup.

Ingredients:

  • 6 large potatoes
  • ½ cup milk
  • 1 cup flour
  • 2 eggs 2 tbsp salt

Wash, peel, and finely grate the potatoes. Mix the other ingredients into a batter then combine that with the grated potatoes. Heat some shortening or lard in a pan, then drop in spoonfuls of the potato mixture and cook, turning once, until the cakes are golden brown on both sides.

Pioneer Gravy

Pioneer Recipes Every Prepper Should LearnGravy adds a lot of flavor to simple foods, especially biscuits and potatoes. How do you make gravy when all you have is preserved ingredients, though? Simple: Use jerky!

Ingredients:

  • Chopped jerky
  • Lard or grease Flour
  • Salt and pepper
  • Milk

Heat grease in a skillet and fry the jerky until it’s crispy. Scoop out the jerky (it makes a tasty snack when it’s cooled). Mix the flour and milk into a batter, then pour it into the grease and slowly stir it until you have a smooth gravy. Put the jerky bits back, unless you’ve already eaten them, and season with salt and pepper.

Related –  A terrifying disaster is upon us (What you can do to keep your loved ones safe during the coming chaos)

Dutch Oven Sweet Rice

Pioneer Recipes Every Prepper Should LearnSweet dishes are always good for both energy and morale, but it’s hard to store enough dried or preserved fruit to make them regularly. You can turn a prepper staple into a tasty pudding, though – rice.

Ingredients:

  • Cooked rice (1 cup per person)
  • Milk (1/3 cup person)
  • Eggs (1 per 2 people)
  • Salt
  • Sugar (1tbsp per person)
  • Raisins
  • Nutmeg
  • Vanilla

Put the milk and rice in a Dutch oven, and add the other ingredients to taste. Heat, stirring slowly until the eggs are thoroughly cooked.

Recipe books did exist in the pioneer days, but they weren’t like modern ones. Quantities, temperatures, and cooking times were often vague because even a domestic coal stove didn’t allow the near-scientific precision you can get from a modern oven. You had to vary cooking times to suit your own stove, and that goes double when you’re cooking on an open fire. It takes practice to judge when things are done when they’re cooking too quickly or slowly, or when they’re in danger of burning. Master that, though, and you’ll find these pioneer recipes are a great way to make quick, tasty, and nutritious meals even when you’re reduced to basic food supplies.


Other Self-sufficiency and Preparedness solutions recommended for you:

The Lost Ways (The vital self-sufficiency lessons our great grand-fathers left us)
Survival MD (Knowledge to survive any medical crisis situation)
Backyard Liberty (Liberal’s hidden agenda: more than just your guns…)
Alive After the Fall (Build yourself the only unlimited water source you’ll ever need)
The Lost ways II (4 Important Forgotten Skills used by our Ancestors that can help you in any crisis)
The Patriot Privacy Kit (Secure your privacy in just 10 simple steps)

Take a look at what our pioneer ancestors ate and the chances are you’re not going to envy them very much. Compared to the food on offer in any modern

The world is already struggling with food supply and crop management. The Intergovernmental Panel on Climate Change (IPCC) foresaw a general global climate warming over the next few decades. Growing our own food gives us control and independence over our lives.

The best seeds to store are those that are ideally suited to the specific climate in which you find yourself. And of course, climates around the USA differ widely, from wet and warm, to cold and very dry. For your particular area, you should be doing some research and working out what fits your local weather systems. One of the best ways to do this is to observe and utilize what grows best around you.

The article will give you some general advice on the kinds of seeds you can think about storing, these are generalist plants but will establish a framework from which to work.

Seeds have to come from a good stock that originates. One of the modern-day issues that we have to deal with is finding seeds that don’t come from GMO crops. Monsanto supporters of GMOs have actively acquired a large proportion of seed companies around the world. Additionally, Monsanto is partnering with several other companies to create the ‘doomsday seed bank’ known as the Svalbard Global Seed Vault with the express task of preserving ‘crop diversity’ anticipating world events would conspire to affect crop production. With that in mind, you need to find the right seeds to build your own seed bank the doomsday.

Heirloom seeds come from original cultivar plants and are often resistant to disease through hybridization with other plant species. They are hardy and contain no changed genes-just a warning. Also, Monsanto buys up several heirloom seed companies, so you have to either build your own or find Monsanto free seed companies. Seeds Now is a company that can supply heirloom seeds and does not deal with GMO-supporting firms. There are several others, check their section ‘about us’ which usually details whether they are GMO-free.

1. Squash Seeds

Depending on your climate, squash is very easy to grow and it gives you a good grub. Squash contains plenty of carbohydrates and a full range of nutrients, including vitamins A and C, as well as magnesium and potassium. They can also be used for cooking both sweet and savory dishes.

Other warmer climates will have good luck with other squash varieties such as Pumpkin. Pumpkin and butternut squash both love the sun, but they also are thirsty plants and need decent amounts of water.

If you use your own seeds directly from a pumpkin, they will need to be dried out. To obtain storable seeds, obey these instructions:

  1. Open the pumpkin (or other squash) and pull out the seed mass along with some pulp.
  2. Put the mass into a colander or sieve and run water over it, pulling the pulp away from the seeds.
  3. Continue to run cold water over the seeds until you have pulp-free seeds.
  4. Place the seeds onto an absorbent paper or cloth towel – spread them out, so they aren’t touching.
  5. Dry them out in a cool dry place for about 1 week.
  6. The biggest seeds are the ones most likely to germinate.
  7. Store them in a cool, dark place, ideally keeping them in a paper envelope.

2. Green Beans

Green beans contain high levels of vitamin A and antioxidants, and they are very healthy for general health. You do have vitamin C, B12, and B6. Green beans are really easy to grow and crop well. They need cane support, as they grow tall (even the varieties of dwarf require some support).

If you wish to store your own green bean seeds grown at home, you should follow these instructions:

  1. Once you stop watering your green beans (around September) the pods will continue to grow. The larger pods are the ones you’re after for future seeds.
  2. Once the leaves of the plant start to die off, remove the larger pods for seed production.
  3. Gently open the pod down the edge.
  4. Very carefully (without damaging the delicate skin) remove the seeds.
  5. Place the seeds on a paper-lined tray, spreading them out, so they don’t touch.
  6. Leave to dry in a cool, dry place for 1-2 weeks.
  7. Store in a jar in a cool, dark place.

Related –  A terrifying disaster is upon us (What you can do to keep your loved ones safe during the coming chaos)

3. Spinach

Spinach is a very versatile food that is easy to consume. You can eat it raw; or cook with it to bulk up salads; It has loads of vitamins A and C, as well as iron and minerals like potassium and magnesium. It’s best grown in spring and fall (some types are annual rather than biennial), and with spinach, I’ve had a lot of success, I can’t seem to stop it from growing. Spinach seeds are a bit harder to get at and keep than the two previous types of seeds that we have mentioned. To obtain the seed you need to let some of your spinach grow on to flower. At this point, it will not be edible (it will taste quite bitter), so it is really only good for collecting seeds. Collect spinach seeds and store them, follow these steps:

NOTE: Baby spinach is the best type of spinach for seed collection

  1. Let your spinach continue to grow until it flowers.
  2. You will get two types of plants, a male ad a female. They can be differentiated by the color of the little balls that grow under the leaves. The female has only green balls, whereas the male has yellow ones.
  3. Usually, the spinach wind pollinates between the male and female plants, but to give nature a helping hand you can give the male plants a ‘flick’ to get them to release their pollen.
  4. Once the plants start to turn yellow they are ready (the color shows they have given up all of their nutrients in the seed stage).
  5. Pull them up and discard the male plants.
  6. Hang the female plants upside down in a cool; dry place.
  7. Leave for about 2 weeks until the whole plant dries up. The seeds will now be dry too and usually, they can be simply shaken onto paper to collect (they are very small).
  8. Keep them in a jar in a cool; dry place – they usually only store them till the next season.

RelatedA Gold Storm Is Coming  (Even the most prepared Americans will be blindsided by what’s about to happen.)

4. Potato

Potatoes are a staple diet of many people around the world, particularly those in the west. They contain potassium, copper, and B6 and are perfect to ‘fill you up at mealtime. They are generally very easy to grow too, though some varieties are quite susceptible to disease. I lost whole crops to a blight during wet years while growing, when that happens, it’s really disheartening. So avoid it, select your variety of starters with strong resistance to disease. They can be found in any good shop. I’ve used the ‘Charlotte’ variety that I’ve never lost to blight yet, and they taste wonderful. Other varieties which are immune to the disease include the Caribbean, Purple Peruvian, and Prince Hairy (very strong against potato beetle).

To produce potatoes directly from the seed:

From the seed, you can grow potatoes. The seeds can be found in small amounts, round pods once the potatoes start to die off. However, not all potatoes grow these pods, especially potatoes created for the mass market because their pollen is not fertile anymore. But if you find the little green balls on your plant, you can try growing potatoes using the seeds inside. However-warning. Growing edible tubers directly from seed takes at least two seasons. You end up with ‘tablets’ the first year that become your ‘seed potatoes’ which ultimately become your first true crop.

To extract the seeds out of the balls:

  1. Harvest the balls when feeling soft and ripe.
  2. It’s hard to get the tightly packed seeds out of the pod; so you can cover the pods with water and smash them up using a rolling pin or similar.
  3. Leave this smash in the water overnight.
  4. The seeds should start to pull away from the pod and sink to the bottom of the container.
  5. The seeds are very small, like tomato seeds.
  6. Rinse the seeds and place them on an absorbent cloth or towel to dry them out.
  7. Store in a cool, dry place.

Using seed potatoes

Not to confuse ‘potato seed’ with seed potato.’ If you have a previous year’s crop, keep those potatoes that begin to sprout, as they become your seed potatoes.

To prepare seed potatoes for planting, I usually have a supply of egg boxes or similar, that I use to ‘chit’ the potatoes out. Egg boxes are good because they keep the potatoes apart from each other naturally. Place each seed potato, and sprout end up in the box and leave for about 6 weeks until you have about 1 inch of sprout in a light place away from frost. Then, they are able to plant.


5. Corn

If you live in a sunny place, corn is a really good crop to grow. It has iron, and vitamin B6, and is a great carbohydrate source. You can use it to make other foods of all kinds, like cornbread. Corn is pollinated by the wind, so you need two crops, a mile apart is good, but then it can get closer and pollinate. If you are interested in harvesting your own corn seed from your crop, follow these instructions:

IMPORTANT: Corn may suffer from excessive inbreeding. You just need to reduce this by providing a strong plant supply from which to take seeds, it is recommended that over 100 plants have a fairly large gene pool.

Corn HAS to be pollinated to form a kernel for the seed and germinate into a new plant. Growing corn in blocks helps pollination rather than in long rows.

  1. Leave the plants for up to 6 weeks after normal harvesting of the ears.
  2. The ears should be allowed to mature and dry on the stalk (try to avoid the ears getting wet in rain during this stage). When they are dry, the kernels will feel hard and can’t be dented by a thumbnail.
  3. Once dried, rub kernels off the ears with your hands.
  4. Lay the kernels onto paper and allow them to dry for a further 1-2 weeks.
  5. Pull any bits of silk or debris from the kernels.
  6. Store in a cool, dry place


Other Self-sufficiency and Preparedness solutions recommended for you:

The Lost Ways (The vital self-sufficiency lessons our great grand-fathers left us)
Survival MD (Knowledge to survive any medical crisis situation)
Backyard Liberty (Liberal’s hidden agenda: more than just your guns…)
Alive After the Fall (Build yourself the only unlimited water source you’ll ever need)
The Lost ways II (4 Important Forgotten Skills used by our Ancestors that can help you in any crisis)
The Patriot Privacy Kit (Secure your privacy in just 10 simple steps)

The world is already struggling with food supply and crop management. The Intergovernmental Panel on Climate Change (IPCC) foresaw a general global climate warming over the next few decades. Growing