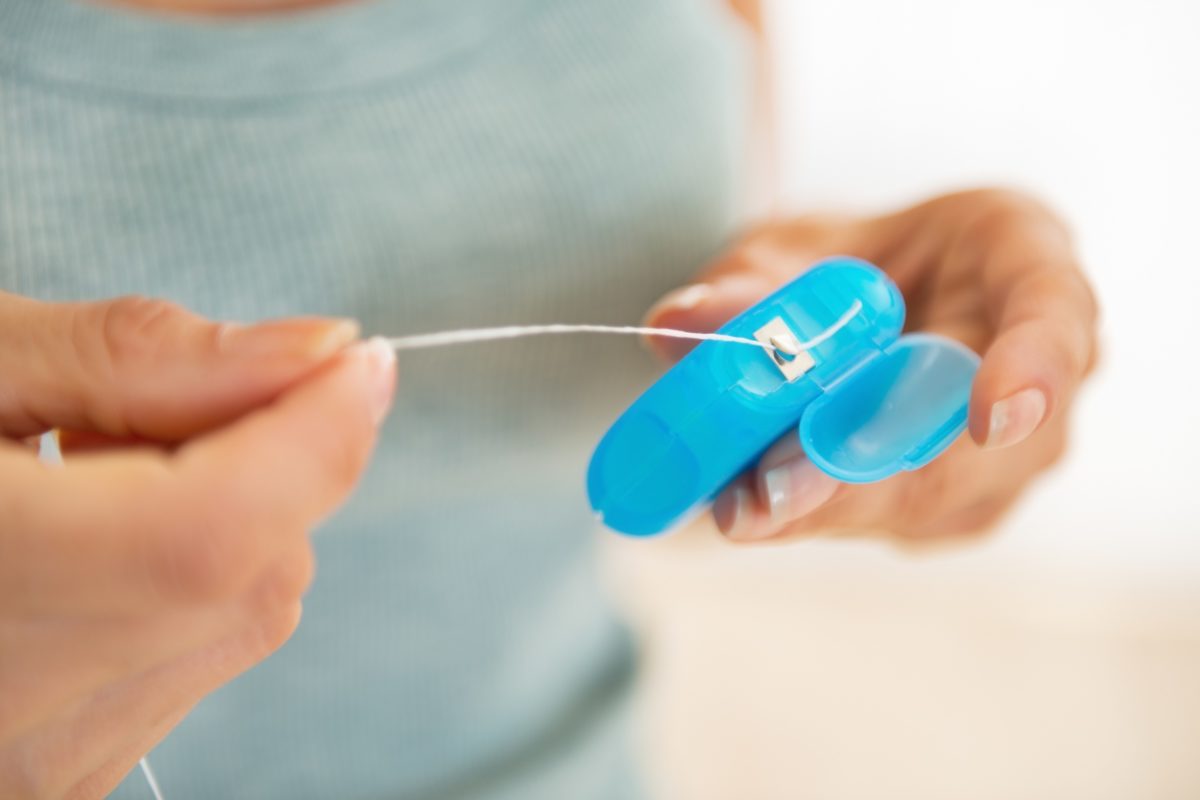
Home2023 (Page 2)

Undoubtedly, most of the developed world lives with the luxury of disposable everyday items and nearly immediate replacement from a well-planned supply chain store. But you must always consider what would happen if the supply chain for household items, hygiene products, food, water, and tools stopped being available. In order to prepare for such an event, preppers around the world save, reuse and re-purpose many items that other folks tend to toss in the trash can.

Without further explanation, here are 23 things that a prepper should never throw away.

  1. Dryer Lint: Dryer lint is highly flammable. Dryer lint is an easy item to collect, compresses to save on space, and will help to get a fire going for cooking and staying warm when the power is out.
  1. Plastic Soda & Water Bottles: Plastic bottles have many uses, but one of the main things they’ll be used for by the prepper is drinking water.  Water glasses break and need replacing. Plastic bottles won’t break when you drop them; they’re lightweight and can be sealed for transport. With a drop of bleach, preppers can store fill and store an otherwise empty plastic bottle with water, every day, for long-term use while the lights are still on.
  1. Old Shoes & Boots: Most folks buy new shoes when their pair starts to look dingy, but they are still very functional. Clothing one’s feet is something the prepper can’t forget to plan for in SHTF. If nothing else by saving old shoes, the prepper will create a wealth of barter items to trade with people. And you can bet the value of a pair of shoes in a post-apocalyptic world is going to be fairly high. Here’s how to make your boots last longer.
  1. Old Clothes: Just like old shoes, we tend to give away clothing or throw it away when we have a small hole or stain on our shirt. The prepper knows that he can still use that clothing for wear in a survival situation, but he can use the fabric to mend, replace and re-purpose many household items. Many people don’t consider sources of fabric in SHTF, but old clothes are great for that.
  1. Wood Scraps: This goes without saying, but wood scraps should always be collected, kept organized, stacked, and dry. While it’s easy to toss scrap wood in the trash, consider the need to keep a cooking fire going if you haven’t had power for 3 weeks.
  1. Cord, String, and Rope Pieces: From sewing clothing to securing shelter, string, cord, and rope will be a highly-valued items that the prepper should never “toss to the curb”. It’s very easy to fold, wrap and store spare cordage, so never throw it out!
  1. Wire: There are two types of wire the prepper should never throw away – conductive and non-conductive wire. The conductive wire should be saved as barter pieces for barter for electrical repair or for making a tin can directional WiFi antenna to extend your communication after an EMP. The non-conductive wire should be saved for utility and fastener use. Don’t throw even a hand-length piece of wire away. Instead, organize it, and put it away in a dry spot.
  1. Spare nuts, bolts, and screws: In an extended grid-down situation, folks will eventually set up some form of commerce. If you’re astute, you can provide income for your family post-SHTF and repair items as needed collecting all the spare fasteners that most folks throw in the garbage.
  1. Used Candles: The prepper can scrape out the last little bit of wax in used candles. When enough wax is collected it can be melted and consolidated into one candle container. New wicks are fairly easy to make. When the lights go out for good, a source of light like candles will be invaluable.
  1. Broken Crayons: Children are great for making broken crayons, but don’t throw the broken ones away! Instead, remove the wrappers and throw the pieces in with your saved used candle pieces, so they too can be used to make more candles.
  1. Broken Pencils: Broken pencils can be cut in half a long way, exposing graphite. The prepper can store them in the glove box of a car. When either end of the exposed graphite in the pencil is hooked up to a car battery and cable, it turns red hot and bursts into flames. Every prepper’s bug-out vehicle should have a bag of cut-in-half pencils. Don’t throw them out!
  1. Zip ties: Extra zip ties come with all sorts of products as extra fasteners. We tend to throw them out. But the prepper cannot throw them away. These are too useful. Zip ties had hundreds of uses and take up virtually no space.
  1. Coffee Grounds: Did you know that you can run your coffee grounds through your coffee machine twice? Some people like weak coffee, and some like a less caffeinated cup of coffee before bed. One can also use coffee grounds as compost for the garden.
  1. Vegetable scraps: Plant and veggie scraps can be used for compost, just like coffee grounds, but the prepper can also throw these scraps out for their chickens to eat.
  1. Hair Clippings: Hair clippings are another great addition to your garden compost pile.  If you were thinking of throwing that pile of hair on the floor away, don’t! Your garden will love the nutrients added to the compost pile.
  1. Soap chips: Usually the little leftover soap bar chips go down the drain or are thrown out. But reconsider collecting and compressing them to make new soap bars. In SHTF the prepper will have to make the most of hygiene products to keep from becoming ill.
  1. Toilet Paper Rolls: Toilet paper rolls are another great source of tinder for starting fires. They can be cut and flattened out for easy storage. Combine cut-up toilet paper rolls with dryer lint the prepper will have a warm fire in no time. You can also make your own substitute for toilet paper.
  1. Broken Rubber Bands: Broken rubber bands really aren’t broken. By tying the two ends together, the rubber band works just fine again. In SHTF a broken rubber band is still an excellent temporary light-duty fastener.
  1. “Expired” Honey: Raw honey really doesn’t expire. Think twice before trash-canning that jar. While most commercially bought raw honey shows 2 years for expiration, the truth is, that honey can be stored almost indefinitely when housed in a cool, dry place.
  1. Rusted Tools: In SHTF, preppers won’t have the luxury of going to the hardware store. If tools become rusted or dingy looking, clean them up with oil and store them in the garage. Another man’s dingy, rusted tools are another man’s lifesaver in SHTF. Old tools are an excellent barter item.
  1. Metal Breath Mint Containers: These types of containers are great for condensing the last portion of chapstick, balm, and salve. The containers usually fit well right inside a shirt pocket. Breath mint containers also work well for survival kits.
  1. Plastic Milk Jugs: Cut the top off the plastic milk jug and you have an excellent pot for small plants. This is a great way to start your garden and move the sprouted plants to a fixed location when you’re ready.
  1. Paper clips: I cannot count the times paper clips are thrown into the trash at an office or put through the shredder, but the prepper wouldn’t do that. Paper clips are essentially robust twist-ties ready to help the prepper fasten shelters and projects in a post-SHTF world. They can be used as shims for repair mechanics as well.

Hopefully, this list has inspired you as a prepper to think of items you can also reuse instead of throwing away.

The vital self-sufficiency lessons our great grand-fathers left us
Knowledge to survive any medical crisis situation
The Smart, Easy Way to Food Independence
Your secret weapon when our society shatters into a million pieces
Secure your privacy in just 10 simple steps

Undoubtedly, most of the developed world lives with the luxury of disposable everyday items and nearly immediate replacement from a well-planned supply chain store. But you must always consider what

Do you know how to be prepared with water before a disaster hits your city? I teach classes at various churches, subdivisions, and businesses on food storage and emergency preparedness.

I decided I could no longer haul all of my emergency items to these classes showing what is needed if a disaster hits my neighborhood. It took two full days to set up the photoshoot and we will be doing videos together sooner than later.

I am a visual person; so I hope these help you see what storing a few containers of water can do for you and your family in case of an emergency.

We Take the Faucet for Granted

Sometimes we take for granted that we can walk into the kitchen and just turn on the faucet and water comes flying out. We have to be prepared for the day when those faucets don’t work. Maybe the water lines are down because power is lost, or the water is contaminated from an unknown source.

You may wonder why I talk about water storage so often, well it’s because we sometimes need a little nudge to get more water stored. I went to get my hair cut today and I asked the girl cutting my hair if she had any water stored at her home.

I didn’t want to be too personal, but she’s been cutting my hair for years and I’m old enough to be her grandfather. Sometimes I will ask her if she is prepared with water and food storage, etc. She said, “No, not yet.” She is newly married and living paycheck to paycheck.

Start With Cases of Water and Bags of Beans/Rice

I suggested she start with just a case or two of water and a few cans of beans and a bag of rice. It’s a good start and she can sleep at night knowing she at least has a day or two of water and a little food in her home.

The shop had a television showing the Hurricane Michael catastrophic events unfolding before our eyes. May God bless all the workers, the first responders, and the families that are being affected by this terrible storm. They reported it’s a 500-year storm, unbelievable. It’s the worst storm in American history. My heart aches for all involved.

Of course, I then pointed out to the girl cutting my hair that where we live is far away from the ocean for any threat of a hurricane or tornado, but we had a 500-year flood in 2013. I left it at that.

Please remember to always use a lead-free hose to fill your water containers if you fill the outside with a hose bib.

How To Be Prepared With Water

I suggest 4 gallons of water per person per day, some may think that’s too much. It isn’t for me, we need water to drink, cook, wash clothes, or at least wash our underwear. And we may have neighbors that have zero water in their homes.

I used to think I was ok since I have my water heater filled with 50 gallons of water. But we shouldn’t count on that water anymore. If it becomes contaminated by terrorists or some crazy group or just Mother Nature compromises the integrity of our water lines, we’ll be in big trouble.

Lead via Water In Flint, Michigan

We have seen it in Flint, Michigan for example what happened to their water based on bad decisions by the local government agencies. It was lead poisoning.

Calculate Water Needs

You can figure out the number of cases of water to buy for the needs of the people in your home for a week, 2 weeks, or a month. Some cases come with 12-ounce bottles, 16-ounce or 20-ounce bottles. Those work great for water storage if a disaster hits. They aren’t the most cost-effective, but they work in a pinch.

WaterBricks

I love WaterBricks, the 3.5-gallon ones weigh about 26-27 pounds depending on how full they are filled. You need only 1/2 teaspoon of Water Preserver for this container and it’s great to know you only have to rotate them every five years.

Milk Jugs

Some people just fill-washed milk jugs. They may leak after a bit, but at least you will have water.  If you are lucky, they may never leak. If nothing else, you can use this water for personal hygiene.

55-Gallon Barrels

You can buy the 55-gallon blue barrels with a pump and fill them, but leave room for expansion if you get a freeze in your city. I have seen these at Walmart for less than $50.00 in Southern Utah. Please remember you need a Bung and a Siphon Pump. Check them out.

Berkey Sports Water Bottles

I have talked to you about the Berkey Sports Bottles, these are great for camping or traveling. In some countries or cities, you may need to be careful about drinking the water. These can be refilled up to 640 times with municipal water. Mark and I gave these as Christmas gifts one year to our family members.

LifeStraw

This is another way to purify your water with a LifeStraw. These are small and compact and will purify up to 1000 gallons.

Big Berkey Water Purifier

I have one of these and have tested it many times. The red food coloring test works, I never saw red water coming through the spout! If you have trouble testing it, please make sure all the filters are correctly installed. These are awesome and may save our life if our water becomes contaminated.

High-Capacity Water Tanks

If you can afford the large high-capacity tanks they are awesome. I finally saved the money to get one last December. I bought one that holds 250 gallons for about $350.00. Yes, they are very expensive, but I can sleep at night knowing I have water. Lots of water.

Do you know how to be prepared with water before a disaster hits your city? I teach classes at various churches, subdivisions, and businesses on food storage and emergency preparedness. I

We’ve all heard the news reports of seeds discovered in ancient tombs that germinated when they were planted; even the seeds you purchase are labelled with dates of expiration or seasonal use. What is the reality regarding the viability of plants, and how long will it last? Here is what we know.

Seed Expiration

Seeds don’t necessarily die, but they might not germinate. You will be very near to maximum germination the first year. But the germination rate will decrease each year that goes by. How long they stay viable depends on the seed form you have, and how it is handled.

How to Save and Store Seeds for Best Viability

Do Seeds Really Expire

If you store surplus seeds from year to year, or seeds from your heirloom plant, storing them in a cold, dry place is safest. Put the seeds in an airtight container like a tight cover pot, an old-fashioned movie tub, or like I do, wrapped in mylar. Mark and date the seeds, and provide the initial seed packet details with the seeds if appropriate. You should dump all the packets into a pint jar with a desiccant packet or a little rice in the bottom for seeds in packets to remove moisture and securely seal the container.

Harvesting Seeds from the Garden

If you save seed from your greenhouse, wait until the fruit or vegetable is completely mature until the seeds are collected and extracted. Make sure the seeds are fully dried until they are placed into the containers.

Then hold the seed containers in a cold, dry place which is regulated by temperature. I’d like to put my seeds on a basement rack, but I’m working for the time being on a refrigerator rack. My downside to the fridge is that most refrigerators are very warm, and if your jar seal is not secure, seeds may have molding issues.

Save seeds from the heirloom varieties only when saving seeds from your greenhouse. Hybrid seeds don’t produce true from generation to generation and you could end up with a poor crop the following year.

How Long Do Seeds Keep?

If you’ve stored your seeds in a safe, dry place, the next year they’ll likely be viable. Plant any earlier than normal however, so others may not germinate. It depends on the sort of seeds you hold, in addition to storage. Some seeds need to be immediately planted, and some need to hold for several years.

Related –  A terrifying disaster is upon us (What you can do to keep your loved ones safe during the coming chaos)

Seed Viability

This chart shows how long you should anticipate your crop seeds to attain reasonable viability. Seeds can germinate for a longer period of time, however they are hit or skipped, so you should usually only begin with fresh seed. This chart does not ensure durability, note that there are a number of variables. Those periods are normal, but under optimal conditions can be much longer:

Seed Viability Over Time

0 to 1 Year – Plant Now

2 Years

  • Corn
  • Leeks
  • Okra
  • Peppers
  • Swiss Chard

3 Years

  • Bean seeds of all kinds
  • Beets
  • Carrots
  • Lettuce
  • Melons
  • Oriental greens
  • Peas
  • Rutabagas
  • Squash

4 Years

  • Collards
  • Fennel
  • Kale
  • Mustard
  • Pumpkin
  • Tomato
  • Turnips
  • Watermelon

5 Years

  • Broccoli
  • Brussels sprouts
  • Cabbage
  • Cauliflower
  • Celery
  • Cucumber
  • Eggplant
  • Kohlrabi
  • Radish
  • Spinach

Storing Seeds in Less Than Ideal Conditions

Even if the seed is kept in less than optimal circumstances, after several years, I have known seeds to germinate and yield a successful harvest. A neighbor once purchased a large number of corn seeds one year, kept them in his garage, and used them with good results for over 10 years until he ran out. If I had done so, they would definitely not have germinated at all, his thumb is greener than mine.

Live plants are crops. Against all odds, some will develop, others will not germinate even though held in ideal conditions. In addition, in adverse environments, many plants perform better. It’s an impossible rule of nature. So, before throwing out some seeds, plant some or check them as I describe below. They might be viable for another year.

Test Your Seeds

There are many ways you can check the plants. You can plant 5 or 10 and see how many germinate, but for most plants, planting many seeds on a pad of moist paper towels is likely easier. Turn them over and growing them in a plastic bag. Put them in a warm place (but not extreme, room temperature is ok). Test them for germination every couple of days. If the seeds are sprouting, you are good at planting. If not, throw them out and start with fresh crop.

What About Survival Seed Vaults?

You’ll notice other online survival seed products packed for 20 to 25 years to keep. Can they still hold those seeds for 25 years? Unfortunately, “maybe” is the best answer I can offer. So much depends on how the seeds are processed. The producers of such sets of seeds bundle the seeds into mylars or cans to keep it dry and cool. If you store them in a cool environment, then you are likely to have viable seeds when you need them. Buy more seeds than you’d plan to need for extra insurance.

Another consideration when seed vaults are considered is that many are filled with popular varieties of seed that may not develop in your neighborhood. Look for vaults containing heirloom seeds which are well established to thrive in your soil and environment.

I prefer to select my seeds individually, because many of the seeds in the common vaults in my location will not grow. If you reside in certain areas of the world, a large-variety vault will fit well for you.

Packing Your Own Seeds

My seed vault consists of packets of heirloom seeds that I have explicitly selected for getting successful results in my region with them. I cover them with a desiccant solution in a mylar bag, since it’s just too hot here. I don’t use an oxygen absorber but other gardeners do. My hypothesis is that seeds are alive and do need some oxygen. I keep them in the fridge. I’ve only stored them this way for around 5 years, but the ones I’ve tested this year have been germinating well. I’m hoping to upgrade them after 10 years but they may last a lot longer.

Related: A Gold Storm Is Coming  (Even the most prepared Americans will be blindsided by what’s about to happen.)


Other Self-sufficiency and Preparedness solutions recommended for you:

The Lost Ways (The vital self-sufficiency lessons our great grand-fathers left us)
Survival MD (Knowledge to survive any medical crisis situation)
Backyard Liberty (Liberal’s hidden agenda: more than just your guns…)
Alive After the Fall (Build yourself the only unlimited water source you’ll ever need)
The Lost ways II (4 Important Forgotten Skills used by our Ancestors that can help you in any crisis)
The Patriot Privacy Kit (Secure your privacy in just 10 simple steps)

We’ve all heard the news reports of seeds discovered in ancient tombs that germinated when they were planted; even the seeds you purchase are labelled with dates of expiration or

You’ve probably heard this one before – brush and floss before hitting the sack. I can wholeheartedly say that dental floss is the best thing to happen for yapper health right after ceramic implants. Have you ever stopped to wonder if the same stuff we use to floss our teeth can be used for other purposes?

Of course you did, and I have to admit that most of you can become very inventive when it comes to, let’s say, repurposing floss (you really should that news piece about that guy who ended up in his hospital after his SO tied him to the bed with dental floss for a wild sex game).

Anywho, floss is very handy to have around, especially when the shit hits the fan. It doesn’t take too much imagination that dental floss can be successfully employed as cordage when the need arises.

From crafting weapons to drying your clothes above the firepit, dental floss is a powerful ally, one that can help you get stuff done without too much effort. So, what are the survival uses of dental floss? Well, keep reading, and you will find out. Maybe I’ll even manage to surprise you.

Weapon-making

Though I can’t say that I’m very comfortable around weapons, bladed or otherwise, in case of an SHTF situation, you can craft yourself a sturdy weapon which can be used for hunting, self-defense, and both. Easy enough to do it – take a long pole and tie your survival knife to one of the ends using as much dental floss as necessary. You can also use floss as a bowstring if you can find a piece of wood with the right curvature.

Fishing

No fishing lines? No problem. Just cut a long piece of dental floss and tie the hook to the other end. If you don’t have anything on hand to act as a floater, you can always inflate a condom and attach it to the dental floss line. You can create your custom fishing box – just like a tinder box, but with fishing implements – using a small oval container (I fashioned mine from an old coconut shell coated with resin), a few hooks, dental floss, a floater, and some piece to act as a weight.

Tying your shoes

There’s nothing worse than a ripped hiking boot shoelace. But wait! It gets even better – no reason to cry over ripped shoes when you’ve got a spare, but that usually never happens. So, if you’re out and find yourself with nothing to tie your shoes, just grab a long piece of dental floss, cut it to size (use the other shoelace as a reference point) and carry on.

Drying your clothes

Anything can happen when you’re in a survival-type situation. I personally abhor anything that ends in me having to sit for any number of hours with soaking-wet clothes. Of course, you can always use the extras in your B.O.B, but that still leaves you with wet apparel.

The best and quickest way to dry them would be over a fire. Take two long sticks and insert them into the ground just about the firepit. Use your survival knife or another sharp implement to create grooves at each end of the stick. Cut a long piece of dental floss and connect the two sticks. Now that you have a clothesline, the only thing left would be to start your fire and hang your clothes out to dry.

Making a simple alarm

Whether you’re alone in the woods or have a small mountain refuge, you’ll need some sort of alarm system. Of course, when you’re still in contact with the rest of the world, you can always hit the local hardware store to purchase an alarm. However, when you’re out there, things take to change a little, in the sense that you will need to improvise.

To make a simple alarm for your overnight camp, plant a couple of sturdy sticks around your location and connect them using dental floss. Attach a couple of cans or empty container, and that’s about it. You may not be able to see what comes your way, but you’ll certainly be able to hear it long before it can set foot inside your tent.

Mend ripped clothing

I know that sewing is not on your top 10 favorite activities list, but any prepper should know how to repair his clothes, especially when there’s no one around to do it for him.

Sewing kits should be a part of your B.O.B. However, in case you’ve forgotten to throw in some needle and thread, you can always use a fishing hook and some dental floss to patch up your clothes. If your first-aid includes a suturing kit, you can also break open a pack and use the sterile thread to seal holes in your clothes.

Stitching up wounds

And because I already broached the subject of suturing, if you’re unfortunate enough to wind up with a big bleeder, you can always use dental floss to make stitches. As for the needle, grab a fishing hook from the kit, and throw it in the fire. You will also need something to hold the hook during the procedure – if your first-aid kit doesn’t come with a pair of straight scissors, you can always use your multitool’s plier.

After cleaning the wound with whatever you have on hand (I would recommend clean water and mouthwash), grab the needle by its midsection, run it through the first incision line, cross the gap, and piece the other edge of skin from beneath.

Pull the thread, grab the longer end, loop the thread four times around the pliers, open it a bit, grab the smaller end, and pull. Repeat the procedure until you close the wound. Congrats! You now know how to make simple interrupted sutures.

That’s it for my 7 cookie ways of using dental floss in an SHTF situation. Have something more to add to the list? Hit the comments section and let me know.

Before you go, you may also like:
Put This Spice In Your Shoes To Fix Toenail Fungus
The vital self-sufficiency lessons our great grand-fathers left us
Knowledge to survive any medical crisis situation
Liberal’s hidden agenda: more than just your guns
Build yourself the only unlimited water source you’ll ever need
Secure your privacy in just 10 simple steps

You’ve probably heard this one before – brush and floss before hitting the sack. I can wholeheartedly say that dental floss is the best thing to happen for yapper health

Many Preppers are simply individuals or families preparing for SHTF, while others may be organized into groups, conducting extensive training exercises. Unfortunately, while preparedness activities are typically focused on food storage or “bug out” locations, we often miss implementing real-world scenarios and “play like you practice” training.

This article focuses on both the adverse effects of sleep deprivation and how the military, emergency responders, and Preppers benefit from using sleep deprivation during training.

It uses guidance from U.S. Army Field Manual (FM) 6-22.5, extensive studies by COL Gregory Belenky – Director of Neuropsychiatry at Walter Reed Army Institute of Research, as well as sleep studies performed at the U.S. Army Ranger School at Ft. Benning, Ga., the Naval Training Center in San Diego, Calif., and Ft. Jackson Army Training Center in South Carolina.

Related: Put This Spice In Your Shoes To Fix Toenail Fungus

Specifically, while FM 6-22.5 acknowledges that anything less than 7 – 8 hours of sleep per 24-hour period will result in at least some loss of performance, there is actually “no minimum sleep period,” particularly for troops engaged in manual or physical duties.

FM 6-22.5 and other authorities recommend that sleep considerations for commanders are actually of higher priority than that for troops because commanders are in a “decision-making” capacity where their decisions could affect unit survivability.

A wealth of scientific research shows that sleep deprivation can be an integral part of any training evolution as it helps prepare members for later stressful conditions during actual operations, helps “weed out” those who may later exhibit psycho-social disorders, and can help to later reduce both physical and mental stress casualties during basic operations.

In the case of SHTF, your family or Prepper group would almost certainly be under extremely stressful conditions, when the general public is at its weakest and most vulnerable.

When human beings are placed in stressful situations, they will always revert back to what they have practiced the most. Any sports coach or military trainer worth his or her salt will tell you that you will always “play like you practice,” meaning that if you practice sloppily, you will perform sloppily.

When it comes to groups and teams that may be called upon to perform under stressful conditions, nothing is more important than realistic training… including sleep deprivation.

EFFECTS OF SLEEP DEPRIVATION

In his studies of “lack of sleep” among trainees at the Naval Training Center (NTC) in San Diego and Army Ranger candidates at Ft. Benning, COL Gregory Belenky – Director of Neuropsychiatry at Walter Reed Army Institute of Research – finds that sleep deprivation clearly degrades complex cognitive performance – like word fluency and decision making in rapidly changing circumstances – which declines by 25% for every successive 24 hours one is awake. Conversely, physical strength and endurance are virtually unaffected.

Belenky notes that during their 58-day training, Ranger candidates average between 3.2 and 3.6 hours of sleep in a typical 24-period, with much of the sleep coming in brief and fragmented “naps.” His studies at the Naval Training Center showed that personnel at the squad and crew level averaged 7-8 hours of sleep per night, while battalion- and brigade-level personnel averaged only 4 hours of sleep.

Over the course of Naval Training Center training evolutions, he noticed that junior personnel improved their performance, while the performance of higher echelon personnel diminished. He attributed this to findings that show that “thinking” is more greatly affected by sleep deprivation than simple, physical tasks.

What this strongly suggests is that trainees involved in simple, physical tasks will not be adversely affected by sleep deprivation, but sleep does become necessary when recruits/candidates must absorb important, academic information. Therefore, a delicate balance should be reached allowing adequate sleep during academic challenges with the application of sleep deprivation during physical, field operations.

Belenky references the term “droning,” referring to sleep-deprived Ranger candidates who could “put one foot in front of the other and respond if challenged, but have difficulty grasping their situation or acting on their own initiative.”

He found that sufferers of sleep deprivation experience a reduction in speed, but accuracy was relatively preserved. In essence, even when sleep deprived, a soldier could still shoot accurately but have difficulty figuring out where he is on the battlefield.

Sleep deprivation can cause changes in alertness, mood, motivation, and initiative, and in a very recent study of Army recruits at Ft. Jackson, S.C., it was found that physical fitness is important not only for typical physical performance but to reduce the effects of sleep deprivation during actual deployment in a stressful environment.

BENEFITS OF SLEEP DEPRIVATION IN TRAINING

In order to survive in emergency situations, we must be able to react and perform. For Preppers, this should involve real-world training that is challenging and stressful. We have seen time and again that even homeland emergency situations require responders to perform at heightened levels for hours – and even days – at a time. Pre-exposure to those levels of intensity is paramount.

Related: Put This Spice In Your Shoes To Fix Toenail Fungus

In emergency situations, performance is enhanced when responders acquire “instinctive reactions” – what military trainers would call “muscle memory.” This is acquired only from intense, repetitive training.

While the adverse effects of sleep deprivation are well documented, strict focus on those effects prevents many from realizing the benefits of inducing sleep deprivation during training.

Don Stevenson is a former member of the Australian Army and a current fitness consultant specializing in fitness solutions for law enforcement and the military. He insists that sleep deprivation is an integral part of military and emergency responder training.

As Belenky’s studies found that “mood” is adversely affected by sleep deprivation, Stevenson insists that, “personality conflicts and morale problems will be multiplied by fatigue as troops become short-tempered.” This can be a useful tool during initial (basic) training as commanders are able to “weed out” candidates and recruits with psychiatric and/or psychological problems who might later become liabilities for the unit.

Other studies show that sleep deprivation and a “willingness to endure hardship” is an integral part of training as it helps trainers identify those individuals who might not be able to cope with stressful conditions.

While FM 6-22.5 directs that the “ideal sleep period is 7 to 8 hours of continuous and uninterrupted sleep each night,” and that anything less “will result in some loss of performance degradation,” it acknowledges that “there is no minimum sleep period.”

Being exposed to sleep deprivation during initial training helps military and emergency responder recruits and candidates learn to recognize the effects of sleep deprivation on themselves and their battle buddies. Even at the troop level, commanders are able to ensure the placement of personnel who are able to recognize the effects of lack of sleep and troops learn to help each other work through it, and how to perform in stressful situations.

ACCOMMODATING SLEEP DEPRIVATION

FM 6-22.5 advises that the best way to evaluate a trainee’s sleep situation is to observe his or her behavior, and lists indications of sleep loss including increased errors in decision-making, irritability, bloodshot eyes, difficulty understanding information, attention lapses, decreased initiative/motivation and decreased attention to personal hygiene.

Among the “physical signs” of sleep deprivation, Stevenson lists vacant stares and bloodshot eyes, blurry vision, slurred speech, slow responsiveness, unstable posture, dizziness, and difficulty performing movements.

For “behavioral signs,” the list includes neglect of routine tasks, poor work output, lack of motivation, poor communication, poor judgment, confusion, irritability, moodiness, and daydreaming.

It is important to expose fellow Prepper trainees to sleep deprivation as long as it is in a supervised training environment. This allows both commanders and trainees to understand how sleep affects performance and how to address many of the problems that come along with fatigue in a stressful environment. As Stevenson suggests, “The better educated your troops are the more likely they are to continue performing when fatigued.”

For actual operations outside of the training environment, Stevenson gives helpful hints for commanders when faced with sleep-deprived troops.

1. Adopt a more relaxed leadership style.

2. Give simple directions and limit tasks.

3. Repeat orders and check for comprehension. Have them repeat it back to you.

4. Use a buddy system. Pair up personnel, to keep an eye on each other. No standing post alone!

5. Rotate personnel, especially those performing demanding tasks.

Perhaps surprising to many, FM 6-22.5 recommends that commanders be placed more prominent in the hierarchy of sleep needs. As adequate sleep is necessary for speed and accuracy in decision-making, commanders should receive “top priority” as leaders who are responsible for making decisions critical to mission success, troop safety, and unit survival. This can be a difficult one for some commanders as they feel like they should be “as tough as” their troops. Such thinking is outdated and dangerous.

Persons on guard duty, performing tedious tasks, monitoring equipment, or cadre evaluating trainees should be given second priority. Last on the scale are those performing physical work, which would include trainees (as long as they are not receiving “academic” instruction).

Stevenson recommends the following sleep requirements for prolonged combat effectiveness. (Note that physical tasks do not require the same sleep as mental tasks).

For Physical Tasks:

Up to three days = no sleep required

Up to six days = 1.5 hours of sleep required

Up to nine days = 3 hours of sleep required

For Mental Tasks:

Up to one day = no sleep required

Up to 2 days = 1.5 hours of sleep required

Up to 3 days = 3 hours of sleep required

SUMMARY

In the case of SHTF, sleep deprivation should not necessarily be something that members want only to accept, but rather deal with as they would deal with other logistical considerations.

While less than 7-8 hours of sleep within a 24-hour period affect higher-order mental abilities and situational awareness, sleep deprivation should not necessarily be a factor in basic training environments, unless training evolutions involve the retention of important knowledge. Simple, psychomotor activities – like hiking or gathering firewood – fit well even in a sleep-deprived environment.

There does seem to be some debate as to whether or not brief, fragmented “naps” help to mitigate sleep deprivation in an operational environment. But most agree that the “quality” of sleep is what is important. This firmly holds true to the old military adage “Never stand when you can sit, never sit when you can lie down.” Even a 20-minute high-quality nap can be beneficial to performance.

Above all else, when it comes to sleep deprivation, “lead from the front” does not apply. Commanders should not allow themselves to become victims of their own training. In both real-world and training environments, commanders, cadres, and evaluators need more sleep than those in actual training or those performing physical tasks.

Equally important for Preppers are the findings that a high level of physical fitness helps mitigate sleep deprivation’s effects. Clearly, Preppers should focus on physical training now to help mitigate the effects of sleep deprivation in time of SHTF.


Other self-sufficiency and preparedness solutions recommended for you:

Put This Spice In Your Shoes To Fix Toenail Fungus

The vital self-sufficiency lessons our great grand-fathers left us

Knowledge to survive any medical crisis situation

Liberal’s hidden agenda: more than just your guns

Build yourself the only unlimited water source you’ll ever need

Secure your privacy in just 10 simple steps

Many Preppers are simply individuals or families preparing for SHTF, while others may be organized into groups, conducting extensive training exercises. Unfortunately, while preparedness activities are typically focused on food

In a survival situation iodine is essential to have readily available, especially if there is a nuclear event of any type (see the section on Potassium Iodide supplementation for full details). Iodine is also essential to have due to its ability to disinfect water. After treating water with iodine you should let it stand for half an hour; this will allow enough time to kill off all the viruses and bacteria. If the water is cold (less than 68 degrees F) then you will have to give it four hours to be sure it is sterilized.

If you check the list of some of the most powerful nutrients to boost your immune system, Iodine stands out from the crowd.

Symptoms of hypothyroidism include fatigue, cold intolerance (you always feel cold), constipation, hair loss, bags under your eyes, and if severe enough, the thyroid gland will swell (goiter). A goiter is evident when looking at a person you will see a swollen area at the front base of their neck, below their larynx or Adam’s apple.

There are other more far-reaching effects of hypothyroidism including stopping ovulation and infertility in women, and increased risk of other cancers including prostate, endometrial, breast, and ovarian.

As a Prepper, iodine is one of the most useful items to have on hand; it is relatively inexpensive, and I also recommend you stockpile a good supply of potassium iodide for any radioactive exposure from a nuclear event as well as other forms of iodine such as Nascent Iodine for daily use, etc. Other sources of iodine are mostly from sea vegetables like kelp, seafood, and shellfish.

Note: The iodine content of iodized salt cannot be used as a source of iodine, since the amount you would need to raise the iodine levels in your blood would be fatal.


Symptoms of Iodine Deficiency

A deficiency of iodine can have serious effects on the body. The symptoms of its deficiency include the following:

  • Depression and frustration
  • Mental retardation
  • Poor perception levels
  • Goiter
  • Abnormal weight gain
  • Decreased fertility
  • Coarse skin
  • Chances of stillbirth in expectant mothers
  • Constipation
  • Fatigue

Iodine is an essential mineral you must get from your diet.

Here Are 9 Healthy Foods That Are Rich in Iodine

1. Seaweed

Seaweed is a good source of antioxidants, vitamins, and minerals. It’s also low in calories.

Seaweed is one of the best natural sources of iodine. However, the amount can vary significantly based on seaweed type, the region in which it grew and its preparation.

Three popular seaweed varieties include kombu kelp, wakame, and nori.

– Kombu Kelp

Kombu kelp is a brown seaweed sold dried or as a fine powder. It is often used to make a Japanese soup stock called dashi.

In a study that surveyed seaweed samples from various Asian countries for their iodine content, it was found that kombu kelp contains, by far, the highest amount of iodine compared to other species of seaweed.

Kombu kelp can contain up to 2,984 mcg of iodine per seaweed sheet (1 gram). This provides almost 2,000% of the recommended daily intake.

Excess iodine consumption is well-tolerated in the majority of people but could result in thyroid dysfunction for those who are susceptible.

– Wakame

Wakame is another type of brown seaweed that is slightly sweet in flavor. It is commonly used to make miso soup.

The amount of iodine in wakame seaweed depends on where it is grown. Wakame from Asia has higher amounts of iodine than wakame from Australia and New Zealand.

One study found that the average amount of iodine in wakame seaweed from various parts of the world was 66 mcg per gram or 44% of the daily recommended intake.

– Nori

Nori is a type of red seaweed. Unlike brown seaweeds, it has a much lower content of iodine.

Nori is the type of seaweed that is commonly used in sushi rolls.

The iodine content in nori varies between 16–43 mcg per gram or about 11–29% of the daily value.

Seaweed is an excellent source of iodine. However, the amount it contains depends on the species. Kombu kelp offers the highest amount of iodine, with some varieties containing nearly 2,000% of the daily value in one gram.

2. Cod

Cod is a versatile white fish that is delicate in texture and has a mild flavor.

It is relatively low in fat and calories but offers a wide variety of minerals and nutrients, including iodine.

According to the Icelandic Food Content Database, fish low in fat have the highest iodine amounts.

For instance, 3 ounces (85 grams) of cod has approximately 63–99 mcg, or 42–66% of the daily recommended amount.

The amount of iodine in cod can vary slightly depending on whether the fish was farm-raised or wild-caught, as well as the region where the fish was caught.

Higher amounts of iodine are found in fish low in fat compared to fatty fish. For instance, a lean fish like cod can provide up to 66% of the daily value.


3. Dairy

Dairy products are major sources of iodine, especially in American diets.

The amount of iodine in milk and dairy differs greatly based on the iodine content in the cattle feed and the use of iodine-containing disinfectants during milking.

A comprehensive study measured the iodine content in 18 different brands of milk sold in the Boston area. It found that all 18 brands had at least 88 mcg in 1 cup (8 ounces) of milk. Some brands even contained up to 168 mcg in one cup.

Based on these results, 1 cup of milk can provide 59–112% of the recommended daily amount of iodine.

Yogurt is also a good dairy source of iodine. One cup of plain yogurt provides approximately half of the daily recommended amount.

The amount of iodine in cheese varies depending on the type.

Cottage cheese is one of the best sources of iodine. One cup of cottage cheese provides 65 mcg, while one ounce of cheddar cheese provides about 12 mcg.

Although the exact amount of iodine in dairy products varies, milk, yogurt, and cheese are major sources of it in the American diet.

4. Iodized Salt

Currently, both iodized and unionized salt is sold in the United States.

The addition of iodine in table salt began in the US in the early 1920s to help decrease the occurrence of goiters, or swelling of the thyroid gland.

There is approximately 71 mcg of iodine in 1/4 teaspoon of iodized salt, which is 47% of the daily recommended intake. However, salt also contains sodium.

In the last few decades, iodine intake has decreased in the US. This is likely due to the push of major health organizations to restrict daily sodium intake to prevent or treat high blood pressure.

Nevertheless, salt only seems to raise blood pressure in salt-sensitive individuals, which is about 25% of the population.

Iodized and unionized salt are commonly sold in grocery stores. Consuming 1/2 teaspoon of iodized salt per day provides enough iodine to prevent a deficiency.

5. Shrimp

Shrimp is a low-calorie, protein-rich seafood that is an excellent source of iodine.

Additionally, shrimp provides key nutrients such as vitamin B12, selenium, and phosphorus.

Shrimp and other seafood are good sources of iodine because they absorb some of the iodine naturally present in seawater.

Three ounces of shrimp contain about 35 mcg of iodine or 23% of the daily recommended intake.

Shrimp is a good source of protein and many nutrients, including iodine. Three ounces of shrimp provide approximately 23% of the daily value.

6. Tuna

Tuna is also a low-calorie, high-protein, iodine-rich food. Furthermore, it is a good source of potassium, iron, and B vitamins.

Tuna is also a good source of omega-3 fatty acids, which may lower your risk of heart disease.

Fish higher in fat offer lower amounts of iodine. Since tuna is a fattier fish, the amount of iodine found in tuna is lower than in leaner fish varieties, such as cod.

However, tuna is still a relatively good source of iodine, as three ounces provide 17 mcg or about 11% of the recommended daily intake.

Tuna offers less iodine than lean fish but is still a relatively good source. Three ounces of tuna provide about 11% of the daily recommended amount.

7. Eggs

Eggs are also a good source of iodine.

For fewer than 100 calories, one whole egg provides a lean source of protein, healthy fats, and a wide assortment of vitamins and minerals.

However, the majority of these nutrients, including iodine, come from the yolk.

Egg yolks are a good source of iodine because it is added to chicken feed. Yet since the content of iodine in chicken feed can vary, the amount found in eggs can also fluctuate.

On average, one large egg contains 24 mcg of iodine or 16% of the daily value.

The majority of iodine in eggs is found in the yolk. On average, one large egg provides 16% of the daily recommended amount.

8. Prunes

Prunes are plums that have been dried.

Prunes are a good vegetarian or vegan source of iodine. Five dried prunes provide 13 mcg of iodine or about 9% of the daily value.

Prunes are commonly known for helping relieve constipation. This is because of their high content of fiber and sorbitol, a type of sugar alcohol.

Prunes are high in many vitamins and nutrients, including vitamin K, vitamin A, potassium, and iron.

Because of the nutrients prunes offer, they may help improve heart health, decrease the risk of colon cancer, and even help manage weight by reducing appetite.

Prunes are packed with vitamins and nutrients. Five dried prunes provide a good vegetarian source of iodine by meeting 9% of the daily value.

9. Lima Beans

Lima beans are commonly associated with the popular Native American dish succotash, which mixes lima beans and corn.

Lima beans are a good source of fiber, magnesium, and folate, making them a heart-healthy choice.

They are also a relatively good vegetarian or vegan source of iodine.

Due to the variation of iodine in soil, irrigation water, and fertilizers, the amount of iodine can vary in fruits and vegetables.

However, on average, one cup of cooked lima bean contains 16 mcg of iodine or 10% of the daily value.

Lima beans are high in fiber, magnesium, folate, and iodine. One cup of cooked lima beans provides about 10% of the daily value of iodine.

The Bottom Line

Iodine is an important mineral, though few food sources are rich in it.

This is why many people around the world are at risk of developing a deficiency.

The foods highest in iodine include seaweed, dairy, tuna, shrimp, and eggs. Additionally, most table salt has been iodized, providing an easy way to add iodine to your meals.

The foods listed in this article are not only some of the best sources of iodine, but they’re also very nutritious and easy to add to your daily routine.

Do you want more info like this? But all in one place? In case you’re a curious prepper, this information is from a book that can be used immediately to improve your health and expand your treatment options in many areas, even if there is never a crisis event for you and your loved ones. You can find more about this book here


Other self-sufficiency and preparedness solutions recommended for you:

Put This Spice In Your Shoes To Fix Toenail Fungus

The vital self-sufficiency lessons our great grand-fathers left us

Knowledge to survive any medical crisis situation

Liberal’s hidden agenda: more than just your guns

Build yourself the only unlimited water source you’ll ever need

Secure your privacy in just 10 simple steps

If you check the list of some of the most powerful nutrients to boost your immune system, Iodine stands from the crowd

Potatoes are often overlooked by preppers. And I really can’t understand why.

They are inexpensive, simple to store without energy, high in carbohydrates (exactly what you need in a crisis), and if you want to, you can make plenty of dishes like bread.

In addition, potatoes hold the distinction that they are one of the easiest and most prolific crops to grow. Not only do they develop well under a range of circumstances, and provide the opportunity to choose from a range of different rising outlets, but it is possible to have two harvests a year in certain climates. Potatoes will grow one of the best crops post-apocalyptic.

If you are not in a position to cultivate your own potatoes and have either been blessed with green-thumbed friends’ bushels of spuds or find incredible sales on these starchy vegetables, you might always be in a pickle on what to do with more potatoes than you and your family will consume.

Certainly, potatoes have a greater shelf-life than any other crop.

1. Extended Dry Storage – Root Cellars

Potatoes can be stored easily through the winter, making them a good source of protein when there isn’t much else available or growing. We have all seen our potatoes gradually rot or sprout in the oven, and what are the perfect strategies to extend your dry storage?

Your first move is to sort the potatoes out. You can NOT store any potatoes that have a noticeable injury, like bruises or cracks on the flesh. Such potatoes can rot even quicker than others, which could transmit rot or fungus to the rest of your potatoes. The failure of your whole potato shop would be extremely disheartening.

The right storage place is a vital part of ensuring your potatoes don’t rot. A root cellar, basement, or seldom opened cabinet in your kitchen will suffice. It’s important that your potatoes are not exposed to moisture and light.

dehydrated_potatoes2Storing your potatoes in slices:

You don’t want to have the potatoes trapped in an airtight container because you want to hold out moisture and light. Good ventilation is important. Store them under any layer of potatoes in ventilated buckets, or even wicker baskets with a sheet of paper. Not only does the newspaper help hold the potatoes apart for proper aeration but it will also act to remove moisture in the air.

Your storage room will preferably be between 35 and 50 degrees Fahrenheit. Lower temperatures may alter the flavor of the potatoes, and higher temperatures will result in decay progression.

Test your daily spuds. Here are some indicators you might be mindful of the future issues.

  • Withered skin
  • Soft to the touch
  • Green coloration
  • Sprouting
  • Mold
  • Bad smell

When it comes to potato preservation, one strategy in the prepper arsenal is to take the steps to treat the potatoes for long-term storage. This is a relatively easy procedure that requires a couple of weeks which should make sure you have potatoes that are much less vulnerable to rot.

Your potatoes spread out on a few layers of newspapers in a dark and cool area. Temperatures will vary from 50 to 60 degrees Fahrenheit. Keep the potatoes for just over two weeks unchanged. What this does is thicken up and dry the skins of the potatoes a litter better for extended storage.

Avoid washing your potatoes prior to storage, and make certain you don’t place them near fruits. Fruits emit a chemical called ethylene which may allow your potatoes to sprout.

2. Dehydrating Potatoes

We’ve all loved a dinner of potatoes coming out of the box like dry white flakes. The potatoes reconstitute into mashed potatoes with a bit of water and milk is far more common in appearance.

You should take action to flake or break the potatoes to dehydrate. As with both, the mechanism is quite close.

If you have a vegetable steamer and dehydrator, this should render the process extremely quick.

dehydrated_potatoes2Storing your potatoes in slices:

  • Thoroughly wash and peel your potatoes. If you prefer to keep the potato peels on the spuds then you can do so
  • Slice the potatoes evenly, using a mandolin slicer, so that they are 1/8” thick
  • Layer your potatoes on the vegetable steamer and steam the slices for 5 minutes
  • Move the potatoes to the trays of your dehydrator
  • Set your dehydrator to 130 degrees Fahrenheit, and dry the potatoes until they are thoroughly dried out

Once dried you can vacuum pack your potato slices or store them in airtight containers. To reconstitute them simply boil them until they are soft. You can also put a handful of the dried potatoes into a soup to simmer slowly with the rest of your ingredients.

Storing your potatoes as flakes will also allow you to create individual servings that could prove to be worth their weight in gold should you need to rely on them.

Storing your potatoes as flakes:

  • Thoroughly wash and peel your potatoes
  • Chop them up into cubes
  • Place the cubed potatoes into a pot with just enough water to cover, and boil them over medium heat until they are soft
  • Drain the water and mash them until they are smooth; be sure not to add any milk or butter, or even salt
  • Layer your mashed potatoes out the trays of your dehydrator, lined with parchment paper
  • Set your dehydrator to 140 degrees Fahrenheit and dry for up to 8 hours, or until all the moisture has been removed from the potatoes
  • Remove chunks of the dehydrated potatoes and pulse them in your blender until you get the desired size of flakes
  • Store your potato flakes in airtight containers or jars until you need them. Properly stored, they’ll keep for up to a full year

Reconstitute them by adding boiling water, milk, butter, and other seasonings to taste.

3. Freezing Potatoes

cubed potatoes freeze

Freezing is certainly one way to store your potatoes for later use, but it isn’t always the most realistic option for those who are worried about a lack of energy. It is necessary, as a prepper, to make the most realistic choices, choices that are similar to those currently living off the grid.

While a freezer is not an impossibility when you live off the grid, it is a massive vampire of energy and is not always ideal for storing food which can be stored using alternative methods.

You should peel and cube your potatoes to freeze, and then par-boil them so they’re not too firm for quick mashing. You can store your potato cubes in freezer bags until drained and cooled, or use a vacuum sealing system to store them in individual portions that can be used when needed.

4. Canning Potatoes

canned potatoes

You probably think of that bumper crop of green beans or cooking up a batch of jam to preserve when you think of canning. Even potatoes can be canned and this serves as a good storage method; particularly if you lack dry storage space in your root cellar.

The method of canning potatoes is just as you can for other products. To prepare your potatoes, you will peel and dice these to around 1⁄2″ cubes. Boil the potatoes, but not too soft, until just done. Drain and then spoon into your prepared jars. Add a teaspoon of salt to quarter-sized pots, then cover with boiling fresh water. Seal the jars according to the standard methods.

Smaller potatoes can be packed whole in large pots. Simply open, heat up, and enjoy yourself when you need them.

Sometimes the strong potato is underestimated and given a poor name because it is high in calories and carbohydrates. They are more than just the starchy beginning of fries though. The Irish Potato Famine, let us not forget. When it matters most they will keep you and your family alive.

Potatoes are often overlooked by preppers. And I really can’t understand why. They are inexpensive, simple to store without energy, high in carbohydrates (exactly what you need in a crisis), and

The oceans contain 97% of all the earth’s water, so if you and your family are searching for a healthy supply, don’t worry about moving your homestead to the coast.

It takes loads of energy to desalinate sea water (and resources, on a large scale), so it’s impractical even in regionally water-stressed areas. Of what is left, 2.5% of the earth’s water is not available, which means that it is too cold, too frozen, or too dirty. Which leaves just 0.5% of the planet’s available fresh water for individuals and land-dwelling species.

No wonder that our utility bills are so big, then. The average person also uses 3,000 gallons of it a month without barely thinking of such a restricted resource. This is flushing money down the toilet, literally. If there is an emergency and the entire town loads up on bottled water, what’s even crazier is, like that’s going to do a lot of anything. In an emergency, there is only one way to minimize utility costs AND provide enough water on hand, and that is by being independent of water, not relying on public works.

When you’re responsible for your own water supply, you’re also more conserving with it, too. The good news is that your property has plenty of untapped freshwater supplies, and the right conservation and ingenuity scheme will help you become more independent and prepared for tough times.

Each of these networks of off-grid water is better when combined. You are more at risk of not getting enough water on hand, relying on one alone, but using two, three, or more will ensure there is plenty for you and your homestead.

The Most Simple One

Probably, some positive things do fall from the sky. It is possible to set up rain barrels somewhere under the heavens and provide a large supply of clean water with one torrential downpour.

A 50 gallon plastic trash can with a lid, some landscape cloth, a 3⁄4″ garden spigot, a double threaded bulkhead with an inner thread size of 3⁄4″, some Gorilla Tape and Teflon tape, a pen to draw a hole and a razor blade to cut it out, are an easy way to make one in five minutes.

The spigot is going to go near the bottom of the trash can, so trace and cut out a hole around the bulkhead there. The bulkhead is inserted and the nut is screwed backwards. Next, loop the teflon tape around the thread on the spigot a couple of times, then screw the spigot into the bulkhead until it is secure and facing down. Cut a large hole out of the lid of the trash can.

With Gorilla Tape, and the cover with a hole put back on top of this, the landscape fabric will be pulled tightly over the top of the can and sealed. That way, the rainwater, which should filter through the fabric and into the barrel, would not be polluted by debris and mosquitoes.

The Second System

To pump it to the surface, hand pumps involve drilling down into an aquifer and using manual labor.

Electric pumps can be used, but you would wish you had the more strenuous alternative if it went out during an emergency.

In the U.S., there are existing companies that will build and drill for you, but at least expect to pay a few thousand dollars.


Another Idea For Your Property

Instead, building a permaculture swale is a perfect way to avoid rainwater from escaping downhill as runoff and soaking into a garden’s soil.

This will take planning and observation of water flow and drainage on the ground you build upon, but can make a planting area more efficient and less maintenance.

When it rains, you need to watch how the water flows, then dig a trench uniformly along those contour lines to slow down and hold the water, generally 6 inches to 1.5 feet deep, and 18 inches to two feet wide. On the downhill side of the trench, the soil removed would be constructed as a berm.

The trench is then planted in desert environments, and the berm is usually in non-desert climates. Instead, the water pooled and slowed from draining off would flow into the immediate soil, making it better over time as organic matter rises.


A Water System For Huge Supplies 

A cistern will give you peace of mind knowing that on standby, you have a large supply of water.

These can range from materials made of stone or metal and depending on what you and your property can accommodate, can hold 10,000 gallons or more or less.

When complete, however, and where it’s constructed, their potential weight is something to be mindful of. If the ground isn’t solid enough, it will sink. Also, if it freezes where you live, it could also be stopped from doing so by burying it in the snow.

Related: Is It Illegal to Harvest Rainwater in Your State?

An Underground System 

A natural or man-made pond can contain plenty of water, and organisms to prevent stagnation or possibly be eaten, too.

Of course, the water would have to be thoroughly washed before being used for drinking or cooking, but if necessary, it’s still a viable choice.

A bonus food supply is supplied by stocking it with fish. If it freezes, a pond dug from 8-12 feet will allow them to survive. Before you dig, a lot of care should be taken, but filling the pond with a tarp and some geotextile material will decrease seepage after it’s completed.

Another Idea For Your Backyard

A well would be a reasonably safe and clean water source on your property. Usually, they are anywhere from 20 to 300 feet deep, which means being protected in the winter from freezing.

If your property doesn’t already have a well, however, digging and implementing one would cost at least a few thousand dollars. But the saved money is going to outweigh the cost.

Aqueducts 

In all those National Geographic documentaries, I’m sure you’ve seen the Romans harness the force of gravity by aqueducts. This will be easier to build if you have some elevation changes on your farm, and gravity is a good way to add water pressure around the homestead.

Most modern showers use about 80-100 psi, but a simpler water system using gravity can be very accommodating if you can be comfortable scaling down to around 20 psi.

A Natural Water Source

If you’re fortunate enough to have a spring on your property bubbling out of the rocks, then you might already have a natural source of clean, delicious water.

The hard part is constructing the infrastructure around the homestead to harness it, however, it is possible with the assistance of gravity.

Related: Is It Illegal to Harvest Rainwater in Your State?

“Cascade” or Water Flow

This is more of a procedural device than a mechanical one. But with it, you are going to conserve and optimize water. Generally, there are 3 kinds of water: white, green, and black. To do laundry, wash dishes, or even water gardens and livestock, you do not need water that’s suitable for human consumption. You can “cascade” water from one level to the next using an proper water flow.

The same water can be used to clean the dishes if you boil water for food. To flush the toilet, the water you used to wash your hands will then be used. When you begin to become more conscious of where your water comes from and more involved in achieving it, you can get more ideas about how to conserve and use it to its full potential.

The Last Off-Grid System 

10 Off-Grid Water Systems You Should Have On Your Property

A water filter will help out a lot.

You can buy a common but costly, heavy duty one from Berkey, or you can make one called a Biosand Filter from materials on your property.

To download a free manual on building it, check out a website from a Canadian charitable organization named CAWST, but the gist of it requires a barrel full of sand and gravel and a top layer of micro-organisms that all kill dangerous pathogens through a process of predation, trapping, absorption, and natural death.

There are several more potential structures, and for every homestead, some of these may not be possible. A smart way to get some ideas is to explore what other individuals have achieved on assets close to yours. In the event of anything occurring, it is important not to have just one device, but as many as possible. Water, can be contaminated, can run out or become poisoned. If SHTF, the first step to surviving and thriving would be to have a healthy supply of good water.


Other self-sufficiency and preparedness solutions recommended for you:

The vital self-sufficiency lessons our great grand-fathers left us
Knowledge to survive any medical crisis situation
The Smart, Easy Way to Food Independence
Your secret weapon when our society shatters into a million pieces
Secure your privacy in just 10 simple steps


The oceans contain 97% of all the earth’s water, so if you and your family are searching for a healthy supply, don’t worry about moving your homestead to the coast. It

A frequent topic in Preparedness and Survival circles is the subject of Bugging Out and more specifically the question of whether you plan to Bug Out or will you Hunker Down. This simple question easily elicits all manner of responses and you will rarely find consensus on which is the better option. The only good thing about this question is there are only two options and one of those has to be the correct one in someone’s eyes. A 50/50 shot of getting this right isn’t too shabby if you are looking at odds, but there will be those who maintain an absolute position on one option or the other.

To Bug out or not bug out, like most questions that we must ask ourselves as we prepare for emergencies is an individual question and there is no universal wrong or right. This question is probably only second in notoriety to “What caliber is the best defensive round”.

If you can imagine going into a big underground bunker full of Preppers who are getting ready for the next Emergency and shouting that question; you will get as many answers as you have people. In reality, there are only a few common calibers but each person will have their own reason, preference, or bias toward one and they will tell you in a very matter of fact tone, their choice and more importantly why you should take their word as the Gospel. Actually, it is probably simpler but just as much fun to pose this question in a survival forum and watch the sparks fly.

The factors that drive each person to reach their own personal decision are too numerous really to discuss in detail, but I will attempt to add my own opinionated two cents to the (already well covered, I know) argument and in doing so, completely invalidate everything I just said above. The reason is that I believe there is only one real answer to this question in almost any situation and my way is the right way. Most of the time.

Before I get too far ahead of myself, you may be asking “What the heck is he talking about?” so a quick definition is called for here. “Bugging Out” is the act of packing up your supplies and leaving home to go to another location. This may or may not coincide with the belief that you will never come back. A common example of Bugging Out is people who are forced to leave town due to a natural disaster like flooding or a Hurricane. They pack up their cars and get out of dodge. This is one of the reasons FEMA and other places recommend having a Bugout Bag or BOB with supplies that will keep you alive for 72 hours so that you can leave at a moment’s notice.


Bugging In or Hunkering Down is the complete opposite of Bugging Out. When you Bug-In you are staying put in your home with your supplies intending to ride out the storm of chaos that is coming. Thus the question is asked in preparedness circles usually in the context of political, biological, or terrorist types of chaos: “Will you Bug out or Hunker down?”

To answer this for yourself, you have to ask several questions to determine which is the better option for you in your circumstance. The questions are pretty basic and revolve around:

  • Your Situation – What pushes your button internally that says “We have to leave”?
  • Your Location – This can apply to both where you are and where you plan to go
  • Your Health – Are you physically able to leave and possibly walk the distance
  • Your Dependents – small children or old relatives. Pets?
  • The Threat – What is the threat we are planning to leave for?
  • Your Destination – Where is the place you are going to?


Your Situation – can greatly affect the decision to Bug-Out or not and you have to decide when you will actually make the choice to go. If you are planning for an economic collapse, what events will trigger you to leave home and head somewhere else? How bad would things need to get before you made that call? What if you are away from home? In that case, you will be more concerned with getting home. What will your family do until you arrive? Is it the middle of winter and there is 2 feet of snow on the ground? Do you have a means of defending yourself and your family?

Your Health – Are you physically able to get up and strap a backpack to your back, walk out the door and never come back? Would you be able to run if needed? Do you require medication that must be refrigerated or taken daily? In some cases you simply won’t have a choice, you will need to Bug-In and plan accordingly.

Your Dependents – Do you have smaller children who may not be able to travel long distances. Are your children still in diapers or do they have special needs? Even healthy children below the age of 10 would have a tough time coping with a Bug-Out situation if the event lasted a long time and there was no stability. Are you pregnant? Do you have pets that you would never leave in a million years or that you would not be able to transport?

Your location – Are you located in a major city or a rural area with miles around you and nothing to look at. Do you live in a place that would allow you to live if the grid came crashing down tomorrow? I am not discussing whether or not it would be difficult, but could you plant a garden, or do you live in a high-rise apartment in Chicago? Would you possibly need to walk with millions of other people out of the city? If this is the case, where would you go?

The threat – This one may be the easiest to answer but you will most likely have more than one answer given the specific threat. If we are talking about a flood or natural disaster and you have plenty of notice you may decide to leave. If we are talking about a viral outbreak or Mutant Zombie Bikers from Mars you may decide to stay. Has your city descended into chaos with riots and fires and mobs of people looting?

Your destination – Where are you heading? Do you have a place to go with a survival kit filled with supplies to last you? If the threat is a natural disaster like a hurricane and you have time, you can probably go stay with relatives for a few days. This may be one of the first things you should think of. Will you pack up the family, load down the car, and hit the highway? Where will you go? For me, I think this was the first factor I built all of my other choices off of. I do not live on a retreat in Idaho with 50 acres of land and an underground bunker complete with livestock and solar power. I do live near a large pond in a relatively small city with enough land to have a garden that would feed my family. I don’t have any retreat property (yet) so I don’t know where I would go. I would not go driving off into the sunset to try and live off the land unless I was desperate. This may be the circumstance that you are facing too and when the time comes you have to decide.


One factor I really like about the Preparedness and Survival community is the wealth of knowledge and experience we have out there. Just like me, everyone has an opinion. Some are based upon experience and others have made decisions after much reflection. Regardless of the experience, one has you have to ask yourself questions when making a decision like this as it could affect everything you have and/or love. No expert can tell you what will work best for you and your family in your situation.

Taking all of the criteria above into consideration, I think for the average person with no place to go Bugging in is the best option. You will not be able to walk into the forest, killdeer, and squirrels and live like a boss. That simply isn’t happening for the “average” person. For one thing, you won’t be alone. There could be millions of others with you too.

I have thought long and hard on this question and I know that if circumstances in my life were different I would most likely have a different answer. As it stands now, my vote is for Bugging In. I have all of my supplies here and we live in a relatively rural area. I am not naïve to believe that we would be insulated from the chaos but I think we would have a better chance here with some shelter as opposed to walking in the woods sleeping under a tarp. As much as I like camping, a home is a better place to defend.

Could that change tomorrow? Sure it could. I am constantly evaluating my situation and when things change, my plans change. Who knows, I might update this site before it’s all said and done with one last message.

“So long folks! I am outta here.”

Other Self-sufficiency and Preparedness solutions recommended for you:

The vital self-sufficiency lessons our great grand-fathers left us

Knowledge to survive any medical crisis situation

Liberal’s hidden agenda: more than just your guns

4 Important Forgotten Skills used by our Ancestors that can help you in any crisis

Secure your privacy in just 10 simple steps


A frequent topic in Preparedness and Survival circles is the subject of Bugging Out and more specifically the question of whether you plan to Bug Out or will you Hunker

A Swimming Pool is Like a Personal Reservoir in Your Backyard. But is the Water Safe to Drink?

The quick answer is yes. But there are a couple of steps you’ll want to take before you hoist a glass of pool water to your lips. In the grand scheme of things, water from a properly maintained swimming pool is safer than any wild water you might find in a river or pond. But regardless of the source, you need to treat any water you harvest, whether it’s in your own backyard or in the wild.

All manner of pollutants can find their way into streams and lakes, from animal manure to pesticides and herbicides, heavy metals, and of course bacteria and viruses. Many of those same pollutants can find their way into swimming pools in addition to human skin cells, human and animal urine, fecal matter, and whatever the wind carries to the water’s surface.


 Related: A terrifying disaster is upon us (What you can do to keep your loved ones safe during the coming chaos)


Fortunately, heavy metal and farm-strength pesticides and herbicides rarely get into a swimming pool. However, a natural weather disaster like a tornado or hurricane can dump just about anything in your pool from the surrounding area, and that’s a time when you might need a water source like your swimming pool the most.

The good news is that swimming pools are usually filtered and treated with chemicals (mostly chlorine) to keep the water clear and pure. Pool owners also spend a good amount of time skimming the surface, and most pools have automatic skimmers to remove floating debris. But what about those swimming pool chemicals?

Traditional Water Treatment for Swimming Pools

The filtering process for most swimming pools involves running the water through a tank filled with diatomaceous earth. It’s a white, powdery substance made from crushed seashell fossils. It’s safe and is used to filter everything from commercially produced beer to water from municipal water and yes, swimming pools.

But What About Those Chemicals?

Two chemicals typically find their way into swimming pool water to effectively treat the water. One is chlorine and the other is cyanuric acid.

Chlorine is added to kill germs. It’s that simple. What’s complicated is the source of the germs. Here are a few of the vectors or sources that bring bacteria and viruses to swimming pools:

  • The wind.
  • Branches and leaves fall into the pool.
  • Our feet deliver everything we’ve stepped on and in, to the water.
  • All parts of our bodies and everything that clings to them, everywhere.
  • Bathing suits T-shirts or anything else someone wears in a pool.
  • Insects that fall into the water.
  • Bird droppings.
  • Mucous, sweat, and other human secretions.
  • And the family dog when we decide it would be cute for him or her to take a dip.

Just going down that list is enough to make any pool owner want to throw another batch of chlorine in the pool. But while chlorine won’t hurt you if you accidentally gulp down a mouthful, drinking highly chlorinated water over a period of time can do some serious damage to your organs and your gastrointestinal system.

In fact, the first sign of mild chlorine poisoning is diarrhea. The chlorine kills the good bacteria in our intestines that help us to digest food. Diarrhea is the result. The simple fact is that you have to get the chlorine out of the water before you drink it. Bromide is sometimes used as a chlorine alternative for sanitizing pool water, and that’s not any safer to drink.

If you have a for chlorine, you should know that water with chlorine levels less than 4 ppm (parts per million) is considered safe to drink. However, there may be other chemicals or pollutants present, so don’t assume potability (water that’s safe to drink) is all about chlorine levels.


 Related: A Gold Storm Is Coming  (Even the most prepared Americans will be blindsided by what’s about to happen.)

Why Would Anyone Add Cyanuric Acid to a Pool?

Algae will often grow in swimming pools. It’s slimy and encourages bacterial growth. The appearance of algae in the water is typically a sign of high alkalinity and an improperly maintained swimming pool. Cyanuric acid is often added as a pool conditioner to raise the acidity of the water to inhibit the growth of algae.

It also stabilizes hypochlorous acid which is a product of the pool chlorine and the cyanuric acid resists the destabilizing effects of ultraviolet light on the chlorine. It’s relatively safe to swim in water treated with acids if they’re used in the proper proportions but they’re also not safe to drink in quantity.

Are There Any Other Chemicals to Worry About?

Yes, but they’re not added intentionally. Ammonia will often show up and its source is urine. Say what you will, but people often pee in the pool. Complicating matters, if sufficient ammonia finds its way into a swimming pool, it can actually interact with the hypochlorous acid to create chloramines that can irritate the skin and eyes and smell bad as well.

To put it bluntly, swimming pool water may look clear and clean, but it has the potential to be a witches-brew of stuff you don’t want to drink.

Even if the pool looks like this, don’t just scoop it up and drink it.

How to Make Swimming Pool Water Safe to Drink

Filter It

A good water filter design to will effectively allow you to filter swimming pool water and make it safe to drink. Look for carbon and ceramic filters built-in.

The carbon filter will remove the chemicals and the ceramic filter will remove any bacteria that have survived the chlorine. Giardia is a good example of a bacterium that is highly resistant to water treatment, so don’t assume the chlorine has killed all the germs.

Expose The Water To The Sun

The ultraviolet radiation from the sun breaks down chlorine. This can happen in a matter of hours unless the pool has been stabilized with cyanuric acid. In that case, chlorine can resist ultraviolet light for weeks.

One way to accelerate the UV process is to harvest a small amount of water in a clear, sealed container. Start with a gallon. Allow it to sit in the sun. It’s like making sun tea without the tea. If you know or suspect the pool water has been treated with cyanuric acid, this can take two weeks or more. That’s not much help if you’re out of the water, so a water filter is your best bet.

Make Your Own Water Filter

There are ways to make your own water filter using an empty 2-liter bottle and layers of sand and gravel; charcoal (activated charcoal is best, and you can make that too), and fabric. This filter design assumes muddy, wild water, but if a storm has left your pool filled with debris, this filter will do the job just as well.

If you do improvise your own filter, you still might want to let the water sit in the sun in a clear container for at least a few hours, just to be safe.

If you do improvise your own filter, you still might want to let the water sit in the sun in a clear container for at least a few hours, just to be safe

What About Bathing and Laundry?

If you’re positive that the pool water has been properly maintained and there’s no sudden buildup of debris as a result of a storm, you’re okay to launder clothes or wash up. Make sure you use detergent with the water in case any residual bacteria have survived the chlorine.

You don’t need to worry about the chlorine bleaching any clothing because the chlorine levels in the water are not strong enough to bleach fabrics.

A Swimming Pool as a Water Source is Actually a Good Idea

If you find yourself without water after a disaster, a swimming pool in the backyard is an easy and convenient water source. It’s much cleaner than a local pond or river and, because it’s close to home, you can filter water in bulk for continuous use much more easily.

If you think about it, the chlorination of swimming pool water is a good first step in any water filtration process. Now if we could just get people to stop peeing in the pool…


Other Self-sufficiency and Preparedness solutions recommended for you:

The vital self-sufficiency lessons our great grand-fathers left us

Knowledge to survive any medical crisis situation

Liberal’s hidden agenda: more than just your guns

Build yourself the only unlimited water source you’ll ever need

4 Important Forgotten Skills used by our Ancestors that can help you in any crisis

Secure your privacy in just 10 simple steps

A Swimming Pool is Like a Personal Reservoir in Your Backyard. But is the Water Safe to Drink? The quick answer is yes. But there are a couple of steps you’ll

How to go off the grid with no money is a common question that many people are asking these days.  In the luxury that we take for granted today, going off the grid may seem non-sensical.  But the truth is there are hundreds of thousands of people all over North America who will choose to live off the grid.

Why?  Because they’ve decided that living a life of true self-sustainability is better and more rewarding than living a life connected to the power grid.

In other words, those who live off the grid don’t want to be dependent on the outside world for resources.  By living off the grid, you are free of society, government, utilities, and everything else we’re accustomed to as a civilization. Is this a good thing or a bad thing? It’s up to you.

If you’re reading this, it’s probably because you’re at least interested in the off-grid lifestyle. You probably desire independence, the ability to sustain yourself and to work outdoors in nature.  You probably also want to find a way to go off the grid in a way that costs as little as possible.

Here’s the truth: going off the grid is going to cost you some money no matter what. But it isn’t going to cost you a fortune either, and there are steps you can take to reduce the cost as much as possible.  Let’s talk about how to go off the grid with no money in greater detail.


What Does It Truly Mean To Live Off The Grid?

Off-grid living is nothing new. In fact, for most of human history, humanity has thrived living off the grid! Only a couple hundred years ago, every family that sustained itself did so without being connected to a ‘power grid’ of sorts.

Today in the 21st Century, living off the grid means living free of any dependence on the rest of society. You sustain yourself.

Therefore, this means no connection to the power grid, no running water from a water company, no heat and electricity from an external supplier, no going to the grocery store, and instead of raising your own livestock and gardens, and without any dependence on society, the public, or the local authorities in any way.

Most people who live off the grid these days do not truly live off the grid. Even though they may create their own running water and electricity and such, they may still go into town every once and again to restock on food and supplies, watch a movie at the theater, see a sports game, and so on.

And that’s perfectly fine. If the kind of lifestyle you’re imagining is one where you raise your own food and create your own running water and electricity, but still go into town every so often for supplies or for other purposes, that’s totally cool so long as you keep your dependence on society to a minimum.

Related: Is It Illegal to Harvest Rainwater in Your State?

In summary, in order to truly live off the grid, each of the following things must happen:

  • You’ll need your own land, with access to running water, timber, and suitable agricultural land
  • You’ll need your own house (or at least some sort of shelter)
  • You’ll need to grow your own food (livestock and gardening)
  • You’ll need to create your own heat and power
  • You’ll need to still earn a living from where you work
  • You’ll need to have your own waste/septic system

Transitioning fully to that kind of lifestyle may sound like it requires a large financial investment, but soon you will learn how to go off the grid with no money at all (or at least a very small investment).

Why Should You Go Off The Grid

Ask somebody who lives off the grid why they choose to do so and they will likely respond with one or more of the following:

  • You can save money
  • You are not dependent on society or the government for help
  • You live more simply and therefore consume less
  • You can be closer to nature
  • You can go green and be more environmentally conscious
  • You can live a life of independence

While some people live off the grid because they have to, for most, it’s a choice. You’ll have to work to sustain yourself a lot more, but the tradeoff is you’ll also get a lot more freedom.  One of the biggest advantages to living off the grid will be the fact that you can sustain yourself even in the event of a major crisis that would devastate the more urbanized areas.

You’ll still feel the effects of economic collapses, EMP attacks, and natural disasters no matter what, but you’ll also be able to sustain yourself in those dangerous times.  In contrast to this, in those kinds of major national disasters, those who are connected to the power grid and dependent on society will find themselves in absolute chaos with the risk of being killed significantly high.

While the stores are being looted and people are boarding up houses, you’ll be nestled quietly off on your property and comforted in knowing that you can still feed your family. That doesn’t mean you won’t ever face danger, but it does mean that you’ll be at significantly less risk in contrast to those who are fully connected to the grid.

Steps On How To Go Off The Grid With No Money

So what are some steps you can take on how to go off the grid with no money?  Well, long story short, if you truly have no money with which to go off the grid, you’re going to need to start saving.


STEP #1 – SAVE MONEY

Yes, saving money is the first step to living off the grid.  And guess what? There are a huge number of ways you can save money!

For one thing, cut some unnecessary bills.

Gym membership? You can work out at home.

Going to the movie theater? Wait for it to come out on Netflix or Digital HD.

Eating out? Eat at home.

Car payment? Sell your car and get a less expensive one (and with cheaper insurance).

Health insurance? See if it’s possible to get a cheaper plan.

Shopping? Go to discount stores or buy in bulk to save per item.

You get the idea. You would also be amazed how simply making it a habit to always use coupons can really save you money as well.  All in all, it’s possible for you to save anywhere from $500 to $2,000 a month on average just by cutting back on your expenses. With a few months of saving, and you’ll have enough to go off the grid.

STEP #2 – SET UP A SAVINGS ACCOUNT

While saving money is great, you may easily be tempted to use it.

That’s why you need to have a place to store your saved money, and the best place to do that will be a new off-grid savings account where you make it a rule to never touch it.  This bank account should grow, from a few hundred to a thousand and then to several thousand, and the more it grows the more excited you will be to add even more money into it so it grows further.

Now look, this idea of simply saving money may seem like the obvious way how to go off the grid when you have no money to start out with.  But guess what?  It works! And if you currently have no money but want to off the grid, practicing patience and setting aside funding is the only way to do it. After all, you can’t just buy property for free. Speaking of property…

Related: Is It Illegal to Harvest Rainwater in Your State?

STEP #3 – LOOK FOR OFF-GRID PROPERTY

The property for your off-grid location needs to have several things, including each of the following:

  • A house or a place to build a house
  • A storage shed or a place to build a shed
  • Secluded (preferably, though you may not mind having close neighbors)
  • Natural source of water (well, lake, river, stream, etc)
  • Timber
  • Suitable agricultural land for raising crops

Your off-grid property also needs to be affordable, and if the cheapest property out there is what you’re looking for, you’re probably going to have to accept that that property will be a little run down and a ‘fixer-upper.’  If there’s already a house on the property, for example, there may be several issues that you need to fix on your own, but the tradeoff is you’ll be paying less upfront.

Also, remember that you don’t have to buy a huge piece of property either.  This idea that going off-grid means you have a massive eighty-acre homestead is ridiculous. Many of those who live off the grid have a small piece of property of two to five acres.


STEP #4 – BUYING THE PROPERTY AND MOVING IN

Be absolutely sure that this is the property you want before you buy it.  In the United States, you can expect to pay $3,000 to $4,000 for every acre of land. So for a five-acre plot of a homestead, that’s fifteen to twenty grand to put down. Yes, there are some areas where you can buy acreage for less than that, but 3k is a good baseline to expect.

If the property has a house or sheds on it, then obviously it’s going to cost much more than that (more on this in the next section).  Once you buy the property, the only real step left will be to move in. It’s possible to move completely off the grid in less than a month if you set your mind to it.

How Much Does It Really Cost To Go Off The Grid?

So you’re probably wondering at this point: how much will it REALLY cost you to go off the grid?  For a small piece of land with a small house on it, $100,000 to $150,000 is probably what you’ll expect to pay.

As an alternative, you could buy a small piece of land for a fraction of that price, and then install a tiny house on it for ten thousand dollars or higher. This would obviously only work for singles and couples, but it is still something to think about.

As for additional expenses, you can expect to pay five grand or a little less for a solar system with 1500 watts, while a septic system can cost you up to twenty-five grand.

Conclusion

So how do you go off the grid with no money?  In short, you don’t.  But you can go off the grid on the cheap, at least when compared to the $250,000 suburban neighborhood homes that are a mainstay in the United States right now.

You’ll really need to save money if this is something you want to pursue, and then afterward, you’ll need to look for the cheapest property you can get while keeping additional costs to a minimum.

That really is the recipe for finding a cheap place to live off the grid right now, and while it may sound overly simplistic, you can’t simply buy land and then move on to it with everything you need for free. It’s simply unrealistic to think that way.

Save money and find a good deal. Do that, and you can spend less money moving off the grid than you would be moving into a neighborhood home.


Other self-sufficiency and preparedness solutions recommended for you:

The vital self-sufficiency lessons our great grand-fathers left us
Knowledge to survive any medical crisis situation
The Smart, Easy Way to Food Independence
Your secret weapon when our society shatters into a million pieces
Secure your privacy in just 10 simple steps


How to go off the grid with no money is a common question that many people are asking these days.  In the luxury that we take for granted today, going

Having read hundreds if not thousands of articles on preparedness, one of the common themes that I see consistently among all authors on all platforms is the focus on skills. Certainly, the advantages are obvious; if you know how to make a fire, then you’re able to do it the moment without having to break out your boy scout manual and fail multiple times at the moment. You can practice on your own time during a non-emergency, and learn everything there is to know about knots, cooking, preserving, and growing. At the moment, you can’t ask an attacker to pause so you can quickly study up on your Tae Kwon Do, or ask the oncoming floods if they could recede for long enough for you to build an adequate barricade for your home.

That said, as a budding young prepper a few years ago, I found it completely overwhelming having to not only purchase so many supplies but also find the time to learn how to garden, how to start fires, how to build shelters, make home repairs and fire a gun all at the same time. That said, here are some buy-it and forget-it supplies that require nothing more than a few dollars in your pocket and a place to store this potentially life-saving equipment.

  1. Weather Radio

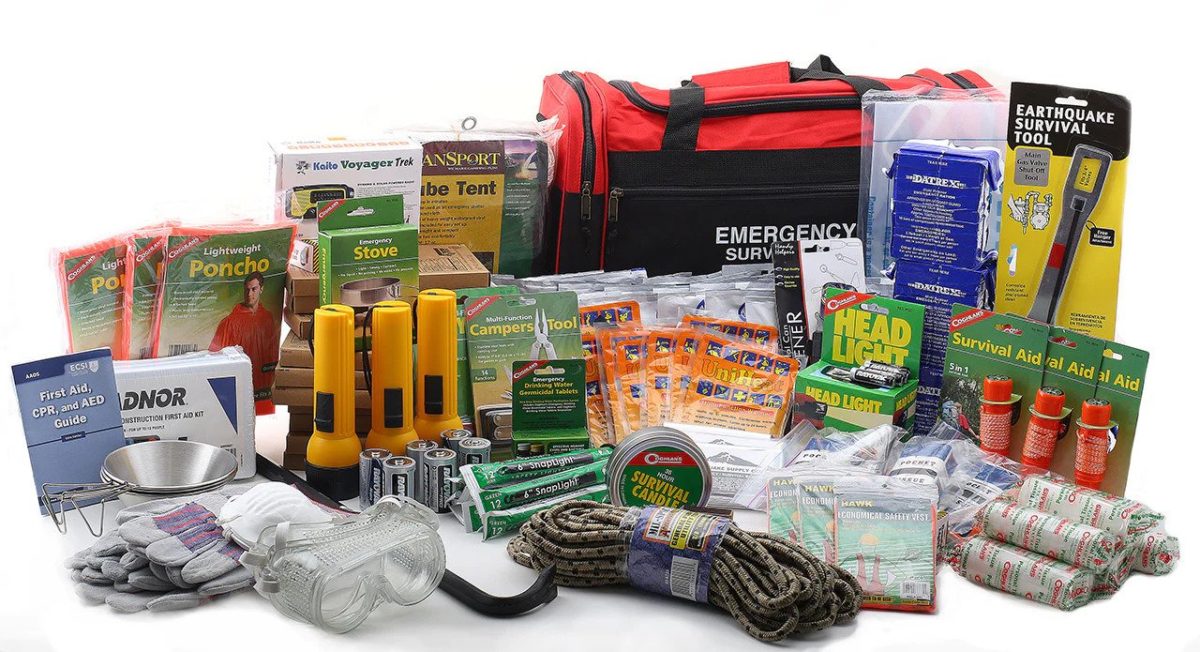
A weather radio, particularly one that includes a hand crank and options for lighting or charging, such as solar, is an essential supply for anyone who has to deal with the wrath of nature from time to time. In case of a power outage, this can charge your phone, light your way through the night, or provide the information you need to make quick decisions for your own welfare. We love this one!

Any good weather radio should be small and offer multiple charging options. It should be easy to program, and you should probably store it with its instruction booklet. Since these devices are so incredibly easy to use, there is almost nothing that you’ll have to do in order to make it work for you, although those who don’t have experience working a radio dial may find it a little difficult to use the old-fashioned technology.

  1. Emergency Cell Phone Batteries

An emergency cell phone battery is exactly what you’d think it is – a portable power source that you can use to charge any device in a pinch. Most of these devices come pre-charged at local stores, although you may have to charge the ones you purchase online. I have one of these at my house for every family member with a device, and we use them so often it’s become second nature for every family member to grab one on their way out the door. In fact, one of our home’s phone charging stations is entirely dedicated to recharging just these battery packs.

What makes these chargers so great is that they function so well on the go. It may look awkward at first to be holding your device with the charger attached, but it works.

It’s also possible to purchase these for your bug out bags, or to keep one in a vehicle, but keep in mind that the battery’s charge will wear off over time. This provides a good opportunity to review your bug out bag every six months or so as you remove the battery packs for charging.

If you do decide to grab some of these, I’d highly recommend getting the highest mAh capacity you can get (this is the measure of how much of a charge a battery can hold). While this will increase the price, and while you may never use the full capacity to charge a device if you’re storing these for emergency use as I described above, then you want to keep the charge for the longest possible time.

  1. Mylar Blankets

It’s an emergency blanket. Not much more needs to be said other than the fact that these make an excellent, lightweight addition to a bug out or get home bag.

  1. Lifestraw (or other portable water filters) and Water Storage tanks

Outside of unwrapping a Lifestraw, there is not much to using it. You simply find some water and suck it on the correct end of the filter.

Other portable water filters are, admittedly, slightly more difficult, but nothing so complicated that you can’t figure it out at the moment. When taking a group of 8th grade students on a camping trip a few years ago, they were all able to use a filter to strain out some clean drinking water without spilling much, and let’s face it, if an 8th grader can do it, so can almost any adult.

Water is a top-3 item that you’ll need to consider when prepping, and having a few portable filters in your home and in your bug-out equipment will help alleviate one of the largest concerns with water. The other concern is equally easy to handle – water storage can be very easily handled by simply purchasing some water bricks or some other convenient storage solution and filling it. No skill is required there.

  1. Long-Term Food Storage

When purchasing supplies for just yourself, I could see the argument behind trying all of the long-term food options before committing to purchasing a huge quantity of flavors you might not enjoy. That said, for a family, any variety pack will likely include enough variety to keep everyone happy. Like the Water Storage equipment, this is as easy as buying, storing, and forgetting.

  1. Car Jumper System

A great buy-and-stash item that you’ll use rather frequently if you drive an old clunky car as I do is a car jumper system to jump your car. This is essentially a high-powered lithium battery that you can charge and store in your trunk. If you need to jump your car, pull out the instructions and follow along with getting your car started. I own three different models (one each for myself, my teenage daughter, and my wife), and each of them has the same three-step approach to getting them set up. When you need it, you no longer need to rely on some good Samaritans to stop to help you jump your car.

All of these will bring you some peace of mind so you can sweat the harder stuff.

Other self-sufficiency and preparedness solutions recommended for you:

The vital self-sufficiency lessons our great grand-fathers left us
Knowledge to survive any medical crisis situation
The Smart, Easy Way to Food Independence
Your secret weapon when our society shatters into a million pieces
Secure your privacy in just 10 simple steps

Having read hundreds if not thousands of articles on preparedness, one of the common themes that I see consistently among all authors on all platforms is the focus on skills.