HomePosts Tagged "self-reliance"

I decided to make beeswax soap for Christmas gifts last year.  It has been on my list of things I should probably know how to do and when my stepfather, who keeps bees, brought me seven pounds of beeswax from his hives, I thought the time was right.

I started my soap-making adventure with a recipe for beeswax soap from the book, “Beeswax Alchemy”.  This book contains directions for making candles, balms and bars, salves, cream and scrubs, soap, and even beeswax art.

BEESWAX – WHERE TO GET IT AND HOW TO HANDLE IT

You can either acquire your beeswax from a beekeeper, which I was fortunate enough to be related to, or you can buy it online and it comes in handy little balls that are easy to measure and melt.  The wax I had was in giant hunks which I sawed off with a bread knife.  I do not recommend this method.  It’s maddening.  Since then I have learned another method which would have saved me a lot of blood, sweat, and tears.


First, beeswax becomes brittle when frozen and is much easier to cut.  Secondly, and I think I will go this route next time, the wax can be melted and poured onto a large cookie sheet lined with freezer paper.  Once hardened, the wax can be broken off into small chunks without sawing at it like a crazed butcher.

You can make soap without beeswax, however, I wanted to use the beeswax I had on hand because the scent is wonderful and it has conditioning properties that I wanted to in my soap.

LYE, LYE, LYE

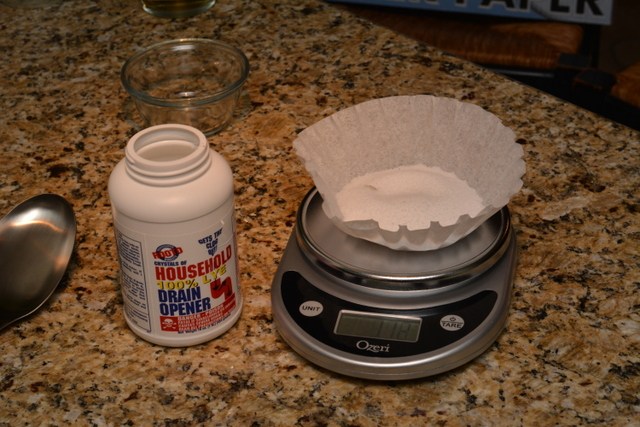
Without lye, there is no soap.  Lye, or sodium hydroxide, is required to make the chemical reaction that makes soap.  Period.  I had seen lye in the hardware store for cleaning out drains and thought that there must be a softer, gentler lye available for making soap.   To my surprise, the lye I made soap with to give my loved ones was made with the same highly caustic chemical that will burn the eyes out of your head.  Since lye is so dangerous, I want to give you some tips:

  1. Measure everything correctly. This is not the time for measuring with your eyes, use a digital scale, it is most accurate. If your lye to fat ratio is off, or you have added too much beeswax you will waste your time because your soap will be sludgy or rubbery.
  2. Once you have added the water to lye, it’s all business. Wear clothing to cover your skin and protective eye-wear.
  3. When the water is added it creates fumes that should not be breathed in. I didn’t know this and I leaned over the pot of lye and took a deep breath.  I am still here, but I wouldn’t recommend it.
  4. ONLY USE STAINLESS STEEL! The lye will react badly with other metals.  I bought a stainless steel pot that I use only for soap making.  I just cannot make mashed potatoes and serve them from the same pot that had a toxic chemical in it.  I am just weird that way.

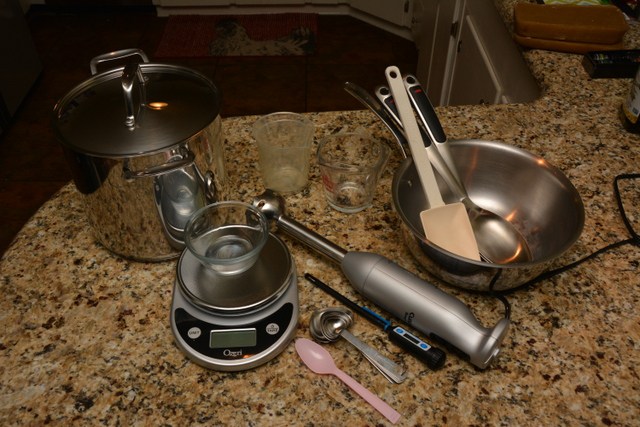
Other equipment you need to make soap

  1. Immersion blender –  This is a luxury item.  You can mix all your ingredients up with a STAINLESS STEEL whisk, but I have to tell you, this blender made mixing so much faster and easier.
  2. Freezer paper – You can buy large rolls of it and it is essential for lining cardboard if you are making your own rectangular molds.  It is also nice to wrap the soap in and tie with twine to give as gifts or just to store for yourself.
  3. Soap molds vs. cardboard – If you use the cardboard and make a box (approximately the size of a bread pan) and line with freezer paper.  I bought a silicon soap mold that was the right size.  The advantage of a mold is that it will be more durable than cardboard over time and you don’t have to fool with the freezer paper.  You can get fancier molds that have lovely designs in them, but I opted for the box shape and cut with a blade for a more homesteader look.
  4. Fragrance – I bought essential oils and used the lemongrass. Any of the essential oils will work great, but I would buy the most concentrated possible so the scent is present.  You can combine scents to create something unique, or just use one of them for a distinguishable scent.

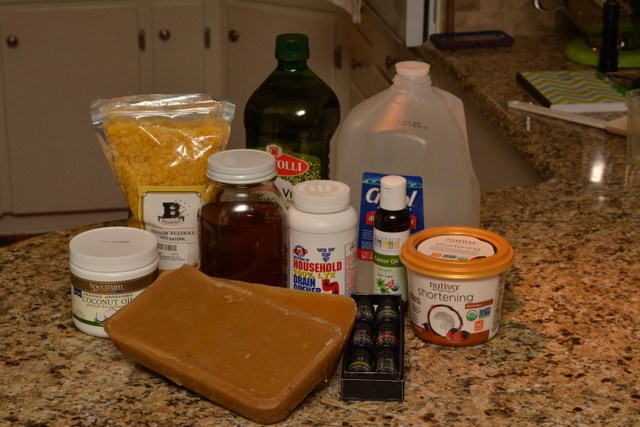
Beeswax Soap Making Material List

  • olive oil – 358g
  • coconut oil – 225g
  • palm oil – 177g
  • castor oil – 32g
  • beeswax – 7.2g
  • distilled water – 266g divided
  • lye – 111g
  • honey – 1 TBS
  • fragrance – 2 TSP
  • disposable paper bowl
  • stainless steel bowl for lye
  • stainless steel pot or microwave save container for oils
  • stainless steel whisk or immersion blender
  • digital scale
  • mold
  • freezer paper (if using cardboard)
  • digital thermometer

Yield – eight 4 ounce bars

How do you make soap?

  1. Measure out the lye and place in disposable paper bowl.

  1. Measure out 148 grams of distilled water and pour into stainless steel bowl. Place bowl onto heat resistant surface and then add dry lye crystals to water (NEVER THE OTHER WAY AROUND)  Stir until lye is completely dissolved.  Set aside to cool.

SIDE NOTE:  Those new to digital scales, this is for you.  When measuring ingredients, first select the TARE WEIGHT and then set the container that will hold what you are measuring (ex. plastic cup, bowl, etc.)  This will analyze the weight of the container so that weight is NOT included in the weight of the ingredients.  Then, once the TARE WEIGHT is selected, the scale should read 0.0 (give or take some zeroes) and then you can add the ingredients to be weighed.  If you are not using a digital scale you will have to weigh the container then add the ingredients and subtract the weight of the container to get actual weight of ingredients.

  1. Microwave the honey, 118g of remaining water, and microwave until dissolved.
  2. Prepare the mold.
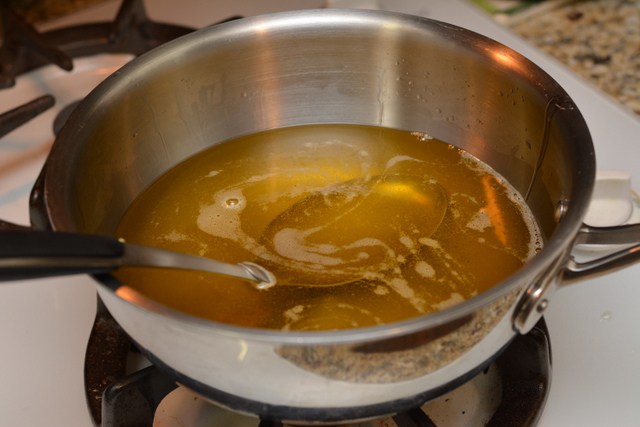
  3. Heat all the solid oils and beeswax in a stainless steel pot. Add the liquid oils (excluding honey and water mixture) and stir.
  4. Check temperature of lye and the oils. This is crucial!  To keep beeswax from getting hard, the oils need to be around 120 F.  The lye needs to be 120 F as well.
  5. Now add honey water to the lye water ONLY when it has reached the correct temperature. Sometimes this will result in a color change, which is normal.

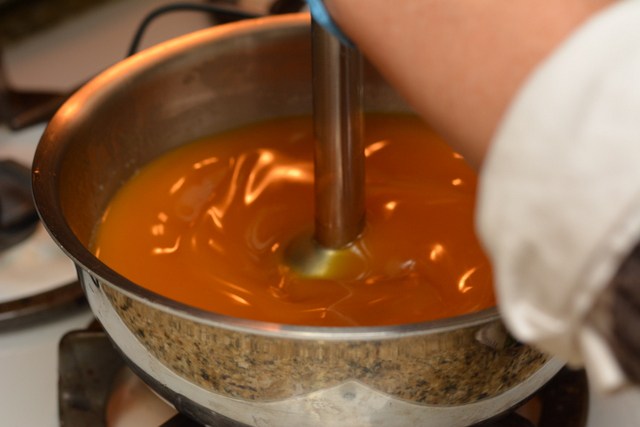
  1. Now pour the lye water into the oils and mix with the stainless steel whisk or the immersion blender.
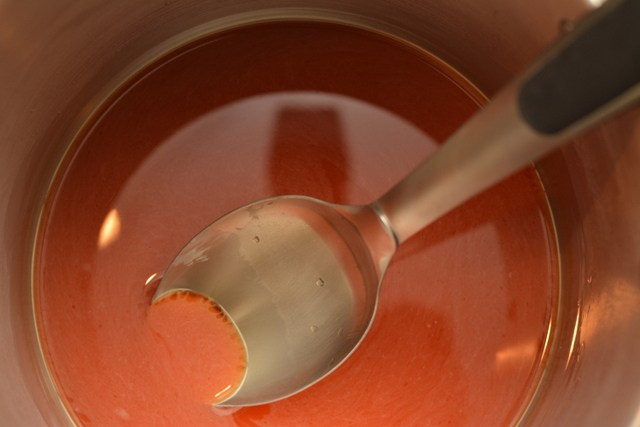
  2. When the mixture begins to looks creamy, it has emulsified and this is the time to add your fragrance.
  3. Keep mixing until it looks like a light cake batter. This is called the trace.

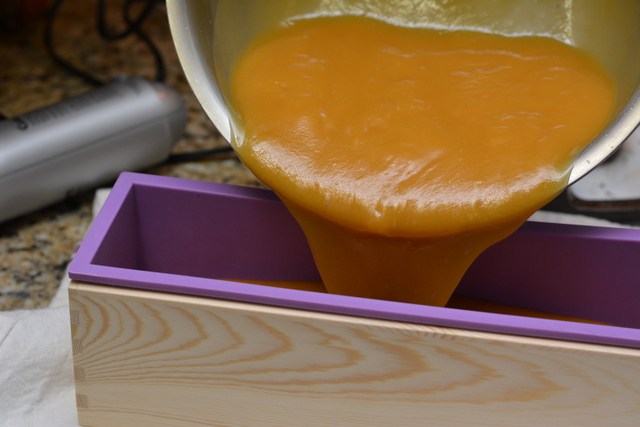
  1. Quickly pour into prepared mold or cardboard container lined with freezer paper. Scrape every bit of residue from the pot with a high-temp spatula.

  1. Tap soap mold on the counter to remove air. Smooth out the top and cover mold with cardboard to hold heat in.
  2. In twenty-four hours the soap should be cool enough to cut. If it seems too soft, then wait and continue checking every 4-6 hours.  Once it is hard enough to cut into bars, I cut it with a blade made for cutting soap.  The handle and size made cutting more even and straight.  I wrapped my soaps in freezer paper and twine and stored them in a cool dry spot.
  3. I also allowed my soaps to cure for 30 days because more water will evaporate from them, resulting in a longer lasting soap bar. I hated the thought of going through this process only for the soaps to sludge away in the shower.

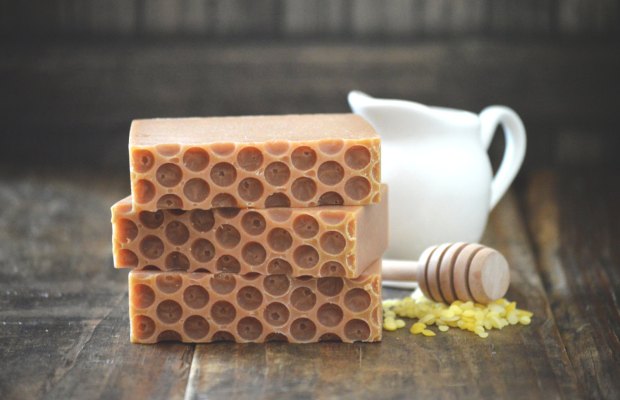
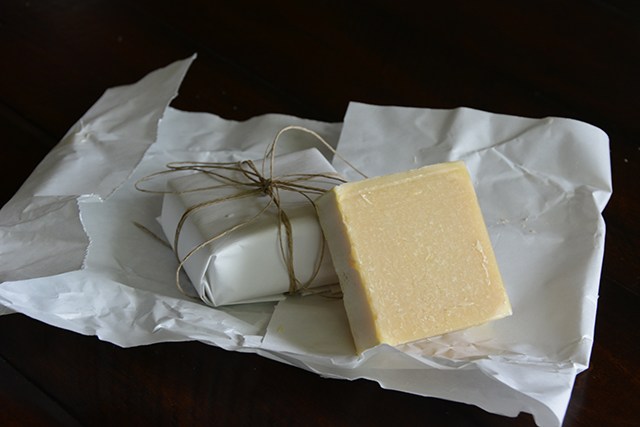
The finished product – looks like… soap.

END RESULT

Like anything else, there are pros and cons, here they are:

PROS

Making soap is a good skill to have under your belt.  One day you may not be able to drive to your local Walmart and pick up a bar of Ivory soap.

They make wonderful gifts!

It is natural and uses a bi-product produced by our dear friend, the honeybee.

This soap is the best if you have sensitive skin, eczema, or other skin conditions.  It will leave you clean without the drying effects of the cheaper commercial soaps.

CONS

The next time I make it, the cost will be significantly less, but it will definitely cost more than cheap drugstore soap.  You can always stock up on the cheap stuff in the event of an emergency and you can shower yourself clean with the best of them.  Personally, I like the idea of having a chemical-free, all natural way to clean up.


Other self-sufficiency and preparedness solutions recommended for you:

The vital self-sufficiency lessons our great grand-fathers left us

Knowledge to survive any medical crisis situation

Liberal’s hidden agenda: more than just your guns

Build yourself the only unlimited water source you’ll ever need

4 Important Forgotten Skills used by our Ancestors that can help you in any crisis

Secure your privacy in just 10 simple steps

I decided to make beeswax soap for Christmas gifts last year.  It has been on my list of things I should probably know how to do and when my stepfather,

You wouldn’t be reading this article trying to figure out what tools you needed to build stuff with if you thought life was like the Sound of Music. But if you’re reading this to add another layer of knowledge to your prepping arsenal, you are at the right spot. Figuring out the basic tools and machines that can get you productive in a time of crisis or in everyday life is more important than you think.

Needs

Let’s start with the basics. Having a mix of manual tools and battery operated power tools will not only keep you efficient but will ensure accuracy in whatever you decide to cut, saw, chop or drill. Here are the tools that will provide the best versatility in a time of crisis or just when you are trying to figure out how to mount those deer antlers above your master bed.

Manual tools:

  1. 16’ Measure tape and 100’ measure tape –  just in-case you want to draw that line in the sand that you dare your neighbor to cross or just need to measure the board length you are going to hand saw.
  2. 8” and 48” level – which allows you to check the horizontal and vertical (plum) of anything you want to truly keep squared.
  3. A good set of chisels – that run in sizes ¼”- 1 ½”. They work great for knocking down corners on wood and cleaning out saw cuts and joints. Make sure the handle is made to handle a hammer strike so if you need to carve out a Billy stick you won’t damage the handle.
  4. Prybars – in a few different sizes, 8” 16” and a 24” big one made for when you are really needing to pry your neighbors food supply door open.

    solarpanelstarterkit

    Solar Panel Starter Kit 400W – You might appreciate a way to recharge your cordless electric tools.

  5. Clamps– you can never have enough clamps! C-clamps, F-clamps, Spreader clamps, Pipe clamps, everything you need to hold stuff together during a glue up or spread things apart.
  6. 6” layout square – It’s a triangle usually made out of aluminum or metal used to make square cuts on lumber stock. Framers sleep with this tool like it’s the Holy Grail. You just can’t make your life any easier with such a simple device.
  7. Block plane – Used to flatten edges of wood, smooth joints and works fantastic for cleaning an edge to glue up to.
  8. Handsaw – For when your battery operated reciprocating saw runs out of juice and the solar panels you are using are working less efficiently because it’s raining outside.
  9. Mallet – Use it as an attitude adjuster or for its real purpose: to coerce things into fitting correctly without destroying or denting them.
  10. T-Bevel/Sliding bevel – Made to measure all kinds of angles you may encounter when building your survival tree-house. Use it to cut angle trim or a slew of other things.
  11. A good screwdriver set and bit set that has a Phillips, star and flathead slotted bits in it.
  12. Utility scissors – A good industrial pair of scissors will be great for opening MRE’s or cutting your jeans to treat yourself when the neighbors Pit-bull decides to use your shin as a drumstick.

workshop

Enough of the manual stuff, lets dive into battery operated POWER TOOLS! As you already know we no longer live in the Stone Age, and technology can help us even when the grid is down. With advancements in solar, hooking up and using the sun to charge your tools through solar panels and inverters is a great way to keep efficient.

With Solar in mind, your power tool arsenal list should include the following:

  1. 20 Volt Jigsaw– Great for cutting angles, circles, arches and works when you need some speed when pumpkin carving.
  2. 20 Volt Impact Driver– you never know when you need the power, but at least you have it.
  3. 20 Volt 6 ½” Circular Saw made to cut lumber quickly and rip large sheets of plywood.
  4. 20 Volt Reciprocating Saw with multiple types of blades including smooth cut, rough cut and a few for all-purpose use. This tool is a must. It’s great for cutting low-lying tree limbs, flush cutting plugs and all sorts of things inside and outside of the shop.
  5. 20 Volt drill driver or simply called a drill. You will have the manual one that you will realize after ½ a turn makes the hair on your knuckles fall off due to the strain of a screw stuck in hardwood. But when you really need to screw stuff down fast this will be your Huckleberry.

For the serious hardcore woodworkers out there, you always have the Amish option. Which is going out and buying a Tablesaw, Jointer, Planer, Sander and Wood Lathe; pulling all the motors and attaching a pulley system so your buddy who lost at your poker table the night before, can pedal power your machine while you woodwork away. For the rest of us, the list above will enable you to handle 95% of most jobs around the house or when building your dream artillery bunker!

You wouldn’t be reading this article trying to figure out what tools you needed to build stuff with if you thought life was like the Sound of Music. But if

The Pro’s & Con’s of Perennials

One of the benefits of going with perennials is that they’re largely a one-time investment. Some may only last a handful of years or a decade, but most will give us 20-50 years or whole lifetimes of production once they get started.

The flip side of that is that most perennials require at least a year or two to establish, many 4-10 years, and fruit/nut perennials could need 10-20 years before they start producing a reasonable yield. A lot of the fruiting perennials are one-offs per year, as well. There are some with longer harvest seasons, but it’s not like an annual garden where in some cases we have the potential to plant four different things in a space per year, and tree and shrub fruit isn’t usually like lettuces or spinach that we can repeatedly harvest from the same plant.

On the other hand, once they’re established, most perennials don’t really need us a whole lot, unlike annuals, and trees need us even less than smaller shrubs and perennial plants. Perennials can be highly multi-function, with additional roles such as nitrogen fixation that can improve soils around them, soil stabilizing roots, pollinator habitat and food sources, livestock fodder or forage in the form of green limbs and leaves or tree hay, and medicinal value. Some can be coppiced or selectively pruned to provide us with kindling, rocket stove fuel and mulching chips.

Here I’ll stay away from trees like apples and plums that are so commonly grafted and are super susceptible to diseases and pests. They tend to need us, and they tend to be pretty recognizable. Instead, we’ll look at some other options. Most of the ones I’ll recommend are largely free of pests.

I’ll come back to the ones that can be a little less obvious as food production in another article as well. Right now, here’s a look at my top five perennials preppers should consider, selected as such due to their climate versatility, ornamental aspects, health, versatility for all stages of preparedness, and highly multi-functional landscape and production roles: pea shrub, oak, willow, wild plums, and crabapples.

Pygmy peashrub can easily fit into even small urban and suburban gardens and homes.

Pea Shrub

Pea shrub is one of the more controversial plants that we increasingly see due to permaculture’s spreading interests.

Many types of livestock can consume the leaves and pods of pea shrub, providing a fodder or forage plant that can sometimes be lacking in the cooler climates. It’s also a habitat builder for small game and small birds, and beneficial predatory insects. Because it can survive in some pretty gnarly climates and ugly soils (thin, compacted, stripped out) it’s an excellent nurse crop or soil retention and rebuilding crop for mismanaged lands, drylands, and cool or cold climates. As a nitrogen fixer, it’s ideal for production alongside trees and larger shrubs with high needs, especially those that can use the N boost later in the growing season (it takes part of the season for the legumes to start producing excess nitrogen, even the perennials).

Peashrub offers great variety in use, tolerant of manicuring to a shaped hedge or blending into a freeform native patch – both hiding food or resource production in plain sight.

It’s happier in part shade than in full sun, which makes it an excellent addition for base shrubs against a northern or eastern wall and alongside established trees.

It’s one of the few where instead of a cold-hardy ceiling, we’re bounded instead by heat. Siberian pea shrub can handle zones up to 8 if there’s water, but many varieties will only go up to 6 or 7.

Warmer areas (7-8, sometimes 6 by variety) will find less flowering with some varieties, which means fewer of the pods we can consume and feed livestock green, the tender green seeds, and the dry peas. Shaded areas can help combat this. Even at its warmer limits, it produces foliage well, with that foliage an excellent addition to our tree hays as well as nutrient-rich mulch that we can use to overwinter strawberries or cover our garden beds.

Oaks

Oaks produce acorns, although there’s more to that story than some might think. Acorns come in a number of sizes and shell thicknesses, which increases and decreases their ease for human consumption or the livestock and wildlife that can make use of them. Oaks also tend to produce in cycles, although the cycles can vary widely, from those that grow and mature the nuts in a single year, to those that might take 2-3 years to drop harvests. Some have the same boom-bust cycles found in other nut and fruit trees.

There’s an oak that can be found for every zone, 3-9 at least, with most zones having multiple species native or compatible. Oaks also cover a wide, wide range of soils and precipitation. This site http://www.wildlifegroup.com/shop-for-hardwoods/ is a sale site, but I keep it handy as a reference for oak types, from their size to their zones, soil and climate needs, to production cycles.

Oaks come in a huge variety, from leaf shape to acorn size and shape, to the climates and conditions they’ll thrive in and their cycles of production.

Oaks can create some challenges due to the jugalone they produce and the high-tannin highly acidic leaves they drop, as well as the dense shade they produce, but there are plenty of native fruits and nuts in oak forests, and even some domestic crops and ornamental edibles that can share space with them, from blueberries to paw-paw. We can also mow the leaf drop annually to mulch over annual gardens and berries that like acidity, or create leaf mold.

A number of yarrows, reed grasses, lilacs, wild-type buckwheats (Californian, coastal, Suzi’s red), woodland and mock strawberry, lavender, lupines, Californian coffeberry/buckthorn, verbena, sages, sorrel, bunching fescue-type grasses, and others can grow in close association with oaks. They allow us to create a naturalized setting or a very ornamental one, with food production for humans as well as medicinal and herbal plants, and pollinator and nurse plants all in the same area. With tailoring, they can create managed free-range grazing for birds raising their own nests, goats, and other species; small game or game bird habitat for increased hunting in cities, suburbs or rurals; and harvested-fodder from grains to soft legumes to fruits and foliage for livestock.

Willow

From the ability to make small-batch or large-plot propagation-rooting and garden-transplant boosting “tea” to the ones that can help with pain management, willow is a pretty well-known function, resource, and survival tree.

We can use its leaves as medicinal feed for most livestock, or regularly supplement with it for goats and rabbits, even chickens, and turn it into tree hay. Wands can be woven for window covers and floor mats, baskets and chair seats, and used as natural ties in some forms of construction, from plant trellises and cages to fish traps and boxes. Its rapid growth enables us to turn it into living fences and hedges with relative speed and ease. We can even use some species to help us “mop up” seasonally or annually boggy areas to allow other plants a better shot at growing.

Willow is adaptable to trimming and pruning to hedges, domes, arches, living fences, and small shrubs, increasing its versatility in small lots as well as large homesteads.

Overhanging ponds, creeks and rivers, willow creates excellent habitat for game birds as well as fish, and it can help stabilize banks. As with use in open yards, it can help create a flood and high-rain buffer, soaking up incredible amounts of moisture, especially as a coppiced hedgerow backed by larger trees. Willow’s absorption powers can also help create a buffer between waste-generating systems like livestock manure, outdoor kennels and pet wastes, overflowing septic systems, and runoff from composting toilets or outhouses, and nearby veggie patches or waterways (look up algal blooms for the impact on fishing and waterways).

Willow makes an excellent resource and function tree, creating shade and habitat, fodder, and wands for various uses.

Bees and other pollinator and predatory insect species use its pollen extensively. The catkins (flowers) provide a very early season nectar flower for pollinators when not much else has started blooming.

As with oaks, there’s a willow for nearly every climate. Some willows excel in a few key functions far more than others, so some research into variety can help us.

Crabapples come in a variety of sizes, flavors and textures, with varying degrees of palatability.

Wild Plum & Crabapples

Chickasaw is by far my favorite wild plum, but it’s somewhat limited as to region. Like oaks and willows, in most of the U.S. and Canada – as well as Europe – there is a wild plum that is native to our area, or from a region that very closely mimics our conditions. Those will almost always be more successful than something we’re trying to force into our conditions.

Chickasaw plum

Wild sandhill plum

Wild plums are highly, highly variable. Not only do varieties change hugely in fruit size, texture, and flavor, those fruits can regularly change tree-to-tree, climate-to-climate, season-to-season –even within a small yard’s space, due to microclimate. Some make larger fruits that, while pretty tart, are readily consumed raw and have enough fruit around the pit to be worth it. Some produce tiny fruits. Some really have to be juiced and turned into jelly with lots of sweetness added.

Crabapples tend even further toward the “needs processing” side of the line, but sometimes a hybrid or cultivar can be found that isn’t too bad fresh or only baked, or can be aged in cool storage like a Braeburn apple or mayhop to totally sweeten the flavor and soften the texture.

Wild plums and crabapples have a number of uses even with the drawbacks.

They tend to be hardier and a little more resistant to the diseases our domestic rubus fruits face. In some cases they might act as a carrier for pest and disease, but in many cases, the wild cousins can actually help us by forming a “windbreak” of sorts, except for pests. Pests and disease carriers hit them, and the wild fruits keep the disease or insect from jumping from apple to peach to plum to roses to berry brambles.

Wild plums and crabapples tolerate heavy pruning and pleaching, providing the potential of food, fodder, and cross-pollination for domestics in any environment.

They can also regularly serve as cross-pollinating partners for domestics. Wild cousins tend to also be broken into early, mid and late seasons, but they regularly have much longer flowering seasons. As a result, if we lose an ideal partner, our wild cousins may be close enough to fill that role not just for one cultivar, but for several.

Wild plums are highly variable in fruit size and flavor, with a long flowering period that results in longer harvest periods.

The extended flowering translates into extended fruiting as well, whereas domestics tend to have a 2-4 week window for harvest, by variety. Wild plums and crabapples can be ripening for as much as a 2-3 month period. That can let us spread out the workload, help cover gaps if we missed the harvest season due to injury or a travel, and it can allow us to harvest some of the later fruits or earlier fruits, and run livestock under them for the rest.

Just like domestic apple and plum limbs can be fed in small amounts green or larger amounts when cut and dried for hay, so can wild cousins. The cousins tend to be lower, bushier and even faster-growing, which can increase the ease and amount of fodder harvests.

Some wild plums are thorny, like pea shrub can be, and the woody trunks and branches have the ability to form living fences with the bonus of harvests.

Crabapples share the hedge-tolerant and woody growth advantages. Both also create habitat for edge-dwelling wildlife like quail and rabbits, increasing hunting capabilities whether we’re using a pellet gun in the ‘burbs or a low-load saboted .30-06 on a large spread.

Mixed crabapple hedge

Perennial Foods

There can be some huge benefits to creating a food forest and forage meadow around our homes. Even if we don’t own homes or don’t own much land, we might consider picking up a hardhat and road guard vest, and putting in some perennial shrubs and trees near us, or indulging in some seed bombs (do NOT throw invasives like bishop’s weed or kudzu anywhere; in fact, stick to wild edibles that are native to your area or the habitat-building natives that increase edible wildlife).

In many cases, the plants we choose can be beautiful and provide other services like shade and pest insect reductions, while giving us a resilient, permanent backup food source should we need it. They can provide feed for livestock, or they can create habitat and food sources to increase our game populations. Whether we’re rural or renting, increasing game means increasing food sources.

Planting natives is becoming ever more popular, so they’re increasing in availability. To fill in the areas around these perennials – and any others – look to not only the native species around you, but also to some of the nostalgia fruits like gooseberry, chokecherry and garden huckleberry that fewer folks recognize these days, and natives from similar areas or foods from Africa, Asia and South America that put up with inclement climates and are equally less known such as teff, amaranth, Asian yams, and quinoa. They tend to have fewer U.S. and Canadian pests, and can help make sure we’re the ones harvesting, not passersby.

The Pro’s & Con’s of Perennials One of the benefits of going with perennials is that they’re largely a one-time investment. Some may only last a handful of years or a

For every season there is beauty. Its something that comes to mind immediately at the thought of that season. Even the cold of winter is highlighted by warm drinks, roaring fires and the holidays. Maybe it’s a means of making the mundane a little more magic or maybe its an appreciation for this life.

If you are a person that lives a prepared lifestyle chances are these seasons mean other things, too. Vital tasks and responsibilities must be handled throughout the year and many are season specific.

What helps more than anything is a schedule for it all! How on earth are we supposed to keep up with all the stuff that we need to keep up with. Its just so much and when you add a full time LIFE on top of that, it gets overwhelming.

Let’s have a high level look at the four seasons and what responsibilities you should prioritize for each.

Spring

1. Home Maintenance and Inspection

After a long winter of being trapped in the house its time to get out, under and around the home. Now is the time to inspect your home for things like:

  • Pests
  • Damage
  • Leaky Pipes
  • Missing Property
  • Fencing
  • Drainage

2. Planting

Of course, spring is a time for planting! This is when the ornery gardener can finally get out and put seeds and seedlings into the soil. Its an exciting time and most gardeners are hungry for that first taste of fresh produce from the garden.

Things like English peas and radish are great candidates to get in the soil early.

3. Fishing

Spring is also a time for fishing. A great skill to practice, fishing is both fun and a great way to fill your bell with protein! The big bass come out in spring, when the water is warm enough, but it can be just as fun to spend the day catching bluegills.

4. Baby Animals

Depending on what you have on your property you might also be dealing with chicks, kids, calves and piglets. The spring is a special time that might require extra work for baby animal care.


Summer

5. Hunting Prep

The summer is a good time to spread out your hunting gear and get ready for the coming fall season. Its also a great time to get out and scout hunting areas. Find out where the deer are going to be and where you are going to set up to take that shot!

6. Processing Wood

Its never too early to start splitting wood for the fireplace. The winter will be upon you before you know it and cool summer nights are also great for burning wood. Splitting wood is also a great workout!

7. Managing Pests

If you keep chickens or other small animals, you might find that this time of year you are managing larger and more dangerous pests. Things like opossum and racoon can wreak havoc on your flock. It might be worth investing in some steel traps or a good .22 rifle to keep your chickens safe.

Fall

8. Insulation

Fall is the time to check home insulation. You are going to be combating the cold and you want to be sure your home is up to the task. Good insulation makes all the difference in this. Consider things like pipes doors and windows.

9. Cold Gear

You will also want to bring out cold weather gear like sweaters, boots and coats. Don’t forget your gloves and hats. Get them out and ready because the cold is on its way. This will also give you time to react if you find you need something new.

10. Harvest/Canning

By this point you are going to be consistently harvesting food. You have probably already been canning and preserving at this point, too!

When it comes to this game you might also be thinking about extra storage. Have you ever considered the old root cellar as a means of increasing storage? It could be just what you are looking for. These root cellars are simple to build and if you know how, you can make them very cheap!

Timothy Griffith created a book called The Easy Cellar that describes the whole process from start to finish using affordable earthbags as the base. It’s a must read if you are interested in an underground shelter or root cellar.

11. Hunting

Winter

12. Deep Food Storage

Winter always seems like a good time to put up more food. Long term food storage, in particular. You need a good place with a consistent temperature. This is another perk of having a root cellar. You can get that kind of consistent temp underground and it takes some of the food storage out of your home!

13. Organizational Preps

The cold winter days can be depressing. However, organizational projects are a great way to pass the time. Maybe you want to store things differently or in a new area. Its also a great time to clean out old space for new items.

14. Prepare Garden Areas (late winter)

Removing debris and waste from growing areas is one of those late winter tasks that can give you a jump on the growing season. Don’t leave this out of your plans.

Conclusion

A little bit of organization can go a long way. In the wide world of prepping, homesteading and the self-reliant lifestyle, there is a lot to consider. Hopefully we have offered you a few seasonal tasks that will make a difference in what you can accomplish.

You don’t wanna wind up funneling all the hard stuff to the end of the year and must rush through it all.

Also, consider adding a root cellar to your property. Even something small can go a long way. I really like the earthbag design laid out in The Easy Cellar. It might be just the storage answer you have been dreaming of!

If you are a person that lives a prepared lifestyle chances are these seasons mean other things, too. Many vital tasks and responsibilities are season specific.

A couple of days ago, my nephew, who’s 8 years old, asked me what do I do for a living. Of course, my answer to him was that I’m a prepper and that I write about it. Cute, I know, but try explaining to a toddler what the Hell is that supposed to mean. Tried to give him the prepping talk with Smokey the Bear and Ivan the gas mask-wearing city denizen.

Dunno if I managed to get through to him – barely convinced my teen daughter and son to help me move some stuff to the family’s mountain cabin, but here’s the thing – in talking to the tyke I got around to realizing how much BS’s floating around our prepping world.

Hell, even the word itself sounds like a cheap millennial knockoff when in fact it’s something as old as time itself. Our grandparents used to call it “common-sense” or just survival. I sometimes wonder – could it be that in prepping for disaster, we actually welcome it in our lives?

Today’s topic will somewhat different. Perhaps you have friends or close acquaintances who wish to become preppers themselves. That’s great, but we really mustn’t lose track of the fact that, in most cases, prepping is far more than buying a nifty gadget or stockpiling food and water in case shit hits the proverbial fan.

The truth of the matter is, not all of us are NBPs (natural-born preppers). Sure, there is such a thing as survival instinct or, as my dad likes to call it, knowing how to guard your royal keister, but that is, more or less, case-dependent. Prepping is not. You do it around the clock, and, most importantly, you never stop.

Sure, for some, it’s a way of life, but for most of us, it’s one of those nagging thoughts nesting at the backs of our heads, keeping us awake at night: “But what if Katrina strikes again? What will happen to me or my family if North Korea declares war on the United States?” Okay, I’m going to stop right here with my end of the world train of thought.

Now, in wanting to show my fellow preppers that this lifestyle choice is no bed of roses, I’ve thought long and hard and finally managed to jot down a small list of reasons why prepping’s more challenging in reality than it is on paper. Call it my way of letting the skeletons out of the cupboard.

Yard Sales or Thrift Shops Are Not the Answer to Everything

I can give you a ton of reasons why you should check out garage sales and thrift shops more often (be sure to check out my article on SHTF items you can find at yard sales for 20 bucks or less). Most items can be repaired and reused. For instance, a while back I found this great garden solar lamp at a Montana flea market.

The owner wanted only 10 cents for it because it was broken and he couldn’t be bothered with the repairs. One new bulb later, the thing was up and running in my garden, giving off the most enchanting glow you’ll ever see. That’s my tiny slice of Heaven or hygge, as the Danish like to call it.

So, if you ever find yourself at a garage sale, spare a couple of moments and look around. You’ll never know what you’re going to find.

Unfortunately, this is where the fun part ends. With a couple of minor exceptions, prepping for every contingency is very expensive. Even if you’re not yet fully ready to drop off the grid, making your house safe, even a small one at that, can run into hundreds of bucks if not more.

Of course, smoke alarms are not that expensive but consider the rest – surveillance system, safety room, sprinkler system, which is a must for any respectable yard owner, garage, keeping your bug out vehicle up to speed, tools, keeping those food and water stocks up to speed, medical checkups, and the list goes on and on.

Prepping’s not the kind of thing you want to rush into or to do it, as the Brits like to say, half-heartedly. You either do it, or you don’t.

Many years ago, before settling down, I lived in a cramped apartment on the 12th floor of this new and shiny glass building. Rent was awfully expensive, but hey, at least I have my own place now.

So, instead of doing what’s right – setting some money aside, making an emergency food and water supply, I went ahead and bought every pack of instant noodle soup I could find. Long story short, city power grid failed one day, and I had to go without electricity for two weeks. Guess what I had to eat all this time? Noodle soup! All day, every day for two whole weeks because I was stupid enough to burn all my money on stupid things like beer and movies and computer games and another crud.

Of course, it’s way cheaper to have a pantry stocked with ready-to-eat noodle soup, but it’s not exactly healthy nor nutritious.

Another harsh reality of prepping is the need vs. afford dilemma. Any like-minded prepper will tell you that in an SHTF situation, dropping off the grid and starting anew is the best option. Regrettably with today’s real-estate market, you can’t even afford to buy a parking spot, let alone a parcel of land.

You may get lucky and find someone willing to part with such a property, but I wouldn’t bet my bottom dollar on that if I were you. Moreover, buying a piece of land means nothing if you can’t build a shack or something on it. I don’t want to sound like the lovechild of Richie-Rich or something, but I could’ve bought two new hybrid vans and refurbish my city house two times over with the money I’ve spent on my off-grid location.

More than Money

As William Ernest Henley so eloquently put it: “beyond this place of wrath and tears, looms but the Horror of the shade.” You know what Henley’s shade is? Loneliness. Sheer, mind-wrecking, solitude. A prepper’s life can be a lonely one, especially if he’s surrounded by ‘pals’ who gift him tinfoil hats for his birthday.

I had a rough time convincing my wife to join me on my prepping merry-go-round. Although she’s as much into prepping as most of you are, I still can’t shake the feeling that she sometimes gives me the stink eye. Can’t say I blame her considering that I spend most of my off days working on our hunting cabin garden.

Anyway, the loneliness part becomes even more apparent when you decide to drop off the grid. And it’s not just about being in a relationship or hanging out with your buds on a Saturday night. I’m talking here about the absolute lack of human contact.

Sure, every wide-eyed lad toiling for a big-shot corporation dreams of living everything behind and going to live in seclusion. It’s not like in the movies – you don’t get to discover the true meaning or purpose of life, and you don’t get to be a sultry, ax-wielding Paul Bunyan ersatz. It’s wild, hauntingly quiet, and, most importantly, not the kind of gig you would want to get yourself into unless the shit really hits the fan.

Solitude aside, piecing together such a project takes a lot of work, dedication, and energy. Of course, I’m talking about good, old manual labor. Yup, off-grid living mostly means that you will need to get off your couch and put that shoulder to the wheel if you want to build something that’s abiding.

Most of the challenges you’ll face will be mostly due to your mindset. Growing veggies may be a quaint and probably soothing endeavor for someone who never held a hoe in his hands, but it’s really not that amusing. I threw my back a couple of times before I was able to plant all of my wife’s herbs and veggies.

Sure, it’s nice to snuggle next to a cozy little fireplace, but it becomes a nightmare when you have to clean out the damn thing. One of the most nerve-wracking parts of setting up an off-grid place is how you choose to deal with things like electricity, water, heat, and, of course, the Internet.

Certainly, you need to have electricity for a couple of appliances, but you also need to think about a backup – a gas-powered generator or something (thinking on doing a piece of how I managed to whip up a water-powered generator for my hunting cabin). Everything has to be thought thoroughly. Otherwise you wind up with another house that’s just as vulnerable during an SHTF situation like any city location.

And probably, the most daunting aspect of prepping is knowing that everything you do is a gamble. There’s no guarantee for anything – nobody can tell you for certain if your crops will yield something or if the home you’ve to build won’t fall on your head in case of a disaster.

Yes, I consider myself to be a gambler of the sort, but the only difference, in this case, is that I know when to cash out. That’s probably the most important aspect – trying to do a lot of stuff at the same time can end in disaster.

A couple of years after I bought the hunting cabin, I was faced with a big dilemma. The mortgage on our city house went up big time. I was the only one who was bringing enough money into the house.

So, there I was, all alone with my thoughts, and forced into making a choice: either keep the hunting cabin and live pay-check to pay-check until I can find a better-paying job or sell the blasted thing. Naturally, I went with option A.

It’s not hard to imagine how this kind of thing ends – arguments after arguments, she threatening to give everything out for Lent and move away. Fortunately, this story had a happy end.

See, when you’re a prepper, natural disasters are only a small part of the equation. You still need to find a way to deal with your fellow man. And let me tell you, convincing someone about dropping off the grid is just as difficult as starting a fire with an ice lens.

Bottom Line

I can’t help to think that, in some regards, preppers are superheroes. Sure, we don’t have capes or X-Ray vision, but we do have this knack to counter every possible problem long before it comes into being.

In rereading T.S. Eliot’s Wasteland, I realized that A Game of Chess, the title of the poem’s second canto, is the best prepping description anyone could come up it. Most of the times, it’s exactly like that – you make a move Mother Nature, and I’ll play my gambit. Crown me not for getting to the edge of the board, but for finding the resolution to survive.

A couple of days ago, my nephew, who’s 8 years old, asked me what do I do for a living. Of course, my answer to him was that I’m a

Is it not already too late if one waits until one is thirsty to begin digging a well?

— Chinese Proverb

When you mention “self-reliance,” it tends to conjure up images of an off-grid homestead on 10 to 20 acres, growing most (if not all) your own food, drinking pure water from your own well, and having a great place to hunker down while weathering the coming storms as the world goes through trying times. However wonderful this image of self-reliance may be, and much as it may be a terrific goal to strive for, for one reason or another it is probably out of reach for many of us.

If you are one of those that has made this vision a reality for themselves and family, that is terrific. However, if your job, finances, family commitments, etc., have thwarted or delayed your dreams for this kind of total self-reliance, you don’t have to wait until you can afford that 20 acre parcel. You can start working where you are now to build and nurture self-reliant living skills that are sure to provide you with more peace of mind and improved health, and will most likely be of great personal benefit during the coming decades of global challenge and change.

There are a number of obviously valuable self-reliant skills and tools one might develop, such as growing a vegetable garden or installing a renewable energy system on your home or business. But there are also many other less obvious ways in which you can develop and nurture your self-reliant skills. A good place to start is by learning how to fix things yourself, rather than simply throw them away. When I was a child in the late ‘50s and early ‘60s, pretty much everything we used and consumed in our daily life were still made in America, and almost all of that was made to be repaired, not just thrown away. When an item is manufactured, far greater inputs in the form of energy and raw materials go into making most items than meets the eye, and far more waste is generated in manufacturing and refining these raw materials than just that item sitting in front of you. For example, according to a UN University study, 1.8 tons of raw materials are used to manufacture the average PC, and most of these materials are dumped somewhere as waste. So, when you repair an item rather than throwing it “away,” you are reducing your consumption and ecological footprint on the planet. It often seems hardly worth your time to sew a split seam on an item of clothing, upgrade a computer, or repair an appliance, but fixing something yourself, or spending a few bucks for someone else to fix it, is one more way of Doing the Right Thing.

Another area of self-reliance that most of us can easily incorporate into our daily life, and improve upon, is taking responsibility for our own health and healing. Rather than waiting for our health to degenerate, then running to the doctor for drugs and procedures to fix the problem, we can develop our natural and alternative healing repertoire of tools and techniques while working in parallel on a building a lifestyle based upon healthy whole fresh organic foods, exercise, and cleansing routines (such as fasting) to help insure that we will have the strength, stamina, and balanced health to be self-reliant when we need it. In today’s world of nearly instantaneous jet travel from all corners of the world, combined with the gross overuse of antibiotics among the general population as well as the animals grown in modern factory farms, the risk may be greater than ever for global pandemic due to emerging viruses or antibiotic resistant super bugs. Building a repertoire of alternative healing skills and herbal remedies may very well someday save your life or the life of your loved ones.

A third area of self-reliance that is rather inexpensive and simple to develop is the field of disaster prep and emergency preparedness. In many ways, emergency preparedness is like car insurance. No one drives down the freeway thinking, “Gee, I think I want to get into a head on collision today!” But if an accident should happen (perhaps someone is talking on their cell phone, runs a red light, and broadsides your car?) you thank God you have insurance to cover the situation. With disaster prep, it is much the same—few of us want a disaster to happen, but if we have put together a simple 72 hour grab-and-run kit, along with a disaster plan (don’t just plan, but practice it too!) then we will be far ahead of the crowd. And if that day should ever come when we need it, you won’t have to risk drinking scummy unfiltered and unsafe ditch water and may well be able to provide help to many others along your path. I also highly recommend you take a first aid and CPR class, if you have not done so already. Luckily I have never had to use my CPR skills, but my fist aid skills have come in handy on numerous occasions!

Another area of self-reliant skills that is relatively easy and fun to develop is your back country skills. There is nothing like backpacking for a weekend (or longer) to quickly teach you which items are critical and which are unnecessary. In many disasters, the luxuries that we take for granted quickly disappear, like automotive transportation, hot and cold running water, and local groceries stores stocked with plentiful provisions. It is at these times that back country skills and the ability to forage for food, while carrying basic supplies and provisions on your back, can make the difference between life and death, or extreme suffering and relative ease/comfort. If you have never camped or backpacked, or have not done so since you were a child, I suggest you take it slow by starting with some easy car camping before attempting an overnight backpacking trip. There is nothing like spending some quality time in the wilderness to rekindle your connection with Mother Earth, building awe and respect for the natural world that surrounds us, and upon which all life depends!

I encourage you to make the development of your of self-reliant skills, tools, and supplies a fun, satisfying, and personally empowering life-long adventure!

“Is it not already too late if one waits until one is thirsty to begin digging a well?” — Chinese Proverb When you mention “self-reliance,” it tends to conjure up images of

As recently as 100 years ago, the most important site consideration for homesteaders and villages was whether plenty of good water was within easy reach. When electric power lines and drilled water wells reached rural areas, however, close proximity to clean water became immaterial – or so we assumed.

Our nonchalant attitude regarding water is rapidly changing, according to well pump installers I spoke with recently. Many are seeing an upsurge in interest by homeowners wanting to learn about and fit hand pumps to their water wells. There are now numerous manually-operated water pumps to choose from, depending on factors such as static (resting) water level and output needed.

Emergency Backup, General Use and New High-Volume Hand Pumps  

An increase in powerful storms with longer power outages is one factor inciting people to think about manual pumps, says Albert Brandt, general manager of Radiant Water Company in Tulsa, Okla. A 2007 ice storm that disrupted electric service for 14 days prompted many to contemplate their water-preparedness, he said.

“A lot of our customers remember using a hand pump on Grandma’s farm, and now want one as a backup,” Brandt told me when I called to ask about hand pump popularity. Radiant Water Company installs Bison, Hitzer and Baker-Monitor hand pumps.

Brandt, who took over Radiant Water in 1998, remembers a swell in hand pump sales as Y2K neared. Now, after a decade-long calm, people are again preparing for potentially troubling times by making sure their families will have fresh, clean drinking water, even if the grid goes down. Recent advances in hand pump design have made them even easier to use and less expensive, he said.

Richard Stothoff, president of Samuel Stothoff Company of Flemington, N.J., said manufacturers, such as Bison Pump Company of Maine, used modern technology to adapt their pumps to function with existing electric submersible pumps.


Stothoff, whose great-grandfather founded the company in 1885, said the company used to install many hand pumps in the then-rural area. Some households still use hand pumps exclusively for water, he said, although such use is rare. Stothoff said he has seen a slight increase in hand pump interest this year, mostly among the self-reliant.

Weather disasters, such as Hurricane Sandy that darkened much of the East Coast for extended periods, spurred more sales for fuel-powered electric generators than for hand pumps, Stothoff said.

“We’re too advanced,” Stothoff said. “We’ve got electricity.”

In neighboring New Hampshire, however, a representative of Northeast Water Wells said hand pump interest over the past five years has steadily climbed as more people build off-grid or geothermal homes. Northeast Water installs Simple Pump brand pumps.

Many types of human-powered pumps have been introduced through the years to accommodate the variety of situations and applications encountered when bringing water to the surface. Until now, however, the discharge capacity has been too low for large communities.

In January 2013, Mother Earth News blogger Ed Essex introduced a homemade hand pump machine, now the WaterBuck Pump, to readers. Since then, the pump has been greatly improved, presently exceeding the peak capacity of a 12-foot diameter windmill by 25 percent, making it ideal for remote communities that need more water from deeper water tables or need an irrigation pump with shallow wells.

In a recent WaterBuck Pump test, a 50-something man of average fitness pumped 17.5 gallons in 1 minute from a static level of 80 feet. These results are minimal compared to what can be done with this machine with one or two stronger men or two to four operators and twin cylinders for irrigation, according to the inventor, Darren Holliday. Now because of the design of this high-volume pump, large communities, small farms and developing countries can have the water they need, he said.

Kresten Jensen, III, general manager of Cook Pump Company, who calculated the WaterBuck’s performance recently, said, “Considering how important the commodity produced by the WaterBuck Pump is to sustaining life on this planet, you have created a very powerful piece of equipment.”

Why Hand Pumps Went to Scrapyards

Because most Americans abandoned hand water pumps more than a generation ago, few today understand how they work or what their limitations are. The pump principle has changed little since its inception, whether for the piston pump invented in 275 BC by Ctesibius, or the rope pump invented in China during the 1st century BC.

Hand pumps were still commonly used in the countryside of the United States and Europe in the 19th century. One pump was usually sufficient to supply water for a family and its livestock. Communities generally took shape around a central well. The people of tiny La Russell, Mo., were so reluctant to give up their community hand pump when progress arrived that they had the new highway paved around it. Residents continue to adorn the old pump with seasonal decorations.

Although hand pumps were scrapped when mechanization and electrification reached rural America, they are still broadly used in Third World countries. Especially where economic resources and fuel sources are sparse, human-powered pumps can significantly improve a water supply system and, consequently, a community’s livelihood.

Hand pump use in the United States is largely for emergency backup, intentionally going off-grid, or even novelty and nostalgia. Meanwhile, in developing nations, human-or animal-powered pumps are vital to survival. Having a manual pump, for instance, significantly increases agricultural yields, provides fast access to drinking water, improves sanitation and empowers women, children and small farmers.

Types of Pumps and Hand Pump Operation

The majority of hand pumps fall into one of two categories: suction pumps (having a cylinder above ground) and lift pumps (having a cylinder below ground).

A suction pump, or pitcher pump, is the type we envision on an old homestead. Repeated strokes of the pump handle gradually “suck” water up the riser main and into the cylinder and out the spout. A suction pump’s operational depth is limited to about 26 feet, according to “Water Lifting Devices” by the United Nations Food and Agriculture Organization.

Piston pumps have their pump cylinder below ground and the water table. Instead of sucking well water out, they lift a column of water upward through the riser main. Each consecutive stroke of the pump handle causes the piston to displace more water up the riser until it flows out the spout.

Theoretically, the depth from which a piston pump can remove water is unlimited. In practice, however, the limit is determined by the power a human can exert on the pump handle and the fabrication and materials of the pump cylinder and rod and piston valves and seals.

There is a hand pump for nearly every need. When selecting a hand pump for your home, consider your average daily household use, static (resting) water level, size of well casing (and liner) and whether the pump will be used only in emergencies or every day.

As recently as 100 years ago, the most important site consideration for homesteaders and villages was whether plenty of good water was within easy reach. When electric power lines and