There is undeniable proof that some plants, not all of them mind you, have outstanding healing properties. One cannot turn to modern medicine each time he finds himself in an SHTF situation.
Sure, med stockpiling helps (check out my article on best over-the-counter painkillers), but you shouldn’t lose sight of the fact that most are made from artificial compounds that tend to put way too much strain on the liver and tummy. In fact, if you read the little label on every pain med, you would see that even the lightest one like Ibuprofen should be taken after a hearty meal.
So, here I am, talking about the remarkable properties of natural remedies. As a prepper, I’ve learned that Mother Nature is quite offering when it comes to healing plants.
Anyway, in searching through my drawers, I came upon this nice little notebook that belongs to my grandpa. Very nice, filled with great memories but, most importantly, some tidbits on healing plants that should be grown around the yard.
Needless to say, I started working on my backyard pharmacy project as soon as the nice weather settled in. For those of you who are not too fond of gardening or believe it to be a waste of time, energy, or money, think again. You really don’t need to be a rocket scientist to figure out that if something goes wrong, home-grown stuff will be more valuable than gold (that’s why I’ve decided to dig up a veggie garden the next time I head up to my hunting cabin).
Anyway, getting back to today’s topic, these plants I found in grandpa’s scrapbook are really something. I mean, beyond the fact that they can be used to give taste even to the blandest dish, they’re also neat in treating all sorts of health issues. Moreover, they’re stupidly easy to grow, require little care, and, if you have a head for business, you can probably make a lot of money by selling them (extra gigs really pay off).
So, if I haven’t bored you to death already, here are my choices in plants that you should definitely consider growing in your backyard.
Basil
Entire books can be written on this topic, but I’m just going to stick to the facts. Basil is great for seasoning (I prefer the green kind over the dried variety), as its aroma is reminiscent of lime.
Apart from that, studies have shown that dishes made with fresh basil, tinctures, and teas are great for bringing down the cholesterol level, as well as reinforcing the blood vessels. Since I’ve acquired a taste for Italian dishes, I’ve used basil in virtually every pasta dish I cooked (even dropped a couple of leaves in my Tiramisu, but that’s another story).
Anywho, basil can be grown both indoors and outdoors, and it requires little attention. Just be sure the plants get at least six hours of sunlight per day. Don’t water them too much because they don’t need that much moisture.
Tea made from basil is great for soothing the nerves. Just wash a couple of leaves, crush them in a mortar, and infuse them in hot water for a couple of minutes. That’s it. You can add some honey and ginger for some extra spiciness.
2. Sage
No, not that kind of sage. I was referring of course to the herb which gives a strong, almost earthy-like aroma to your dishes. Grandma always uses to put sage in all her meat dishes (you should try adding some dry sage to your pork chops next time).
Just like basil, it’s very easy to grow around the house. The only trick to sage is to don’t overwater and overfertilize the plants. Teas and tinctures made from sage are great against pharyngitis, tonsillitis, and for sore throats, in general. The plant’s crushed leaves can be made into a poultice, quite efficient at dealing with cuts, bruises, sores, and burns.
To make tea from sage leaves, rip two or three, wash them thoroughly, and put them I cup. Add boiled water and allow them to infuse a couple of minutes.
3. Rosemary
This plant will always remind me of The Sleeper, one of Poe’s most awesome poems (“The rosemary nods upon the grave, the lily lolls upon the wave.” Sorry for that flight of fancy, guys. Anyway, rosemary is great for any kind of dish, especially pork cuts and fish.
As a natural remedy, it boasts quite a record: detoxes the body, relieves migraines, improves blood circulation, rids you of morning breath, and also helps with any bouncy-bouncy (sex) related problems. Granny wrote down that rosemary works best if it’s grounded into a fine powder. Take a teaspoon of this stuff every morning, before breakfast. Keep into under your tongue for 15 minutes then swallow.
4. Parsley
No soup or broth would ever taste the same without parley. I myself make sure to have an ample supply of this plant, regardless of the season. As a health aid, parsley’s packed with vitamins A and C. More than that, the increased iodine content makes parley not only great anti-rad food but also a great thyroid regulator.
If you have kidney stones, juice made from freshly-picked parsley leaves can alleviate some symptoms, especially going to the toilet for the number one part. Just stick a handful of parsley leaves into the blender, add a small cup of water, and some lemon juice.
Mix it, pour it into a mug, and drink it on an empty stomach. You should also know that parsley’s also good for the ladies if it’s first eaten by gents (wink, wink).
There is undeniable proof that some plants, not all of them mind you, have outstanding healing properties. One cannot turn to modern medicine each time he finds himself in an
Yeast has long inhabited the planet Earth, a simple, hundreds of millions of years old organism. It plays a vital role in alcohol creation, as the fungus turns sugars into the intoxicating brew of choice. There would be no beer, wine, vodka, champagne without yeast, what do you have.
This ancient fungus lives all around us in the world, and we only need to create an environment it likes, to take advantage of it. The majority of people buy yeast from the supermarket in its dried form. This is because it’s the quickest way to get your hands on usable yeast. It’s dried in minutes and activates.
With the advent of craft breweries, while home brewing has become very popular, yeast is mostly used to raise bread and baked goods. Another popular use to it is pizza crust. You are tasting the regional flavor of the area’s combined yeast and water when you’ve traditionally baked bread. These are all critical parts of using it. It adds stuff.
So how is it that makes bread come up? Well, the yeast releases gas as it consumes the sugars and breaks them down. Aye. Little gas bubbles – mostly carbon dioxide – make bread and pizza grow. We would all be eating flatbreads morning noon and night without those little guys.
Potato Method of Harvesting Natural Yeast
Making yeast with a potato is so simple it’s ridiculous. There is no reason why you wouldn’t have it on hand at all times if you have potatoes. You are merely getting out of the way of a natural process.
1. Wash your potato off and slice it in half. You can peel it if you want but you can scoop the meat from the potatoes away from the skin pretty easily when its finished cooking.
2. Place your potato into a small saucepot and cover it with water. Then bring that water to a boil.
3. Cook the potato until a fork is inserted in the center and can be pulled out without resistance. The easier to mash the better.
4. Pull the water from the heat and remove the potato. Keep the water. It’s now full of starch that yeast love to eat.
5. Let the potato cool a bit and then mash it well with a fork.
6. Add the potato to a 1-quart mason jar. Then fill it up with the potato cooking water.
7. Add a ¼ cup of sugar and a tsp of salt to the mix in the jar.
8. Cover with cheesecloth and place it in a dark warm place so the yeast can get started blooming.
9. After about 2 days you are going to see the yeast bubbling into the jar ad then you will know it is in there and it’s ready.
Creating a Biga or a Sponge
If you want to make the most of your homemade yeast and bake the best possible bread, you’ll use it to create what’s called a biga or a sponge. This is when you are taking a portion of your meal and yeast from a bread recipe and allowing it to combine for about a day before producing the bread. You mix these two ingredients into a batter consistency, cover it and keep this mix in a cool, dark place.
If your recipe needs 4 cups of flour and tbsp of yeast you’ll want to mix about 2 cups of flour with 1 tbsp of yeast and enough water to create the consistency of a thick batter. This will ferment and build a flavor depth you would not get otherwise.
You can also use a portion of your biga and keep the rest running by feeding the active yeast every day. Your sponge is basically a breathing breathable being that can be fed every day with flour and sugar. It will engulf this and all you need from time to time is to add these ingredients, and maybe some warm water.
All of this sustainable leaving and flavor from a single potato.
Related: What Do You Do When Someone Asks For Food in a Crisis?
Using the Yeast
A lot of articles teach you how to make leaves from various things but never really go into the specifics of how to use them. When you want to make it a one-time use just swap 1 tablespoon of your fresh yeast with 2 tablespoons of a packaged one. Use the amount of water needed by the recipe, and don’t deviate from it. The rest of it will finally die out from your jar and you can start over.
This yeast can be used in any application just like a store-bought one. The best way to preserve your yeast, though, is to use the sponge method and keep that thing alive as long as you can. If you are professional at this, then you’ll have it all the time on demand and never need to buy the packets.
What Else Can Make Yeast
There are other things that you can use to make yeast. You have to remember that it is everywhere and all you have to do is create an environment that this little fungus loves.
Fruit
Crushed fruit that is covered and left out for a couple of days will begin to bubble. In this situation, you have yeast that is eating the sugars in the fruit.
Sourdough starter
Traditional sourdough from San Francisco actually gets its unique flavor from lactobacilli which produce lactic acid during the fermentation process, but there is also yeast in it. Only combine flour and water into a strong dough to make a sourdough starter, and leave it exposed to the sun for a few days before it starts to turn brown. Keep feeding it every few days with flour and water. When you want to make bread, mix the dough then add in a quarter as much starter as you have dough.
Potato Boiling Water
I read stories about people using water that boiled potatoes in to make yeast. So, instead of using our mashed potato you would eat that potato or feed those potatoes to your family and keep the water. Place the water with the same combination of salt and sugar in a mason jar. The point is that just the same goes for this to work.
We collected yeast from the air much longer than we purchased it in supermarket packages. It can be used to bake bread and things but it’s also a perfect way to make your own alcohol. This is a great skill, using yeast that occurs naturally. Alcohol is one of the most effective preparations to cleanse wounds or to barter.
However, you’ll use it for every day used to make bread. Making dough of quality is a skill that preppers don’t spend enough time on. You can extend that to a variety of things as you start to learn how to make dough. The preparation of items like grains and whole red wheat is a no-brainer for preppers. Why isn’t mastering the production of dough with that wheat as much a priority?
Pluck some yeast out of the air and continue bread-making around. It’s a genuine aptitude for planning that warrants your attention. You might fall in love with it, so be careful.
Yeast has long inhabited the planet Earth, a simple, hundreds of millions of years old organism. It plays a vital role in alcohol creation, as the fungus turns sugars into
Dehydrated potato flakes are a nutritionally healthy, highly portable source. They’re pretty easy to cook, don’t weigh too much and keep without refrigeration for a long time. Even, when you make them from scratch you know what’s in them, so they taste better.
Preparing the Potatoes
Peel the potato and cut it up into medium-sized pieces.
You can wait until after you boil the potatoes to peel them if you prefer. Any of the bits will come off the skin as they simmer. Let the pieces of potato cool off a bit, slip a butter knife or fork under the edge of the peel and pull it away. It will come off with ease.
Put the bits of potato into a saucepan and add enough water to cover them generously. It takes about 4 cups of water in a medium-size pot to cover 1 big baking potato.
Add a tablespoon of salt, if you like. It’s not really important, but the flavor is much preferred by many people. I use 1 to 2 sea salt grinds.
Bring water to a rolling, full boil. Switch the heat to roughly medium so that the water remains at a steady boil and cook the potatoes for 15 to 20 minutes. These are achieved by simply sliding a fork through them.
Take the peeled, cooked potato pieces out of the pan with a spoon and put them into a large bowl. Do not throw out the potato water. Mash the potatoes with a fork or hand potato masher.
Attach 1/2 cup of potato water to the potatoes and stir in. A mixer to this part works best. Mix them in until they are smooth. Add 1/4 more cup of potato water and add some more. They should be the consistency of runny pudding. Add more water, if necessary, until they are the right consistency.
While adding water to the potatoes doesn’t make much sense, it does need to be done. The potatoes must be thin and a little runny, or they will not dehydrate and break down properly.
Dehydrating in the Oven
Line a baking pan or pizza pan with parchment paper. Cut the parchment paper down to size so it fits neatly on the bottom of the pan. Parchment paper that extends beyond the edges of the pan will scorch.
Spread the mashed potatoes out evenly in a thin layer (no thicker than 1/4 inch) on the parchment paper. Place another piece of parchment paper on top and lightly smooth it over the potatoes.
Dehydrate the potatoes for 6 to 8 hours in a 170-degree Fahrenheit or 75-degree Celsius oven. Leave the oven door open slightly to allow the moisture to escape.
Dehydrating is a Dehydrator
If you are using a dehydrator, use the fruit leather tray or the pans/sheets designed for use with your dehydrator.
Set your dehydrator at 130 to 145 degrees Fahrenheit or 55 to 65 degrees Celsius and leave the potatoes in for 6 to 36 hours, depending on how quickly your dehydrator works. Check them after a few hours and turn over the chunks that are getting dry.
Related: 7 Unusual Ways To Use Your Vacuum Sealer
Making Potato Flakes
The potatoes will be dry, crunchy, and white-gold to golden-brown when they are done.
Put the dehydrated potato pieces into a food processor or blender to crunch them up into flakes. Grind them up as much as you can. The finer the grind the smoother the mashed potatoes.
Using Homemade Potato Flakes
The potato flakes are reconstituted with about twice as much water as the flakes. The 2/3 cup water and 1/3 cup flakes, for example, make 1 serving. The amount of water required is going to vary so you may want to experiment. To enhance the taste and texture, add a little salt, 1 to 2 teaspoons of butter, and around 1/4 cup of milk to the potatoes. Use the water to place the salt in the pan, bring it to a boil, remove from heat, mix in the flakes, milk, and butter. Coconut oil or olive oil can also be used in place of butter.
Shelf Life
If you keep the potatoes flakes in a regular container they will last between 6 months to a year. The best way to store them would be in Mylar bags, add oxygen absorbers, keep them in a cool, place and the flakes could last for 5 maybe 8 years.
Dehydrated potato flakes are a nutritionally healthy, highly portable source. They’re pretty easy to cook, don’t weigh too much and keep without refrigeration for a long time. Even, when you
The term “survival food” is actually really generic. What are we talking about surviving through?
Is the survival food supposed to get us through a 3-day blizzard?
Or how about a month-long power outage?
Or what if there is a disaster that causes us to flee from our homes and Bug Out in the wilderness?
Each of these situations is going to require different types of survival foods.
In this survival food list, I want to address the types of survival foods you should be stockpiling based on the type of disaster. They are:
Survival foods for short-term disasters
Survival foods for long-term disasters
Survival foods for evacuation/bugging out
Short-Term Disaster Survival Foods
These are the most common types of disasters that we come up against. They include situations like blizzards where you are trapped in your home and unable to go grocery shopping. They also include short-term power outages.
You won’t need a lot of survival food for these situations, especially because you will be able to eat through your regular food supply (and will especially have to hurry to consume those frozen foods if the grid goes down!).
But there are some items which are absolutely necessary:
WATER: During blizzards, hurricanes, and other disaster situations, it is common for the water to go off. Have at least 1-2 gallons per person, per day. This includes water for drinking, cooking, and hygiene. Read how much water you really need for emergencies.
Canned food: Including canned meat, beans, fish, fruit, vegetables
Crackers
Oatmeal
Cereal
Powdered milk – Learn how to make powdered milk
Peanut butter
Jams and jellies (preferably in plastic containers and not glass)
Crackers
Instant mashed potatoes
Granola bars
Red lentils
Couscous
Dried fruits/fruit leather
What Isn’t On This Survival Foods List:
You’ll notice that I didn’t include some of the “obvious” survival foods on this list, like dry beans, pasta, and rice. The reason for this is that they take a really long time to cook. Even with presoaking, you will still need to cook dry beans for about an hour. Rice and pasta are a bit better, but even they take a long time to cook.
In an emergency situation, you probably won’t have the power for cooking. You can use one of these off-grid cooking methods. However, if you are trying to cook dry beans, you will blow through fuel very quickly.
On top of that, cooking with fire isn’t always safe after an emergency. For example, during earthquakes, it is common for gas leaks to occur. You shouldn’t light any fire if you suspect a gas leak.
Stick to No-Cook Foods
For short-term emergencies, no-cook foods are the safest bet. Canned foods are ideal because they can survive flooding and other damage.
For your carbs, choose instant mashed potatoes (which can be made with cold water in a pinch) and crackers. I did include couscous on the list because it cooks in just 2 minutes. Also, red lentils are on the list because they too cook really quickly with presoaking.
Long-Term Disaster Survival Food
These are the situations that hopefully will never occur, but will want to be prepared for in case they do. For example, if there is an EMP attack or nuclear disaster, we might be forced to hunker down in our homes (bug in) for over a month.
In these situations, our survival food requirements will drastically change. You need foods which:
Provide you with optimal nutrition.
Can be cooked/prepared with very little fuel and water.
Won’t be damaged easily (for example, nothing in glass jars).
Are compact so can be stored easily.
Have minimal packaging so your location doesn’t get littered with trash.
Don’t all taste the same so you come down with food fatigue.
Are you struggling to keep track of your stockpile or unsure what to store? Our workbook and inventory sheets can help. Read more here.
List of Long-Term Survival Foods:
Many of the foods on this list are freeze-dried. These foods can last for 25+ years when properly packaged. Freeze-dried foods also retain their nutrients and taste great.
If you want to go the DIY approach to survival foods, I recommended reading our post: Food Preservation: A Survivalists Guide.
Specialty survival foods can be a bit pricey but are very convenient. If you want to find out more about this option, read our post on the best emergency food companies.
WATER: Again, water is your most important survival item!
Canned Foods: These are great for both short-term and long-term disasters. Just don’t rely solely on canned goods as they are usually loaded with sodium and sugar (plus most taste like crap).
Freeze-Dried Fruit: Freeze drying is one of the best ways to preserve fruit for the long term, and without taking up much space. Invest in freeze-dried fruits as you will really need the antioxidants in fruit to keep you healthy… Not to mention the fiber you will need to keep your bowels moving!
Freeze Dried Veggies: Freeze-dried veggies taste a lot better than canned veggies, and they take up a lot less space. Just add water to rehydrate them, or snack on them. You will need them for the minerals and vitamins that they provide.
Seaweed: Seaweed isn’t exactly the tastiest food, but it is one of the most nutritious foods you will find and is very compact when dried. It is also naturally salty so you can use it to flavor foods. Here is a decent guide to edible seaweed.
Olive Oil, Vegetable Oil, and Lard: Oils and fat are the most caloric-dense foods you will find. They will provide you with energy, flavor food, and also prevent food from sticking to your cooking pots and pans.
Honey: Honey can last virtually forever, is a great natural immunity booster, and has anti-bacterial properties. For long-term survival, it beats sugar for flavoring food.
Powdered Milk: Look for powdered milk in cans as it will last longer without having to vacuum seal.
Instant Meals: Don’t bother with the instant meals you find in supermarkets. They usually take up too much space with empty packaging and are nutritionally incomplete. Further, they aren’t meant to be stored for a long time. This is your survival we are talking about, so spend a bit more on emergency food from a reputable brand.
Freeze Dried Meat: This takes up much less space than canned meat.
Dried Meat: When stored properly, dried meat can last for over a year.
Dried fruits and vegetables: These can last for upwards of 5 years when stored properly.
Beans, lentils, and rice: These are cheap and have very long shelf lives. Just remember that they take forever to cook, so you’ll need an off-grid stove plus lots of fuel.
Canned tuna in oil: This is a great source of protein and Omega 3. Plus, you can turn a tuna can into a survival candle or stove!
Ramen Noodles: You will want some carbs, and these are great because they cook quickly. Read do ramen noodles expire?
Instant Mashed Potatoes: Also because you will want some carbs and no cooking is required.
Protein bars and granola bars
Pickles/Preserves: Learn how to make your own Lacto-fermented pickles here. Just remember to store the jars in a way that is safe for disasters like earthquakes.
Storing Long-Term Survival Foods
Just because a food can last “forever,” doesn’t mean it will survive a disaster. For example, a bag of sugar won’t go bad — but will be ruined if it gets touched by floodwater. The same goes of any food in a box.
The best way to package survival foods (except cans, obviously) is in vacuum-sealed mylar bags which are then put into buckets. Read this article about the most common food stockpiling mistakes to make sure your stockpile lasts.
Bug Out Survival Food
There are some disaster scenarios that would cause us to flee our homes and bug out in the wilderness. You definitely don’t want to be lugging around heavy cans of food in your Bug Out bag!
Caloric density is incredibly important here. You won’t have a lot of room in your bag, so limit the food you bring. More important is water – – you can go a month without food but only 3 days without water.
Bring:
Survival water + water collection device + water filter
Survival food bars or other nutrient-dense foods
Yep, that’s all you need for food in your Bug Out Bag!
See 50+ Bug Out Bag food ideas here.
What sort of food are you stockpiling for survival?
The term “survival food” is actually really generic. What are we talking about surviving through?Is the survival food supposed to get us through a 3-day blizzard?Or how about a month-long
Whether it is a hurricane, economic collapse, or EMP blast, you know that disaster could strike at any moment.
This isn’t being paranoid. This is being realistic.
And when we face the reality that disasters could happen, we can take steps to prepare for them. One of the most important steps for disaster preparation is food stockpiling.
Whether you are a long-time prepper or newbie, make sure you aren’t making these food stockpiling mistakes.
Not Stockpiling Enough
Most grocery stores keep a stockpile of food that would last people about 3 days – assuming that you are able to get to the grocery store at all.
So, a stockpile of 3 days worth of food might be fine for getting you through a small blizzard. But it isn’t going to do squat when a major disaster occurs and the supermarkets can’t restock for weeks or even months.
At the very minimum, you should have a 30-day stockpile of food on hand.
This can seem difficult if you have limited space for your food stockpile. But stick to dense foods which don’t take up much space, like cans of beans and bags of rice as opposed to bags of potato chips.
Keeping All of Your Food Stockpile in One Place
In event of a disaster like an EMP attack, your disaster plan may be to hunker down for the next month until the chaos dies down.
But plans don’t always go according to plan!
What if you aren’t at home when the disaster occurs? What if your home is wiped out? What if intruders take over your home?
For these reasons, you need to keep some food stockpiled in other places too, like at work and in the trunk of your car. You might not be able to stockpile 30 days worth of food there, but any little bit will help.
Not Rotating Food Stockpiles
Just because canned and dry food seem like they can last forever, it doesn’t mean you should let them sit on the shelves until doomsday. Continuously use food from your stockpile, and replace it in the process (emphasis on replacing it).
Improper Storage
Your food stockpile needs to be stored in a cool, dry place. Mold can quickly destroy foods like rice, pasta, and cereals. You also need to make sure your food stockpiles are properly sealed to keep out bacteria and pests.
Here are some good articles to start with about how to properly store items for the long term:
Storing Drinking Water in Recycled Bottles
You will need a LOT of water for a 30-day emergency stockpile.
Consider that a person should drink about 8 cups of water per day (1/2 gallon). That means you need 15 gallons of water per person. But that is just water for drinking!
You also need enough water for cooking and sanitation. Aim to have at least 1 gallon of water per person, per day.
It is completely okay to use your old plastic bottles (such as old milk jugs which have been cleaned out) for storing water. However, they need to be properly cleaned and sanitized so mold and bacteria don’t start to grow.
You also need to ROTATE your water AND THE BOTTLES every 6-12 months.
Plastic bottles, especially milk jugs, are biodegradable. If you don’t toss them, your emergency water will leak out!
Learn more about the best water storage containers.
Forgetting Nutrition and Medical Conditions
Just because the end is near, it doesn’t mean you should completely forget about nutrition.
Sure, you will be better off than your neighbors who are eating out of trash cans and fighting rats for scraps… but you still need to be healthy in order to keep up your energy levels. A stockpile of mac n’ cheese just isn’t going to cut it.
Try to diversify your food stockpile as much as possible. You will not only want the obvious foods like dry grains and beans, but meat, dried fruits, dried milk, nuts and seeds, and dried veggies.
I highly recommend getting a food dehydrator so you can make your own dried veggies. You can usually find freeze-dried veggies at health food stores.
Also, don’t forget about any medical conditions your team members may have.
Stockpiling food for a diabetic is obviously going to look a lot different than for other people!
Not Stockpiling Equipment with the Food
Great, you’ve got an endless supply of rice and beans to eat! But how are you supposed to cook them???
Don’t forget to stockpile cooking equipment along with your food, including a stove and fuel, a can opener, and a pot.
Telling People about your stockpile
I know you are proud, but don’t tell people about your food stockpile. When SHTF, where do you think they are going to come to first???
Not Keeping Pests Out
Last year, my wife opened up one of our bags of stored rice only to have a swarm of moths come out. We thought we’d done a good job of sealing off the bag – but that doesn’t do any good when the eggs were already in the rice when we packed it!
Instead of being disheartened by this experience, we learned from it. Now we know that we’ve got to take steps to keep pests out of our food stockpile.
This includes moths, mice, rats, cockroaches, and many other pests which can get into your food.
Read more about dealing with pantry pests.
Relying On Your Stockpile
Let’s hope that the chaos after the disaster dies down within 30 days (or however long you’ve stockpiled food for) and you can return to normal life shopping at the supermarkets. But what if it doesn’t?
How do you plan on eating when the stockpile runs out?
Good disaster planning requires you to think of the worst-case scenario. This isn’t being paranoid or pessimistic. It is being prepared!
Now is the time to learn survival skills like how to forage for food in the wild, how to make your own self-sustaining food systems (such as aquaponics), and how to hunt.
How are you stockpiling your food? Please share your tips in the comments section.
Whether it is a hurricane, economic collapse, or EMP blast, you know that disaster could strike at any moment.This isn’t being paranoid. This is being realistic.And when we face the
I decided to make beeswax soap for Christmas gifts last year. It has been on my list of things I should probably know how to do and when my stepfather, who keeps bees, brought me seven pounds of beeswax from his hives, I thought the time was right.
I started my soap-making adventure with a recipe for beeswax soap from the book, “Beeswax Alchemy”. This book contains directions for making candles, balms and bars, salves, cream and scrubs, soap, and even beeswax art.
BEESWAX – WHERE TO GET IT AND HOW TO HANDLE IT
You can either acquire your beeswax from a beekeeper, which I was fortunate enough to be related to, or you can buy it online and it comes in handy little balls that are easy to measure and melt. The wax I had was in giant hunks which I sawed off with a bread knife. I do not recommend this method. It’s maddening. Since then I have learned another method which would have saved me a lot of blood, sweat, and tears.
First, beeswax becomes brittle when frozen and is much easier to cut. Secondly, and I think I will go this route next time, the wax can be melted and poured onto a large cookie sheet lined with freezer paper. Once hardened, the wax can be broken off into small chunks without sawing at it like a crazed butcher.
You can make soap without beeswax, however, I wanted to use the beeswax I had on hand because the scent is wonderful and it has conditioning properties that I wanted to in my soap.
LYE, LYE, LYE
Without lye, there is no soap. Lye, or sodium hydroxide, is required to make the chemical reaction that makes soap. Period. I had seen lye in the hardware store for cleaning out drains and thought that there must be a softer, gentler lye available for making soap. To my surprise, the lye I made soap with to give my loved ones was made with the same highly caustic chemical that will burn the eyes out of your head. Since lye is so dangerous, I want to give you some tips:
Measure everything correctly. This is not the time for measuring with your eyes, use a digital scale, it is most accurate. If your lye to fat ratio is off, or you have added too much beeswax you will waste your time because your soap will be sludgy or rubbery.
Once you have added the water to lye, it’s all business. Wear clothing to cover your skin and protective eye-wear.
When the water is added it creates fumes that should not be breathed in. I didn’t know this and I leaned over the pot of lye and took a deep breath. I am still here, but I wouldn’t recommend it.
ONLY USE STAINLESS STEEL! The lye will react badly with other metals. I bought a stainless steel pot that I use only for soap making. I just cannot make mashed potatoes and serve them from the same pot that had a toxic chemical in it. I am just weird that way.
Other equipment you need to make soap
Immersion blender – This is a luxury item. You can mix all your ingredients up with a STAINLESS STEEL whisk, but I have to tell you, this blender made mixing so much faster and easier.
Freezer paper – You can buy large rolls of it and it is essential for lining cardboard if you are making your own rectangular molds. It is also nice to wrap the soap in and tie with twine to give as gifts or just to store for yourself.
Soap molds vs. cardboard – If you use the cardboard and make a box (approximately the size of a bread pan) and line with freezer paper. I bought a silicon soap mold that was the right size. The advantage of a mold is that it will be more durable than cardboard over time and you don’t have to fool with the freezer paper. You can get fancier molds that have lovely designs in them, but I opted for the box shape and cut with a blade for a more homesteader look.
Fragrance – I bought essential oils and used the lemongrass. Any of the essential oils will work great, but I would buy the most concentrated possible so the scent is present. You can combine scents to create something unique, or just use one of them for a distinguishable scent.
Beeswax Soap Making Material List
olive oil – 358g
coconut oil – 225g
palm oil – 177g
castor oil – 32g
beeswax – 7.2g
distilled water – 266g divided
lye – 111g
honey – 1 TBS
fragrance – 2 TSP
disposable paper bowl
stainless steel bowl for lye
stainless steel pot or microwave save container for oils
stainless steel whisk or immersion blender
digital scale
mold
freezer paper (if using cardboard)
digital thermometer
Yield – eight 4 ounce bars
How do you make soap?
Measure out the lye and place in disposable paper bowl.
Measure out 148 grams of distilled water and pour into stainless steel bowl. Place bowl onto heat resistant surface and then add dry lye crystals to water (NEVER THE OTHER WAY AROUND) Stir until lye is completely dissolved. Set aside to cool.
SIDE NOTE: Those new to digital scales, this is for you. When measuring ingredients, first select the TARE WEIGHT and then set the container that will hold what you are measuring (ex. plastic cup, bowl, etc.) This will analyze the weight of the container so that weight is NOT included in the weight of the ingredients. Then, once the TARE WEIGHT is selected, the scale should read 0.0 (give or take some zeroes) and then you can add the ingredients to be weighed. If you are not using a digital scale you will have to weigh the container then add the ingredients and subtract the weight of the container to get actual weight of ingredients.
Microwave the honey, 118g of remaining water, and microwave until dissolved.
Prepare the mold.
Heat all the solid oils and beeswax in a stainless steel pot. Add the liquid oils (excluding honey and water mixture) and stir.
Check temperature of lye and the oils. This is crucial! To keep beeswax from getting hard, the oils need to be around 120 F. The lye needs to be 120 F as well.
Now add honey water to the lye water ONLY when it has reached the correct temperature. Sometimes this will result in a color change, which is normal.
Now pour the lye water into the oils and mix with the stainless steel whisk or the immersion blender.
When the mixture begins to looks creamy, it has emulsified and this is the time to add your fragrance.
Keep mixing until it looks like a light cake batter. This is called the trace.
Quickly pour into prepared mold or cardboard container lined with freezer paper. Scrape every bit of residue from the pot with a high-temp spatula.
Tap soap mold on the counter to remove air. Smooth out the top and cover mold with cardboard to hold heat in.
In twenty-four hours the soap should be cool enough to cut. If it seems too soft, then wait and continue checking every 4-6 hours. Once it is hard enough to cut into bars, I cut it with a blade made for cutting soap. The handle and size made cutting more even and straight. I wrapped my soaps in freezer paper and twine and stored them in a cool dry spot.
I also allowed my soaps to cure for 30 days because more water will evaporate from them, resulting in a longer lasting soap bar. I hated the thought of going through this process only for the soaps to sludge away in the shower.
The finished product – looks like… soap.
END RESULT
Like anything else, there are pros and cons, here they are:
PROS
Making soap is a good skill to have under your belt. One day you may not be able to drive to your local Walmart and pick up a bar of Ivory soap.
They make wonderful gifts!
It is natural and uses a bi-product produced by our dear friend, the honeybee.
This soap is the best if you have sensitive skin, eczema, or other skin conditions. It will leave you clean without the drying effects of the cheaper commercial soaps.
CONS
The next time I make it, the cost will be significantly less, but it will definitely cost more than cheap drugstore soap. You can always stock up on the cheap stuff in the event of an emergency and you can shower yourself clean with the best of them. Personally, I like the idea of having a chemical-free, all natural way to clean up.
Other self-sufficiency and preparedness solutions recommended for you:
I decided to make beeswax soap for Christmas gifts last year. It has been on my list of things I should probably know how to do and when my stepfather,
When starting their food storage people commonly ask: How much food do I need? There are a few considerations to make when deciding on quantity. Each food storage type has its own characteristics so included below are some things to keep in mind when determining how much to store.
Pantry/Canned Foods:
If you decide to include pantry/canned foods such as the grocery items that you consume regularly, calculating this can be fairly simple. First figure out how much you and your family go through in a typical week. Take that number and multiply it by the amount of time you would like to have food on hand and strive to obtain that amount. Thirty days is a good initial goal.
Taking advantage of grocery store sales is a great way to quickly build up this portion of your food storage. Remember: eat what you store and store what you eat. This means don’t buy foods that you don’t normally eat just because you see them on sale. By purchasing and preparing the foods you normally eat, rotating out the oldest items in your pantry first and then replacing these items regularly you ensure that this portion of your food storage is always fully stocked and up-to-date.
Bulk Items:
Stocking up on foods you already eat is an easy way to increase your storage.
When it comes to bulk foods, remember that these storage items are excellent for extending meals that you make with your other storage foods or making meals from scratch. Adding rice, pasta or beans to any meal will stretch your food dollar regardless if the meal is canned, freeze-dried or a long-term storage food, Bulk foods are also great for having everyday essentials on hand such as salt, sugar and flour. For example, you will want to store sugar if you are used adding it to your daily coffee.
When determining how much to purchase consider your family’s typical serving sizes and then buy the items based on how many times a week you plan on needing them. Having a surplus will never an issue because bulk foods can last a very long time if properly stored. Note that when purchasing bulk food items you may need to repackage them in order to extend their shelf life sufficiently for your needs.
MREs
If you plan to include MREs as part of your food storage, keep in mind their limited variety and high cost; they are best suited for short-term emergencies. MREs don’t require any cooking so put them in your go bags or evacuation packs. A case of MREs contains 12 meals. Each MRE contains 800-1200 calories so you only need about two per day. A smart goal would be to have one case of MREs per person; this will provide approximately 1 week of meals for each family member.
Dehydrated and Freeze Dried Foods
Quick and easy option that doesn’t require cooking.
Dehydrated and freeze-dried meals are much lighter and can come in small packages for portability. These, too, could double as a bug out supply with the understanding that extra water would be needed for reconstitution.
While you can get individual food items that are either dehydrated or freeze dried, one advantage of these foods is that you can buy prepackaged meals and then all that you would need to make a tasty meal is hot water. These complete meals may not be as convenient to eat as MREs but they provide a much greater variety of meals from which to choose.
Unlike pantry food and MREs, calculating how much freeze-dried and/or dehydrated food you will need is not easy so we will guide you through it.
How much Long-Term Food is Enough?
When deciding how much freeze-dried and dehydrated foods to add to your emergency supply, the most important rule to remember is to go by calories not by serving size. Emergency food companies have different definitions for what constitutes a serving and emergency food kits are not one-size-fits-all even though they may be advertised that way. The first step is to figure out how many calories you and your family consume on a daily basis. Next multiply that by the number of days for which you want to be prepared. This becomes the minimum number of calories that you need to have in your food storage program.
Once you know how many calories your family requires you can figure out how much dehydrated and freeze-dried meals you need. Keep in mind that your daily caloric requirement changes based on what activities you are doing. For example, a hard work day cutting down trees and moving storm debris will require more calories than sitting around playing cards while waiting for a storm to pass. Its best to assume you will need more calories than less. In general teenage and adult males need 2800 calories per day, teenage and adult females require 2200 and children 13 and under use 1400. Infants require special food so plan and purchase food accordingly.
Once you have the total daily calories needed decide how many months’ worth of food you want. This is influenced by your personal comfort level. The longer period of time you can supply for the better but most people can’t afford to go out and buy a year’s worth of food without some prior planning and budgeting. The best recommendation is to start where you can. First build up a 2-week supply and then move to 30 days’ worth. Once you have that, work up to three months, then six and then a year. Build up your food storage supply as big as you need in order to feel safe and to be able to provide for your family in any disaster situation.
Watch out For Serving Size
Remember when choosing an emergency food supplier to look at the total calories in what they call a serving. Similar with our everyday food, a single serving is not enough calories to be considered a complete meal. Instead consider the total number of calories in the package. Going by our figures above an adult male needs about 2800 calories a day or 933 calories per meal.
Many people make the incorrect assumption that a serving size should contain enough calories for a complete meal. In truth, there are no standards for serving sizes; they are only suggested portions by the manufacturer.
Serving sizes are recommendations that also assume that you will also be eating other foods. Focus on the amount of calories in the whole package instead of the number of servings per package. Don’t expect an entrée meal to complete your calorie intake. Look into having snacks, drinks, fruits, vegetables, rice and other food items to help increase your daily calories. Having a variety of foods to eat creates normalcy in an emergency situation.
In a blackout scenario, diseases of all types will flourish, and our immunity will be compromised by starvation and inadequate nutrition. Our only chance for survival will mean our mastering of prevention, not our waging war on infections.
We will still get infections, and we will have to deal with the ones we contract, but in the meantime a strategy that will best serve us is prevention.
This is what I had in mind when I started my research on how to slowly replace all the drugs me and my family depend on, with natural solutions that I would find no matter what happens around me.
And my research was not only focused on finding cures, but also ways of preventing disease by boosting your immune system. If you check the list of some of the most powerful nutrients to boost your immune system, Iodine stands from the crowd.
Looks like iodine is vital for normal growth and development of the body. Did you know that around 60% of the iodine in the human body is stored in the thyroid gland? Its health benefits play a very important role in the normal functioning of the thyroid gland, which secretes thyroid hormones that control the base metabolic rate of the body. In fact, without it, thyroid hormones could not even be synthesized.
Iodine controls the functioning of thyroid glands, which, in turn, has a significant influence on the metabolic processes in the body. It helps in the optimum utilization of calories, thereby preventing their storage as excess fat. Other benefits include the removal of toxins from the body and assisting the system in utilizing minerals like calcium and silicon.
How did iodine make its comeback? Well, it was not an accident.
It is the same old sad story; the wonderful microbial life and fertility of our soils get progressively depleted of all of their minerals and trace elements as they get poisoned with concentrated chemical fertilizers and pesticides of all sorts. Soil farmed in this manner is lifeless and dead. Unfortunately except for organic farms this describes the vast majority of farms in the United States today.
Soil treated with those toxins cannot form humic acids and fulvic acid and consequently cannot process inorganic minerals into organic minerals and trace elements which your body can easily absorb.
The humus content of the soil, which took millions of years to develop, is destroyed in a few decades, and along with it the fertility and productivity of the soil. Foods are grown that look okay but are nutritionally depleted and empty, and are lacking the fulvic acid from the soil that is so important in facilitating the human body to absorb all the nutrients it so desperately needs to function properly.
Consequently each successive generation of fruits and vegetables grown in these dead soils results in less and less mineral and trace element content. This is compounded by our modern methods of cooking and processing food, resulting in foods that are devoid of enzymes, vitamins, minerals, and most trace elements, but overflowing with high fructose corn syrup and other forms of sugar and soaked in innumerable types of toxins.
This doesn’t even take into account the potential environmental disaster of GMO foods, and international corporations like Monsanto and their almost total control of seeds and the resulting means of food production. Seed companies are now selling hybrid seeds that produce plants that are sterile and cannot reproduce themselves like open-pollinated seeds can. Farmers around the world are jumping on this hybrid seed bandwagon due to the promise of increasing yields, along with pest and pesticide resistance, as well as larger-sized vegetables.
However, this is done at the expense of the loss of several thousand years of local plant breeding that has developed local plants, known as landraces, which are perfectly matched to the local environment as well as the local insects, soils, and weather patterns. These plants contain DNA that has many different traits and characteristics that we do not want to squander and lose forever. Once lost, these varieties of plants will be gone forever.
As a Prepper, you have to have a seed vault of heirloom seeds that are open-pollinated and thus will produce viable seed themselves for your next season. Seed germination and gathering, along with the ability to breed plants to improve size, taste, and other characteristics, is essential for any serious Prepper or survival group.
There is no doubt that we will have to grow our own food; we have to learn to do so using organic techniques in healthy soil rich in all the minerals and trace elements that we require for good health. In the bibliography of my extended research there are many books on this subject that will help teach how to do so.
One fabulous source for open-pollinated heirloom varieties of fruits and vegetables is the Seed Savers Exchange. This was started in 1975 by Kent Whealy and his wife, Diane, who just wanted to save some varieties of vegetables that they ate as children that they noticed were disappearing. Gardeners of all races and ethnicities had come from all over the world to the United States, bringing with them jars of seeds from their “old countries”. These seeds were grown in backyards all over the country, but were being lost by the thousands before the Seed Savers Exchange became reality.
This idea has grown into a thick catalogue of thousands of varieties of any fruit and vegetable you could imagine, and has resulted in the salvaging of an innumerable number of these plants that otherwise would have gone extinct. I highly recommend joining it and making a contribution if you have any unusual varieties. For a Prepper it is a wonderful source of seeds at reasonable prices; currently the catalogue has over 12, 000 varieties of vegetables, herbs, and other plants. As a couple they have probably contributed more to saving the genetic diversity of our planet than any group or government.
Scientific American had a revealing article in April 2011 on the changes in nutritional content of some of the foods we grow. From 1975 to 1997 the average calcium content in twelve fresh vegetables dropped 27 percent, iron levels 37 percent, vitamin A levels declined 21 percent and vitamin C levels dropped 30 percent!
Wheat has half the protein content of one hundred years ago.
We would have to eat eight of today’s oranges to get the vitamin C content of one orange our grandparents ate.
The calcium content of broccoli would require you to eat three heads of today’s broccoli to get the same amount as one head în 1950.
Alarming reports detailing the decline in nutritional content of our foods go as far back as 1935 when the Department of Agriculture began sounding the alarm, and things have gotten markedly worse since those bygone days.
The quarter of the American population that eats the least fruit and vegetables has twice the cancer rate as the group that eats the most; that alone is a startling statistic.
A consequence of all of this is a drastic decline in the iodine content of soils, dropping as much as 50 percent in the last thirty years. The World Health Organization (WHO) estimates that over 2.2 billion people worldwide are at risk for iodine deficiency.
Iodine is essential for proper functioning of the thyroid gland, which in turn controls your metabolism and many other functions. Iodine, however, is not only essential for the thyroid but also is found in the thymus, breast, salivary glands, pancreas, brain, cerebrospinal fluid (the fluid that your brain and spinal cord float in), stomach, and skin.
A woman’s thyroid gland is twice the size of a man’s and hence she will need more iodine, especially during pregnancy and breast feeding.
The developing fetus’s brain is dependent on adequate iodine (along with essential fatty acids), without which the child will be born mentally deficient (before the current political correctness was imposed on all of us by the Democratic party, in a time when speech used to be free and not censored, these children were called cretins. Try that now and see what happens to you!). Some of the non-thyroid side effects of iodine deficiency are easily traceable to its source in the body. In the salivary glands, dry mouth. In the brain, cretinism and slow mental development and slow brain functioning. In the skin, dry skin and a lack of sweating. In muscles and joints, fibromyalgia-type complaints of aches and pains. Iodine deficiency is also the cause of many of the cysts that develop in patients’ breasts (fibrocystic breast disease) and other body organs.
Iodine is essential to those parts of the body named above, but also its deficiency has been implicated in a large number of conditions and diseases such as ADHD, miscarriages, Multiple Sclerosis (M.S.) and Alzheimer’s disease as well as Parkinson’s disease and a large number of other neurological disorders.
Another major issue with getting enough iodine is a problem with competition with other halogens like fluorine, chlorine, and bromine. All of these halogens are adjacent to iodine on the periodic table of elements, and have similar structure and hence compete with iodine. With all the fluoride currently being placed in our drinking water, and all the bromine used for fire retardation and other chemical uses, this has caused a major problem.
Bromine is also added to commercial breads and baked goods.
Standard laboratory tests will not pick up bromine or fluorine replacement of iodine in thyroid hormones and these hormones will be reported at levels which are wrong because they are inactive due to their replacement of iodine.
Thyroid hormone without iodine that contains bromine or fluorine cannot function and is useless to the body’s needs.
Lugol’s solution, which is a liquid form of iodine and iodide combined, is very useful when one or two drops are placed in a small glass of water daily. Use this solution to rinse out your mouth once a day and then swallow it. This will provide enough iodine to your body and help displace any flouride or bromide that might have replaced iodine in your thyroid and other tissues.
Note: Too much iodine in a diet supposedly can lead to hypothyroidism or a slow thyroid. That being said, the Japanese have the highest intake of iodine of any population in the world, and do not have an epidemic of hypothyroidism, so as far as I am concerned, high iodine intakes have no serious adverse consequences and many benefits.
Another wonderful source for iodine is Nascent Iodine.
Nascent Iodine comes as a liquid, it is iodine in its atomic or most basic form. Nascent Iodine is the form that is most readily recognized by the body and most easily absorbed. It has a high electromagnetic charge on its surface and this makes it more readily absorbed by our bodies. Because of this easy absorption, Nascent Iodine helps displace bromine, chlorine, and fluorine and also prevents their uptake, thereby helping to detoxify the body.
Nascent Iodine also stimulates the thyroid to produce more thyroid hormone such as T3 and T4. Nascent is the form that was used by dentists and doctors in the pre-antibiotic era to treat infections în the mouth, topically on the skin, and internally as well. Nascent Iodine is also the best form to protect yourself from radiation exposure due to its rapid absorption in a readily usable and recognized form to the body.
Nascent Iodine also has the following benefits:
Supports and boosts the immune system
Helps regulate metabolism
Boosts energy levels (especially if you have an iodine deficiency, which many of us do)
Maintain detoxification systems and help flush the body of toxins
Fight off infections by its antiseptic properties
The usual dose of Nascent Iodine is from one to ten drops daily depending on your situation. Keep in mind that each drop of Nascent Iodine contains approximately 400 mcg (micrograms) of iodine. I take four to five drops daily to maintain good thyroid health. It can either be taken orally mixed with fruit juice or water, or the drops can be administered directly under your tongue. I personally like it in a small glass of cold water, I also swish it around my mouth to clean my mouth of any pathogens before I swallow it. You might as well disinfect your mouth while you are at it; there is no downside to that and lots of benefits as far as prevention of tooth decay, which in a survival situation without a dentist might prove to be very important.
Many diseases gain entry into our bodies through our mouths and thus the importance of good oral hygiene, so why not use an iodine water mix to cleanse and disinfect your mouth while at same time providing yourself with a steady flow of life-sustaining iodine?In a survival situation iodine is essential to have readily available, especially if there is a nuclear event of any type (see the section on Potassium Iodide supplementation for full details).
Iodine is also essential to have due to its ability to disinfect water. After treating water with iodine you should let it stand for half an hour; this will allow enough time to kill off all the viruses and bacteria. If the water is cold (less than 68 degrees F) then you will have to give it four hours to be sure it is sterilized.
Symptoms of hypothyroidism include fatigue, cold intolerance (you always feel cold), constipation, hair loss, bags under your eyes, and if severe enough, the thyroid gland will swell (goiter). A goiter is evident when looking at a person you will see a swollen area at the front base of their neck, below their larynx or Adam’s apple.
There are other more far-reaching effects of hypothyroidism including stopping of ovulation and infertility in women, increased risk of other cancers including prostate, endometrial, breast, and ovarian.
As a Prepper, iodine is one of the most useful items to have on hand; it is relatively inexpensive, and I also recommend you stockpile a good supply of potassium iodide for any radioactive exposure from a nuclear event as well as other forms of iodine such as Nascent Iodine for daily use, etc.
Other sources of iodine are mostly from sea vegetables like kelp, seafood, and shellfish.
Note: the iodine content of iodized salt cannot be used as a source of iodine, since the amount you would need to raise your iodine levels in your blood would be fatal.
Symptoms of Iodine Deficiency
A deficiency of iodine can have serious effects on the body. The symptoms of its deficiency include the following:
Many of us feel a sense of anxious urgency about our prepping. We know that if we suddenly find ourselves trapped in a Level 2 or 3 situation, we are not yet ready to be able to survive such a challenge; but what we don’t know is if/when a Level 2/3 situation might suddenly appear.
To put it as bluntly as possible, the biggest constraint we have is the lack of cash to invest in our preparing.
Well, we can’t give each and every one of you many thousands of dollars of cash, but we can equip you with the tools to cut down on your own monthly outgoings. In this, the article about prepping on a low budget, we look at how you can get out of debt more quickly, freeing up the money you currently spend on paying off what you owe, and enabling you to use it on more productive things instead.
Strategy 1 – Prioritize Paying Off Your Debts
So what is the first thing you should pay off? Generally it will be the balance with the highest interest rate. Look at all the debts you have, and understand what the APR is on each of them. You might be amazed to see the difference in APRs. For example, maybe you have a discounted car loan at 1.9%, a student loan at 5%, a revolving line of credit at 7%, and two credit card debts, one at 15% and one at 24%.
In such a case, you should make nothing more than the minimum payments due on everything except the 24% credit card debt, and you should do all you can to get that 24% balance reduced down. At 24%, you are paying $20 a month on every $1000 you owe; if you can reduce the total owed by an extra $100 in payment this month, then next month that will give you a $2 reduction in interest you pay on the now lower total amount outstanding. $2 might not sound like much after having paid off $100 extra the previous month, but if you are making payments over, maybe, two years, then in approximate terms, that $2 is a recurring benefit over the 24 months of the loan and will (sort of) save you $48 over the remaining period of the loan. That’s a much more significant saving, isn’t it.
That is one of the key things about reducing your interest payments. A trivial seeming $1 a month reduction in interest payments might seem of no value at all, but it is saving you $1 a month for every subsequent month, as long as the loan remains open, and over many years, that really adds up.
The other key thing is that if your interest bill is now lowered by $1, next month your payment is going more to paying off the balance and less to paying interest, so you are paying off more principal, which means that the following month, there will be even less interest to pay and even more principle paid off, and so on.
You might already know that if you start missing payments, your debts start to spiral out of control. The flip-side of that is that if you start paying more than your minimums each month, you quickly start to reduce your balances much more positively than you’d have thought possible.
After you’ve paid off the worst loan (in terms of interest rates) you’ll then successively move through everything else you owe money on.
Generally, the last thing to pay off would be your house mortgage, because that probably has the lowest interest rate associated with it. Plus, for most of us, the interest is tax-deductible, reducing the real interest cost by as much as 30% or more (depending on whatever your top marginal tax rate is).
There’s no better way to control your outgoings without making any impacts on your lifestyle at all than by simply prioritizing how you pay off your debt, starting with the highest interest bearing debts first, and then working successively down to lower and lower interest bearing debts.
Exception – Prepayment Penalties
Some types of loan might have prepayment penalties associated with them.
Make sure that the loans you are focused on paying off as quickly as possible have no prepayment penalties associated with them. If there are penalties, you are probably advised to concentrate on paying off other debts first.
Strategy 2 – Keep a Credit Card with No Carried Over Balance
Many credit cards have a deal whereby if you pay off your balance completely when it is due, then each month’s charges don’t incur any interest if you keep paying them off when the balance comes due. Okay, we probably understand that already.
But did you know that if you don’t pay off your card entirely, then all charges immediately start accruing interest without the grace period you’d otherwise get if you were clearing the balance each month?
In other words, if you have to keep some balance on a credit card, have two credit cards. One which you are paying off, but on which you add no new charges, and a second one which you keep current, so when you add new charges to it, you can pay them off when they come due, next month, without incurring any fees on those.
Strategy 3 – Consolidate Costly Credit
If you can, it is very helpful to consolidate your debts and to move them to the lowest cost source of money.
For some of us, this can best be done by getting a Home Equity Line of Credit (HELOC). You’ll probably get an interest rate around 4% – 5%, and possibly might even be able to claim the interest as a mortgage/tax deduction on your 1040, depending on your circumstances and the nature of the amounts owed.
Let’s say you owe $5,000 at 12% and $5,000 at 18%, and you manage to get this transferred to a HELOC at 6%. That means your monthly interest payment will instantly reduce by $75 every month – more if you can make your new interest payments tax-deductible. That’s another $75 a month that you’ve suddenly created – and it is money you should then use to keep paying down your debt, at a new faster rate.
If you can’t get a HELOC, maybe you can still get some smaller loan from your bank or credit union, and if not at 6%, definitely still at much less than what you’re paying to the worst of the credit card and other lending sources.
Move the money you owe to the lowest cost lender.
Strategy 4 – Refinance Your House
We just spoke about rolling credit card balances to a HELOC. But what if you have a home mortgage with a high interest rate on it? Why not ‘kill two birds with one stone’ – refinance your home to a lower rate and also increase the amount you’ve borrowed to pay off other debt.
At the time of writing, there’s even a federal scheme that allows some home borrowers to get a federally subsidized new home loan with no origination fees and no qualification requirements. Ask if you qualify for one of those.
Strategy 5 – Roll Balances to a New Card
Maybe you sometimes get offers in the mail giving you ‘pre-approved’ credit cards and allowing you to roll over a balance from another credit card, with an initial grace period of no interest charge applying.
Make sure there truly are no charges – no ‘cash advance’ type charges or anything else at all, and if it truly is a way of getting some months of free interest, then if the interest rate that commences at the end of the free period isn’t worse than what you’re paying now, why not cut up one credit card and start using the ‘free money’ offer on the new credit card?
We know some people who have done this repeatedly, each time getting a new grace period of some months before any interest starts being charged.
Needless to say, don’t go into debt initially with the plan to do this into the future, but if you are already in debt, this might help reduce the cost of paying off the money you owe.
Strategy 6 – Renegotiate Your Interest Rate
You mightn’t realize this, but many times you’ll find you are able to negotiate the interest rate you are charged on your credit card balances. The credit card company doesn’t just have one interest rate that everyone, everywhere in the US, uniformly pays. It sets interest rates more or less individually, based on your credit score, your history with the card issuer, your address, and many other factors.
If you have been making your payments regularly – or sometimes even if you haven’t – you might be able to negotiate a lower interest rate. Even if you only get a 1% reduction in your interest rate, this could save you thousands of dollars. Say you had a $10,000 loan at 18% and were making payments over a 10 year period. If you can reduce that to 17%, and if you keep your monthly payment much the same as it was before, that means you now pay your loan off over nine years instead of ten, and your total interest paid drops from $11,922 to $9,587.
You pay your debt off a year sooner, and you save yourself $2335 in interest, all as a result of getting ‘only’ a ‘small’ one percent reduction in interest charged.
That’s sure worth making a phone call and asking for, isn’t it!
Why would a credit card company/bank drop your interest rate? Because it costs them a lot of money to get a new customer; and it costs them much less to keep you as a good customer than it does to lose you and buy in another customer – the marketing cost of getting each customer, and the promotional cost of a ‘no fee for the first year’ and/or a ’100,000 mile frequent flier bonus if your sign up for our card’ and/or a ‘no interest on balances rolled over for six months’ or whatever other offer they are giving to new customers is massive.
Summary
There are sometimes good reasons and sometimes unavoidable reasons to go into debt. But there are almost never valid reasons to delay paying off the debt you’ve incurred. The most compelling reason of all is that getting out of debt is just plain smart – your disposable income will skyrocket when you no longer have so much of your paycheck already committed to debt repayments.
The six steps above will help speed you towards a debt free future. It will help, but you’ve still got to do some heavy lifting too – make paying off your debt a priority, and accept some lifestyle sacrifices while doing so. In return, you’ll have a much healthier financial future.
Chimichurri (Spanish: [tʃimiˈtʃuri]) is an uncooked sauce used both as an ingredient in cooking and as a table condiment for grilled meat. And yes, this is Argentina’s Favorite Sauce.
Food historians think that chimichurri was invented by gauchos to flavor meat cooked over open fires. If so, the gauchos probably used dried herbs as fresh herbs would spoil.
Argentine in its origins, chimichurri is typically made of finely-chopped parsley, minced garlic, oregano and white vinegar – though there are regional variations, with Uruguay adding red pepper flakes for an added kick. The name’s origin is unclear. Numerous linguists hold the name, chimichurri, as derived from Basque’s tximitxurri, pronounced chee-mee-CHOO-ree; stumbling interpreted as ‘a mix of several things in no special order’.
Another story claims that the name comes from ‘Jimmy’s curry’, Jimmy, being an Englishman who joined the fight for Argentine Independence. His name, being difficult for Argentines to pronounce, morphed into chimichurri.
Miguel Brasco, an Argentine food critic, believes the word was coined when the British failed in their invasion of Rio de la Plata in 1806 and were taken prisoner. The detainees requested condiments for their food and mixed English with Spanish.
Perbacco chef, Staffan Terje believes that chimichurri is identical to Sicily’s salmoriglio sauce, which is served mainly on seafood.
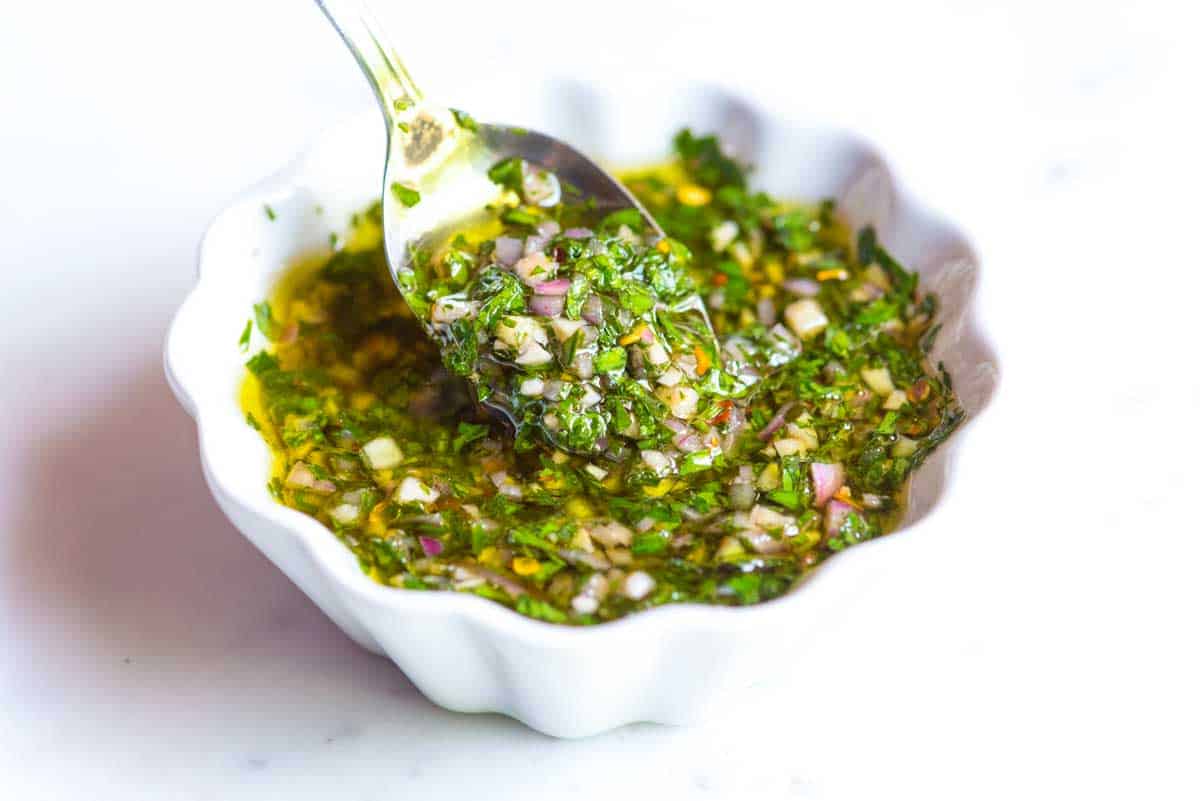
So what is Chimichurri? A zesty, green sauce made with fresh herbs, garlic, vinegar, chili pepper and olive oil that livens up pretty much anything you throw at it.
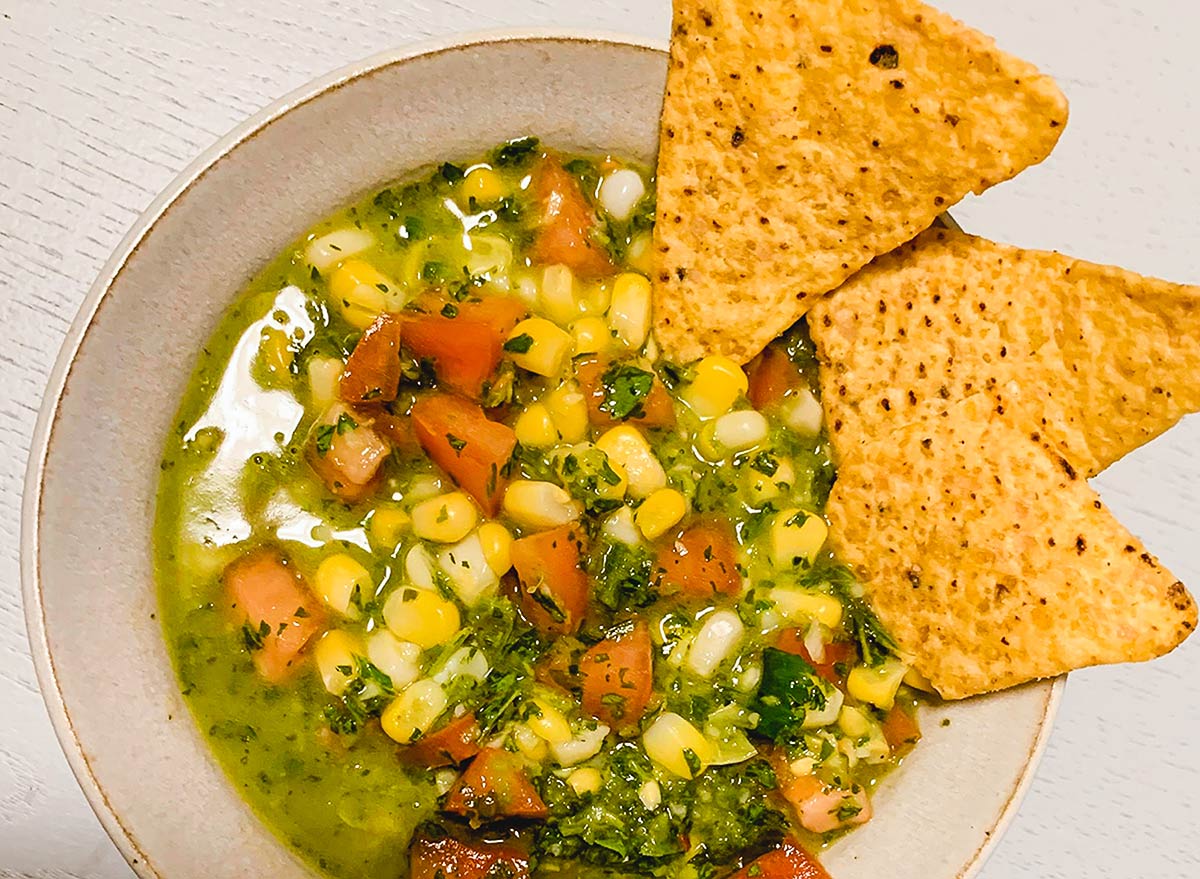
Let’s be honest, jalapeño Chimichurri is perfect as a topping for a grilled steak or a relish for lamb or chicken. Or served with tortilla chips.
When your garden is overflowing with peppers and summer herbs, whip up a batch of jalapeño chimichurri then store it in your fridge or freezer to keep those summer flavors alive all year round!
It’s as versatile as your favorite white t-shirt. You can use it 100 different ways. Steak, shrimp, fish, vegetables and chicken all love it — especially if they’re grilled or roasted. It even passes tossed with pasta or spooned over fresh tomato slices. Stirring it into scrambled eggs is a good idea, too.
But I promised you a recipe. Here’s we go.
Remember – you can make the sauce by hand or with the help of a bender or food processor. By hand works perfectly fine, it just means the sauce will have a bit more texture. The food processor makes quick work of things so choose whichever method you like best.
MAKES 1 CUP
YOU’LL NEED
1/4 cup vinegar or lemon juice 3 cloves garlic 1 jalapeño, halved and seeded 1/2 cup fresh parsley or cilantro leaves 2 Tbsp. fresh oregano Pinch of chili flakes Pinch of salt 1/4 cup extra virgin olive oil Ice cubes
HOW TO MAKE IT
Place vinegar or lemon juice, garlic, jalapeño, resh parsley and or cilantro leaves, fresh oregano, and a chili flakes, and a large pinch of salt in a blender.
Pulse a few times to start then blend on medium speed. Slowly add extra virgin olive oil and 2 to 3 ice cubes. Puree until smooth.
Scrape down the sides if necessary. Season with additional salt and chili flakes to taste. Serve over grilled fish, chicken, steak, pork, or veggies!
Transfer any leftovers to a glass or plastic container with a tight-fitting lid. Store up to 2 weeks in the refrigerator.
Chef’s tip: Divide the jalapeño chimichurri into ice cube trays and freeze and use 1 to 2 cubes as desired per recipe.
Courtesy of Claudia Sidoti
Turn your jalapeño chimichurri into a fresh corn & tomato salsa and stir in 1 large diced tomato and 1 cup fresh charred corn kernels! Serve with tortilla chips.
Until next time, enjoy this perfect Summer Jalapeño Chimichurri.
Processed food is food that’s changed in any way from its natural state. That includes washing, canning, freezing, or adding ingredients to it. Baking, cooking, or preparing it counts as processing, too.
For the unfamiliar, being catfished is when someone fakes their persona and leads you to believe they’re someone totally different than who they really are. A swimsuit model who’s also the CEO of her own million-dollar company? More like a 59-year-old man who saves his toenail clippings.
And it turns out that online users aren’t the only culprits of catfishing—so are food manufacturers. That’s right, many of the foods lining supermarket shelves call themselves one thing, but they’re really quite different from what consumers have been led to believe based on their appearance and language used on the packaging.
Thanks to the combination of exploiting labeling technicalities and downright stellar jobs by these products’ marketing teams, we’d like to introduce you to these foods that are less trustworthy than gas-station sushi. (Or your sketchy ex.) Find out if the processed foods you’ve been eating are really what you think they are.
1
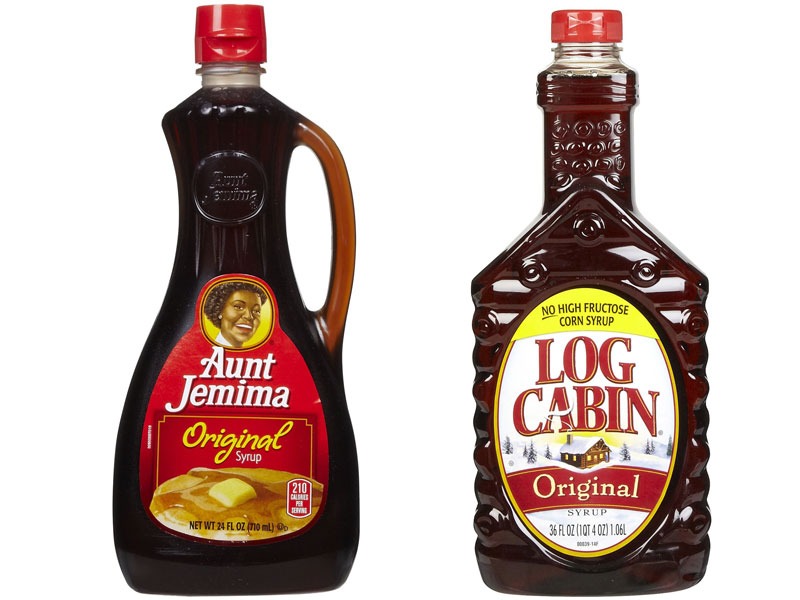
“Maple” Syrup
Yes, technically brands like Aunt Jemima, Mrs. Butterworth’s, and, most deceptively, Log Cabin, only call their products “syrup,” but their marketing sure says otherwise. Whether their dark amber color shines through clear plastic bottles or lies hidden within the same plastic jugs that have housed maple syrups for generations, there’s no discrepancy that these companies want you to equate their product with the real stuff, Grade A maple syrup—you know, the sap that’s tapped from maple trees and boiled into an antioxidant-rich sweetener? But unlike this functional sweetener, these syrups are primarily composed of high fructose corn syrup, artificial flavors, and caramel color—all ingredients that have been connected to a slew of health issues, from fatty liver disease to cancer.
2
White Chocolate
Think of white chocolate like white, refined flour: over processed and devoid of nutrients. White chocolate’s only “chocolate” comes from cocoa butter (the rest is milk solids, milk fat, and sweetener), and even that ingredient commonly loses its antioxidant properties during a “deodorizing” step. Without non-fat cocoa solids, white chocolate doesn’t have any flavanoids—antioxidant compounds that have been shown to improve glucose metabolism and lower blood pressure—or gut-healthy prebiotics, which help reduce inflammation and fight weight gain. It also lacks the ability to stimulate the euphoria-inducing chemicals that real chocolate does, including serotonin. Grabbing some chocolate? The darker the better. More cacao means more happy chemicals and less sugar.
3
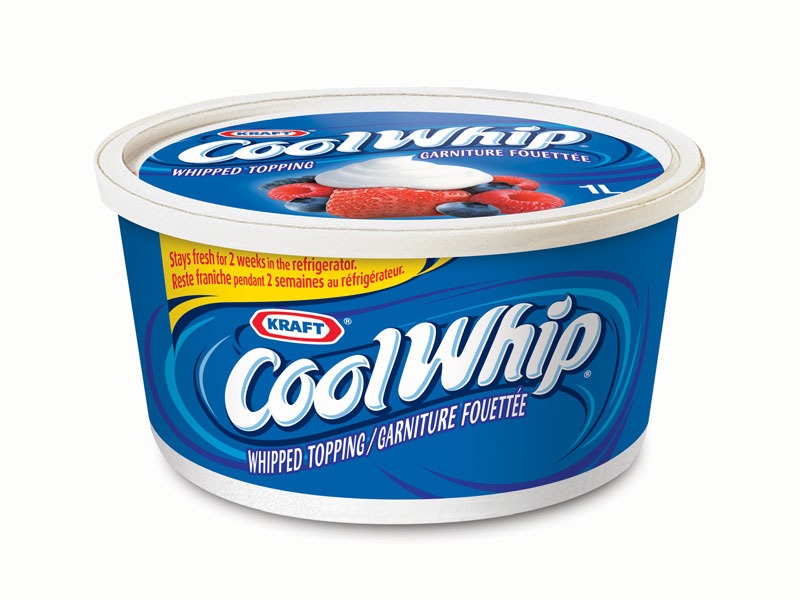
Cool Whip
Whip, as in whipped cream, right? Not exactly. Kraft Cool Whip’s first ingredient is water, followed by hydrogenated vegetable oil, high fructose corn syrup, corn syrup, and finally, skim milk. Fun fact, the original recipe was “non-dairy”—it didn’t even have milk! Kraft only started adding skimmed milk and light cream in 2010. And although Kraft is the most common store-bought brand, you should also be checking the ingredients of any generic “whipped” topping out there. Looking for whipped cream? Buy a little carton of heavy cream, grab a mason jar, and start shaking!
4
Bac’n Bits
When an apostrophe replaces a letter in a food’s name, it’s a dead giveaway this product isn’t what it wants you to think it is. Oh, and the label’s “bacon flavored.” Textured soy flour and oil provide the “bit,” carcinogen-contaminated Red 40 and caramel coloring provide the visual cue this stuff sure looks like bacon, and the combination of yeast extract, disodium inosinate, and disodium guanylate—otherwise known as MSG—provides the meaty, umami flavor. These so-called “flavor enhancers” have been implicated in increasing appetites along with stimulating your body to pump out insulin, the fat-storage hormone. If you fried up a slice of bacon and crumbled it, you might be eating double the calories, but you’d save yourself 180 mg of sodium.
5
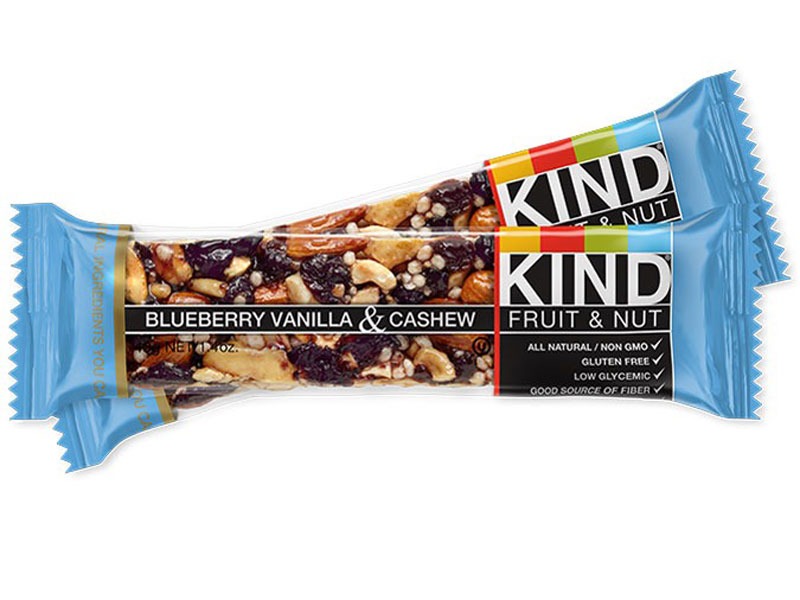
Kind Blueberry Vanilla & Cashew Bar
We’re big fans of KIND bars because their products are low in sugar and high in satiating, healthy fats and protein, but they might not be giving you exactly what you think. Yes, even healthy foods can be untrustworthy. This bar boasts the name “blueberry,” but upon a closer look at the ingredients, we see KIND really means apples and plums. Huh? In reality, KIND’s formulation of its “blueberry pieces” is actually “blueberries, sugar, apples, plum, apple juice, vegetable glycerine, citrus pectin, natural blueberry flavor.” Rather than nosh on this bar with “natural blueberry flavor,” pop a few raw blueberries to burn belly fat, boost memory, and uncover your abs.
6
Dean’s Guacamole Flavored Dip
Just because the label says “guacamole” and the stuff inside looks green does not mean this product is bursting with the same fat-blasting properties as avocado. Keep reading and you’ll see one of the most telling words in branding: flavored. This imposter is made mostly of skim milk (!), oil, water, and tomatoes. And less than 2 percent real avocado! With all its liquid, how is this guacamole-style dip dip-able? It’s from emulsifying egg yolks, gelatin, a slew of gums and gels, and then thickening it up with isolated soy protein. And that green color you see? It’s just blue, red, and yellow food dyes. Besides the fact that real avocados will lend their free-radical-fighting benefits, sticking with the green fruit will also help you avoid this waist-widening concoction.
7
Commercially Grated Parmesan Cheese
Wood you like some wood pulp on your pasta? No? Well then maybe you should nix the pre-grated parmesan cheese. Kraft was slammed with a lawsuit in early 2016 for using cellulose, an anti-clumping filler made from wood chips, in its “100% Grated Parmesan Cheese” product. And more private testing found Castle Cheese Inc.’s “Parmesan” also included less expensive cheese like cheddar, swiss, and mozzarella. In fact, American versions of Parmesan cheeses are so far from the real thing (they also include nontraditional ingredients such as potassium sorbate and cheese cultures) that the European Union wanted to ban American-made cheeses from even calling their product parmesan! A little advice? Buy a grater and grate it yourself.
8
Sunny D
If the sun tastes like corn syrup, modified cornstarch, canola oil, cellulose gum, artificial sweeteners, artificial flavors, artificial colors, and loads of preservatives, Sunny D certainly unleashed it. And while Sunny D Tangy Original promotes that it has 100 percent of your vitamin C for the day, the majority (a whopping 98 percent) of this drink is just water and high fructose corn syrup. That’s right. That orange you see on the label is only present in the “2% or Less” section, along with five other fruit concentrates, so that amount of vitamin C is probably only coming from the added ascorbic acid. If you want some orange juice, you’re better off going with something that has to be refrigerated, like Evolution Fresh’s Cold-Pressed Orange Juice.
9
Fruit Snacks
Yes, the first ingredient is usually fruit and vegetable juice blend from concentrate, but following that is sugar, corn syrup, and modified corn starch, along with more sugar, and carnauba wax. Heck, some roll-ups even include partially hydrogenated oils—aka artery-clogging trans fats now banned by the FDA! And don’t be fooled into thinking these gummies are as healthy as the real thing just because they have the word “fruit” in them. In fact, fruit juice is one of the worst added sweeteners for your health because it’s high in liver-wrecking fructose and low in the slow-digesting fibers that make fruit healthy in the first place. Snack on real fruit to get the fiber and nutrients that come naturally packaged with it.
10
Just Mayo
While this might be the only product on the list we wouldn’t dock for its ingredient list, it has rightfully earned its place as an untrustworthy food. That’s because Just Mayo isn’t actually just mayo. According to the FDA’s “Standards of Identity,” the condiment has to have vinegar, lemon juice, and an egg-yolk-containing ingredient in order to be called mayo, and because Just Mayo is vegan, it has no eggs. (Which is weird because the label also has an egg on it.) Maybe “I Can’t Believe It’s Not Mayo” would be a better name. If you’re as confused as we are, but still want a vegan mayo, check out Sir Kensington’s new Fabanaise, a mayonnaise-like spread made with chickpea water!
11
Whole Wheat Breads
Shutterstock
You’ve been told to eat more whole grains, but don’t think that choosing whole wheat ensures a healthy pick. According to a Harvard School of Public Health study, many products displaying the yellow Whole Grain Stamp have more sugar and calories than whole grain foods not bearing the logo. That’s because manufacturers realize that many of us still crave the sweetness of white breads, so they add back the sugar to make whole wheat taste better. When you’re looking for a whole grain bread, make sure whole wheat is listed as the first ingredient and the food should ideally be free of high fructose corn syrup.
12
Processed Cheese
Whiz or whizout? That’s the question you’ll often be asked in reference to whether you’d like your Philly Cheesesteak doused with a heaping spoonful of Cheez Whiz. Or should they be called a cheezsteak? That’s because Cheez Whiz, along with processed cheese products like American Cheese and Velveeta aren’t really cheese at all. In fact, federal laws mandate that each of these products be labeled as “processed cheese” or a “cheese product” since their manufacturing process is quite different from natural cheeses: they start with only 51 percent real cheese, add some artificial flavors, colors, fillers, preservatives, emulsifiers, acidifiers, heat it up, and then wrap it up. Reach for a block of 100 percent real cheddar—the U.S. just imported way more than we need, so cheese prices are about to go way down.
13
Southwestern Egg Beaters
We’ve already busted the egg-yolk myth, but if you’re looking to boost your protein intake, we can see why you might want to pick up a carton of egg whites. But don’t think all you’re getting in a carton of Southwestern Egg Beaters are eggs. Somewhere between processing and packaging this carton also picked up a few extra ingredients, like “natural flavors,” a slew of gums, autolyzed yeast extract (aka MSG), and a tinge of color to make it feel like you’re eating the real thing. You know what’s better than feeling like you’re eating the real thing? Eating the real thing: Whisk two eggs together (yolks and all), season with salt and pepper, and dice up a red pepper. Saute the pepper in light canola oil for about a minute, or until it’s tender, pour in the whisked eggs, and cook until done. Voila! And no “autolyzed yeast extract.”
14
Reduced Fat Peanut Butter
Peanut butter is touted by experts as a health food—packed with protein, fiber and healthy monounsaturated fats, plus plenty of fat-burning folate. But when you pick up a reduced fat butter, you’re getting a product that’s packed with sugar and fillers, causing you to store fat, not burn it. When manufacturers take out the naturally-occurring, healthy fat, they’re left with a bland product in need of some serious doctoring up. So they add things like sugar, corn syrup solids, and soy protein concentrate. And regardless of whether you go for fat or not, picking Skippy means your PB will contain hydrogenated vegetable oil, the trans fat which researchers found to increase heart disease risk by a whopping 23 percent. The best butters have just two ingredients: peanuts and salt.
15
Agave Syrup
Shutterstock
People ate up the fact that Agave syrup was a great alternative to sugar because it was natural and came from a plant. Newsflash! Sugar also comes from a plant—so you can throw out that argument. Plus, agave is actually a modified sugar, which means you can’t actually tap an agave plant and get syrup. The syrup has to be processed (yes, it’s technically a processed food) with enzymes that turn it into sugar. Another argument by marketers? It has a low glycemic index, which means it doesn’t spike blood sugar levels right after eating it. And that’s actually a bad thing. It has a low GI because it’s full of fructose—at least 80-90 percent, way more than the 50 percent of white sugar—a form of sugar that doesn’t affect glucose levels, but it can lead to insulin resistance, fatty liver disease, hypercholesterolemia, and obesity over time.
16
Frozen Banquet Burgers
They might be convenient, but these sliders are certainly a stretch of the truth. In reality, they’re closer to veggie burgers than they are beef burgers. That’s because Banquet’s patties are made of beef, water, textured soy protein, soy flour, caramel color, soy protein concentrate, and soy lecithin. You’re better off whipping up your own burger at home using 100 percent grass-fed ground beef. It’ll probably take more time to preheat the oven for these nasty sliders than it will to simply sear your perfect patty in a skillet.
17
Potato Snacks
Whatever the brand, these potato chips aren’t what you imagine when we say “Lay’s.” Rather than sliced potatoes, these “chips” are really pulverized potato flour mixed with varying additives like oils, fibers, and yeast extracts and then molded into a chip-shaped snack. What’s even more amusing is that the Kellogg Company actually argued with the U.K. government that Pringles weren’t chips so that the product wouldn’t be taxed as a luxury item. And a judge agreed, citing the fact they were unnaturally shaped and were made up of less than 50 percent potato. Congrats?
18
Hot Cocoa Mixes
With everyone touting the health benefits of chocolate, it’s no wonder our go-to warm-me-up drink during the cold months is chocolate. But just because cocoa is on the label doesn’t mean this product is healthy. Many hot chocolate mixes should really be called “Sugar Blends with Oil, Additives, and Oh yeah, Some Cocoa.” Cocoa is actually listed fourth on Swiss Mix’s list of ingredients, and what’s worse is that the cocoa powder is alkalized, meaning it’s devoid of any healthy antioxidants. Make your own hot chocolate but just boiling a cup of whole milk mixed with a tablespoon of pure cacao—the naturally-occurring sugars in the milk are all you need to sweeten this beverage up.
19
Coffee Creamers
We don’t know about you, but when we read the word “creamer,” dairy cows come to mind. Unfortunately, that’s not what you’re getting when you pick up coffee creamers like Coffee-Mate. In fact, the brand even labels it as lactose-free! And in true untrustworthy food fashion, this creamer is none other than corn syrup solids and hydrogenated vegetable oil in disguise. But hey, there is milk protein! That counts, right? Wrong. If you’re looking for something to add to your coffee, add heavy cream.
20
“Low Carb” Bars with Added Fiber
Ever heard of net carbs? Many diets are based on this term, claiming that we should only be worried about the total carbs minus the amount of fiber because fiber is what helps slow digestion of the carb sugars, keeping blood sugar from spiking and hunger at bay. We’d be on board if it weren’t for the fact that many companies lower the net carb count by adding functional fibers to their bars and meals. Functional fibers, like polydextrose, are synthetically created in a lab, and may not provide all of the same benefits that the dietary fibers from veggies, whole grains, and fruits do. According to multiple studies, polydextrose is fermented like fiber and has beneficial effects on bowel function, but a study in Nutrition Review found it has little or no effect on fasting glucose levels and doesn’t form the same kind of filling viscous gel that dietary fibers do to slow the rate at which food is broken down and nutrients such as glucose are absorbed—which means it might not actually help keep you fuller longer.
Thousands of residents remain evacuated after a destructive Northern California wildfire nearly doubled in size overnight, fed by wind and dry conditions, officials said Wednesday. The blaze burning in El Dorado County, has charred more than 53,000 acres and is 0% contained, Cal Fire said.
“The Caldor Fire continued to experience unprecedented fire behavior and growth due to extremely dry fuels pushed by the south west winds,” Cal Fire said in an update. “
A red flag warning is still in effect for the fire area through 8:00 PM tonight with winds switching to the northeast. These winds, combined with low humidity and extremely dry fuels, lead to critical fire weather conditions.”
We are mainly preppers and have most of the basics sorted out thanks to great websites such as this but I have been thinking lately about how prepared my preps really are for SHTF.
The wildfires helped concentrate my focus and I will soon implement the next level of preparation. My risk of wildfire is small at my home and very, very real at my cottage. You might have almost no threat but even so read on because fire can visit you anyhow. Canada has an okay site to figure out regional risks and I am sure the USA has similar but use your brain and figure out your risks as relying on others is never smart.
Leaving aside the issue of if climate change is human caused (it is and it is not man-made BTW. Women are responsible as well!) or even if the Earth is experiencing severe heating (it is) I want to focus on how you can begin prepping for wildfires. This is helpful in many SHTF issues including nuclear war and civil unrest so even if you feel wildfires are unlikely in your neighborhood please read on. Of note I am planning a much more extensive article on the probable climate changes North America may experience in the next 5 to 25 years and I will debate climate change in that article not this one. This is about wildfires and fires generally.
Specific Threat of Wildfires:
Preparing in advance for these situations showed that even with a major fire burning close by people feel safe until the last possible minute. Some have bags ready and some full gas tanks. But most do not. The take away is to store gasoline (one tank full) and keep the car’s tank half full always. I already do this and simply use the stored gas every 6 months and replace. I use high-octane only for this and do not plan on multiple gallons as 50 litres is enough (one tank). It is for evacuation not driving through the wastelands looking for trouble. Many cars ran out of gas on the highway and had to wait 24 hours before help arrived. This is not a good idea at any time and especially not if you are evacuating.
Wood stoves are common generally and hopefully so amongst preppers but where is your wood stored? Against your house is a bad idea as an arsonist might get an idea or a wildfire might come by. Another issue with storing wood against your home is mice and rodents. They thrive in these piles which is cool if you are hungry but right now merely encourages them to invade your home. Build a wood shed from shipping pallets and keep it about 25 feet at least away from your primary home structure.
You know your routes (multiple) out of your neighborhood and you have driven them, right? CNN.com
Hose pipes are a good idea but can yours spray water on to your roof easily? Do you have multiple hoses so everyone in the house can damp the roof and the garden if wild fires are in the area? Is your roof made of metal? Are your gutters filled with debris or empty? Do you have clearance from the tree line that is deep enough to prevent fire jumping? Even in suburban areas there are trees and many are very close to homes. Is your council going to chop them down to create a safe area to stop fire spreading or can you legally do that yourself?
The wildfire showed the importance of pre-planning and that is what we do, eh? A major wildfire means five minutes mandatory evacuation. You know your routes (multiple) out of your neighborhood and you have driven them. In a wildfire expect smoke, flames, and fear.
Plan for this and how you will avoid sitting in a traffic jam for two hours on a route that should take ten minutes while the flames get nearer and nearer. Of course in many SHTF scenarios a car won’t work or be a safe bet but if you know your area, if your car is gassed, and if you evacuate before the mandatory evacuation is given a car is your best bet here. Not only your transport and your source of worldly goods but it is your home for a while.
Many in their cars had the windows open which in SHTF is never a great move. There are multiple videos on-line with people literally screaming to close windows as the fire suddenly hits the road they are on. There is a resource at the end on what to do if you are trapped in a car in a wildfire.
Knowledge is power so you have great local maps and have figure where the fire might come from and go to. You generally keep a close eye on local weather systems so you see the developing threat of high temperatures, low precipitation, and high winds. Best to think of the issue before others do and take steps to avoid the issue or at least have everything ready to evacuate.
You have bug out clothing for all seasons I hope. However is it all fire resistant? Seriously have you cut off a piece and tried to set it on fire? Modern clothing is excellent but some of it is very combustible. Running around evacuating with sparks and flames near you wearing great bug out clothing that is basically tinder is not smart.
I do not have a smoke hood. It is on my list of things to get. It is being moved upwards! Awesome to get out of a burning house fire and would be excellent in a wildfire. Simply put these are a need not a want and I better get more focused on needs.
As a prepper I have multiple garden tools including shovels. I think five at the last count and I always get them when I can for free which is surprisingly often. Rusty shovels work just fine but people tend to throw them out! Do you have sand or soil near your home and can you cover a large area near your home with this quickly? Again removes a fuel source for an approaching wild fire and worth a try.
Do you have home insurance? Is the coverage applicable for a wildfire? Is the coverage sufficient to rebuild after a wildfire completely destroyed your home?
Call your insurer and ask those questions and get covered. Of course the policy and other documents are in a fire resistant safe and already bagged inside so you can grab and run with them. Copies are in everyone’s bug out bags I hope.
Another striking feature of the wildfire was how easily people get separated. There were two routes out, north or south. The Government said “go north” which was fine as they said this as the south route was blocked by cars but the north had little ability to sustain the evacuees. Awesome work was done and is being done but do you really need the Government to direct your escape route? They make mistakes and did so here.
Some families were separated as they split up, one to get the children and one to get the pets. Good idea but then the one party heads south and one north. Simply put identifying where you will go and meet up is essential in SHTF before you split up. Have several back up locations to meet up. People today are overly reliant on cell phones but I do not know if this failed here but system overload coupled with cell towers burning could easily make this idea to communicate a big fail. Have a plan that does not rely on cell phones or radios. If you have these and they work check in frequently on each other but if they go silent know where to go and how to get there to meet up again. Does everyone have a small and decent compass? Can everyone use it in a basic fashion? Everyone should have one each and a working flashlight. It can be very dark at noon in a wildfire.
Bug out bags are an essential even if you live already at your bug out retreat as I do. We have one for each person at home and one for each person in the car. The home version is very heavy and I do not plan to travel far on foot with it. The car version is for fast travel and each of us can easily convert the other’s car pack into one pack if we are on our own. We can debate style, weight, contents forever but each bag has $200 in five and ten-dollar bills. So $400 is always available. Taxi or accommodation or buying food/water in SHTF (initial phase of course) is the purpose and so far my partner has not been tempted to ‘borrow’ it for essentials like dog bones! I also carry a fair amount of cash on me. Recently at Costco the debit and MasterCard system failed for an extended time. Our full cart merely proceeded through the lines of agitated people and we paid the bill in cash and left. Cash is King in most localized SHTF situations and have it before the banks shut the ATMS or the power fails.
Image – CNN.com
Beyond Wildfires:
I have a fair amount of stored food in my basement, my cottage, and my garage. Fort McMurray really hammered it home to me that I really need to get most of this buried into the ground. A nuclear blast, wildfire, or a roving gang of hungry ex-military types cannot see, eat, or destroy what is buried in the ground. My home might be gone but my stores should not be burned out as well!
Think about storing small amounts of gear, food, and water along your evacuation (bug out routes) and around the local area. Think about how to find them if a big fire has gone through or a big old nuclear bomb has gone off. It is always good to split your stores and always great to be able to dig up a few days supplies as you move away from danger. This gets complex but cheap plastic food containers with double zip lock bags works just fine.

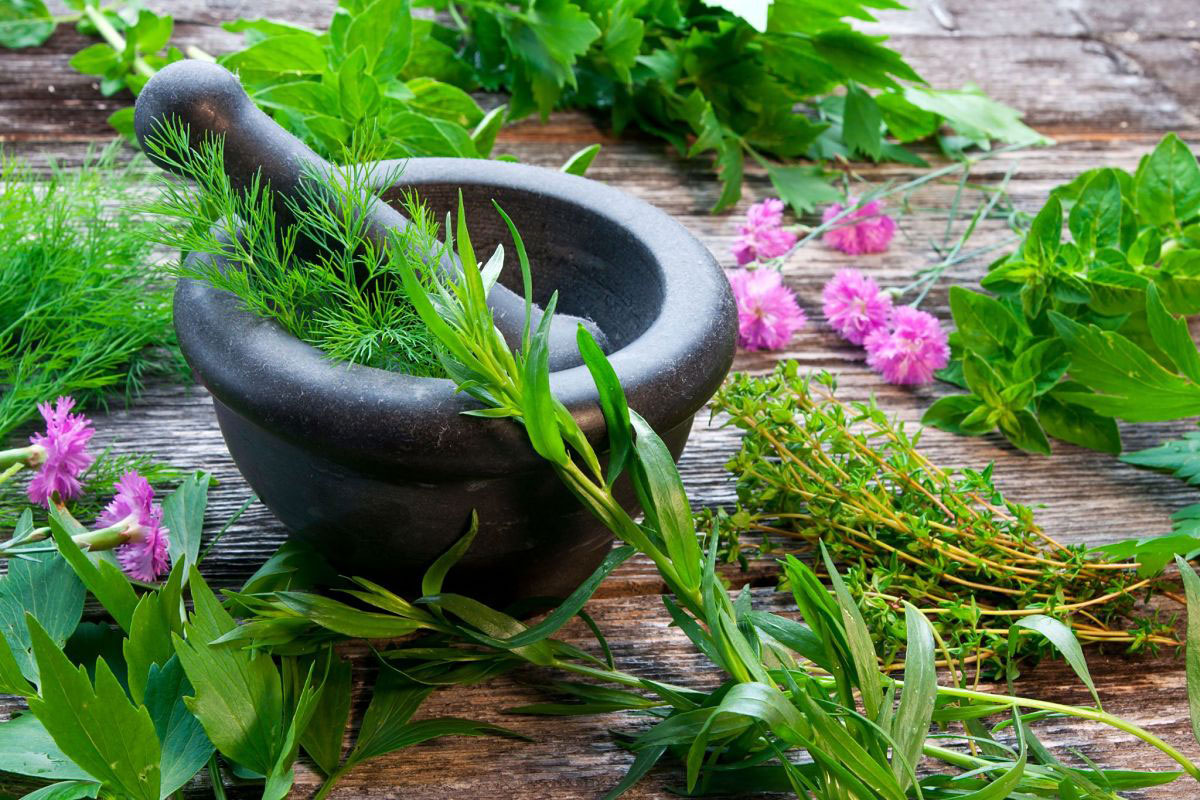


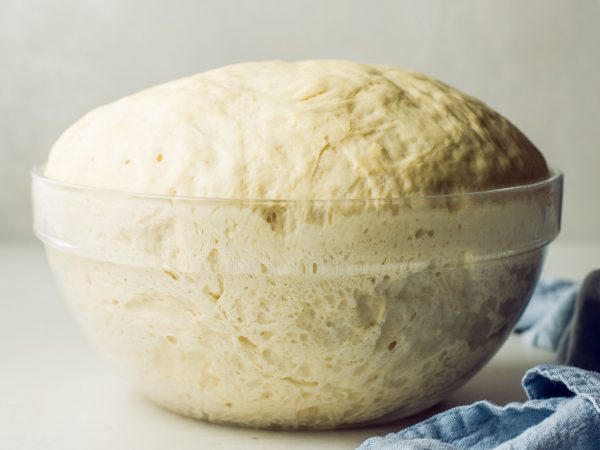


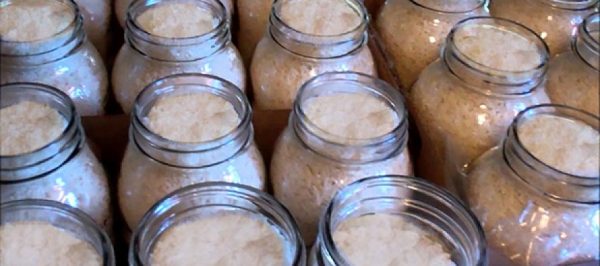


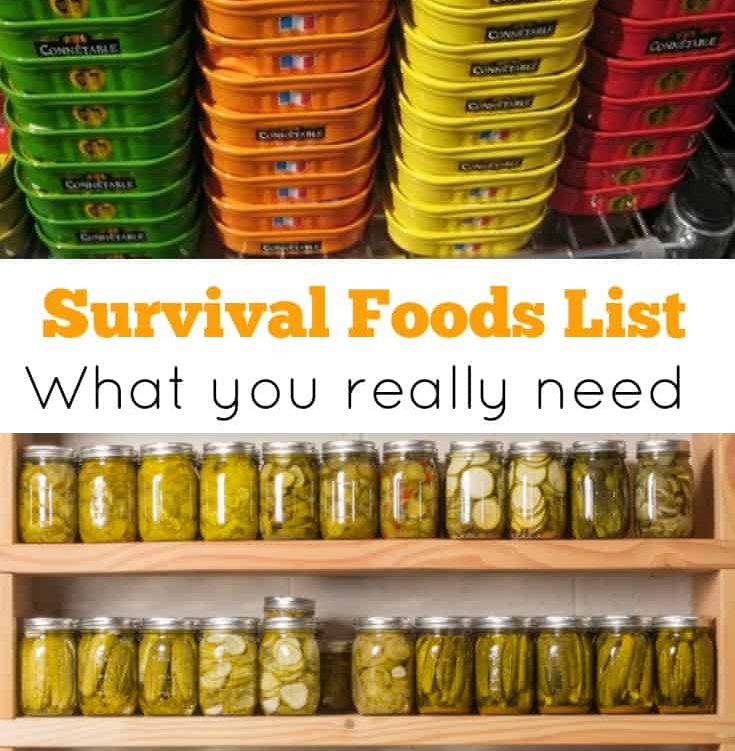
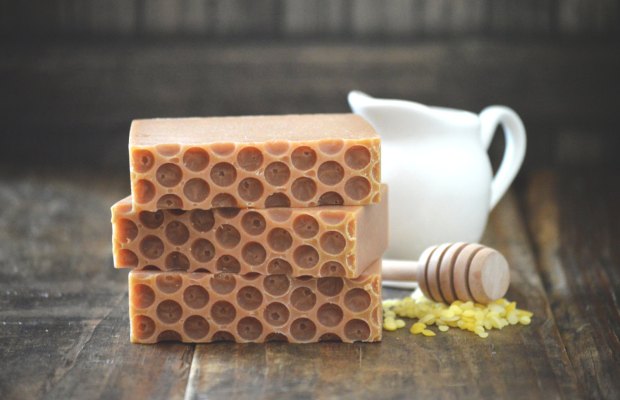


 The finished product – looks like… soap.