HomePosts Tagged "SHTF" (Page 8)

I will never understand how restaurants can get away with charging a hundred bucks for a piece of old beef steak. Sure, it’s delicious, melts in your mouth, but, c’mon, does a man have to sign an arm-and-leg lease to enjoy a good steak? Anyway, should’ve started by saying that I’m a big fan of aged food; cheese, fish, meats.

You name it! The bad news is that these are not the types of foods one can make at home. Or so I thought after stumbling upon this recipe. The funny part is that I was actually looking for a way to clean the freezer without using anything, well, toxic, when this little jewel sprung right into my eyes.

So, why should you try aged meat? Well, because it’s easy to make. On top of that, get this: the oldest beef cut in the world is 13 years old! Imagine having ready-to-eat meat at home without having to brine, refrigerate, go shopping, or hunt. Well, it’s possible, and I’m going to show you how to do it.

So, without further ado, here’s how to make your own aged beef.

Gathering the ingredients

As I’ve said, this recipe doesn’t require any special ingredients like salt, vinegar, or whatever else people use to preserve meat (not touching that topic with a ten-foot pole). Still, the cut of choice will ultimately determine the taste. The recipe I mentioned about involved large cuts of meat – the bigger, the better. Would be a good idea to go to a butcher’s instead of hitting the supermarket. Anywho, avoid small cuts, and choose meats that pack some fat – whole ribs, porterhouse cuts, rib steak, or New York strips.

That’s basically it as far as the ingredients are concerned. For aging, I would advise using a zip-lock bag instead of food wrap – does a better job at keeping the air out; meat should age on its own. The last thing you’ll need is more air.

Arguably, refrigeration’s the best way to go about aged beef, but considering that our grand used to prepare meat long before fridges were invented, I would venture to guess that the root cellar is also a good choice.

As for quantity, a two pounder’s more than enough in my opinion – if you’ve never eater aged meat in your life, better make a smaller batch. Otherwise, you’ll get stuck with something with an extra chunk of meat.

All done gathering your stuff? Great! Let’s get to the ‘cooking’ part.

How to Prepare Aged Beef

Step 1. Prepare the fridge or designate a shelf in the root cellar.

Make sure that fridge’s clean. Stinky food, molding, and, grime will affect the aging process. So, if something smells bad in there, better toss it in the trash. One more thing: remove cheese, garlic, onion, or fish from the shelf assigned to the aged meat. Garlic and onions are fine, but not during the aging process (gives the meat a funny taste).

Step 2.  Set temp and check humidity

The funny thing about meat: if it’s kept in above 40 degrees Fahrenheit temps, it will go rotten. On the other hand, if you stick it in a below 32 degrees Fahrenheit enclosure, it will freeze. So, in this case, the sweet spot would be 36 degrees Fahrenheit. Set the fridge’s thermostat accordingly and don’t forget to check the humidity inside (should be around 60%, give or take).

Most modern setups can display values such as temp and humidity. Still, if you have an older model, I would strongly recommend buying a hygrometer (a device that measures indoor humidity). It’s quite affordable and can be used around the house as well.

Step 3. Preparing the meat.

If you decide on paying a visit to your local butcher, ask him to leave the meat as it is; most tend to trim the excess, which is a definite no-no in this case. Wash the meat a couple of times, dry with paper towels or something, and place in a zip-lock bag.

Advice: if you want to hasten the aging process, try wrapping your meat in cheesecloth. Keep in mind that the cloth must be changed each day to prevent sudden dehydration.

Step 4. Store the meat in your fridge or root cellar.

Grab a small oven tray from the pantry, put the meat inside, and stick in the freezer. That’s it! All you need to do now is wait for the meat to age.

Additional considerations on aged meat

Color’s very important in figuring out how long should the meat age. For instance, if your cut has a darker color to it, the aging process takes anyway from a couple of days to one week (don’t forget to check up it each day). On the other hand, if the beef cut has a lighter color, it needs at least 7 days to age. Still, I wouldn’t advise you to keep it longer than 30 days. Always remember that there’s a fine line between edible aged meat and a spoiled chunk of something.

Another thing to keep in mind is that the fridge’s thermostat might not be able to keep up with the process. When you’re done checking the meat, recheck the temp and humidity.

The whole idea is to allow the meat to dehydrate on its own – that’s why it’s a good idea to turn on the fridge’s fan and to set it on low. In some cases, the in-build fan may not be enough. Not to worry – just grab a laptop or desk fan and place it inside the fridge on the same shelf as your aged meat.

When the aging’s complete, remove the cloth from the meat and set it on a plate. I should warn you though that the meat might give off an unpleasant smell even after removing everything from the fridge. Don’t worry about that – use a knife to cut the outer layer. Leave a little bit of fat.

Now, given the proper conditions, meat can be preserved longer than 30 days. However, if you plan on taking it out of the cloth and ziplock bag, you should eat it within one or two days.

That’s it for how to make aged beef steak. What’s your take on this? Hit the comments sections and let me know.

Sure, it’s delicious, melts in your mouth, but, c’mon, does a man have to sign an arm-and-leg lease to enjoy a good steak?

Most of you have heard the news now of the devastating floods in Wimberley Texas. Our thoughts and prayers go out to the families who are suffering there now and can only offer our hope for their peace and healing. From what I have heard, this flood was fast moving after 6 inches of rain fell North of Wimberley last Sunday. The region is also known as Flash Flood Alley because of its reputation as the most flood prone area in the country. Even with that nick-name, this flood was severe and worse than all-time water levels since the 20’s.

Floods are common in many areas around the world though and even if you live far away from “Flood Alley” you could find yourself impacted by walls of water that at a minimum can cause some minor inconvenience to a huge loss of life and property. As preppers, we want to make sure we aren’t forgetting about Mother Nature when we make our plans to keep our family safe so I wanted to write down some steps you can take to prepare for a flood that might protect your family or allow you to help someone who has been affected by a flood.

Preparing for a flood

WimberleyFloodPlain

Map of the flood plain in an area near Wimberley, TX as see from the FEMA flood map service center.

Before you build your home

Since Katrina there has been a greater focus on the risks of flood damage in our country. Some people are even advocating that everyone, regardless of where they live obtain a flood insurance policy. I think that is a little ridiculous, but we can take some fairly reasonable steps to avoid the most likely places for a flood in the first place.

A flood plain is an area of land that is at risk for flooding. This is usually because it has flooded at some point in the past due to a river or some other body of water like a river or a stream overflowing its banks. Katrina had the levees that were breached and all of the water they were holding back ran into New Orleans. River banks can be overrun just as easily if the water level rises above their height. Anyone caught in the area surrounding that over run of water is in the path of the flood.

A weather alert radio can send you audible alarms to alert you to approaching floods or tornados.

You can easily check if your property is located in a flood plain before you build by going to FEMA’s Flood Map Service Center. On this site you can put your address in and click on the View Map icon to the left of the page once you find your grid to see if the property you want to build on is in a flood plain. I ran this for some land in Wimberley and you can see the historical flood paths to avoid (image above).

When there is a threat of a flood

Not being in a place where there is even the remotest chance of flood would be the best way to avoid getting in this situation  but  sometimes you have to deal with the disaster you get offered up. If you hear of the possibility of a flood there are some steps you need to take.

Stay up to date with the local forecast conditions – By this I mean keep your news on or purchase a battery powered radio with weather band. Some models like the Midland WR120EZ NOAA Weather Alert will automatically receive weather related alerts and sound an alarm in case you weren’t paying attention. These are also useful for Tornado alerts where time is of the essence.

Have a plan to bug out – This doesn’t have to be walking away from doomsday but it could be a quick exit to higher ground or a safer location. If you are in an area prone to flooding or if your local news is anticipating flooding you need to be prepared to leave quickly. This means having bags packed with your prepping supplies that you need to live on for the duration of the event and possibly longer. Make sure you have a few alternate routes out of your neighborhood and that your vehicle is equipped for the conditions on the roads.

Have a plan to bug in after a disaster – Flood waters might not reach your location but that doesn’t mean you will come out of the flood unaffected. Even people who didn’t see any water during Katrina were forced to live without water, electricity and the benefits of the local police for weeks. Your prepping plans don’t have to always end with you riding towards the sunset in your bug out vehicle, you may just be stuck where you are. This could give you the opportunity to help some of your neighbors out.

Cleanupafterflood

Cleaning up is a nasty but horrible part of the aftermath of any flood.

Cleanup after a flood

If you are fortunate enough to live through this nightmare but your home or possessions aren’t there are several considerations to consider when the water has receded and the cleanup must begin. Cleaning isn’t simple and it isn’t going to be fun but it is very necessary.

  • Shovel out all mud and debris. Wash mud off of everything that was contaminated. The mud dredged up from river bottoms smells incredibly bad and could be full of toxins.
  • Clean and disinfect every surface. This is another good reason to have the ability to make your own bleach from Calcium Hypochlorite. This includes everything you would eat off of and all surfaces contaminated with the flood waters.
  • Take everything that is salvageable outside to dry as quickly as possible.
  • Wall boards that have become wet will need to be removed at least to the water level and any insulation will have to come out as well.
  • Carpet and rugs that were flooded are best thrown out. Some wooden floors can be salvaged if they are allowed to dry properly
  • Ensure you have clean water – Don’t drink any well water until it has been cleared
  • Electricity shouldn’t be used until it has been inspected.
  • Check your home’s foundation for cracks.

There are many other considerations for the aftermath of a flood that fall well within the context of our standard preps we discuss on Final Prepper. Make sure you have an adequate supply of food to ride out this crisis. Of course, if your food is destroyed by water it would be necessary to clear that out too. Water should be stored and you should also have a way of filtering water to make it safe for drinking and cooking.

Lastly, security was an issue in both Katrina, Sandy and I suspect we might see some of that from this latest disaster. Make sure you are prepared to defend yourself from the unscrupulous who always seem to appear when there are people to be taken advantage of. The last thing you need after a disaster is to lose what little you had that survived to some criminal.

What flood preparedness ideas do you have for surviving?


Other self-sufficiency and preparedness solutions recommended for you:

The vital self-sufficiency lessons our great grand-fathers left us

Knowledge to survive any medical crisis situation

Liberal’s hidden agenda: more than just your guns

Build yourself the only unlimited water source you’ll ever need

4 Important Forgotten Skills used by our Ancestors that can help you in any crisis

Secure your privacy in just 10 simple steps

Floods are common in many areas around the world though and even if you live far away from “Flood Alley” you could find yourself impacted by walls of water that

If you are like me you don’t have the resources to afford a bug out retreat. My prepper ideal of a remote fortress located on hundreds of wooded acres, miles away from civilization and fully stocked with 20 years of supplies, flowing water and established orchards for me and the rest of my extended family is sadly just a dream. I hope to one day have a location that I can fall back to if I need to leave my house, but the way things are going right now at least, my isolated retreat is just my simple suburban home.

A true remote location that will provide shelter and safety isn’t something that most people can swing. It is one thing to live in a remote area but it is another to live closer to larger metropolitan areas for the convenience of work, schools and commerce while also maintaining a separate property to be used if the grid goes down. Having two homes is not something the average prepper can afford, or at least I haven’t figured out how to yet. I know that there are some that will say you have to make sacrifices now, to sell everything and move while there is still time but for a whole host of reasons my family plans to stay put and try to ride out any crisis that would head our way.

Does that mean that I don’t believe we will ever be forced to leave? No. I can see a lot of potential reasons to bug out even if we don’t have anywhere to go, but it would be the absolute last resort. I know enough to know that the best plans can change and I can already foresee situations where what I thought would happen might turn out differently. There are no absolutes in life so I will adjust if needed.

Thinking about what I would do if I was forced to bug out led me to the concept behind this post. What if me and my family couldn’t stay in our home for any one of a dozen reasons? Where would we go? Would we be left only to bug out to the woods and try to hide there? Are there other options? What would give us the best chance of survival?

If you have to leave now

If I had the resources to be able to move to an ideal retreat location, what would I be looking for? Could I use these traits of the perfect survival retreat property to help me find a place after the SHTF that could keep my family safe? I started thinking about how I could apply these same search criteria on a much smaller scale perhaps even locally to my home to find someplace where my family would be safer. I know there are some who will say for one reason or another that you will never be safe in any location permanently. I guess they assume you would wander the wilderness forever eating moss and shrubs or else you die.

Retreat1
Everything depends on the disaster  you are going through and it is with articles like this that I usually have people saying how one or more of my points won’t work because of X. This will probably be no different, but to frame the discussion let’s just say that a global pandemic has hit the US very hard. The virus was so deadly that 45% of the population was killed in one year.

Naturally, with a disaster on this scale, panic and rioting are common as services had ceased due to problems with supply and personnel. Cities are burned to the ground and no order existed in the town you live in. Over the last few months you have heard reports on your Ham radio of gangs roaming further out of the city and they are on track to be in your neck of the woods in a few weeks. You know that you can’t defend your home against overwhelming numbers and your neighbors were almost all decimated by the virus or have left long ago. Being prepared you were able to shelter in place and reduce your exposure but without a large group to defend your property the prospects of survival look bleak.

With the news of approaching gangs who have slowly fanned out looking for food and creating a path of destruction in their wake you have decided it is time to go. You pack up the supplies most critical to your family’s survival and head out away from the city looking for a new place to call home that will give you all of the traits of that perfect retreat location that you couldn’t afford before the SHTF.

What are the traits of good retreat?

As you set out on the road you will be looking for a new place to stay. Depending on the location you are in you would probably want to get as far away from the city as possible. Finding a new place to hunker down will be difficult and you will most likely need to find a location that is an abandoned home or building. What would you look for?

Retreat2

Running water – A location next to or very near a source of water will be crucial assuming the utilities no longer work. This is where location matters as cities routinely do not have a source of running water. If your city is not located on a river, you could improvise rain catchment systems but you would need to work out a system for storing the water. This isn’t impossible, but I think cities have their downsides. Even if half of the population was gone due to the virus, you will still be in the middle of a large area of others all competing for resources to live. Do you leave town or do you try to claim the top two floors of an abandoned building?

In the country, running water is easier to find but you are still going to treat it for disease. There is no way of knowing what is upstream but you can boil water for a minute to kill all of the active bacteria and make it safe to drink.

Away from population/ Lines of drift – The further away from people the better is what we look for in a retreat, but that assumes we have some support in the form of a larger group. You may find that you will want to stay closer to others for safety, but again each situation will be different. My preference would be to hide away but you can be attacked in the woods just as easily as in the city.

In a disaster we frequently mention the Golden Horde and you would assume if 45% of the people are dead already there would be a lot less people you would need to worry about but I would still stay as far away from interstates and secondary roads as possible. I would be looking for a place I could hide in that would be very likely overlooked by anyone out wandering around. Of course, if it is a location you found that means someone else could find it too.

Good ground for growing food – This is regional as well but if you live in an area with a short growing season it would make sense to move to a new home where you could grow food for longer each year. That may mean migrating south or east or west depending on where you live. Can you grow food in a city? Of course, it you can find good dirt and assuming the climate is more agreeable to long growing seasons. You can still garden just about anywhere in the US though but what you grow and how well you are able to garden will be factors.

Retreat3

Defensible – High ground with clear lines of sight – Does your new bug out retreat give you the ability to defend it if need to? If you are going through all the trouble to move somewhere else, you would want it to be an upgrade hopefully, right? Any location you select should ideally give you good visibility to your surroundings so that you can see who is approaching. In a city this could mean the roof of a building but I still think that is a less ideal place. Having a cabin halfway up a mountain with some cleared land would be better. What about an abandoned bank or service station? You could have security on three sides but the store front windows would be a downside.

I would be looking for a building that had no windows if those were my options; or at least windows too high for the average person to crawl in. Something like a warehouse would give you a lot of choices if it was in the right location.

This is all hypothetical but I think it is conceivable that in order to survive you could have to roam outside of your city in a worst case scenario. The same advantages of the retreats that we look for can be had in other locations too if you know what you are looking for. Will it be as nice as that dreamy prepper retreat? Probably not, but it could still give you a location that could keep you and your family alive.

A true remote location that will provide shelter and safety isn’t something that most people can swing. It is one thing to live in a remote area but it is

Prepping for a large majority of us involves analyzing the risks we see inherent with situations we could be faced with and taking steps to mitigate those risks. For a lot of risks, the answer is simple. To avoid starving due to a disruption with our food delivery system you can grow your own food, you can plan to increase your storage of long-term foods by canning or purchasing quantities of extra foods, freeze-dried foods or bulk food items like wheat, beans and rice. Other aspects we prepare for involve a similar process but usually the place where we are best prepared is home.

Sure we can plan for bugging out if needed. Our bug out bags extend our abilities to leave our castle in the face of impending doom and move to a safer location. We can outfit bug out vehicles with additional capacity to move overland and carry extra supplies but nothing really replaces a strong, stable location where we have systems in place to help us survive. As well has having all our stuff, we know the land, usually have some relationships with neighbors or friends to further build-out our potential survival group. Our home base has incredible advantages that we might not miss unless we are away when some disaster happens and you are forced to make it home with only what you have on you and what you are able to scrounge or scavenge along the way.

I think of this subject at least once per year because I travel on business. My family travels to see relatives or to vacation in some nice place if we are lucky. When either of those things happen and I am hundreds or thousands of miles away from home, I feel less prepared for anything than when I am sitting in my suburban (non)bunker with all of my support systems surrounding me. However, I have learned that just because your man-cave isn’t within arm’s reach and all your weapons and gear aren’t as easily available, you can and should still prepare. There are some lessons I have learned and rules that I try to follow as closely as I can when I travel that could keep me alive and help me make it back home if disaster struck and I was away from my family. Today I want to talk about how to travel like a prepper so that you aren’t left with nothing if faced with disaster.

I have discussed in the past how to pack like you are never coming home. That article captured some of my thoughts around what you should consider if you were traveling with family via car somewhere away from home. Today I will focus more on the scenario of a trip where you are going to be traveling alone perhaps on business and need to plan for getting back home and surviving should some emergency occur.

Do your homework before you travel

Naturally, where you are traveling to, what your reason for traveling is, who you will be with and the method of travel all factor into decisions you have to make before you start throwing the first pair of socks into your suitcase. If I am headed an hour or two away, I would not plan the same way I would for a trip overseas. If I was traveling in my car, I would have different items than if I was traveling by plane.

Here are a few things I think about:

  • How far away from home will I be?
  • Is the destination a major urban center or more rural?
  • How will I get there?
  • What restrictions if any are there on what I carry or how I dress?
  • Can I make it home if needed on foot from this destination?
  • What is the best/safest route?
  • How long would it take?

The goal is to consider my travel destination within the context of what I am traveling for and take with me items that appropriately could mitigate my situation if some emergency happens. These emergencies can scale from minor travel disruptions to a complete grid-down mess.

What prepper tools can you bring with you on your travels?

Many of us leave the bug out bags and our go-to war chest rigs at home when we travel and that makes sense. If you leave town for a business trip, you simply won’t be able, without an inordinate amount of headache, take many of your prepping supplies with you.

There are some staples that I bring with me whenever I go that are multi-use and offer me several advantages that the casual traveler won’t have. Before I get into those, make sure your situational awareness doesn’t take a break when you are out-of-town. Know where the exits are at all times, especially in a strange place. Do you know the route back to the airport? Where are the major freeways? Are you watching the news for current events? Keeping connected to what is going on around you is advantageous too.

EDC items packed in the suitcase

Many people who fly these days pack all their luggage in a carry on. This has some advantages but many more drawbacks in my opinion. First, you can’t bring anything on the plane that could be construed as a weapon so that rules out knives and firearms obviously. Yes, I know people will say that you can never lose your luggage if it’s with you in the overhead compartment, but I would rather take my chances with that than to not have some defensive measures with me. Actually co-workers have looked at me strangely when they saw I was carrying a knife on a business trip because the idea is so foreign now. They even said, “How did you get that through security” because the idea of checking luggage is so foreign to them. Oddly enough another co-worker. when they saw I had a knife and a multi-tool said, “I know who I am hanging out with if anything bad happens”. They could see I was thinking ahead.

41iqJTqUPvL

CamelBak Arete 18 Hydration Pack – Day pack for carrying essential gear plus water bladder

  • Knife – I bring along my tactical folding knife whenever I travel because the utility and advantages of a knife in a survival situation are too great to ignore. Yes, I assume that there might be some way for me to purchase one at my destination should all hell break loose, but who wants to take that chance?
  • Multi-Tool – Another force multiplier that goes with me. My Leatherman Wave has 17 tools that I could use if needed during an emergency. Some will say that since you have a knife on your multi-tool you could leave the other knife at home. Yes, you could, but I have a backup.
  • Headlamp – I have extolled the benefits of a great headlamp many times in the past and you don’t even have to worry about sneaking this past security. Being able to see with the added benefit of hands-free is a great advantage in a lot of situations. Need to get out of the hotel at night because of an earthquake? Wouldn’t you want to slap your headlamp on your head before you move out?
  • Bandana – Cheap multiple use items. The ubiquitous bandanna can offer protection from contaminants in the air, can be used to shield you from the sun, as a bandage, a sling and many other tasks limited only by your ingenuity. Carry more than one because they don’t weigh anything or take up space. You can have one in your carry-on luggage.
  • Source of fire – Pack a couple of Bic lighters and some dryer lint or a few WetFire packages to get a blaze going when you need to.
  • Firearm – If I am traveling any place that has a reciprocity agreement with my state on concealed carry, I am flying with a firearm. Flying with firearms is perfectly legal and relatively pain-free. I also carry a spare magazine, a holster and at least one box of ammo. If the worst does happen and I am forced to deal with a horrific situation, I want something more than harsh language as self-defense.
  • Bag/Backpack – I won’t pack anything large, but a small bag to carry items is another useful thing if you have to walk. Many travelers already have a backpack that they throw their laptops in. If you have one already you are good. I don’t have a backpack though so I carry the Camebak Arete 18 which does two things for me. First, it is a simple day-pack that can hold a modest amount of gear and supplies. I can throw all of my EDC items in this pack if I need to plus some shelter options and maybe some food and hit the road. Additionally, it has a water reservoir so I can carry water to drink at the same time. You can never have too much water capacity though so I also pack a 48 Ounce Nalgene Wide mouth canteen. This rolls up to about the size of a small deck of cards when I am not using it, but allows me to double my water capacity. I throw in a Sawyer Mini Water Filter too. For its size, it is phenomenal and gives me the ability to filter more water than I can probably drink in a couple of years safely.
  • Watch – My Pathfinder watch is solar-powered and it has a compass so if I get lost, this could help point the way.
  • Backup power – I also carry a battery backup system. The RAVPower 16750 Battery pack can charge my cell phone 6 times. If you are delayed somewhere or the power is out but cell service is still working, this can keep you talking with family. Also makes long overseas flights better when your devices don’t crap out on you mid-way across. Bonus feature, this has a light on it.
  • Cash – Always fly with cash because your credit cards or ATM cards may not work where you end up. How much cash should you carry? That depends on what you are comfortable with. I generally tend to bring enough to get me out of minor jams, but not so much I could buy a car. A couple of hundred dollars could go a long way.

hiker-1149877_640

You could be forced to make it home on foot. Will you have the right supplies to do that?

How will you make it back home if the worst happens?

So the EDC items above give me some advantages. I can cut things, shoot at bad people if they try to harm me, light my way and know where I am going. These tools above can help you anywhere you are, but what if you are forced to try walking home? What can you bring with you to assist you on that journey should you be unfortunate enough to have to make it back to your family.

Consider your clothing

I love sitting in airports and observing the outfits that people fly in. I imagine something tragic like a crash landing on a remote mountainous region and visualize how these people in their flip-flops and short shorts will fare.

For starters, I always fly in good laced up shoes just in case I have to make it out over sharp or hot surfaces but I also pack a walking outfit that fits the climate and terrain I will be traveling through if I have to make it back home. This isn’t anything fancy and I am not bringing changes of clothing but I do have some basics.

  • Long pants – Preferably some that are a little more durable. Hiking pants that convert to shorts would work too and pack down small. Extra pockets give you the ability to carry more and make sure they have loops for a belt.
  • Long Sleeve Shirt – Yes even in hotter climates I pack a (lightweight) long sleeve shirt. I can roll up the sleeves if needed, but cover up if the sun is an issue. Longer sleeves also help with mosquitoes and other insects.
  • Hat and Sunglasses – Seasonal. For warmer weather Hats offer a break from the sun and you always need to protect your eyes. In colder weather, the hat would be a toboggan.
  • Rain Gear – A jacket at a minimum even if there is no rain forecast for where I am staying. A rain jacket also doubles as a windbreaker. Colder locations I would bring other layers and a fleece.
  • Good walking shoes – These don’t have to be hiking boots but something that you can comfortably walk in all day. For many days potentially.

Know your route home

Sure you might be able to pick up a road atlas at a store before you leave, but know the route you would take back home just in case. One business trip I was on put me on the other side of the country. There were several routes home, but most passed directly through large cities. It may be necessary to avoid these in a really bad collapse.

Discuss plans with family

My family knows that if something happens when I am away that I will be coming back as long as I am alive. Cross country trips on foot could take months so they know it may take some time. If communication is open, then likely the emergency isn’t so wide-spread that civilization has failed. They know where the supplies are and what to do in order to stay safe. Make sure your family knows this too.

The items above only scratch the surface. There are so many other ways to stay safe when you travel that aren’t mentioned here but I find that the items above are the ones that most people leave at home. I could go on and on with other items that are useful, but I thought that this list covers most bases. What do you pack when you travel?

There are so many other ways to stay safe when you travel that aren’t mentioned here but I find that the items above are the ones that most people leave

As disaster prepping continues its precipitous rise in popularity it seems every conceivable gadget, defense rig or bit of advice has been done or handed out. Everything’s been thought of, right? Not so fast. When you come right down to it, that advice, those how-to’s are what works for them. “Them” are all the people out there on the internet writing blog articles and posting videos. Most of them have the best intentions. They want to impart their knowledge to others who might benefit from it. But how do you take what they offer and make it your own? How to tweak it, modify it and customize it to what works best for you? This is exactly what should be done for a bug out vehicle, or in this case a bug out trailer. It has to meet your specific needs and include those particular adaptations and improvements that will be comfortably functional for you when everything else is going down the tubes.

Where to Start

First, select a base trailer to build up into the perfect survival masterpiece trailer. Lucky, for you there are a ton of choices out there. Trailers in all shapes and sizes have been manufactured for decades to meet all kinds of utilitarian needs from the professional contractor or construction firm hauling equipment to trailers meant for moving goods to those built for transporting recreational toys. Add to those variations all the recreational camping trailers on the market and the choices seem pretty much endless.


Do your research, envision the finished trailer in your mind, go look at potential buys in person, seek out used trailers for sale to save money, and pick the one that best fits your needs. Remember the longer a trailer is, the more restricted it will be for some locations. Longer trailers, obviously, need a larger turning radius and more space, in general, to maneuver. They are also limited to predominately flat roads as they are unable to manage rolling trails with narrow troughs between steep inclines.

Consider these types as potential bases to build out from;

  • Box utility trailers
  • Compact horse trailers
  • Teardrop trailers
  • Airstream trailers (compact versions)

To pull that trailer you need to first build your bug out vehicle.

These types provide solid bases from which to customize to your unique specifications offering enough variety to fall within particular budget constraints. The benefit of these trailers is they are already enclosed which is a head start, so to speak, which allows you to jump right into customizing the inside. Having said that, though, there are numerous examples of people who have built up open-topped trailers, or even homemade pickup bed trailers, into rugged, workhorse camp trailers capable of going anywhere the vehicle towing them can go. But more on those later.

Enclosed Trailer

Determine the type of space you want to have inside. Will the trailer be self-contained with room to sleep and move around or will it serve as a gear and supply storage and transport? Once the usage of the inside space is settled on you can set to designing the features; insulated walls, the sleeping and sitting areas, storage (gear, food, water), cooking equipment and fuel (Used inside or out? Is ventilation needed?) and windows.

The biggest decision to make (most likely made before even buying the trailer) is will it be a sleeper or a transporter. Will the environmental conditions require an insulated, indoor living area or will an expansion component like an attached tent or pop-up roof sleeper be sufficient and comfortable?

BugOutTrailer1

This trailer has almost every bell and whistle imaginable. Click the image for more photos and details.

If you’re starting with what is, essentially, an empty box on wheels then it would behoove you add a layer of insulation, especially if you plan to sleep inside. The typical, recreational, camp trailer will already be insulated but it’d be worth checking its condition if the unit is an older model. Insulating a cargo trailer is done in the same fashion as insulating the walls of a house. The trailer will already have ribbed, structural support throughout, just as a wall has studs. Cut and fit sections of insulation between these ribs and cover over with sheets of plywood, measured and cut to fit properly and don’t forget to do the same with the roof.

From here, the rest is a custom job, built to your standards and needs. Aftermarket interiors such as cabinetry, foldout beds, convertible seating (into sleepers), and counters are available from various travel trailer retailers or you can build them yourself. Sinks and plumbing are easily found at supply stores and counters can be built to fit a typical camp stove. Research space-saving techniques online for innovative storage areas, utilizing every empty space inside and out. Add storage fuel and propane tanks, generators and batteries outside to avoid gasses from building up creating dangerous conditions inside. For additional energy supply needs beyond fuel, with most trailers’ flat roofs, consider installing solar panels or even a roof-mounted, wind turbine.


ButOutTrailer4

Sleeping tents are a popular add-on to some bug out trailers.

Open Trailer

The open utility trailer comes in a full range of forms and sizes. By the term “open” we mean what is essentially, a flatbed trailer with 1-2 foot sides all around or a shallow, open-topped box on wheels. A popular customization for these is to convert them into tent trailers. A number of companies have cropped up over the years that manufacture folding or pop up tents that collapse into a zipped up square and overlays the open trailer. The tent and its support platform are hinged on one side and raise like a hatchback and serve as a cover lid for the open-topped trailer. The inside space is used for equipment and supply storage which can be partitioned off to effectively organize supplies. Or a portion of the inside houses slide-out storage containers or even full, outdoor kitchen setups with stove, sink and counter space.

Many people who go this route with their bug-out trailer make them into truly rugged, go-anywhere contraptions. Fitted with independent suspension, off-road tires and specialized hitches with couplings that allow for extreme vertical and horizontal towing angles these trailers can go virtually everywhere the vehicle towing them can go.

Both types of trailers, open-topped and enclosed, can incorporate external storage containers mounted to the outside walls, on over-sized wheel wells and to the roofs. There is often space on the trailer’s tongue for sturdy containers, propane tanks for cooking fuel or battery banks to store power. The customization opportunities are extensive, limited only by your imagination, time and to some extent, your wallet.http://fpnws.wpengine

Trailers are really one of the most versatile, bug-out vehicle options able to carry all that’s needed for a survival situation – food, water, shelter and lots more – the essentials, all piled into a mobile home away from home.

As disaster prepping continues its precipitous rise in popularity it seems every conceivable gadget, defense rig or bit of advice has been done or handed out. Everything’s been thought of,

Work Smarter Not Harder – In The Garden

Sometimes in the preparedness folds, we really get wrapped around axles. We have so much that we’re learning and trying to do, and we’re regularly doing it on a budget – which is just one more thing that circles around our heads and beats us up.

We can limit some of the pains of preparedness by changing how we look at things, but also how we do things. Gardening and larger-scale growing is routinely on our to-do list. It’s something that’s going to come as a shock for those who don’t practice ahead of time, no matter how many tricks get applied. However, we can save some time and stress on our bodies with a few low-cost and low-skill tricks and tools, and see increased yields. Bigger yields means lower dinner costs and potentially some increased food storage, letting us expand our preparedness in other ways.

Here are a handful of quickie, usually highly inexpensive – easy garden hacks to save time, money and labor. As you read them, don’t forget: Paper products are compostable.

Mulch

Mulch makes life easier.

Mulch can be straw or wood chips, lightly soiled animal litter, mown or whole leaves, the tips of branches we’re pruning, or shredded white paper. Shredded paper will settle into a mat that makes it tough for weeds, but “loose” mulch routinely does better with a weed suppression barrier down first. We can use newsprint, cardboard, or phone book pages as a weed suppressor and to keep small plants free of dirt kicked up by rain. We won’t get the same moisture-holding and soil aeration improvements, we will still have to weed some, especially if we already have beds that are weed prone, but it lessens our time spent sitting or crouched and bent over.

Mulch lessens the pains of gardening. We don’t weed as much, our plants do better, and we don’t have to water as much.

In some forms of mulch gardening, the mulch stays right there year-round. Some styles use a mulch that in hot, damp climates rots enough during the off-season and is tilled in that winter or early in spring. In others, we scoot aside just enough to drop seeds or transplants in during succession plantings, add amendments like cured manure or compost or pH-raising pine by raking it just into or over the surface, and add mulch more slowly.

Plastic bottles

olla-drip-irrigators-easiest-way-to-do-it-plantcaretoday_com

Sub-irrigated planters for buckets and storage tubs and conventional planters can be made using bottles for the tubes instead of aquarium or garden hoses or PVC.

We don’t store water or foods in milk jugs because they’re porous and can leach previous content out slowly, but they have their place among soda and juice bottles in the garden.

Various bottles can be used to make mini-greenhouses, cloches, scoops, and seed spreaders, as well as mouse and rat traps (2Ls can work for small squirrels and chipmunks, too, or slow them down enough for the garden terriers to get there). They’re great for vertical strawberry and herb and lettuce towers. We can use them to keep cord from tangling, and punch various holes to use for spreading amendments and treatments. Whack them in half, use sourdough starter and water or beer, and they catch horrific numbers of slugs.

For time savers and back savers, though, bottles really excel at helping us water.

Sub-irrigated planters for buckets and storage tubs and conventional planters can be made using bottles for the tubes instead of aquarium or garden hoses or PVC.

Whether we grow in raised beds or tilled rows, mulched beds or multi-layered hugel or lasagna beds, we can use bottles as a spin on olla irrigation, too. We can drill holes all over, as shown in the graphic from http://plantcaretoday.com/soda-bottle-drip-feeder-for-vegetables.html, bury it near our plants, and use a hose to fill it quickly. A similar version plants the bottle cap-down, with holes drilled in the cap and the sloping neck, and the inverted bottom cut entirely or with just enough remaining to make a flap. Those are even easier and faster to fill, with less aim needed.

The water from those will then sink out slowly, watering deep at the roots and watering our plants, not the weeds or walkways. Less water is lost to evaporation, and we don’t have to deal with timers or hose connections, or PVC to avoid standing out there forever to slowly sink in water. We pour it in, fill it up, and move to the next. If it’s really hot and dry, we might need to repeat, but it’s a low-tech, low-expense way to work faster than standing there with a hose or moving hoses back and forth so we can mow.

Maybe that means less time on our feet overall, or maybe that lets us progress to our weeding and suckering or the next round of planting.

Seeding time – The Dibble

A dibble is basically just something that makes a hole for us. Usually, it’s a somewhat shallow hole and it’s usually intended for seeds but we can work with that. There are two general types, rolling or boards, although with leek dibbles (which work with any transplant), you walk around with a rake or double-handle tool poking your holes. Boards are typically set up with dowels that will poke holes, or come as cutouts and we use something to poke holes to our desired depths. Rolling dibbles tend to be drum or wheel style.

drum-or-rolling-dibbler-and-dibble-board-www_ncat_org

There are two general types, rolling or boards.

Plans are out there for dibblers that can run from almost nothing if you salvage parts or make minis out of coffee cans and 12” PVC or make a single, double- or triple row dibble wheel out of bikes from Craigslist. Drum styles can cost as much as $100-200 to make at home if you’re inclined to go that route instead. Some of the really fancy board dibblers even get marked in colors so one board can be used for spacings from 1” to 6”.

In no-till schemes where you drag a pointed hoe to clear a spot for seeds, dibble wheels tend to be handy. In tall raised beds and window boxes or trays, a board dibbler may be more beneficial.

Using dibbles at whatever scale we choose to lets us quickly mark the space for seeds and transplants. Even if we have to go back with a post hole digger for some of those transplants, time spent upright instead of crouched tends to make for happier backs.


Seeding time – Furrowing rake

A furrowing rake is the simple DIY result of adding tight, relatively stiff hose or PVC to an ordinary hay or garden rake, and using it to drag lines along a prepared bed. It’s typically done so that the extensions are movable, letting us go as tight as the 1-1.5” gaps of the rake tines out to the full 1-2’ width of that rake.

We can get as complex as we like, adding marker lines to tell us how deep we’re aiming, or using multiple depths so we can plant cutting salad greens in the shallowest grooves and have deeper grooves for our peas. We can drag it both down and across a bed to create a grid, with seeds going at the cross points.

rake-with-hose-for-seed-spacing-1-themarthablog-dot-com

A furrowing rake is the simple DIY result of adding tight, relatively stiff hose or PVC to an ordinary hay or garden rake, and using it to drag lines along a prepared bed.

Taking a few minutes to prep some moveable rods or pipes and lay out our grid – while standing – limits how much measuring we do while we’re bent or crouched, saving time and pain with a very quick and low-cost trick.

Seeding tubes or pipes

Dibbles and furrowing aren’t the only way to limit how much time we spend crouched over during seeding time. Even a congestion-planting scheme that calls for under-seeding doesn’t have to be done from a stool or our knees.

There are a couple of tiers of standing seeders for small plot growers, from this really simple version http://knowledgeweighsnothing.com/how-to-build-a-back-saving-pvc-corn-bean-seed-planter/ to this more advanced DIY https://thinmac.wordpress.com/a-homemade-seed-planter/.

Those aren’t really necessary, though. All you really need is a pipe smooth enough for seeds to roll through cleanly and sturdy enough to stand up straight.

If you want to work with tiny seeds as well as larger ones, maybe you lay on skinnier aquarium tubing to attach to a tool handle or yardstick (with rubber bands, even), and make yourself a pasteboard, tin-can or paper funnel and tape it in place. Use the back-end of a teaspoon or the little measuring spoon from somebody’s aquarium chemicals to fish out 2-5 seeds at a time.knowledgeweighsnothing-com-pvc-seed-hack

Seed tapes and mats

If we’re not digging the various seeding tubes, we can also use our rainy days or blistering hot days to make seed tapes out of strips of paper, or larger seed mats out of unfolded paper napkins and paper towels like these http://annieskitchengarden.blogspot.com/2009/09/september-22-2009-home-made-seed-mat.html & http://simple-green-frugal-co-op.blogspot.com/2009/12/construct-your-own-seed-mats.html . We don’t have to mix up some kind of funky glue like with some of the DIY-ers show. The toothpick dab of white Elmer’s the first site shows is water-soluble and works just fine.

When we’re ready to plant, we just zoom along exposing our soil or following her mix, lay out our mats, and cover them again. We can work in fair-sized lengths that we roll up around an empty tube and then just nudge along using a broom or hoe, or use a square or two at a time that lets us stagger our planting for a staggered harvest or interspersed companion flowers.

Seed mats and strips can also be made out of a single thickness of newspaper pages for larger seeds like peas and beans as well, although we’ll want to make a small 1/8” slit or poke a pencil-tip hole through to give our seeds a head start on busting through the heavier paper.

Since we’re planting 3-6” or as much as 8-12” apart in those cases, whether we do rows or congestion beds, working with a larger paper size makes sense. The newspaper sheet will decay over the season, but being thicker, it does offer a nice head start for our seeds over the weed seeds that may be lurking below. Being thicker, it also does better if the seed gets that head start of a slit.

No more removing gloves. No more exposing seed packets to dirt and moisture, or unfolding and refolding and sticking them in a pocket as we try to keep track of where exactly the tiny black seeds landed in our bed. And since they’re evenly spaced instead of scattered in lines and areas, it’s minutely easier to tell which tiny baby dicot we should be plucking when the weeds start – at least we can work quickly in some of the gaps.

In the garden – Avoid the crouch-ouch

So why the focus on things that improve soils without hauling lots of bales, limiting all the bending, limiting the bending and time we spend watering (or pumping water), collecting trash to make all kinds of weird contraptions in the garden? It’s not just me being a greenie, I promise.

Especially for seniors and those with nagging pains and injuries, the ability to work standing upright or from a chair without leaning over or reaching far can not only increase the joy of gardening, but in some cases go as far as making gardening possible again.

Arthritic hands, shaking from an injury or age, and loss of full motor function from an accident can make it frustrating and painful even to fetch out and drop a lima or pea, let alone broccoli and spinach, and unless they’re willing to just punch some holes in a baggy and shake, just forget about iceberg and romaine and strawberry spinach.

The ability to work slowly over winter or summer to prepare for spring and autumn leaf and root crops, the ability to use a tube and funnel, then shake or scoop seeds using something they can actually grip is enormous.

Reexamine how you garden

Even for those in good health or who just like to be out there, some simple and inexpensive DIY projects and some trash collection and reuse can save a lot of time.

That might make a difference in garden size now, while we’re working and balancing families. It will definitely make a difference later, when we’re depending on those gardens to feed us or add a little forkability and crunch to our starvation-staving diet (I loved that article, BTW).

Saving backs and creating easy-to-use tools can also let us involve our parents and kids a little more in some cases, giving them independence and sharing the satisfaction that comes from a meal we procured for ourselves. There’s little better in life than seeing that pride returned to your parents and grandparents, or watching it bloom in your children.

It also sucks to fail, especially when we have a lot of time invested in something.

Water reservoirs, reduced weed competition, proper seeding coverage, and workload-friendly seeding methods can help increase our rate of success, which encourages us to do it again.

Work Smarter Not Harder – In The Garden

Urban Camouflage and Concealment

It makes me laugh when I see a lot of SWAT Teams and PSD guys wearing Tactical Black and other colors that look cool but do nothing but make them stand out. In reality, black is one of the worst colors to wear. Ask yourself, what is black in nature? Look around you and what in your surroundings are black? I expect very little… In urban areas, most walls are white, gray or cream… Light colors! The colors you wear should blend in with your background whether its day or night.

At night dark colors stand out, especially when moving past light backgrounds and in urban areas most backgrounds are light colors. Even in rural dry areas when moving through low bush and fields the silhouettes of people in dark colors are easy to see at a distance.

You do not have to have expensive patterns to give you good camouflage and concealment, a gray dress shirt and a pair of light khaki pants is way more effective than tactical Tim dressed in SWAT black!

Movement and Rural Camouflage

Modern humans are positively disadvantaged when surviving in and moving one foot in rural and wilderness areas. Most people these days have never spent a night outside without any cover, let alone in bad weather. When you’re in the woods or bush you need to get comfortable in the environment. I remember one of my military instructors telling me that to be able to fight in an environment, you must first be able to live comfortably in that environment, and this is true. If you’re having difficulty living day-to-day how can you operate?

6000768

Camouflage your face, neck and any areas of the exposed flesh with mud, ash or charcoal from fires. Or use a balaclava or scarf to cover your face and wear gloves.

You need to start using all your senses as the animals do, learn to identify sounds, smells, movements and what they mean. You need to especially be able to identify things associated with people, like footprints, cigarette stumps, broken twigs or foliage, fences, straight lines, domestic animals, aircraft, vehicles, talking, etc. Think about human smells like fires, food, fuel, human waste, and tobacco; if your senses are sharp in bush or wooded areas you should be able to smell or hear people before you see them.  When moving you must do so quietly and regularly stop to look, listen and smell for any indication of people. If you identify people in your proximity are you going to take cover, evade or ambush?

You should always consider camouflage and wear clothes that blend in with your environment, in urban areas wear light blues and grays in rural areas browns and greens. As I have said before there is no need for military camouflage clothing as this will just draw attention to yourself.

Basic fieldcraft, things are seen because of these reasons: Shape, Shadow, Silhouette, Shine, Spacing & Movement.

  • Shape: Disguise your shape; use foliage or rags to break up your outline.
  • Shadow: Keep in the shadows and always be aware that you are not casting a shadow that could be seen by your opposition.
  • Silhouette: Don’t stand out against skylines, lights, white walls, etc.
  • Shine: No chrome, shiny watches, mirrored glasses, sparkly jewelry and the like.
  • Spacing: If moving with others, remain spread out, but not too regularly and do not bunch together.
  • Movement: Move carefully, as the sudden movement draws attention and is the main reason camouflaged personnel and animals are seen.

The basic guidelines for camouflage are

  • Learn to blend in with your surroundings.
  • If you are using foliage to conceal yourself or your position don’t use too much or too little.
  • If you are in a long-term hide remember to keep your camouflage fresh, dead foliage will alert people to your position.
  • When moving avoid skylines.
  • Don’t use isolated or obvious cover; it’s the first place others will look. Consider hiding in thorny bushes or nettles as most people will not expect anyone to hide there.
  • Camouflage your face, neck and any areas of the exposed flesh with mud, ash or charcoal from fires. Or use a balaclava or scarf to cover your face and wear gloves.
  • Take all noisy objects from your pockets, such as keys and coins and make sure nothing on your person rattles.
  • Make sure there are no shiny surfaces on your person, equipment or clothing.

realtree-camo-pattern-max-1-xt-05

Guidelines for Movement

You should always move quietly and cautiously and avoid stepping on dry twigs or breaking through foliage and undergrowth as this will make noise and leave an easy trail to follow. If you know you’re going to a rural area or possibly going to be in an escape and evasion situation avoid smelly foods, strong soaps and aftershaves, as these will be easy to smell by those used to being in the bush. Always be careful not to leave signs you were in an area such as footprints, broken foliage, human waste or trash.  Trash and human waste should be carried out of a hostile area and disposed of when safe to do so.

You should always move in “bounds” from one piece of cover to another. Your bounds should never be more than, say 50 yards, especially at night. When you stop at the end of each bound you should use your senses to try to detect any human presence then plan your next bound. Moving in short bounds is the safest way to move through populated areas or places there are unfriendly forces. Remember, always be prepared to take evasive action or defend yourself.

61w8LlcrfyL._SL1002

Camo Face Paint Sticks – 3 Pack – 6 Colors

The speed at which you travel will depend on whether it’s day or night, the type of terrain you’re in, people or police patrols in the area. Never push yourself to your limit, you always need to have energy in reserve so you can run in an emergency; tired people are also rarely mentally alert. If you must run from your opposition try to do so only for a maximum of a few hundred yards, then slow down and move quietly, cautiously and cover any signs of your direction of travel. Do not use obvious routes, which tend to be the easiest routes to use; head up hills and into thorny areas, etc.

There are no set time periods for halts but you should try to take ten minutes in every hour on long journeys. Tracks, paths, and roads make for fast, easy travel and can aid navigation but can also be very dangerous as your opponents will watch them closely. To be cautious walk a few meters off to the side of any roads or tracks.  Places to expect sentries are at the entrances to urban areas, on bridges, crossroads and on high prominent terrain.

Avoid being silhouetted when crossing skylines and hills, go around them rather than over them where possible. If you need to cross an obstacle or skyline then keep low and crawl, if it’s a fence, crawl through it or under it. If you have to cut through a fence, cut through the lower strands and then disguise the hole with undergrowth or tie the wire strands back together, never cut through the top strands as this will be easily noticed.

realtree-camo-pattern-realtree-max-4-04

Moving at night

You need to learn to treat the night and darkness as your friend, darkness affords you cover. Many people are afraid of being in the dark especially in rural areas or derelict buildings; you should use this to your advantage. If you are moving you should always try to stay in the shadows, if you get caught in a beam of light or car headlights you should freeze, the chances are that you will remain unnoticed. You must have your immediate reaction drills for encountering a person, being caught in the light of the hostile fire at the forefront of your mind. Being caught off guard will get you captured or killed.

There are both natural and man-made noises that are useful to you because they can cover up or disguise the sounds that you make when moving. The best time for moving covertly is during bad weather; rain will cover the noise of your movement and any ground sign you leave. Bad weather also keeps people undercover, lowers the morale of those standing guard, learn to love bad weather.

General guidelines for rural movement

  • Wear clothing that blends in with local people and the terrain.
  • Do everything possible to disguise evidence of your passage; cover footprints, never break twigs or undergrowth and repair broken foliage.
  • Avoid contact with all people unless absolutely necessary.
  • Litter, food and human waste must be buried or carried with you.
  • Learn about tracking, then you’ll be aware of what anyone following you will be looking for.
  • If moving with others spread out and when crossing obstacles such as rivers or roads etc. take up positions to be able to give warnings of any threats that might be approaching. Also, stay low move fast and cross one by one.
  • Always be ready to take cover from gunfire or people you may encounter by surprise.
  • Remember certain smells indicate human activity; odors float downhill in cool air and rise in warm air.
  • Watch for stones, leaves or logs that have been moved, the undersides of these will be darker in color and damp environments, this can be an indicator of human activity or the location of hides.
  • Always look for straight lines as they are rare in nature and are usually man-made.
  • Learn to identify unnatural vegetation, such as green leaves among dead branches or areas of too much foliage as this could indicate human activity such as hides or ambushes.

These are some basic guidelines to get you thinking, these skills can’t be learn sat in a comfy chair, you need to get out and learn and practice them. Everything I have written about here is simple and the main thing required is situational awareness and common sense!

Modern humans are positively disadvantaged when surviving in and moving one foot in rural and wilderness areas. Most people these days have never spent a night outside without any cover,

This is the second article looking at ways we can cut our dependence on commercial feeds for our livestock. The first article primarily dealt with historic feeds and ways of storing them and some of the feeds that are rarely seen in small-scale production in the U.S. As stated in the first article, our modern livestock – even a lot of the dual-purpose homesteading breeds – are accustomed to certain types of feeds, heavy on mass-production mono-culture grains and hay. Those feeds tend to produce the fastest results and be cheap and easy to access.

However, they do contribute to the financial cost of keeping livestock and they require certain cultivation methods that may not be available to everyone. Substituting fertilizers and water-hungry crops for tubers and less-common grains may be part of the solution to making our livestock resilient to a small personal crisis or a major regional disaster. It can help us weather some of the ups and downs in pricing, as with droughts that send livestock feed and grocery bills skyrocketing.

There are some other ways we can increase our self-sufficiency and resiliency, though, even if it drops our livestock’s production to historic levels and takes a little longer to finish our meat stock. There is no one way to do anything, and no solution is going to work for everyone. However, having some backup ideas and methods in place as alternate feeds is rarely a bad thing, especially if we’re counting on meat rabbits and chickens, eggs, and milk in a collapse or Great Depression situation.


Rule of Thumb – Rabbits to Goats, Chickens, & Pigs

There are a couple of rules of thumb that can apply to our livestock and what we provide as a base feed or supplement. The first is that if hares can eat it, so can goats. Happily, chickens and pigs will eat almost anything – especially if they see other livestock going after it. Most feeds safe for rabbits will apply to them, too.

The Rabbit Food Pyramid

The Rabbit Food Pyramid

The rabbit point comes in because of all the lists available out there for pet or show rabbits. Some of the feeds for rabbits come right out of our kitchen gardens. Some of the feeds in those lists lack the roughage both hares and goats need to keep their guts processing. Others offer some excellent ways to increase the feed availability for livestock using something that already exists.

One example is trees and tree hays. Rabbits and goats can happily consume a wide number of trees, some of which may already be on our property and in need of pruning, such as willow, apple, maple, elm and mulberry.

Tree hays are little different from using a fodder like locust and calliandra that’s fed green. We can treat a surprising number of trees just like we do grasses and dry limbs at peak nutrition to pull out for hay or add to our silage. Like grasses, tree leaves are at their highest nutrient content before they flower and start directing energy toward fruits.

That allows us to selectively harvest small green boughs that would be pruned in another season normally, selecting for branches with lower impact on our future fruit harvest. And since the flowers themselves are sugary powerhouses and pollen is an excellent protein source, collecting limbs that bear those is only a bonus.

rabbits eating tree leaf and branch

Rabbits, tree branches and leaves


The richest tree fodders can only be used in limited number to modern rabbits, because they have sensitive digestions. Once it’s hay, instead of a leaf or three for a large meat rabbit, up to 20-40% of their grass hay can be replaced by tree hay. The larger branches themselves can go to rabbits, goats and chickens, too, even a couple of inches across should you prune something that large. They’ll strip the bark in some seasons, and rabbits will use chunks to help keep their ever-growing rodent teeth under control.

Soaking tree hays can help increase the interest and palatability for finicky livestock. Individual leaves can be soaked, or branches can be righted and stuck in a bucket of water for 24-48 hours to soak up liquids. Chickens won’t eat quite as many of the tree hays, even soaked, and pigs regularly need them soaked and sometimes mixed in with something like turnips and grasses. However, both are a little more willing to eat silage.

Don’t use the whole branches for silage, just the leaves and the tenderest tips that cattle in bare lots are willing to nibble.

Tree Fodder & Fruits

Cattle - lucerne tree fodder

Cattle consuming tree lucerne


There are actual trees like the black locust and smaller options like pea shrub that are being studied and cultivated as livestock feed replacements, especially in places like Africa with limited irrigation and poor soils. There are mixed feelings about keeping livestock on tree fodders, there are mixed research results, and studies tend to focus on one aspect of feed or another – it’s hard to get a comprehensive paper on DM, protein, digestibility and palatability all at once. Still, if livestock is part of the plan, it might not hurt to look into some of them. A lot of U.S. climates can mimic climates found somewhere in Africa – where a lot of the research starts and focuses still.

Fodder and forage trees and shrubs can be managed for human harvest and transport, or planted along outsides of fences or inside curbing poles and fences that limit livestock’s reach. Quickly rotated pastures can also allow the trees and shrubs to mature and grow back.

Native trees and shrubs that can be used for grass and hay replacement for rabbits and goats include American sycamore, blackberry, dewberry, raspberry, roses, hackberry, gooseberry, alder and mesquite. Livestock can eat currants, but currants and some of the other soft berry shrubs tend to not respond as well to “pruning” as brambles and gooseberry.

Other options for livestock include planting trees that drop seed or nuts, either for human harvest and fodder, or for livestock to forage on its own. Elm samaras can be collected green or brown to use as a fatty nut or seed supplement as well. Acorns are another example. There are a wealth of oaks out there that produce at different times, produce in ebb-and-flow cycles, develop acorns for two years instead of one, and produce different sized acorns. Most nuts are too valuable for livestock, but somebody with thriving hazelnut/filbert thickets might run in goats and then pigs or chickens.


Goat climbing and eating black locust

Goat climbing and eating black locust

There are the conventional fruits such as apples and pears. For me, the focus on fruit trees for livestock is largely on storable fruits that can go from tree to cellar. Most tree fruit is going to be too rich for domestic rabbits and a lot of cattle and horses, but pigs and chickens seem just fine with even large portions of meals made up of pears.

“Weedy” fruits like wild plum and mayhaw need absolutely no help from me to grow, but will produce some goat forage and fruits for pigs and chickens. Shrubs like chokeberry and chokecherry can be used alongside chicken tunnels and moats and runs, with the birds helping themselves to berries that protrude or drop within reach, and humans harvesting the berries they can’t reach – berries which don’t look like “normal” human or livestock foods and that dry well for later feed.

Rule of Thumb – What we eat, they eat

A lot of livestock feeds are already made from things that humans can consume – corn, soy, wheat, sunflower, millet. In the first livestock feed article, we pointed out things like tubers that store well. We can also take a look at local foraging options, and encourage what are basically weeds to use as feed. I wouldn’t try to forage for a goat’s entire diet, although there are things I can plant (and protect) that they can forage for themselves.

Sheep eating Kudzu

Sheep eating Kudzu

Cattail in the four or five human-edible stages is happily and healthily consumed by everything but cattle and horses. Reed grasses (avoid European phrag like the plague) provide a storable seed. Chickens and hogs will dig chufa. Don’t plant the stuff for heaven’s sake, but if kudzu is nearby, it makes a nice flower jelly and its leaves are readily palatable to even cattle.

Wood sorrel, henbit, low clovers, plantain, purslane, and dandelions are so routinely cursed by gardeners and lawn-growers, but they provide an enormously beneficial mix of protein- and micro-nutrient heavy foods, with the benefit of being enormously palatable as well as cold hearty. That means we can stick them under some plastic or grow them in tiers of soda bottles in our windows in winter, and be providing fresh foods to our livestock, even in just dribbles. That keeps our livestock healthier and more ready to transition back to pasture grazing.

Wood sorrel, henbit and chickweed are also tall enough and “heat”-tolerant enough that we can use them in grazing frames inside chicken runs, letting the birds munch them down as far as they can reach but having them grow back faster because the birds can’t get all the way down to the roots. They’ll hold up to grazing and manure better than just wheat or barley grasses.

Chicken grazing frame

Chicken grazing frame

Cheno-family lamb’s quarters, mallow, amaranthus pigweeds, shepherd’s purse, most of the sonchus thistles, any strawberry plants to include the invasive “weed” variant with little or no flavor, and wingstem or Iron weed can all be consumed by rabbits, goats and chickens. Most can also have leaves and stems dried to provide roughage or healthy supplements throughout winter and early spring.

Check out what Sam Thayer says about your area and your local foraging guide. Nettles have to be treated for livestock the same way they are for us, and some wild edibles are too time consuming, but there are others that can increase our feed (and pantry) potentials without a great deal of work because the weeds grow like … well, weeds.

Alternative feeds for your livestock

Using a mix of intentional forage and fodder trees, increasing the use of fruit trees and shrubs to harvest green grass and dry hay replacements or increase silage content, and looking at the wild edibles in our areas as a way to increase livestock feeds can make a difference in both resiliency and livestock costs, especially if we’re running small flocks and herds.

You need to slowly transition livestock to new feeds, especially if they’re accustomed to 1-2 base feeds, but livestock is just like humanity – we all do best with a variety of foods. Livestock is especially dependent on gut microflora to help them break down foods. I’m sure you’ve heard the “starving with a full belly” nugget. Before commercial feed and penned livestock was so prevalent, there was also “spring sickness” or “green dribbles” that came in part from livestock being able to access pasture again after winter, eating their heads off, and ending up with upset stomachs. Slowly transitioning livestock and keeping them on a variety of feeds can help limit those conditions because their guts stay primed to consume them.

Some other nuggets to research, especially for game birds like ducks and young poultry that need higher proteins, include black soldier fly farms, algae and duckweed aquariums, and worm bins or troughs. Fast-breeding minnows will change the flavor of eggs and meat, but can be kept in pretty small tanks with low energy needs. There’s also barely-sprouted grains (the ones that barely have any “tail” showing when they’re offered). I’m not a major fan of sprouted fodder systems (the kind that grow root mats and green shoots in trays) as a primary livestock feed for anything more than a couple of chickens or rabbits, but then, I’d also rather grow and re-grow rotating flats of mixed weeds and wheat grass for them in winter because it’s a lot less costly and labor intensive. Just remember that while some livestock like chickens and rabbits can be vegans and have lower protein needs, the game birds like ducks are not really grazers – they need seeds and-or live foods and the higher calories and proteins those offer.

There are a world of livestock feed options that don’t begin with slicing an alfalfa bale or cutting open a bag of pellets. Even if we choose to stay with grains and conventionally farmed feeds, having the alternative foraging and fodder options gives us a fallback and gives us something to shoulder as we walk around, giving our livestock extra nutrients and variety that can help keep them healthier.

This is the second article looking at ways we can cut our dependence on commercial feeds for our livestock. The first article primarily dealt with historic feeds and ways of storing

Air conditioning is a pretty modern convenience. There are still lots of countries where A/C is a luxury found only in hotels, restaurants, and the homes of the rich. Little beats retreating to a lake, basement or cellar for the afternoon, but we can look at them and back in history to the 1950s and earlier to figure out how we can make our lives a little bit more comfortable when we have outages or grid-down situations. There are a ton of ways we can help cool our bodies and little changes to activity and habits that can be incorporated for beating the heat in our homes, too, but for this article, I’m going to concentrate on the dwelling space itself.

Generate Shade

The more of our buildings that we can ring with shade of some kind, the cooler the building will stay. Even so, just shading the entrances and windows of homes, cellars, and workshops can help reduce the heat inside. Shading entrances is especially good in air-conditioned or cooled spaces. It helps reduce the sudden inversion that happens when the doors open. That can be huge for a cellar being filled with harvest.

There are three ways we can generate shade around our homes: window awnings, porches, and trees.

house

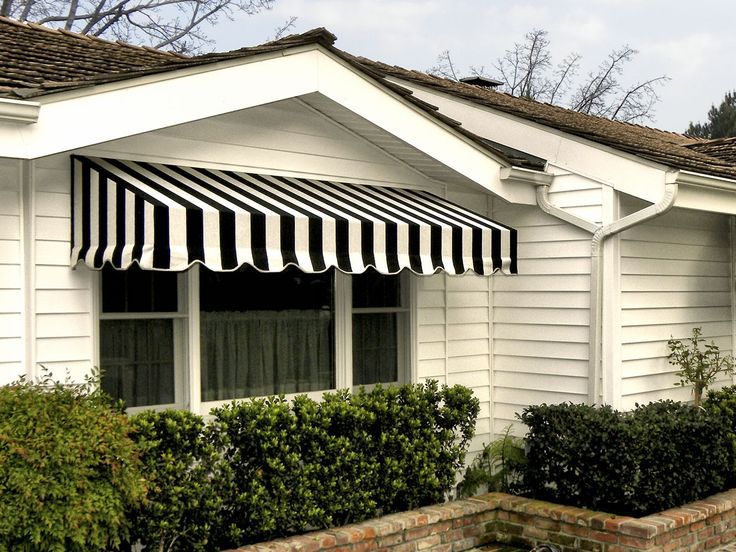
Shading windows with a short but deep awning and sheer tier curtains to reduce heating from sunlight.


Shading with window awnings helps reduce the amount of sunlight that enters the home. Old-style window awnings are deep. They’re designed to protect starting fairly early in the morning, all the way through midday into afternoon.

However, they were typically placed so they don’t actually cover much of the window. That protects from the brutal summer sun when it’s taking a high arc, while allowing for natural light early in the morning and late in the evening as the sun is setting, and for more natural light during winter when the sun’s path is at a lower angle.

Covered porches have the same effect – creating a buffer around doors if not the whole side or house. The deeper the porch, the less light will get through. There are programs available online that can help people at various latitudes figure out exactly what depth is most ideal by the compass directions, but generally 6-8’ will reduce summertime heat while still allowing for decent winter light to enter.

Deciduous trees are ideal for the southern face of a building and are regularly used on the east and west sides as well. They shade in the summer and then allow light to pass through their empty limbs in winter.

summer-house-veranda-villa

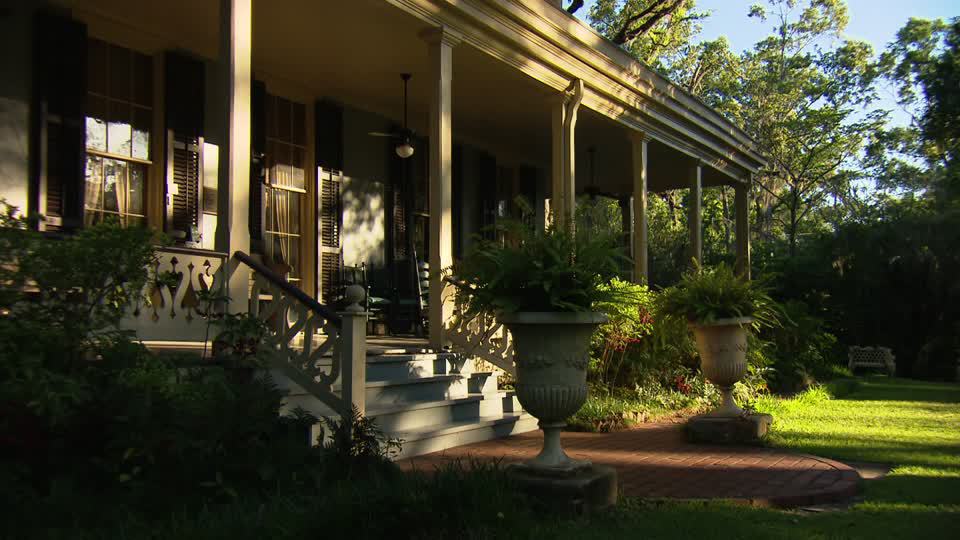
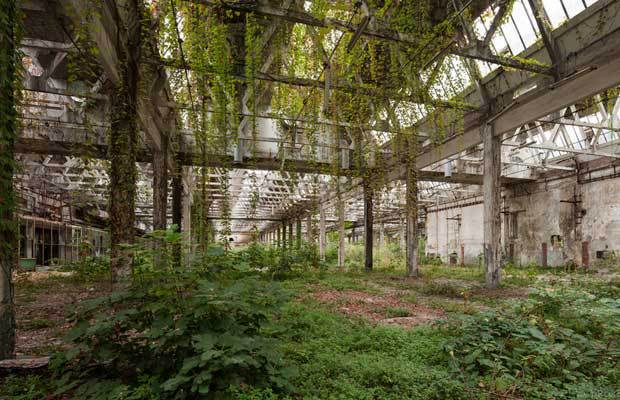
Image: The more shade we can generate, the cooler our interiors will stay.

Seasonal Window Dressing

Window dressing didn’t start out as the “just window dressing” that makes some of us crazy now. A lot of history is in all those fancy-do’s we drape around. While lace became vogue and sheers and tier curtains became the providence of rich folks, they started out as a way for poorer folks to gain some comfort without spending as much on fabric.

Sheers allow both light and airflow to enter the home, while the pale and white colors reflect back a lot of heat for us. Tier curtains originally protected the lower half of a window that wasn’t originally shaded by deep awnings or a shallower porch.

Today we also have light-blocking or “blackout” curtains. They’re typically a white backing that faces outward to bounce light and heat outside again, and any color at all that appeals on the inside. We can replicate them with white or pale green-sign Dollar Store/Tree shower curtains, or the real deal can be found even at Dollar General.

curtains

Blackout curtains reduce noon to daybreak, but because they also impact airflow, they’re more for our air-conditioned world with selective, judicious seasonal use in an outage or grid-down scenario.

Those light-blocking curtains with a solid surface are designed for an air-conditioned world, however. Pier 1 to Dollar General, they dampen airflow as well as light. If we’re going to be opening windows, we’d be better off hitting Goodwill/Salvation Army or a fabric store and picking up the oldest, thinnest white or pale-colored sheets or loose-weave blankets they have. Sheets have the bonus of a band at the top that makes for easy hanging, but there is iron-on fabric/sewing tape that can help even the most needle-challenged soul make some curtains.

Bonus Tip: We can get dark fabrics, sheets, blankets, towels, and shower curtains to get the reverse effect and create more passive solar heating in winter.

Elevated homes

In the time before air conditioning, a lot of homes were raised, with open airflow underneath. It’s still seen in some places, although it’s now more common in areas that flood or get damp in North America now.


-summer-house-veranda-wooden-house

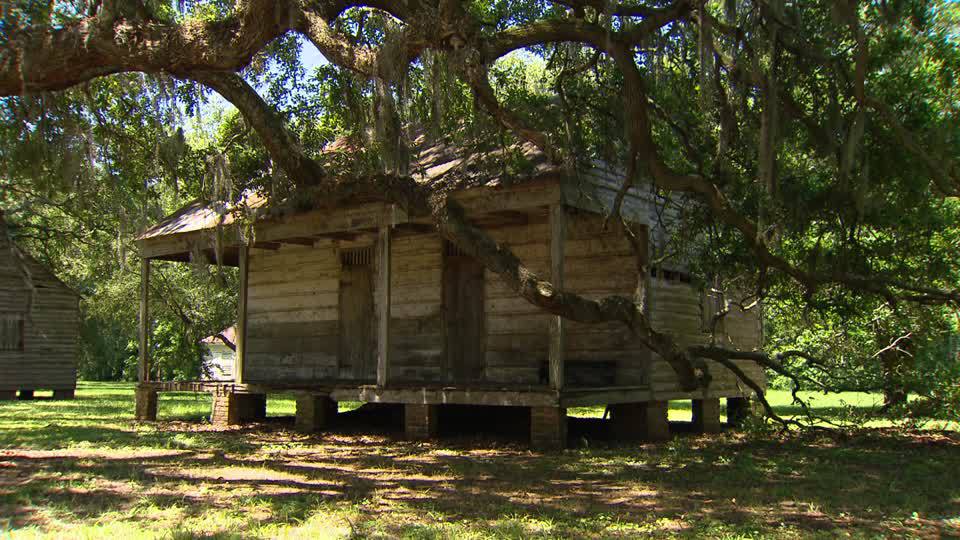
Even outside of flood plains and when windows were expensive, simple Southern shacks were elevated slightly to increase airflow and decrease inside temperature.

We can’t do much about getting a preexisting home up off a foundation, but if we decide to build from scratch or buy a new one, it’s worth thinking about. Trailers are elevated, but even modern trailers aren’t usually insulated to the same degree that a house can be, even retroactively. Unless it’s the only thing besides a windowless brick that fits the budget, being elevated isn’t enough of a selling point to go for a trailer.

Thick Construction

Houses used to be nice and sturdy, built thick and dense. In some cases, that can create an oven, but with some shade and some windows for airflow, dense construction can create very much a cave-like atmosphere. That functions both ways, heat and cold, working to keep the house or building a more constant temperature.

We can sometimes cheat our way to denser walls and ceilings even in a home we already own. The thicker we pack our insulation – and the higher the grade of the insulation we use – the more solid our walls become. It’s not that difficult to pop off drywall and replace insulation, or add additional layers to it, overlapping the edges and layers as often as possible, and it can make a big difference in our daily life energy costs as well as during grid-down times.

If we don’t want to do the whole house, we might consider doing it either on the south or west side where the sunlight and heat are most brutal, or we might consider re-insulating the ceiling of a basement to create a heat-relief cave. We could also consider buffing up the insulation if we have an interior washroom, an isolated kitchen, or some other space that generates a lot of heat.

Airflow

We can’t do much about lifting our ceilings or putting in more or wider windows without a lot of expense, but both contributed hugely to cooling homes pre-A/C.

Tall ceilings allow heat to rise and collect up out of the human-use space nearer the floor. The advent of fans increased this hugely. A fan blowing just down or across us from the ceiling or a stand feels pretty darn good. Switching the rotation or blades so that fans are actively drawing air upwards instead of blowing down was a big help.

Even with A/C, a floor fan tilted to blow cool air up away from the floor and into our living space helps lower our electrical power use even in modern times.

Fan

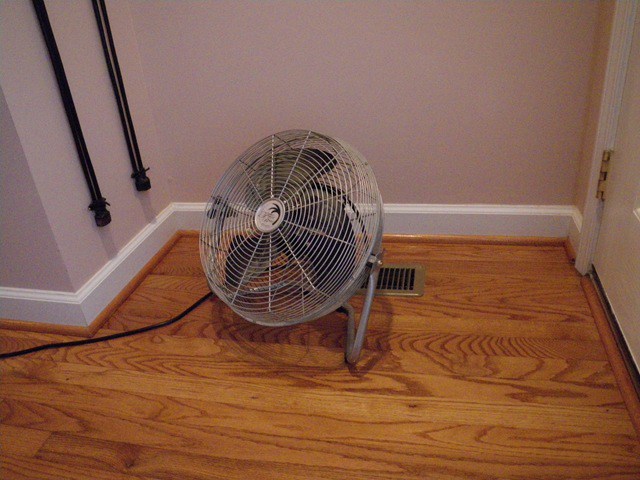
Even a small fan set to blow back up from the floor can make a huge difference in our power draws (and bills). They function similarly to the historic use of ceiling fans to draw heat up but instead, they keep cool air from settling at our ankles.


Fans can also be placed in windows. In cool weather, they’re set to draw air inside. In warmer weather, they get flipped to help shove hot air out – especially helpful in the kitchen, just like when we set off the smoke detector while frying chicken.

Fans in windows can be a big help anywhere, and make a ton of difference for homes with few windows, a lot of turns, and little natural airflow.

Homes were originally designed not to block airflow, with room flowing into each other, large pocket or double doors in central areas, and copious windows that were arranged for cross ventilation. If we have the chance to buy or build, or renovate, they’re something to add to the list to check for. We can also find out where the weight-bearing walls are and remove one or widen doorways into arches to improve airflow.

Fans can also be used to help direct airflow from one end of the funky corners or dead spaces we get a lot in modern construction to another, but with kids and pets, the oddball placement required usually isn’t worth that one. However, since fans run off so much less power than an A/C, it’s an idea to stick in the back of our heads for an outage.

Whole House Fans

These aren’t just an attic fan. These are a specific cookie that does a specific job, and does that job best under specific conditions.

This guy http://www.greenbuildingadvisor.com/blogs/dept/musings/fans-attic-do-they-help-or-do-they-hurt does such a good job explaining a whole-house fan and the conditions, I’m just going to thumbnail it. There’s also a comparison here http://www.airscapefans.com/learn-about/whole-house-vs-attic-fans.php.

Basically, a whole-house fan is specifically for cooling the house, not the attic. A whole-house fan gets turned on at night with all the windows open. It’s function is to suck all the hot air from the day up into and then out of the attic. The vacuum draws in the cooler nighttime air, especially early in the morning when it’s coolest. Then the windows and vents in the house all get shut, holding that cool air for as long as possible. The denser the construction, the better the insulation and tightness of windows, and the more shade in the afternoon, the better it works.

It’s not like opening the house to cool off when we’re pretty sure we’re running the A/C almost all day tomorrow, because the A/C is actually more efficient without having to pump out all the moisture we’re going to let in.

This isn’t a “today” deep-summer fix for most of us who deal with 90-100+ temperatures, although it can reduce temps by 10-15 degrees even into afternoon, which helps keep us from running our A/Cs at times when it’s more comfortable (reducing power costs). However, in an outage of any duration, a whole house fan – which is pulling a lot less energy and requires a less robust generator – dropping the house from more than 95 degrees F down to 85 or 80 is something of a gift. Even if it only lasts to midday and then we have to reopen the house and run house fans with the temperature creeping up into “totally miserable”, it gives us more time to do canning chores and it can make for much, much more comfortable sleeping.

Alternate Sleeping Quarters

When it was really brutally hot and sticky, folks used to take to their fire escapes and front porches to sleep. Hammocks and cots indoors or outside under mosquito netting or a fly film pavilion help by increasing airflow compared to a standard mattress.

Air mattresses and air beds are fabulous little creations that can help keep us indoors, but accomplish almost the same thing – a fun fact I learned very recently as furniture made it one way, the wrong way, and faced delays in a move. They need to be fairly decent, though. I’m partial to Coleman. I’m not allowing another Intex into my house. Others’ results may vary.

air-bed

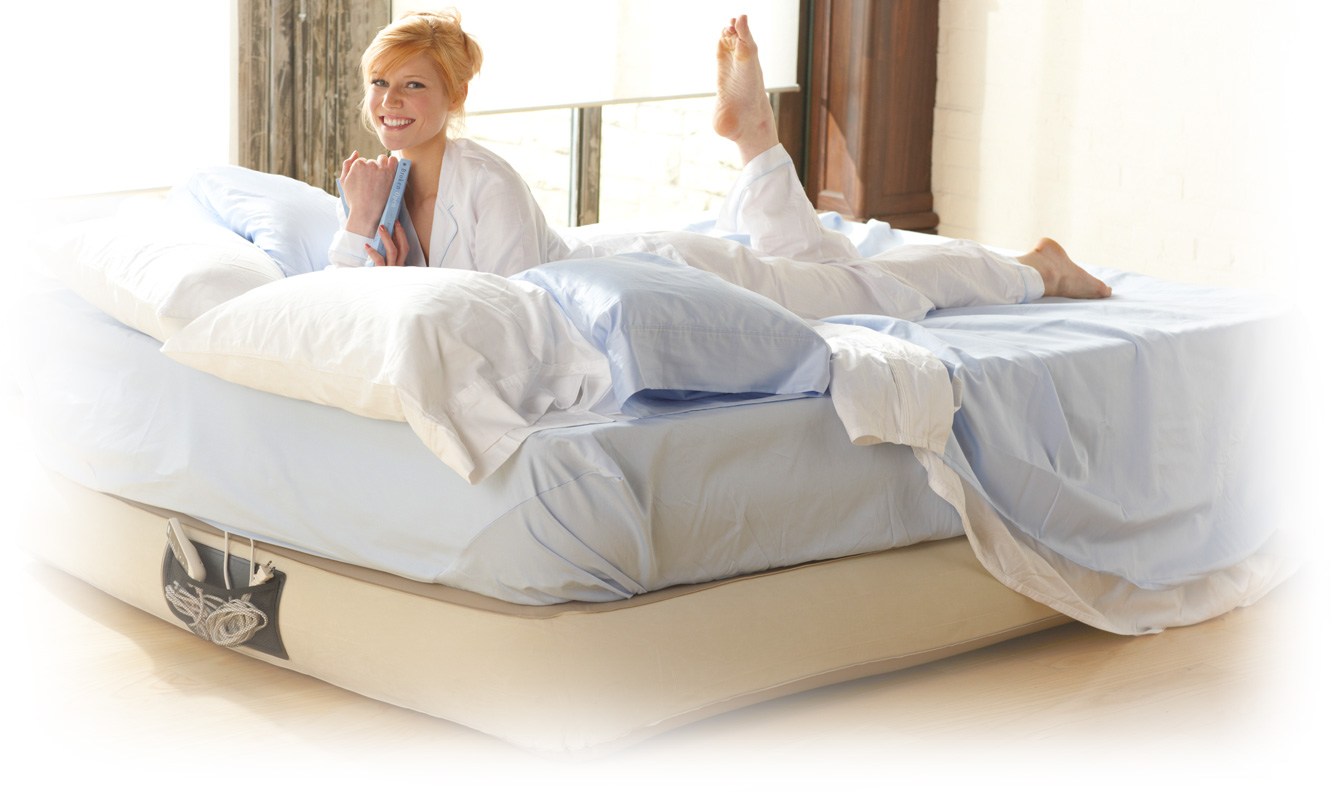
Air beds aren’t just for camping. A good air bed or air mattress on top of existing box frames or mattresses can help reduce heat while sleeping, providing more relief in summer the way hammocks once offered a cool-air option on the porch for sticky southern nights and afternoon siestas.


I have no idea how exactly air beds/mattresses manage it, but I can guess that the big pocket of air they store acts like insulation and then becomes a cold sink. I came to this conclusion because I’ve found that air beds are cooler than air mattresses. With an air mattress, I’m comfortable a few degrees warmer than usual. With an air bed I’m sleeping like a baby and reaching for a light blanket at the temperatures where I’m normally tossing and turning on our (stupidly expensive, was-going-to-be-perfect) $1K mattress system and crazy expensive stay-cool pillows. It was significant enough a reduction while I was by myself for a month, I threw one on the guest bed and I just sleep there when I’m hot (most nights).

Cooling Homes & Selves

There are lots of ways we can cool ourselves as well as our homes. Certain animals, the elderly, young children, and people with respiratory issues (even just allergies) are more sensitive to heat and heat stresses, and it’s important to know ways to help them and have somewhere for them to retreat from the heat. That might mean rigging an Egyptian cooler so there are cool, damp cloths for wiping down, or it might mean putting together enough of a battery bank or quiet generator to keep fans going. We’ll adjust, to some degree, but if a crisis hits during summer or it’s just a temporary outage, knowing some ways to cool a house can help with the adjustment.

This is about houses, but I can’t miss the chance to plug water. In high heat, I consume a gallon and a half of just water, and another gallon of things made with water. Getting some fans, getting fixed-shut windows opened, and installing screens are important, but we also need to be budgeting for water, whether it’s storage or catchment or our backup well or spring systems. Being 10 degrees cooler isn’t going to save us from dropping due to dehydration.

The more of our buildings that we can ring with shade of some kind, the cooler the building will stay. Even so, just shading the entrances and windows of homes,

Nothing beats mom’s homemade food. Unless you live alone or don’t have any cooking skills or no emergency food left in the pantry. Well, you know how it goes – when life wants to throw crap at you, it uses a shovel. However dim the perspective may be, Mother Nature will always provide, if you know how to ask.

In today’s article, I’m going to talk about one of the most interesting birds out there – the pigeon. Some love them because they’re friendly and chatty and pettable, others not so much. I personally neither like nor hate them – they’re okay as long as they stay away from my car!

Anyway, even though the perspective of catching your own food is not something one would do out of pleasure, there are times when stop caring about those things and do what’s best for your growling stomach. If you find yourself without food, you can always enjoy a nice and tasty pigeon stew or steak.

The idea of eating pigeon meat may appear as revolting. However, history reveals that pigeon meat is not only palatable but a delicacy which once adorned royal feasts. During the 19th century, around Boxing Day, young couples and families would head out of the house to do a little bit of ice-skating.

As the weather was nippy, the skaters needed something hot and tasty to put some color back into those flushed cheeks. The snack of choice was the so-called Pigeon Pie Mystery. Fast-forward in time, pigeons have become associated with nasty things like car-wreaking, necrophagic behavior, and uncleanliness.

Despite these objections, pigeon meat is safe to eat, but you’ll need to catch them first. Sure, they may be friendly and a bit curious, but that doesn’t mean they’ll allow you to gut them.  In today’s article, I’m going to show you a quick and rather ingenious way of trapping pigeons, using common household items. Enjoy!


Gathering the materials for your first pigeon trap

For this project, you will need the following materials:

  • Plastic straw rope (you can replace it with dental floss or any kind of cordage).
  • An old plastic bottle.
  • Plastic bucket.
  • Wire cage (it doesn’t have to be new; if you can’t find one around the house, you can always go and buy one from your local flea markets or thrift shops).
  • Styrofoam board (should be about the size of the wire cage).
  • Crafts knife.
  • Pole.
  • Glue.
  • Small wooden board.
  • Hammer and nails.

Are you done gathering the necessary materials? Wonderful. Here’s how to piece together your first pigeon trap.

Crafting the backyard pigeon trap

Step 1. Remove the part of your wire cage. For this project, you may want to get one of those rectangular cages (mine is an old chicken coop I found in the attic).

Step 2. Glue the Styrofoam board to the top part of your cage. Allow the glue to work its magic before proceeding to the next step.

Step 3. Using your crafts knife, cut a hole in the Styrofoam board. The hole should be wide enough for your plastic bucket to pass through with any problems but, at the same time, prevent the pigeon from escaping.

Step 4. Once you’re done cutting the hole in the Styrofoam board, use the same knife to cut two small entrance on each side of the plastic bucket. If you really don’t want to sacrifice a bucket, you can go for one of those one-kilo yogurt containers. Just be sure you keep the lid.

Step 5. Apply some glue over the edges of the lid and place in on the bucket. Allow the glue to dry.

Step 6.  It’s now time to craft your wooden lever. Nail the small wooden board to the top part of the pole. Make sure that the board can move up and down freely.

Step 7. Plant the pole-and-board lever into the ground, just above the Styrofoam board opening.

Step 8. Make one small hole in the front part of the board and another one in the back.

Step 9. Draw some cordage through both holes. Ensure that the cord drawn through the hole made in the front back of the board is long enough as to allow the bucket to reach inside the cage.

Step 10. Tie the front string to the bucket’s handle.

Step 11. Fill your plastic bottle with water and tie it to the back string.

Step 12. Place a couple of seeds, kernels or breadcrumbs on the bottom of the bucket, and wait. Congrats! You’ve just built your first pigeon trap.

More on the makeshift backyard pigeon trap

The idea behind this simple trap is simple: attracted by the seeds or kernels placed on the bottom of the plastic bottle, the pigeon will land on the edge of the Styrofoam board. Bear in mind that pigeons are cautious by nature, meaning that they will take a good look at your thingamajig before stepping inside the trap.

If you cut only one small hole in the side of the bucket, the pigeon will not approach the seed, because it will realize that they’re no way out of there. That’s why you should have two openings.

Once the little sucker starts eating, it will probably figure out that everything’s okay and will step on the bottom to stuff its beak with them goodies. The second it steps inside, the bucket will be lowered inside the coop, trapping the bird.

You should pay extra attention to how the bucket’s lowered inside the cage. For this trap to work, the cord’s length should allow for the bucket’s body to reach the inner part of the cage, with the lid blocking the opening made in the Styrofoam board.

I can’t give you any precise measurements – it’s a trial-and-error process. One last thing: the plastic bottle’s contents. It would be wise to fill it with water instead of sand or earth; the trap’s sprung by the pigeon’s own weights. Putting anything heavier inside the bottle will make the trap useless.

That’s it on my makeshift pigeon trap. What do you think? Hit the comments section and let me know.


Other self-sufficiency and preparedness solutions recommended for you:

The Lost Ways (The vital self-sufficiency lessons our great grand-fathers left us)

Survival MD (Knowledge to survive any medical crisis situation)

Backyard Liberty (Liberal’s hidden agenda: more than just your guns…)

Alive After the Fall (Build yourself the only unlimited water source you’ll ever need)

The Lost ways II (4 Important Forgotten Skills used by our Ancestors that can help you in any crisis)

The Patriot Privacy Kit (Secure your privacy in just 10 simple steps)

Nothing beats mom’s homemade food. Unless you live alone or don’t have any cooking skills or no emergency food left in the pantry. Well, you know how it goes –

Homesteading’s the fine art of getting your land legs while learning how to do most of the stuff on your own. It’s great to have your own slice of heaven by the sea or in the middle of a dark and twisted forest – I for one can vouch that, most of the time, it’s rather amusing to figure out how our ancestors did things like tending to the garden, raising farm animals, settling in for the winter, picking up fresh herbs from the garden or building simple stuff out back.

Still, as pleasure-laden, as homesteading may be or become, it’s rather a turnoff when you need to do all of the things or more when you’re sick. Even a simple cold or the flu can turn a grown man into a noodle, but imagine what happens when you become bound to your sickbed with no one around to take care of you and your house.

Yes, that may strike as being a little depressive, but, unfortunately, it can happen even to the best of us. I being struck down a couple of months ago by the stomach flu somehow wound up all alone at my hunting cabin. Wife couldn’t come up on account of the kids being sick too and no driver’s license, so I was kind of force to get ingenious about my homesteading.

Anyway, after careful considerations and some chicken soup, I came with this wonderful piece which details my journey from sickly couch-potato to a regular Paul Bunyan wannabee. Without further ado, here’s are my golden rules to successful homesteading while you’re sick.

  1. Stay in bed

Of course, my first golden rule had to be a no-brainer because of reasons. Just kidding – most people tend to underestimate the severity of their medical condition and decide to just brush it off. Don’t do that. If you’re feeling that your legs are turning into the noodle, get to bed, medicate, and sleep on it. Remember that you’re all alone out there, and if you happen to collapse while working the field or chopping wood, there’s no one around to pick you up or drive you to the hospital.

  1. Get in touch with emergency services

No matter if you’re a big city dweller or the king of your own hill or mountain, you’ve still got to figure out how to get in touch with the emergency services in case shit hits the fan. A while after I bought my hunting cabin, figuring out that I kind of get down with the flu when spring comes, I went to my local drug store and bought me a one-push emergency bracelet.

Surprisingly, the device has great coverage, even in places where there’s no phone signal. Don’t kid around with your health, especially if you decide to drop off the grid. If you can’t find an emergency bracelet, use an emergency service smartphone application like Emergency+ if you have adequate coverage. A portable distress beacon is always a great alternative, but it will need some tinkering before you can use it to alert the local emergency services.

  1. Keep an ample supply of chopped wood or fire-starting material

Golden rule number three – when you’re game, chop as much wood as you can because you won’t be able to do so when you’re sick. It would also be a good idea to keep a small wood stack as close to the home as possible to minimize exposure to the elements.

Yes, I know that’s a big no-no in the big book of prepping, but some rules are meant to be bent if in doing so increases your survival likelihood. If your stove is running on another kind of fuel, be sure to keeps some close by, but not too close to the heating device.

  1. Soup broth all around!

I know it’s kind of a cliché but hot chicken soup really help you’re sick or feeling down. Making some in your home is no big deal. Still, I would skip the cooking part and go buy some canned soup. Sure, nothing beats a home-cooked meal, but do keep in mind that you can’t prepare the broth that much in advance.  So, make sure you have enough in your pantry for whatever the case may be.

  1. No one should be without a checklist

Checklists are a marvelous way of keeping everything nice and tidy, especially if you’re the kind of person that has no love for neatness. If you find yourself alone and sick on your property, get yourself together and try to jot down a small to-do list for the next couple of days. That way, you will have ensured that you haven’t missed anything.

  1. Let someone know you’re there

You may be king of the mountain, but every king sometimes requires the aid of a royal advisor. In this case, you should let someone know where you are and, most importantly, how long you’re planning on staying. If you plan on moving there, get to know your neighbors and, if possible, ask someone to check up on you every couple of days to make sure that you’re safe and sound.

  1. Keeping your meds close

You don’t need to be sick in order to figure out that it’s really important for the meds to be within reach. I personally emptied an old wooden wardrobe and sort of turned it into a big med cabinet. Of course, you can do as you like when it comes to med storage. Don’t forget about the golden rule of med hoarding: painkillers first, anti-histamines second, and vitamin supplements last.

These are my golden rules of homesteading while I’m sick. As I’ve mentioned, all of this stuff are the results of my me-time at the hunting cabin. Sure, it may be possible that some steps might be a bit off, but, as I’ve said, this was a personal experience. Think something’s missing from the list? Then go ahead and hit the comments section and let me know what you think.

Homesteading’s the fine art of getting your land legs while learning how to do most of the stuff on your own. It’s great to have your own slice of heaven

Wherever you are working or living at some point you will have to use vehicles, for most people they are part of their everyday lives. Driving itself can be a dangerous task in many places and as we have seen many kidnappings, robberies and assassinations occur when people are in or around their vehicles.  In times of civil unrest or if you’re traveling to a potentially hostile area your vehicle security and travel must be planned for and taken seriously.

Vehicles should be regarded as an important piece of your equipment and should be well maintained and never treated as a toy.  Before you take a vehicle out basic maintenance checks need to be done, like checking the battery, oil, fuel level, tires, water, spare tire, break down and vehicle emergency kit. You should always ensure you have a good means of communications and that you regularly check in with trusted people who can send assistance in the case of an emergency. You should also always know the routes you are driving and the location of any facilities along those routes that could be of use to you whether it’s a coffee shop with a bathroom or a hospital with an emergency room.

Basic Vehicle Security

Vehicles need to be secured or manned at all times, if they are left unattended, they, and the area around them, must be searched for IEDs, electronic surveillance devices, contraband and anything suspicious. The area around a vehicle must be searched as you approach it for any suspicious vehicles or people; the criminals may have found your car and are waiting for your approach it to kidnap or assassinate you. I always try to park my car as far away from others as possible, that way there is no cover for anyone to hide and if any other car is parked close to mine they are immediately suspicious.  If you keep the vehicle in a locked garage still always lock doors and trunk, you will also need to search the exterior of the garage for IEDs, electronic surveillance devices and signs of forced entry in a high-risk environment.

If the vehicle cannot be garaged, try to park it in a secure, guarded area or somewhere that is covered by surveillance cameras. Drive-ways and regularly used routes from your residence to main roads should regularly be search for IEDs and signs of criminal activity. A vehicle needs to be searched after being serviced or repaired and after being left unattended for any length of time, here are some guidelines on how to search a vehicle:

  • 100 Deadly Skills – Great information for people who want to make sure they can survive any dangerous situation.

    Always search the general area around a vehicle for any explosive devices or suspicious people waiting to ambush you. Always check the outside of a garage for any signs of a force entry before you go in and check garage doors and drive ways for signs of booby traps, land mines and ambushes. The roofs of garages need to secured!

  • Turn off all radios and cell phones and check the immediate area surrounding the car for disturbances, wires, oil/fluid stains, footprints, etc. It helps to keep vehicles a little dirty as you will be able to see smears in the dirt if someone was trying to break in.
  • Visual check through the windows for anything thing out-of-place or wires, etc.
  • Get down on your hands and knees and check underneath the vehicle, inside fenders, wheels and arches for any devices. Also check for cut tires, lose wheel nuts and devices placed under the wheels. This is where a flashlight and a search mirror can come in handy.
  • Check the exhaust as it is a very easy place to put an improvised explosive device. You can have bolts or wire mesh put in to exhausts to stop IEDs from being placed in them; if you do this, make sure the bolts or wire mess is not visible as this can draw attention to the car.
  • Slowly open the car doors and check the Interior of the vehicle even if there is no signs of a forced entry. Do the same for the trunk and make sure to search the spare tire and break down kit.
  • Open the hood slowly and check the engine. Again it might be helpful to keep the engine dirty as new wires and hand prints are easy to see.
  • Final turn on the engine and check all the electrics.

This is just a guide to searching vehicles but as you can see to do a thorough search can take time and would require someone to be watching the back of the searcher. Your best defense is to deny the criminal access to your vehicle but this can prove to be very difficult in the real world.

Vehicle Drills

If you are consider undertaking some advanced driving training, I see little need for evasive driver training but can see applications for people to learn to be able to handle vehicles at speed and in hazardous weather.  Again, vehicle drills cannot be learnt from manuals or videos, you will need to learn them from an experienced advanced trained driver. Always check out the instructor’s background, qualifications and reputation, look for those that offer sensible driving courses and not wannabe spy holidays.

The main thing you need to learn is how to drive safely and to be able to identify any possible threats and avoid them. In most large towns and cities you will not be able to perform such things as J turns or other evasive maneuvers due to lack of space and traffic, so you must always be aware of what is going on around you.  The main thing I tell people is to keep as much space as possible between you and the car in front as this can give you some space to maneuver in congested traffic.

When you watch the movies and there is a car chase and the cars are skidding all over the place check the state of the roads they are on. Chances are the roads will be wet, and the tires on the cars will have minimal tread. This is the same on most evasive driving courses, but these are also usually done on private roads or open areas where there is no other traffic.  Think about why you put decent tires on your vehicles; to stop them from skidding and spinning out of control right? When you are driving around you always want to be thinking of where you could take evasive action, in urban areas there will be few places where you could spin your car around and drive against the traffic flow; that’s Hollywood.

If the criminals or terrorists are in any way professional they will attack you when your car is penned in and you cannot take any evasive maneuvers, not on wide open roads. It’s a common street kid tactics in a lot of Latin American cities to rob cars at traffic lights that are at least two cars back from the stop light with other cars behind them; these cars are stuck and cannot escape. If street kids on bicycles with at most a rusty revolver have worked out how to jack people in cars don’t you think their big bothers have also?

I am regularly asked about whether I favor armored cars or not, as with everything they have their pros and cons. Armored cars do have an application, the first thing you need to consider is what level of armoring the car your buying or using has. I have come across people driving around in cars armored to stop pistol caliber rounds in areas where the bad guys carry assault weapons, they thought an armored car was all they needed and were unaware of the different levels of armoring. You will also need to confirm where the car is armored; doors, windows, floor, engine, roof etc. Some cars may only have some armored panels in the doors and rear seat, always check for yourself and do not believe what people tell you.

Now think like the criminals, if you knew your target was driving around in a SUV armored to B6 level are you going to shoot at them when they are driving around or wait for them stop and get out of the car, or stop them and make them get out of the car? Think about how can you get someone out of a car; what would you do if a female driver bumped into the back of your car, get out to inspect the damage and then possibly be kidnapped by her two armed accomplices crouched in the back seat of her car? Always be aware of decoys that are intended to make you stop and get out of your vehicle, such as accidents or even bodies next to the road. Basic rule, stay in your car and keep moving between safe areas.

A criminal tactic when targeting armored cash-in-transit vehicles is to box them in, cover the van in gasoline, then give those inside to option of throwing out the cash, surrendering or being burnt alive. An issue with armored vehicles is that you cannot shoot at the criminals from the inside. There was one incident I recall from the mid 1990’s where an unarmored van that was moving cash was stopped and ambushed in an Eastern European country, the fact the van was unarmored enabled the security personnel inside to be able to shoot through the sides of the van and drive off the criminals, which they could not have done if they had taken an armored van that day. There have also been numerous incidents where criminals have assassinated targets traveling in armored vehicles with IEDs, Rocket Propelled Grenades (RPGs) and improvised shaped charges. An armored vehicle can assist you in your security program but it should not be all there is to your security program.

Security Considerations when using vehicles

  • Always check the area around the vehicle before you approach it.
  • Search the vehicle prior to use for IEDs, electronic surveillance devices and contraband.
  • Always keep a spare set of keys for the vehicle on you in case the driver loses his or is taken out by the criminals.
  • Be aware of the vehicle’s capabilities; make sure the driver has experience driving that type of vehicle.
  • Always drive safely at the maximum, safest speed, within the legal speed limit.
  • Always carry out basic maintenance checks, before you go anywhere and check that communications work before leaving a safe area.
  • Make sure you know what to do if your car breaks down; will someone come to get you or will you call for roadside assistance?
  • In rural areas things that should be included in your break down kit should include cans of fix-a-flat, air compressor, jump leads, tire plugging kit, tube to siphon gas, gas cans and a tow rope.
  • Know which routes your taking and keep maps in the vehicle for all areas you’re traveling in. Also have alternative routes prepared that have been driven and checked out.
  • Inform personnel at a location 10 to 15 minutes, before your arrival.
  • Constantly check behind you for criminal surveillance vehicles and be suspicious of motorbikes, especially with two people on them.
  • When being followed by a motorbike always watch to see if both the rider’s hands are on the handle bars, if you only see one hand, what is the other holding or doing?
  • Make full use of your mirrors; put a mirror on the passenger side for the passenger to use.
  • Regularly carry out counter-surveillance drills and always be watching for any cars following you or suspicious people along regularly used routes.
  • Keep a good distance from the car in front, so you can drive around it in an emergency and try to avoid being blocked by other vehicles.
  • Never let the vehicle fuel tank to go below half full and know where all gas stations are along your route.
  • Keep doors locked when traveling between locations and in urban areas do not open windows or sunroof more than an inch, so things cannot be thrown in.
  • Always be prepared to take evasive action, be aware of danger points on your routes and drive towards the center of the road to have space for evasive maneuvers.
  • Blend in with your environment; don’t drive expensive cars in poor areas, etc.
  • Be suspicious of all roadblocks, temporary stop signs and car accidents, etc. Never stop to pick up hitchhikers or help other motorists, as these could be covers for an ambush or carjacking.
  • Keep vehicle keys secure and know who has all the spare keys and access to the vehicle.
  • Remember others can monitor tracking devices and help services such as OnStar, then get the details of where you are and you’re routine without the need for surveillance.
  • Be extra vigilant at traffic lights and in slow-moving traffic.
  • Keep the vehicle in a locked garage when not in use and lock all doors and the trunk.
  • Wherever legal reverse park; this will help if fast get away is required.
  • Always use seat belts, especially when driving at speed or taking evasive action.
  • Keep a safety knife handy to cut away seat belts and break windows in the case of a crash.
  • When driving on dangerous roads or taking evasive action open the vehicles windows to make escape easier in the event of a crash.

Wherever you are working or living at some point you will have to use vehicles, for most people they are part of their everyday lives. Driving itself can be a